Want to easily add dynamic social media feeds to your WordPress website?
Putting your latest posts, photos, and videos from various social networks on your site is a great way to keep your content fresh, make it look more engaging, and connect with your visitors on multiple platforms, all in one place.
Based on my work with embedding social content, I know that adding social media feeds to your website using the normal embedding options can be hard.
These embedding options often don’t give you all the choices and features you need for your feeds to fit smoothly with your site’s design, look good, or combine content from different networks.
At Smash Balloon, we make the best social media feed plugins for WordPress. Our plugins make it super easy to show content from various social networks.
In this article, I’ll show you 7 easy ways to add social media feeds to your WordPress website.
What’s more? This guide walks you through everything step-by-step. It’s made for everyone, so you can quickly add beautiful social media feeds to your site — no coding needed.
In This Article
- Easiest Way to Add Social Media Feeds to WordPress
- Video Tutorial on Embedding Social Media Feeds
- How to Add a Facebook Social Media Feed to WordPress
- How to Add an Instagram Social Media Feed Widget to WordPress
- How to Add a TikTok Social Media Feed to WordPress
- How to Add a Twitter Social Media Feed to WordPress
- How to Add a YouTube Social Media Feed to WordPress
- How to Add Your Google, Facebook, Yelp, and TripAdvisor Reviews to WordPress
- How to Add Social Media Feeds to WordPress (Combined)
- Why You Should Embed Social Media Feeds on Your Website
Easiest Way to Add Social Media Feeds to WordPress
The best way to add social media feed widgets to your WordPress website is by using the best WordPress social media feed plugin in the market: Smash Balloon.

As the best WordPress social media feed plugin, Smash Balloon is a collection of social media feed plugins that allow you to easily embed social content on your website:
- Facebook Feed Pro – Add Facebook feeds to your website.
- Instagram Feed Pro – Display customizable Instagram feeds on your WordPress.
- TikTok Feeds Pro – Add engaging TikTok feeds from multiple TikTok accounts on your WordPress website.
- Twitter Feed Pro – Embed Twitter content from timelines, hashtags and more on your WordPress site.
- YouTube Feed Pro – Add your YouTube channel, playlists, and more to your WordPress.
- Reviews Feed Pro – Showcase your best reviews from platforms like Google, Yelp, and more.
Smash Balloon plugins are trusted by over 1.75 million users to quickly add social media feeds to their WordPress websites. No complex coding snippets or custom CSS needed.
Since the social media plugins are so user-friendly, you can create, customize, and embed social media feeds in just seconds, so it’s perfect for WordPress beginners.
With an average rating of 4.9 stars out of 5, Smash Balloon plugins are the best social media feed plugins for WordPress trusted by the world’s biggest brands.

I’ll use each of Smash Balloons plugins to add WordPress social media feeds of popular social networks like Facebook, Instagram, TikTok, Twitter, Google and YouTube — step-by-step.
Video Tutorial on Embedding Social Media Feeds
We created a YouTube video tutorial below. In this video, you will learn how to add social media feeds to your WordPress website using the Smash Balloon social feed plugins for Instagram, Facebook, YouTube, and Twitter.
Prefer to follow written tutorials instead? Feel free to skip to the specific social media feed that you want to add to your website:
- How to Add a Facebook Social Media Feed to WordPress
- How to Add an Instagram Social Media Feed to WordPress
- How to Add a TikTok Social Media Feed to WordPress
- How to Add a Twitter Social Media Feed to WordPress
- How to Add a YouTube Social Media Feed to WordPress
- How to Add Your Google, Facebook, Yelp, and TripAdvisor Reviews to WordPress
- How to Add Social Media Feeds to WordPress (Combined)
Let’s kick things off by looking at how to add a Facebook feed to WordPress below.
Pro-tip: Looking to display social media on your Elementor site? Here’s how you can embed social media feeds on your Elementor website.
How to Add a Facebook Social Media Feed to WordPress
With over 2.93 billion monthly active users, Facebook is the most popular social networking platform in the world.
Millions of people promote their business on Facebook, so if you’re a business-owner, influencer, affiliate marketer or blogger, it’s crucial that you add Facebook social media feeds to your WordPress to stay ahead of the competition.
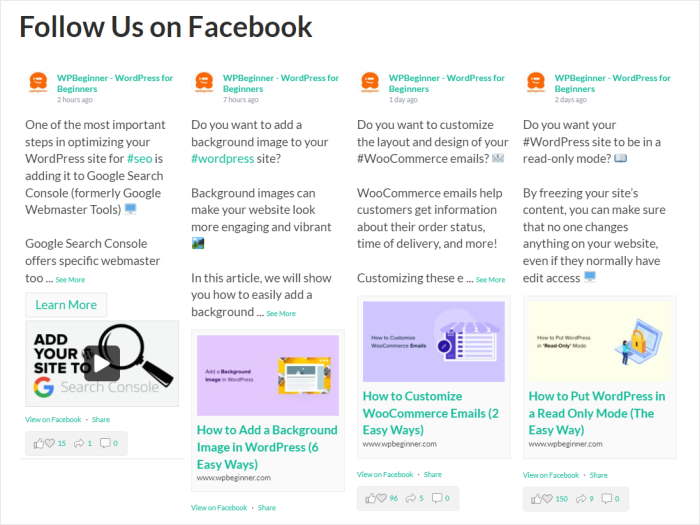
You can easily use the Facebook Feed Pro plugin from Smash Balloon to create, customize and embed Facebook feeds on your website with just a few clicks.
To increase your Facebook followers, engagement and sales, you can embed different feed types on your site, such as Facebook albums, events feed and even Facebook live streams.
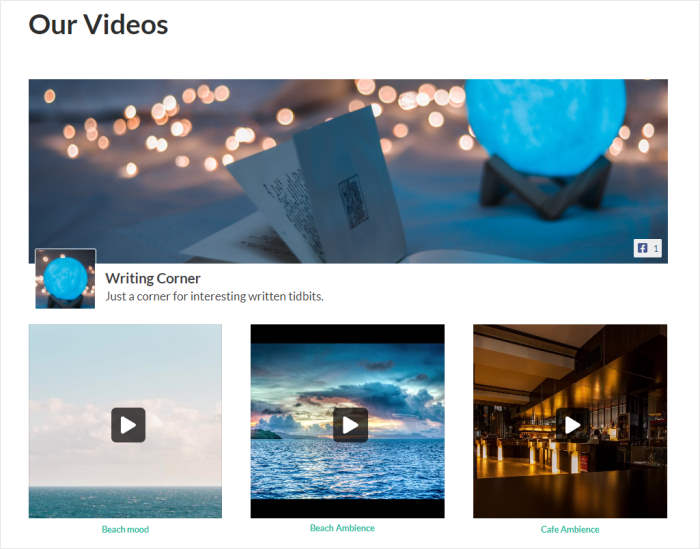
Another great thing about the plugin is it automatically copies your site’s existing WordPress theme, so your Facebook feeds look great and responsive, right out of the box.
And if you want to customize how your Facebook social media feeds look, you can do this with just a few clicks using Facebook Feed Pro’s visual customizer.
On the left panel, you can see the feed customization settings you can freely change such as the feed layout, template, feed type, color scheme, Facebook like box, load more button and lightbox.
And on the right panel, you can see a live preview of your Facebook feed in real-time.
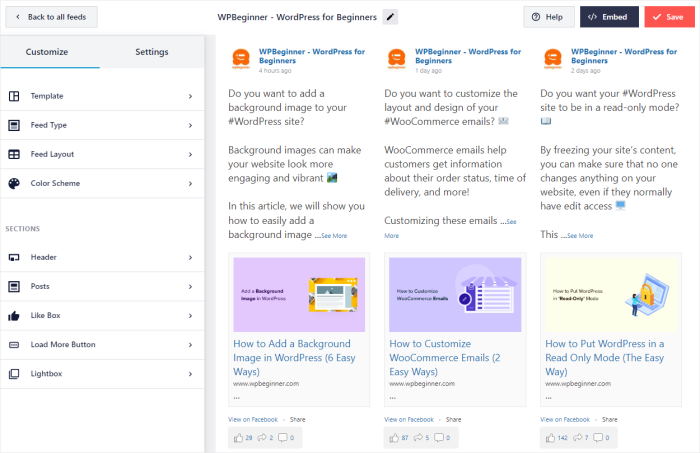
Using Facebook Feed Pro, you can freely personalize your Facebook social feed’s content and design in seconds. No need to spend money to hire a designer for your feeds.
Check out these detailed tutorials for the step-by-step instructions on embedding Facebook feeds on your website:
- How to Add Facebook Feeds to Your WordPress Website
- How to Fix Facebook Video Embeds Not Working
- How to Display Facebook Events Calendar on Your Website
- How to Embed Facebook Reviews on Website (Step By Step)
Want to start creating custom Facebook feeds? Get started with Facebook Feed Pro today.
How to Add an Instagram Social Media Feed Widget to WordPress
Did you know that over 25 million brands use Instagram to promote their business?
If you’re using Instagram to market your products or services, you need to add an Instagram feed to your WordPress to boost its functionality, allowing you to reach more people and get more sales.
Over 1 million websites use Instagram Feed Pro to display customizable Instagram social media feeds on WordPress — without technical knowledge needed.

Want to use social proof to improve trust in your brand?
Use the plugin to embed other people’s photos and videos promoting your business by adding Instagram hashtag social feeds to your site in just a few clicks.
Interested in making more money with the help of social media? Add an Instagram shoppable feed to your website, like this:
When your site visitors click on your Instagram photo on your shoppable feed, they’re directed to your products page where they can directly buy the item from your online store.
Another cool thing about Instagram Feed Pro is you can easily moderate your Instagram social feed using its Allow List.
To create an Allow List and only show the posts you manually select on the visual customizer, click the green checkmark next to the Instagram posts, then save the changes, like this:
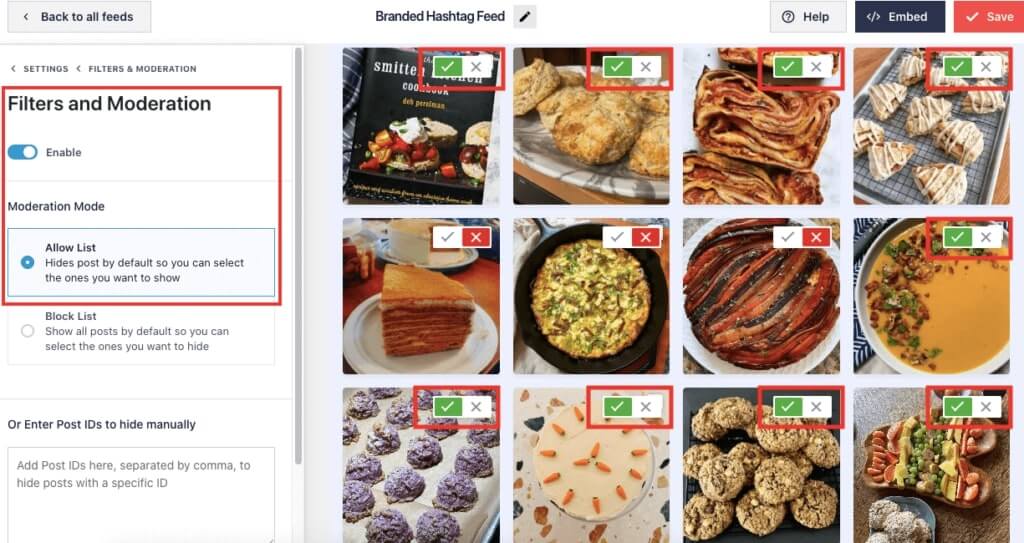
See how quick and easy that was? Just by clicking, you’ve customized your Instagram feed’s content to show only the posts you want — you didn’t even need to touch a single line of code!
Personally, I also like how Instagram Feed Pro automatically updates your feed every time you post on Instagram.
This way, I save time and resources in posting and my site visitors always see my latest Instagram posts on my website.
Read these next posts on adding Instagram social media feed widgets to your website:
- How to Embed an Instagram Feed on WordPress
- How to Embed Instagram Reels on Your Website
- How to Display Multiple Instagram Feeds on Your Website
- How to Embed Instagram Carousel on WordPress Website
- How To Add Your Instagram Feed to Elementor (In 5 Minutes)
Start adding custom Instagram social media feeds to WordPress.
Get started with Instagram Feed Pro today!
How to Add a TikTok Social Media Feed to WordPress
Do you want to add a social media feed of TikTok videos on your website?
With over 1 billion monthly active users worldwide, TikTok is one of the best video social marketing platforms to help you boost brand awareness and increase your sales.
In fact, in the US alone, users spend 55.8 minutes daily on TikTok in 2023.
And since TikTok videos are proven to capture your audience’s attention, it makes sense to embed TikTok feeds on WordPress so you can get more views on TikTok after posting.
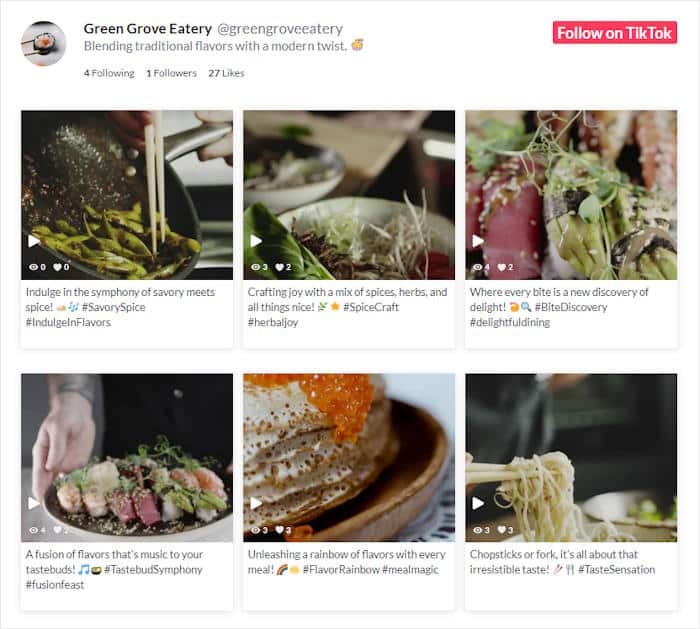
If you’d like to display a single TikTok video on your site, you can use WordPress’ built-in TikTok block.
This lets you add only 1 TikTok video each time, though, so if you want to embed a lot of videos manually, it would take a lot of time and effort.
Want to add TikTok videos easier and faster?
Sure thing! You can always use Smash Balloon TikTok Feed Pro. It’s the best TikTok feed plugin to help you create, personalize and add TikTok feeds on WordPress with just a few clicks.
Even better, TikTok Feed Pro will automatically update your feed daily so you can display your latest TikTok videos on your website.
That means you won’t have to waste time manually embedding new videos on your site whenever you make a new post on TikTok.
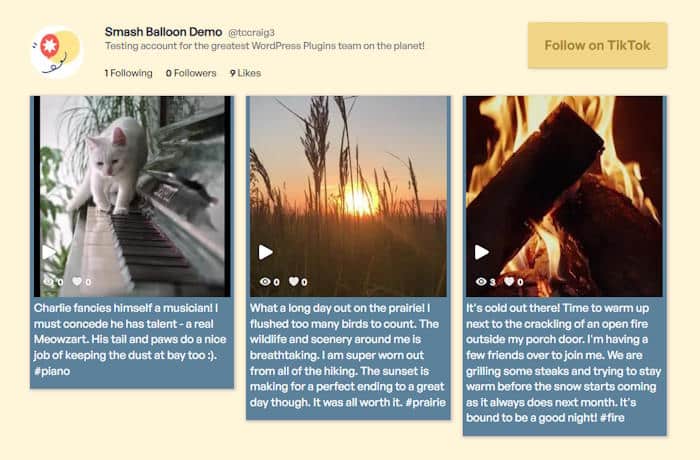
TikTok Feed Pro also gives you full control over your feed’s design and content. In just a few clicks, you can use its visual customizer to set up your TikTok feed’s:
- Template
- Layout
- Header
- Individual TikTok Videos
- Video Player Experience
- Load More Button
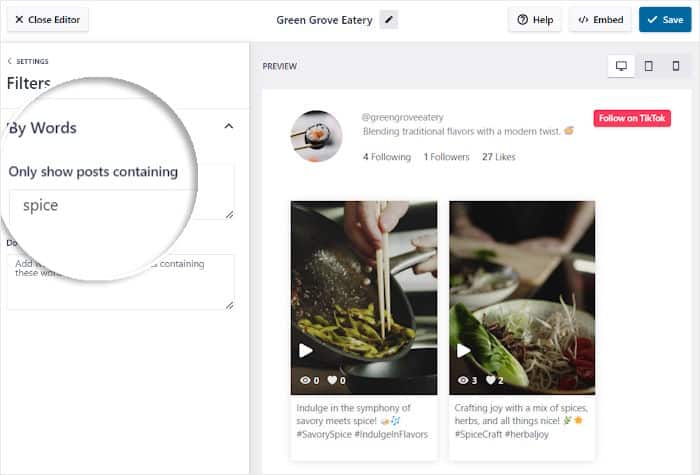
Plus, TikTok Feed Pro has a powerful filter that lets you choose to only display posts with specific terms or set up banned words to automatically remove certain videos from your TikTok feed.
Ever notice how some TikTok feed plugins plaster that TikTok branding all over your site? That’s because many TikTok plugins rely on basic iFrame embeds that can disrupt your feed’s design.
But there’s why lots of our users trust TikTok Feed Pro. TikTok Feed Pro takes it a step further, using a sleek MP4 video player for a cleaner, more professional look so your embedded TikTok feeds seamlessly match your site’s theme.
For step-by-step instructions on how to add TikTok feeds, check out these tutorials:
- How to Embed TikTok Videos in WordPress Easily
- How to Create a TikTok Widget for Your Website
- How to Add a TikTok Feed to Your WordPress Beaver Builder Site
Start showing TikTok feeds on your site when you grab TikTok Feed Pro today!
How to Add a Twitter Social Media Feed to WordPress
Ever wanted to embed Twitter posts on your WordPress website?
Sure, there’s a built-in Twitter block that lets you manually embed tweets on your site.
But this block lets you embed a single tweet only, so you’d have to embed this multiple times if you want to show multiple tweets.
If you want to do this easier and quicker, you can use Twitter Feed Pro to embed custom Twitter feeds on your website automatically — no need to deal with CSS, HTML or API yourself. The plugin handles it for you.
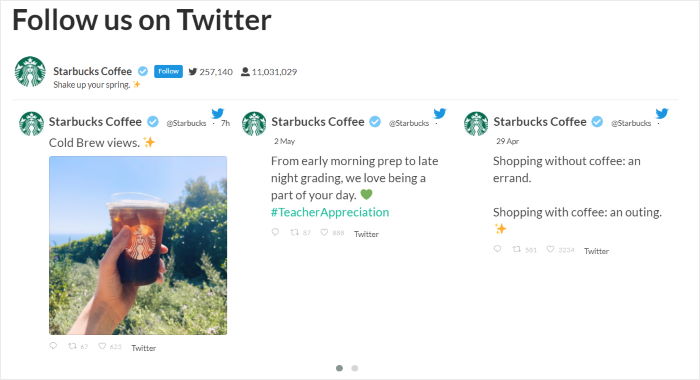
Using this plugin, you can display a Twitter timeline feed widget containing multiple Twitter posts, photos, videos, and gifs so your visitors can view them in a popup lightbox directly on your WordPress website.
Do you have a special hashtag for your business?
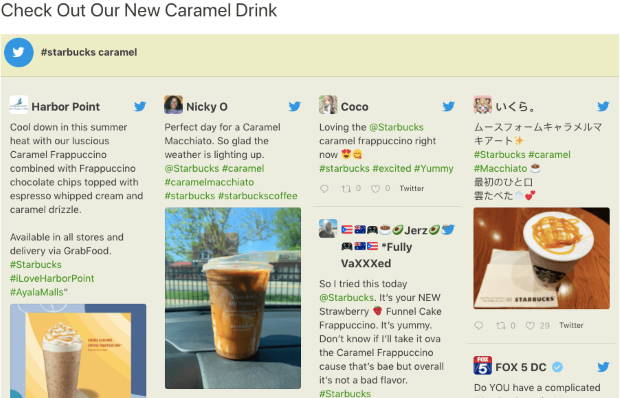
With the help of Twitter Feed Pro, you can show other people’s tweets about your business via hashtag feeds. This helps you use social proof to generate awareness about your latest products.
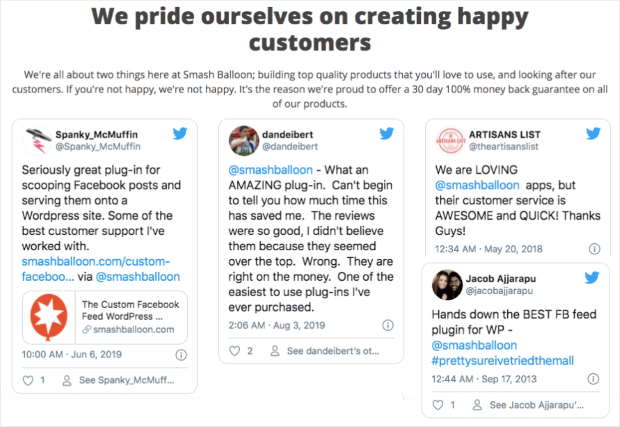
You can also use this best Twitter feed plugin for WordPress to showcase tweets from other accounts that @mention your Twitter handle to build confidence in your brand and get more conversions.
To get started, check out this helpful tutorial on how to embed a custom Twitter feed on your WordPress site.
Want to dig a little deeper into how to add a Twitter feed to your WordPress site? We’ve got you covered! Check out the guides below for all the details:
- How to Integrate Twitter Feed on Your Website [5 Easy Ways]
- How to Add Your Twitter Feed to Elementor
Start showing Twitter feeds on your website when you get started with Twitter Feed Pro now.
But what if Facebook, Instagram, or Twitter doesn’t have your target audience while YouTube is thriving with users perfect for your business?
There’s a great YouTube feed plugin that we’ll show you how to use next.
How to Add a YouTube Social Media Feed to WordPress
Are you interested in getting more YouTube subscribers?
Like TikTok, succeeding in YouTube means you need to promote in other platforms. With millions of YouTube videos regularly uploaded in the platform, it’s tough to grow your YouTube channel if you’re relying on YouTube alone.
That’s why it’s important for you to add YouTube social media feeds to your WordPress site.
When you embed your YouTube channel using YouTube Feed Pro, you expose your videos to more people who are already interested in your brand — your site visitors.
As a result, they’re more likely to watch your YouTube videos and interact with your content.
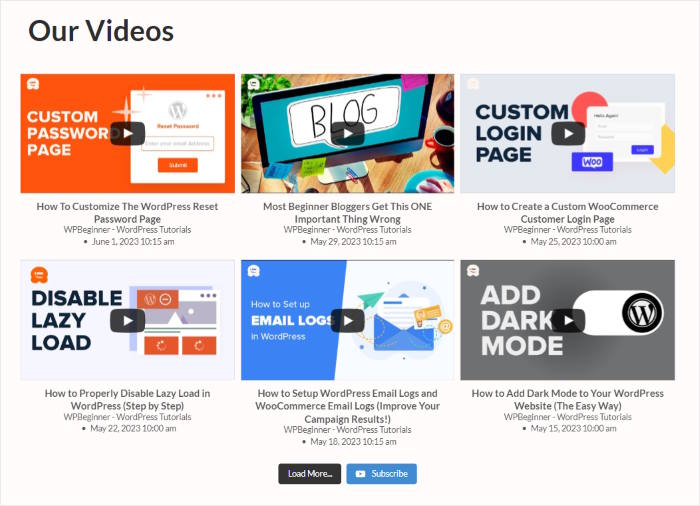
If you do live streams on YouTube, you can also get more viewers when you add a YouTube live stream feed on your website.
This way, people visiting your site can also join your existing live streams and even check out the old videos from your YouTube channel.

Just like other Smash Balloon plugins, YouTube Feed Pro has a ready-made visual feed customizer. This lets you easily customize how your YouTube feeds look in seconds — without needing to code or hire a professional designer.
In fact, you can also use the plugin’s visual customizer to embed your YouTube feed on your site with just a few clicks!
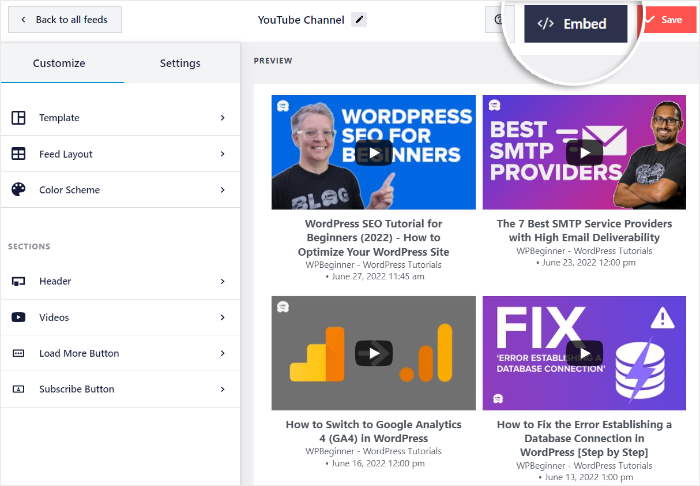
For more details, check out this useful post on how to add YouTube videos to your website or this step-by-step tutorial on how to embed YouTube playlists on WordPress.
Display custom YouTube feeds when you get started with YouTube Feed Pro today.
How to Add Your Google, Facebook, Yelp, and TripAdvisor Reviews to WordPress
99% of online shoppers read customer reviews to decide whether they want to buy from you or not.
That’s why showing your best user reviews on your WordPress is a great way to use social proof. It helps build brand trust and convince potential customers to do business with you.
To display reviews on your site, you can either copy each review and paste it on your WordPress one-by-one…
Or you can use Reviews Feed Pro and let this top-rated reviews plugin do everything for you.

As the best reviews feed plugin in WordPress, Reviews Feed Pro lets you create, customize and embed reviews feeds from Yelp, Facebook, WordPress.org, Google, Tripadvisor and Trustpilot.
Not tech-savvy?
Not a problem. Reviews Feed Pro comes with ready-made templates so you can showcase your customer reviews in different styles like showcases, grids, carousels and more.
Even better, you can easily customize the content and design of your social media review feed using the plugin’s user-friendly feed customizer.
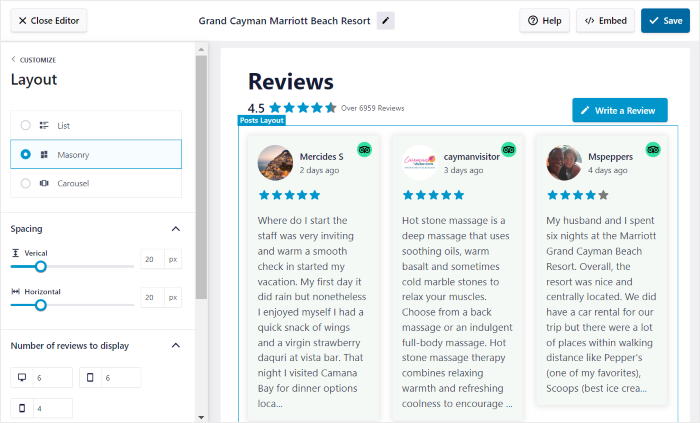
Even better, the Reviews Feed visual customizer lets you quickly:
- Highlight your highest star ratings at the top of the feed so you can create a better impression of your brand
- Filter out reviews that contain profanity or certain banned terms
For more details on adding customer reviews to your WordPress website, see the complete instructions here:
- How to Embed Google Reviews Widget on Your Website
- How to Embed Yelp Reviews on Your Website
- How to Embed Tripadvisor Reviews Widget on Your Divi
- 6 Ways to Add Customer Testimonials to Your WordPress
Want to embed custom reviews on your site to boost brand trust and get more sales?
Grab your copy of Reviews Feed Pro today!
How to Add Social Media Feeds to WordPress (Combined)
What if you want to add multiple social media accounts and just combine them into 1 feed?
With Smash Balloon’s Social Wall Pro plugin, you can create feeds from the top social platforms in Facebook, TikTok, Instagram, Twitter and YouTube with the help of the best social media aggregator in WordPress.
To begin, get your own copy of Social Wall Pro here.
After downloading the plugin, install it on your website by following the instructions in this post on how to install WordPress plugins to WordPress.
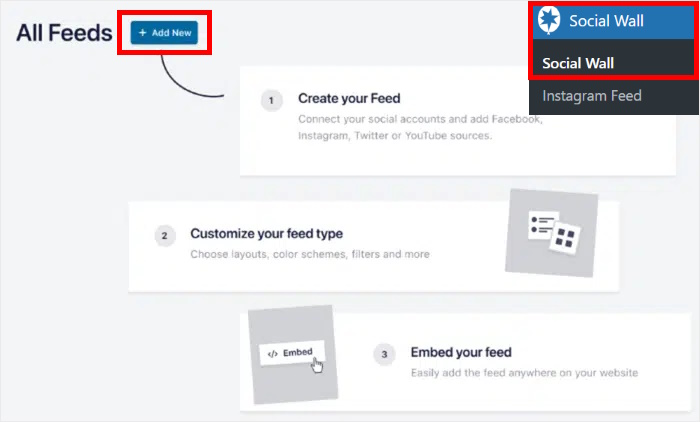
From your WordPress dashboard, navigate to Social Wall and then click on the Add New button at the top.
The plugin will then let you choose the social media platforms whose content you want to display on your wall. Just click on the Add to Wall button below the platforms you’d like to select.
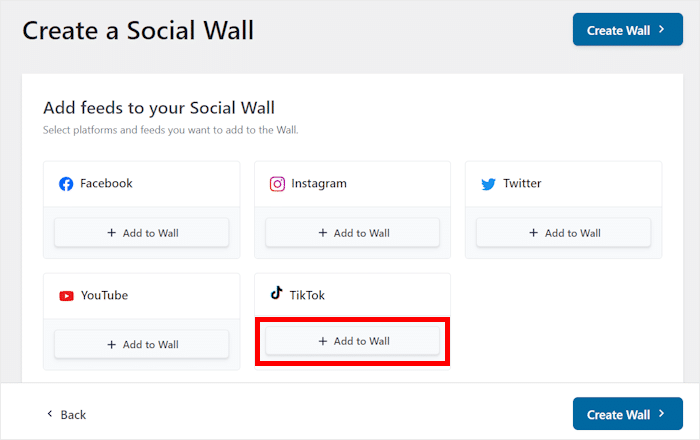
Once you do that, you’ll see the social media feeds you’ve created for each of these platforms.
To continue, select the feeds you’d like to add to your social wall and then click on Create Wall.
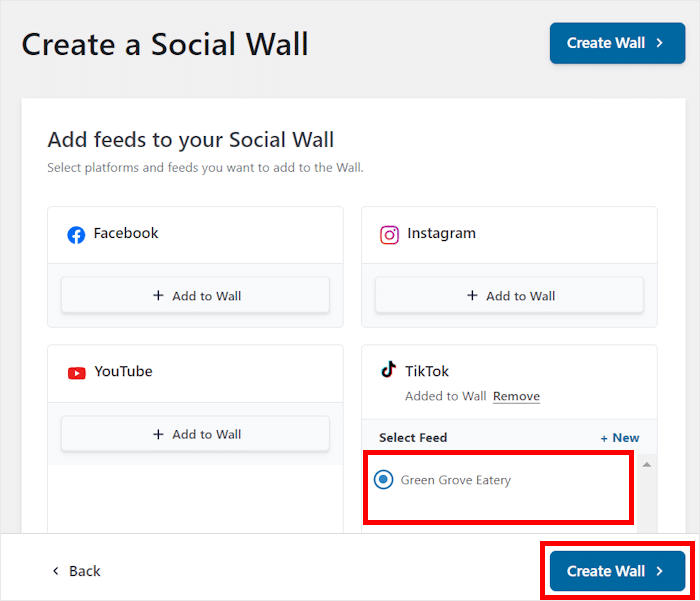
Then, almost instantly, your Social Wall plugin will create your new social wall feed. lIf you embed it on your website, the social wall can copy your website’s design and look beautiful right out of the box.
Before you do that, you can customize your social wall as well.
Customize Your Social Media Feed
To help you design your social wall with ease, the plugin will now open the user-friendly visual customizer.
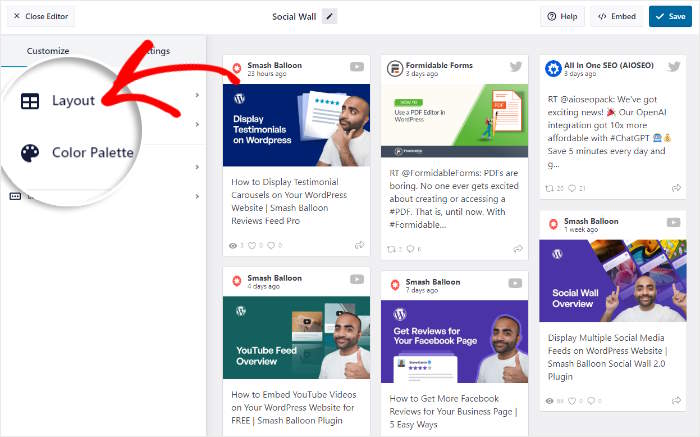
Using the options on the left, you can quickly customize your social wall’s layout, color palette, post elements, and much more.
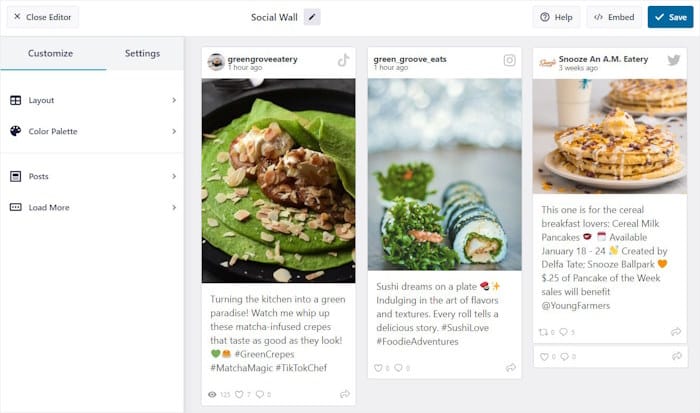
Like the other plugins in this guide, you have a live preview of your social wall to make customization easier. To start the customization, click on the Layout option.
You can now choose from 3 different layout options for your social wall:
- Masonry: Show tons of different social media posts in multiple columns
- List: Display a single column of social media posts and make each post clearly visible
- Carousel: Create a beautiful slideshow to show your social media posts
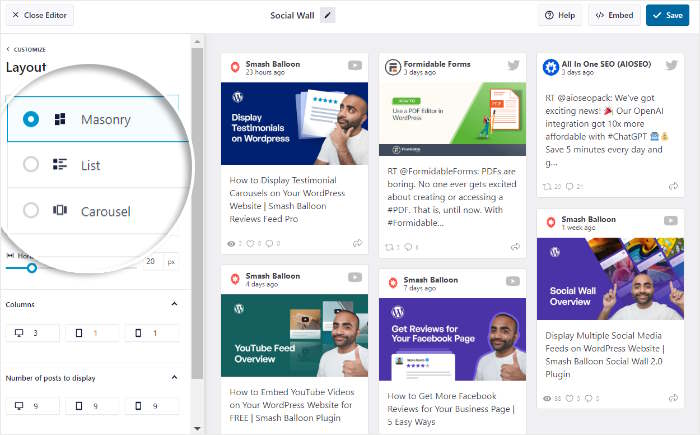
Simply select the layout you prefer and then click on Save to confirm your changes. Then, you can click on the small Customize button to return to the main customization options.
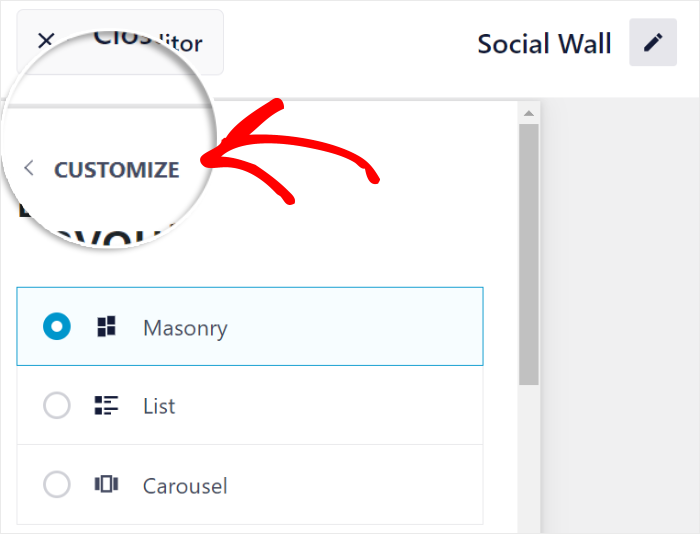
You can also control which of the post elements are visible on your social wall. For that, select the Posts option on the left.
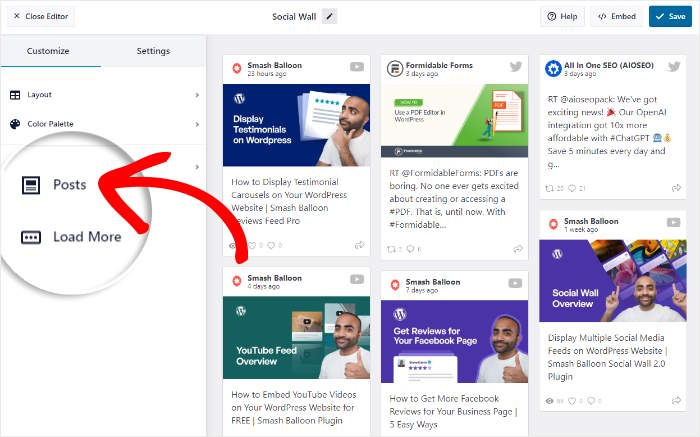
Now, you can choose to hide or show different elements of your social media post, like the avatar, post text, date, and more. Simply select the option you want to show and unselect the option you want to hide.
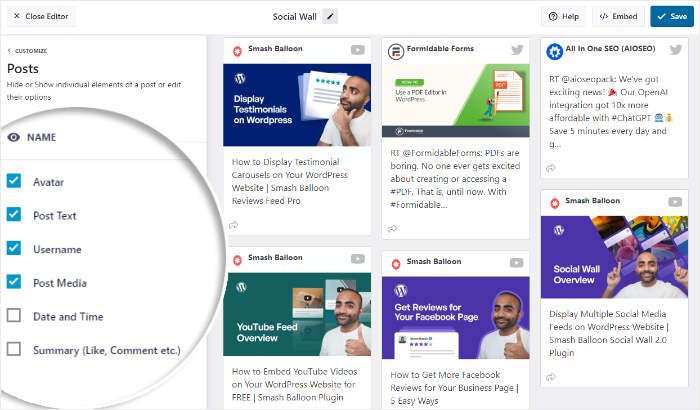
After finalizing your post elements, click on Save once more.
You can also use the remaining customization options to change your color palette, button design, filters, and more.
Once you’re happy with how your social wall looks, you can click on Save before moving on to the next step.
Add Your Social Media Feed to WordPress
As the best social media aggregator, Social Wall Pro makes it super easy for you to add your social media feed to WordPress websites.
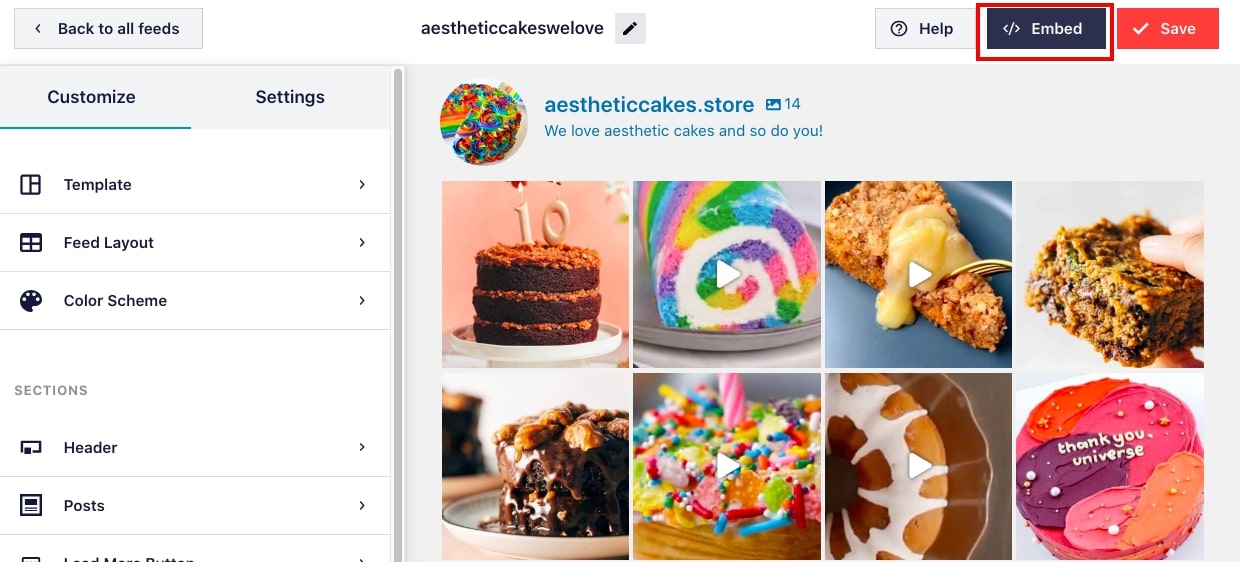
From your visual customizer, click on the Embed button at the top.
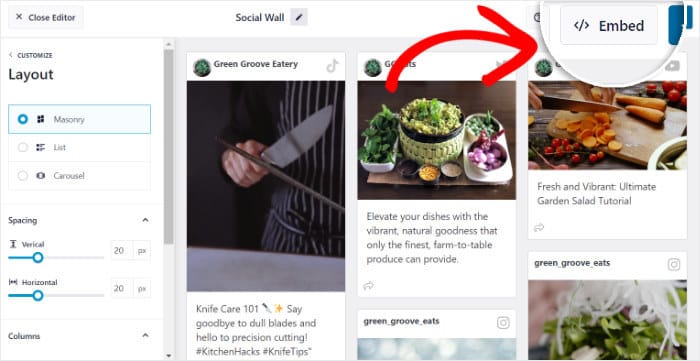
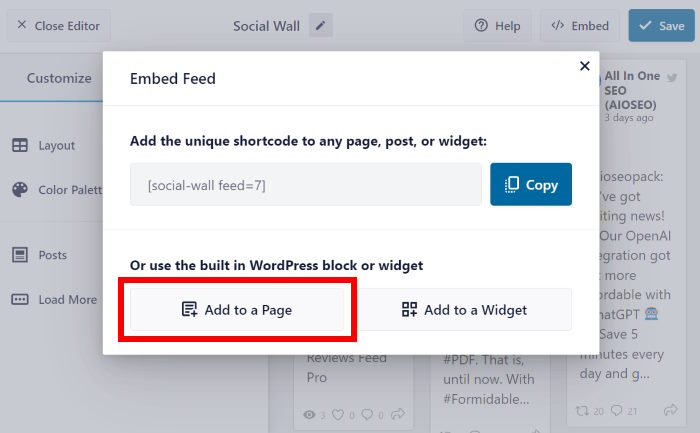
Clicking on that will show the embed options for your social wall. From here, you can add it to a page, embed it as a social media widget, or copy the shortcode.
For now, we’ll display the social wall on a WordPress page. To do that, click on Add to a Page here.
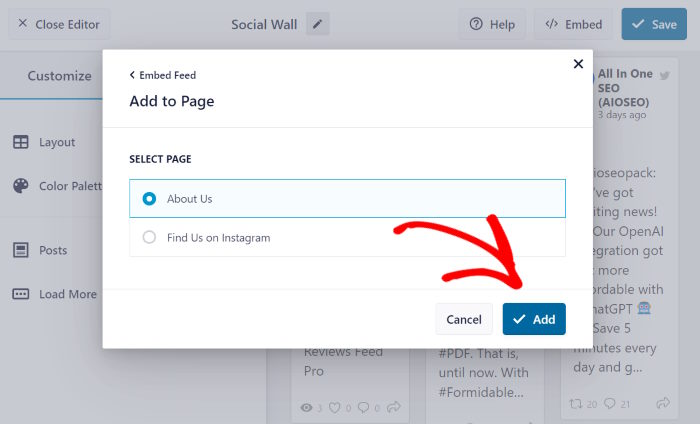
Social Wall Pro will then show you a list of WordPress pages on your website. You can select the page you prefer and then click on Add.
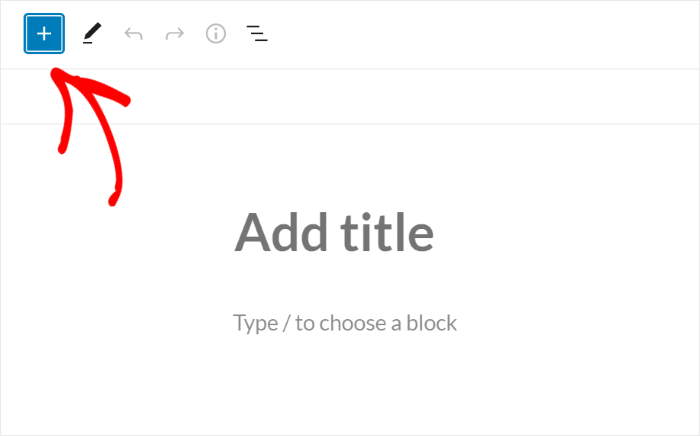
Next, you’ll be automatically redirected to that page so you can embed your new social wall easily. To do that, first, add a new content block by clicking on the plus (+) icon.
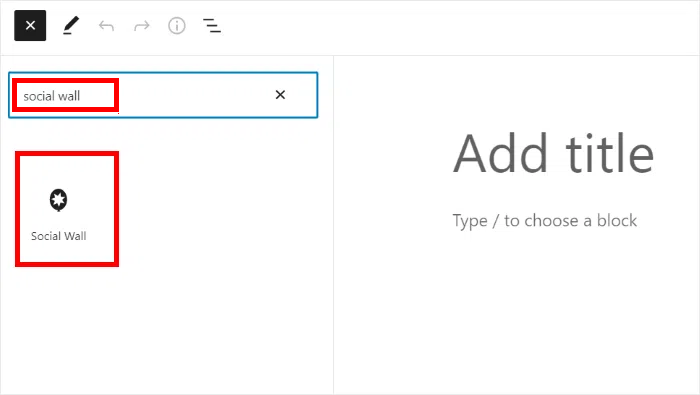
Next, use the search bar to look for the “social wall” block.
To embed your wall, click on the Social Wall block in the search results below.
Feel free to edit the page, and when you’re happy with how it’s set up, then click on Update. Finally, you can open your website to take a look at your social media wall like this:
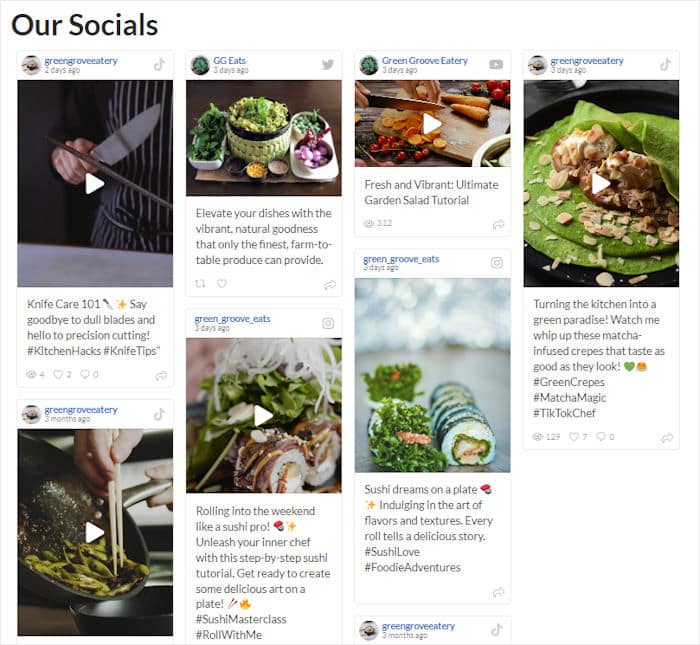
That’s it!
You now know how to add social media feeds to WordPress websites using the super-easy suite of social media feed plugins from Smash Balloon.
Why You Should Embed Social Media Feeds on Your Website
Based on our detailed social media marketing statistics, 58.2 million U.S. adults look at brand-related content on social media multiple times per day.
By integrating social media platforms into WordPress, you can delight website visitors with your social media content, boost your followers, and secure more potential customers.
Other benefits of adding social media feeds to your WordPress include:
- Promoting brand awareness – Instead of adding easy-to-miss social icons, you’ll show social feeds that contain your real-time updates and updated social media posts.
- Reaching more people – You can display all your feeds in a single place, so visitors can see which social media posts you publish on each platform — right on your website.
- Get more engagement – Adding video content like TikTok widgets or YouTube feeds on your site can get you more views and comments, instead of just showing a subscribe button on your sidebar.
- Boosting website SEO – When you add social media posts to your site, your visitors interact with your feed so they stay longer, boosting your SEO so your website can rank higher in the search engines.
- Improving trust in your brand – With social media feeds on your website, it’s easier to curate user-generated content (UGC) to improve your reputation and grow your conversions.
- Increasing your sales – Social media feeds are the ideal way to display social proof for your e-commerce brand or WooCommerce site, like customer reviews and testimonials. This creates social trust and convinces your site visitors to buy from you.
According to our social media marketing research, the average user has accounts on more than 8 social media platforms such as Instagram, Tumblr, Facebook, YouTube, TikTok, LinkedIn and more.
That’s why simply embedding feeds from just one social network isn’t enough.
You can reach tons of customers and grow your business faster by showing social content from the biggest social media networks: Facebook, Instagram, TikTok, YouTube, and Twitter.
Ready to add social media feeds to your WordPress website? Get Smash Balloon now!
Want an easy way to turn website visitors into customers? Check out our WordPress tutorial on how to embed social media review widgets on your site.
You can also read this next post on how to get more views on your Instagram reels.


