Ready to showcase your video content by embedding your YouTube channel directly on your website?
Displaying a feed of your latest YouTube videos automatically keeps your site fresh and encourages visitors to watch your content without ever leaving your page.
As someone who helps website owners integrate video content, I know that getting your YouTube channel to display just right using YouTube’s standard options can be complicated.
Used by over 1.75 million websites, Smash Balloon is the leading provider of social media feed plugins for WordPress, making it effortless to display content from platforms like YouTube.
In this guide, I’ll show you the simple 6-step process using Smash Balloon’s easy-to-use YouTube feed plugin to embed your YouTube channel feed on your site.
What’s more?
You can quickly get your beautiful YouTube channel feed live by following along step-by-step — no technical skills required.
In This Article
- Video Tutorial on Embedding YouTube Channel on Your Website
- How to Embed a YouTube Channel on Your Website for Free
- 2 Ways to Add YouTube Channel Feeds to WordPress
- Easiest Way to Embed a YouTube Channel on Your Website
- 6 Steps to Embed a YouTube Channel on Your Website
- Why Embed YouTube Channel to Your WordPress Website
- FAQs on How to Embed a YouTube Channel on Your Website
- How to Embed YouTube Channel in Website Builders
- Start Embedding YouTube Channel Feeds Now
Video Tutorial on Embedding YouTube Channel on Your Website
If you prefer to follow along a video tutorial, here is the step-by-step guide we created on how to add YouTube channel widgets on your website:
How to Embed a YouTube Channel on Your Website for Free
Looking for a free way to show YouTube videos on your website? You can follow the steps below to manually insert YouTube videos on your website:
- Open the YouTube video that you want to embed.
- Click on the Share button to open the embed options for the video.
- Select the Embed option then Copy the code on the popup.
- Return to your website and add the HTML block to your page or post.
- Finally, paste the code that you copied earlier.
2 Ways to Add YouTube Channel Feeds to WordPress
Should you manually embed YouTube channel widgets on your website, or is it better to use a plugin to automatically do it?
Check out this table I made to help you compare:
| Feature | Using Smash Balloon’s YouTube Feed Pro | Not Using a Plugin |
| Setup Complexity 🛠️ | Super easy. No coding required. Set up in just a few clicks! | Complicated and requires technical skills to understand coding and YouTube API. |
| Coding Requirements 💻 | No coding needed to embed YouTube channel feeds. Perfect for everyone, even beginners. | You’ll need to code yourself, which can be challenging without experience. |
| Customization Options 🎨 | In just a few clicks, customize your channel’s look to match your site’s layouts, styles, and more! | Hard to seamlessly match your feed with your site — needs lots of coding work. |
| Integration with Website 🔗 | Easily add multiple channels or playlists to your site. | Limited to basic embedding unless you have advanced coding skills. |
| Help and Support 📞 | Get expert help from a friendly support team when you need it. | YouTube doesn’t have a dedicated team to help fix YouTube video embeds. You’re on your own if something goes wrong or you get stuck. |
| Features 🚀 | Packed with features like live streams, moderation and filtering options. | You need to copy/paste each video embed code provided by YouTube |
| Final Takeaway ✨ | Want to easily embed YouTube channels in minutes? Check out Smash Balloon’s YouTube Feed Pro today! | Be ready for a tougher setup with limited options if you go without a plugin. |
Let’s talk about the simplest way to display a YouTube channel on your site below.
Easiest Way to Embed a YouTube Channel on Your Website
Adding a YouTube channel feed to your WordPress website is as easy as installing a WordPress social media plugin, connecting it to your YouTube channel, and letting it do the hard work for you.
You can use YouTube Feed Pro, which helps you create, customize and display your YouTube channel feed on your website in a few clicks.

And as the best YouTube feed plugin for WordPress, YouTube Feed Pro by Smash Balloon works great with any WordPress website.
You can use it to effortlessly embed your entire YouTube channel and even embed YouTube playlists directly onto your website.
Here’s what I love about it:
- From the plugin’s visual feed customizer, you can easily create beautiful YouTube channel feeds for your website – even without coding languages like iFrame, HTML, CSS, or JavaScript.
- YouTube Feed Pro uses smart loading for your videos to improve your webpage’s speed and performance, resulting in better SEO for your site.
- You get access to a support team of WordPress experts who are always ready to lend you a hand if you need help with your YouTube feeds.
- YouTube Feed Pro is 100% compatible with popular website builders. You can use it to embed YouTube feeds on Elementor or add YouTube feeds to Beaver Builder. It’s not designed for Shopify, Squarespace, Weebly, or Wix, but it’s guaranteed to work with WordPress.
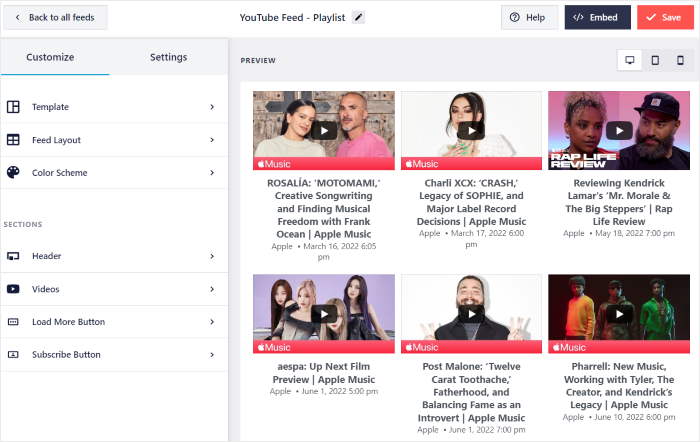
Lots of people use YouTube Feed Pro to showcase their YouTube videos, and it has a fantastic rating of 4.9/5 stars.
It’s a social media feed plugin from Smash Balloon, a name used and loved by over 1.75 million websites to add social media feeds to WordPress, ensuring it’s a reliable solution for your video needs.
Want to easily embed engaging YouTube channel feeds on your website? Get your copy of YouTube Feed Pro here.
6 Steps to Embed a YouTube Channel on Your Website
For this method, I’ll use YouTube Feed Pro to embed a feed of YouTube channel videos on my website.
YouTube Feed Pro will make sure that my feed automatically matches my website’s design, and it’ll keep my YouTube channel feed updated whenever I upload a new video.
Here’s a quick step-by-step guide on how you can display YouTube videos from your channel on your website:
Step 1: Install the YouTube Feed Pro Plugin
To begin, you can download your copy of the YouTube Feed Pro plugin here. Then, install and activate the plugin on your WordPress site.
Not sure how to do this? Check out this step-by-step tutorial to install a WordPress plugin for your guide.
Step 2: Create a New YouTube Channel Feed
To get started, you can create a new YouTube feed that you can use to show videos from your channel.
First, navigate to the YouTube Feed » All Feeds menu from your WordPress dashboard and click on the Add New button at the top.
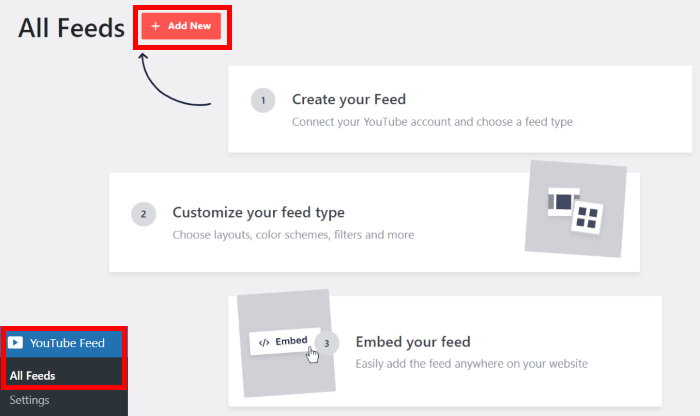
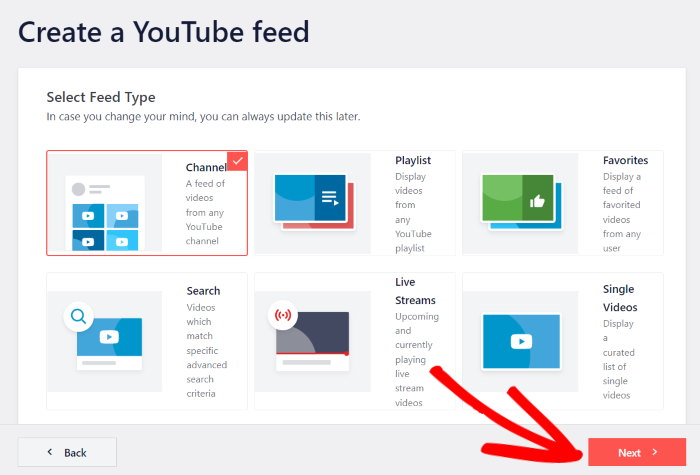
After that, YouTube Feed Pro will ask you to choose your YouTube feed type. From here, you can choose to embed a YouTube playlist, search results, YouTube live streams, and much more.
Expert Tip: Do you upload YouTube shorts on your channel? You can even display YouTube shorts on your WordPress website with YouTube Feed Pro.
To continue, I’ll go ahead and select the Channel feed type. Once you pick your feed type, click on Next.
Step 3: Connect The YouTube Channel You Want to Embed
You can now choose from 2 ways to connect your new feed to YouTube:
- Add a YouTube API Key
- Connect your YouTube account
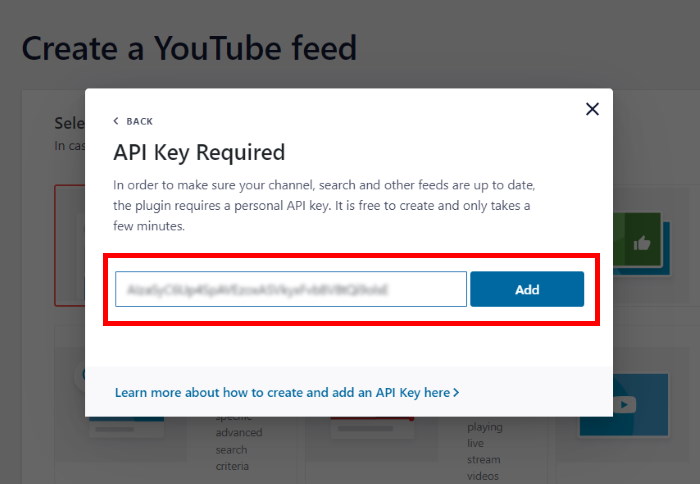
If you want access to all the feed types supported by the plugin, click on the Add API Key option on the popup.
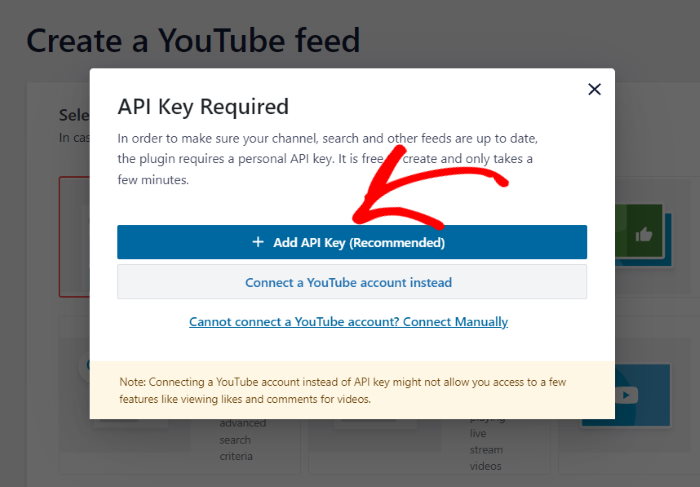
After that, take a look at this step-by-step guide on how to create an API Key. In just a few simple clicks, your API Key will be ready.
Next, paste your API Key on the popup and then click on the Add button.
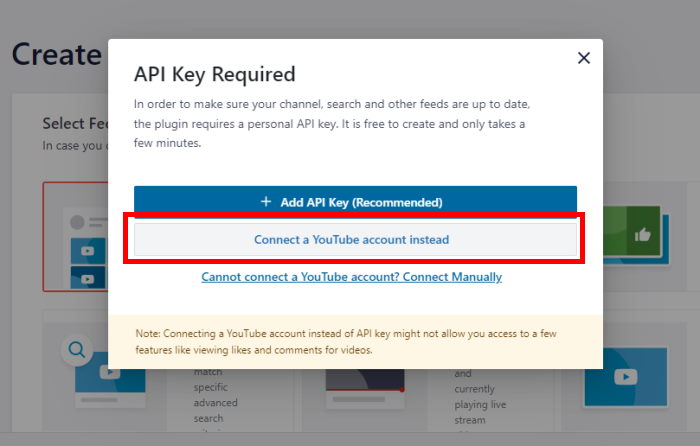
Or, you can simply link your website to your YouTube channel account. This way, you get access to fewer YouTube feed types than with the other method.
To do that, click on the Connect a YouTube account instead option.
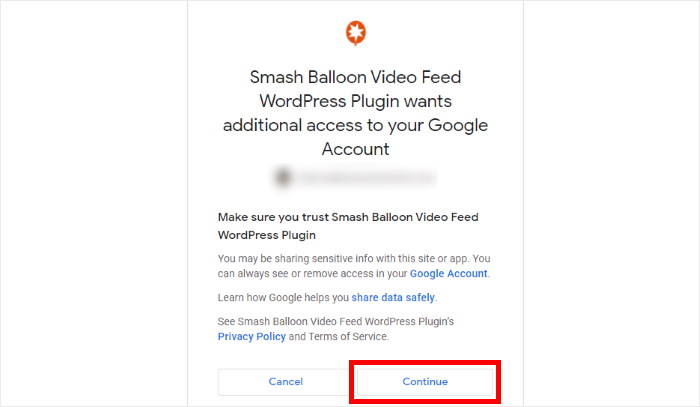
Doing that will send you to https://www.youtube.com, where the plugin asks for read-only access to your account. It will then use this access to connect your feed to YouTube and won’t be able to make any changes.
As you can see, it’s completely safe to use YouTube Feed Pro.
On the popup, click on the Continue button to confirm this access.
Step 4: Select Which YouTube Channel to Embed
After connecting your YouTube feed, go ahead and open the YouTube channel that you want to embed.
At the top, you can see the URL for this YouTube channel. Now look for “/channel/” or “/user/” in the URL and then copy everything after that:
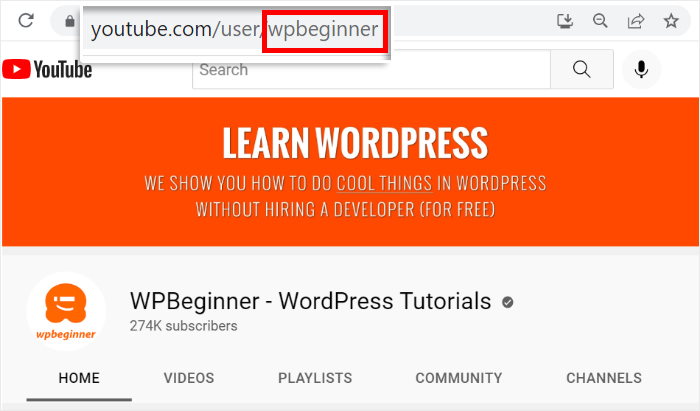
As you can see, I’m using YouTube Feed Pro to embed the official WPBeginner YouTube channel.
Now, return to your website once again and paste it into the Channel ID or Username field.
Finally, click on Next to finish adding the source for your YouTube feed.
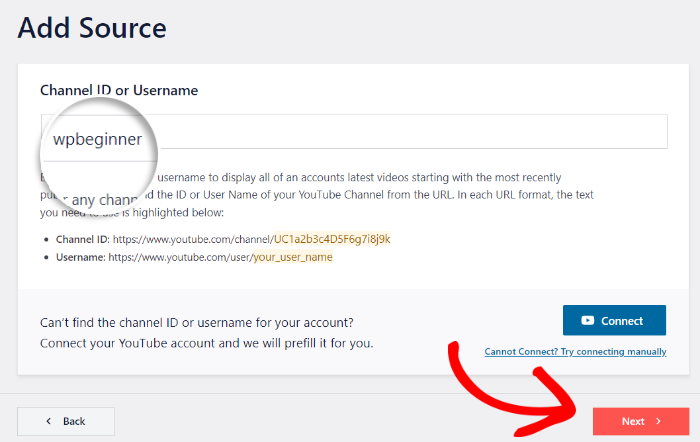
In just a few steps, your YouTube channel feed is now ready to be embedded.
You can now display it on your website, and it will instantly look great right out of the box because YouTube Feed Pro will automatically copy your website’s theme.
What if you want to customize your feed’s design, though?
No worries.
When I first tested YouTube Feed Pro, one thing I really liked about it was that this plugin comes with a visual feed customizer that also gives you control over the design of your YouTube feed — no coding necessary.
Step 5: Customize Your YouTube Channel Feed
To get started, you can choose to import the design of a YouTube feed template. Here are the 6 feed templates that you can pick from:
- Default
- Carousel or YouTube Slider
- Cards
- List
- Gallery
- Latest Video
- Showcase Carousel
- Widget
After selecting the feed template that you want for your YouTube channel feed, click on Next.
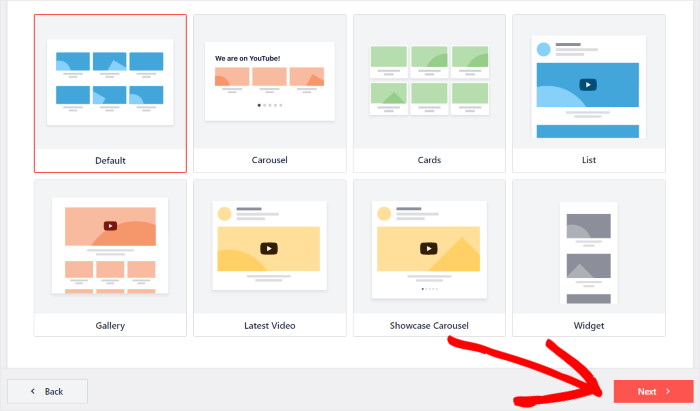
After that, the plugin will open your YouTube channel feed in the visual feed editor so you can customize its design in real time.
You can see the options to change your feed layout, feed formatting, color scheme, header style, YouTube subscribe button design, and much more on the left side.
Towards the right, you have a live preview of how your YouTube channel feed looks.

Ready to change the design of your YouTube feed? Normally, I start by changing the layout of the YouTube videos.
First, click on the Feed Layout option on the left.
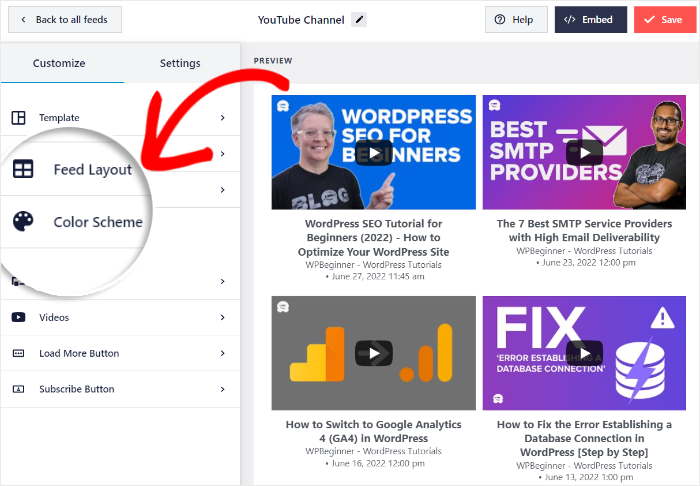
You can now choose the layout of your feed and control what your YouTube channel’s feed looks like on your WordPress website.
YouTube Feed Pro comes with 4 options for you to choose from: Grid, Gallery, List, and Carousel.
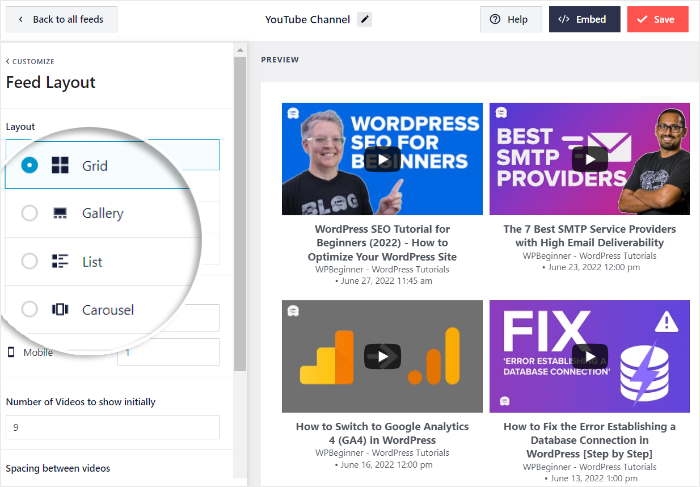
With the grid layout, you can show all of your videos in neat rows and columns. As a result, your YouTube channel feed can embed tons of videos at once.
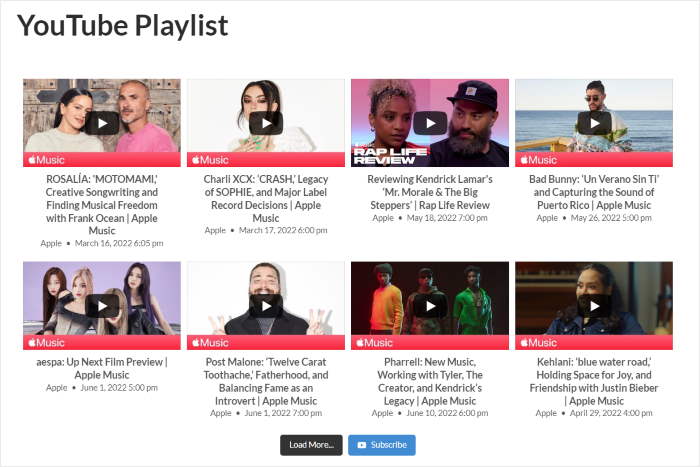
Next, you have the gallery layout, which highlights one YouTube video while showing the remaining videos underneath.
It’s a great way to put the focus on your best YouTube video and grab people’s attention. Personally, I use the gallery layout for my embedded YouTube channel whenever I want to promote a specific video that’s effective in transforming my site visitors to YouTube subscribers.

Another great way to put the focus on your videos is to pick the list layout. The YouTube videos on your feed will then appear in a single column.

You can also go for the carousel layout that will show the YouTube videos as a slideshow carousel.
This makes your website even more interactive and allows you to show lots of videos for your YouTube channel feed without taking a lot of space.

Select your YouTube feed layout from these options and then click on the Save button at the top.
Next, click on the small Customize button to return to the main customization options once again.
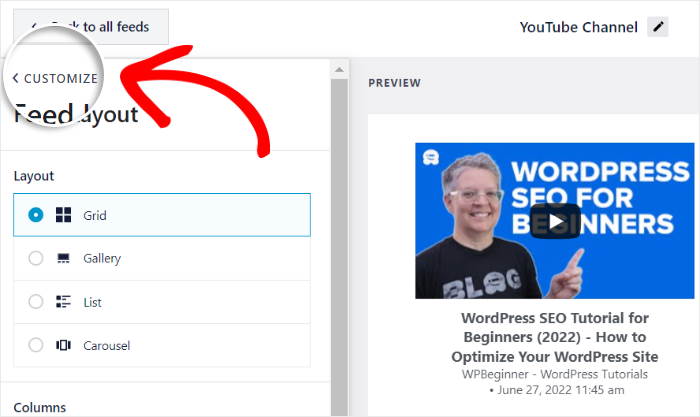
From here, you can continue changing the design of your YouTube channel feed.
Look for the Header option on the left and click on it to continue.
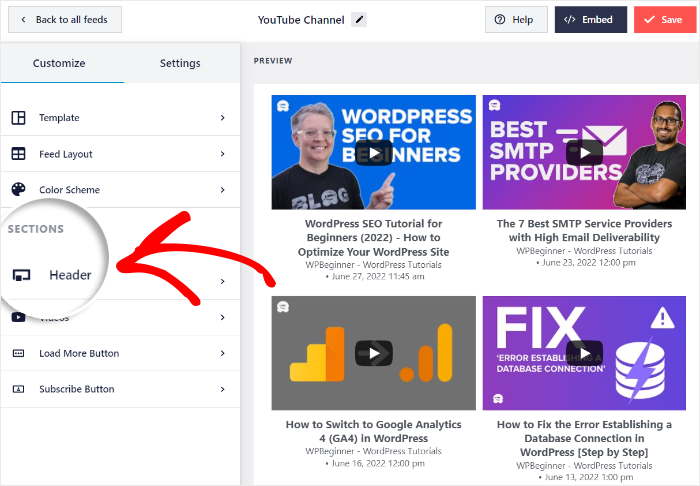
At the top, you can find the option to Enable or Disable a header for your YouTube channel feed widget.
Under that, you can choose from the 2 Header Style options:
- Standard: Show the channel name, icon, and other info at the top of your feed
- Text: Write a heading to show on top of your YouTube channel feed
Finally, you have the option to show or hide the Channel Descriptions and the number of Subscribers.
If you have tons of subscribers, I recommend you enable this to boost your social media marketing and encourage your site visitors to follow you.

After setting up the header options for your YouTube channel feed, click on the Save button at the top once again.
As you can see, YouTube Feed Pro has a simple live feed editor that you can use to freely set up your feed design without any coding.
You can now change the remaining customization options, including the color scheme, YouTube subscribe bar, load more button design, post style, and more.
Finally, click on Save once you’re happy with the design of your YouTube feed.
Step 6: Display Your YouTube Channel Feed in WordPress
Using the YouTube Feed Pro plugin, you can easily add YouTube channel feeds to your website. In fact, there are 2 embed options for you here:
- Embed your WordPress YouTube channel feed on a page
- Embed your WordPress YouTube channel widget on the sidebar or footer
Don’t know which way to use to embed YouTube videos? I’ll talk about both ways to embed your YouTube channel below.
Embed Your WordPress YouTube Channel Feed on a Page
To add a YouTube channel to your site with ease, you can simply use the live feed editor.
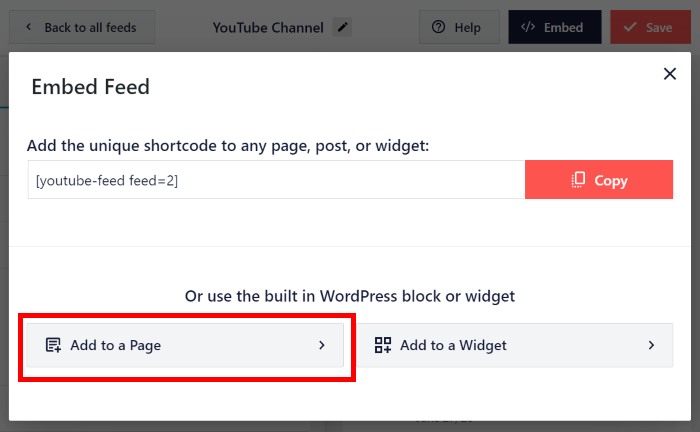
First, click on the Embed button at the top to get started.

You can now see a popup that you can use to set the location of your YouTube channel feed.
To embed the feed on a page, you can click on the Add to a Page button on the popup.
After you do that, you can see a list of all the pages on your WordPress website.
To continue, select the page where you want to show your YouTube videos and click on Add.
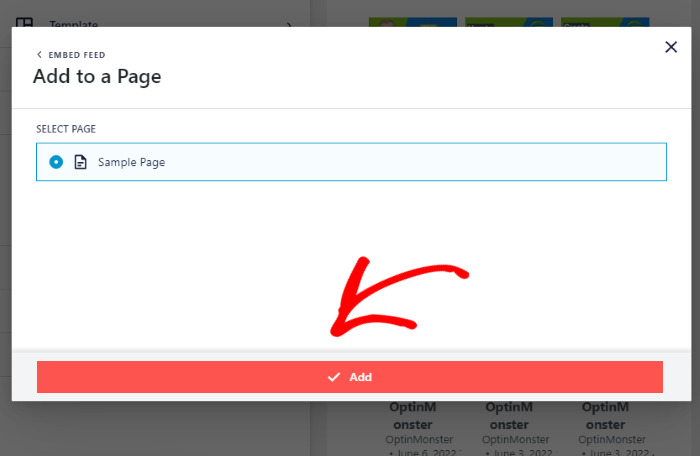
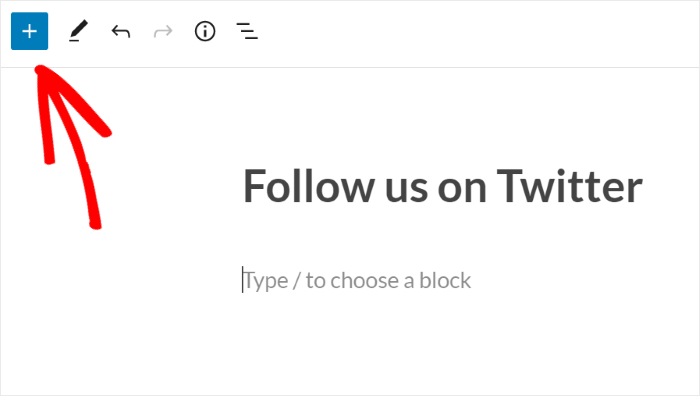
The plugin will then send you to that WordPress page so you can embed your YouTube channel feed.
To get started, click the plus (+) icon and add a new content block to your page.
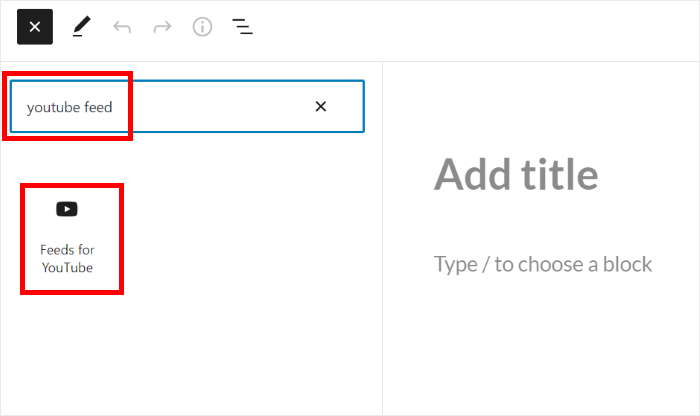
Now look for “youtube feed” using the search bar at the top and then click on the Feeds for YouTube block from the results.
Now, click on the Update button at the top to publish your YouTube feed.
Below, you can see the YouTube channel feed that I embedding using this plugin. If you followed the instructions, you’ll also have a similar YouTube feed.

How to Embed Your YouTube Channel Feed on a WordPress Sidebar
Now, if you prefer to add YouTube channel feeds as a YouTube widget on your website sidebar instead, here’s a simple way to do it.
First, go to the YouTube Feed » All Feeds menu from your dashboard area and then click on your YouTube channel feed.
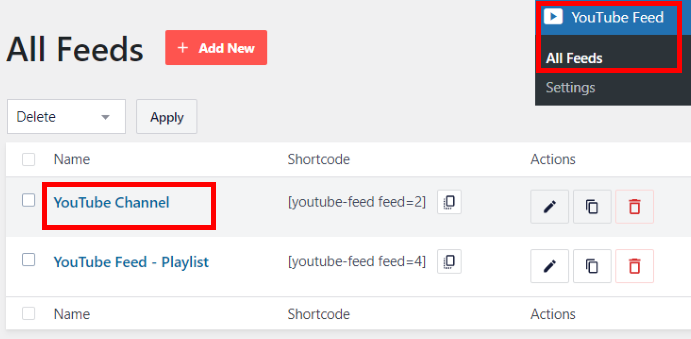
From here, you can embed your YouTube channel feed as a widget as well.
Just click on the Embed button at the top to continue.

On the popup, click on the Add to a Widget option since you want to embed your YouTube content on the sidebar or footer.
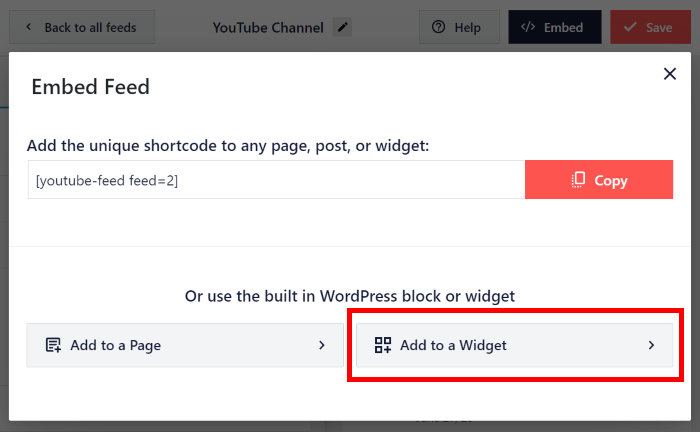
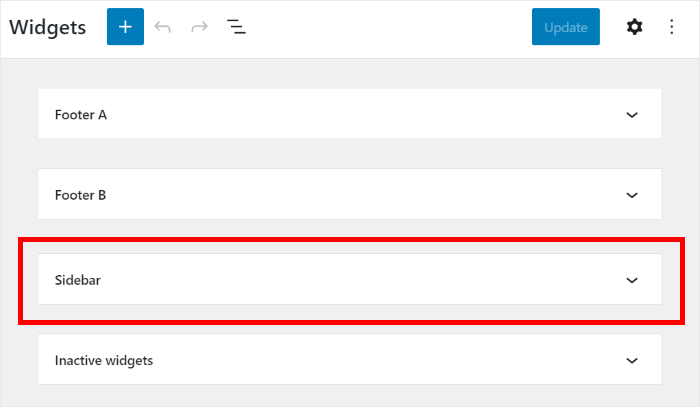
Doing that will open the Widgets page of your website, where you can add, remove, and manage your WordPress widgets.
To show your YouTube channel feed on your website sidebar, click on the Sidebar panel here.
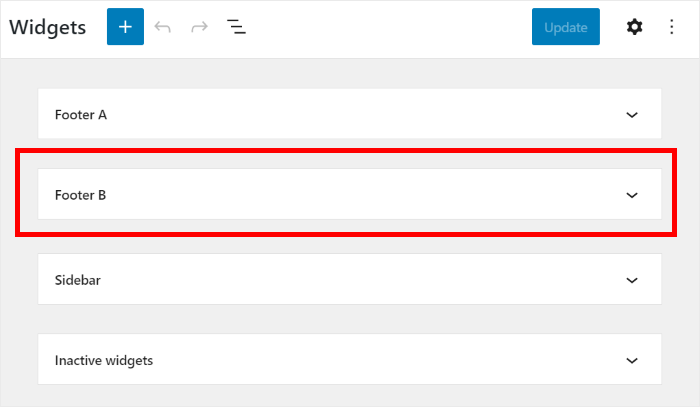
Alternatively, you can click on a Footer panel instead to show your videos there.
We’ll go with the sidebar for our tutorial.
Finally, you can click on the plus (+) icon to create a new widget on your sidebar or footer. Then, select the Feeds for YouTube widgets.
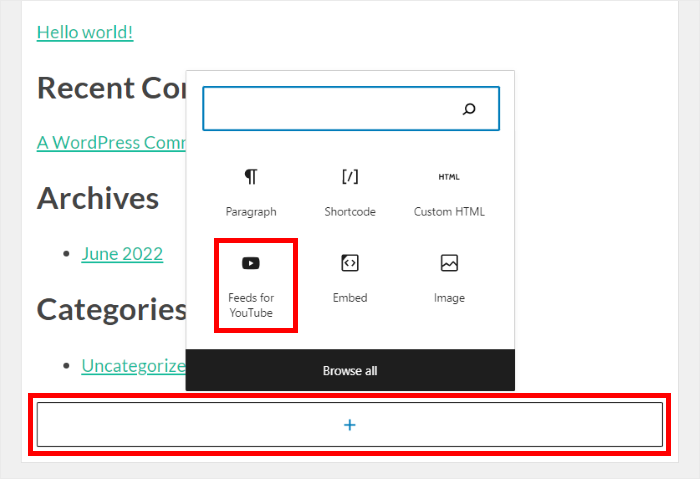
After that, click on Update, and you’ve officially added a YouTube video widget with your channel on your website sidebar!
Simply check out your website and see your channel feed’s video content nicely displayed right there.
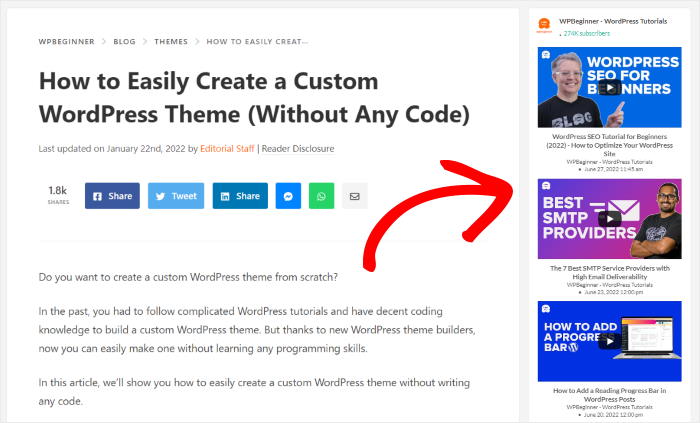
So, there you have it!
You’ve finally learned how to embed your YouTube channel videos onto your website. Now, you can start growing your channel and expanding your audience.
All you have to do is add YouTube channels to your site, and you can grow your subscribers and make your site more engaging at the same time.
Ready to embed YouTube channels on your site? Get started with YouTube Feed Pro here.
Why Embed YouTube Channel to Your WordPress Website
- The more website visitors see your videos, the more they can be converted to your channel subscribers.
- You can embed video testimonials to show people raving about your products and convert more people into customers.
- The more accessible your YouTube channel is, the more potential you have to engage with your customers through video.
- Like TikTok videos, you can stand out from your competition if you give your customers another way to view your content in the form of videos.
- You can embed your newest YouTube videos on product releases, news, sales, and more to keep visitors informed while boosting your channel views.
FAQs on How to Embed a YouTube Channel on Your Website
Can you embed an entire YouTube channel on your website?
Absolutely! You can embed all the videos from any YouTube channel on your website.
The downside is that manually embedding all these videos takes a lot of time.
Of course, you can sidestep that issue by using a plugin like YouTube Feed Pro that automatically embeds all the videos for you.
Is it legal to embed a YouTube channel?
Yes, embedding YouTube videos is 100% legal since you’re not actually storing any content on your site. All the data is still stored on YouTube; you’re just fetching the data to show to your visitors.
Does embedding YouTube videos slow down your website?
It can slow down your site in some cases, but you won’t have to worry about that if you’re using a trusted plugin like YouTube Feed Pro.
Is it better to embed a video or link to YouTube?
Both have their pros and cons, but embedding YouTube videos can be a great way to keep people on your site for longer, boost your SEO, and promote your YouTube channel.
Still, if you want to share a video quickly without taking up space on your site, sharing a link can be the way to go.
Are you allowed to have multiple YouTube channels?
Yep, and a lot of popular YouTubers actually have multiple channels for different types of content.
Plus, you can follow the steps above to embed the different channels on your website too.
How to Embed YouTube Channel in Website Builders
- How to Embed a YouTube Playlist on Your Divi Website
- How to Embed YouTube Playlist on Elementor (Best Way)
- How to Display YouTube Shorts on Your Thrive Architect
- How to Fix YouTube Video Not Working in Elementor
- How to Embed YouTube Shorts on Your Divi Website
- How to Embed Your YouTube Live Stream to Elementor
Start Embedding YouTube Channel Feeds Now
Putting your entire YouTube channel feed on your website might sound complicated, but it really doesn’t need to be.
With Smash Balloon’s YouTube Feed Pro, you can display all your latest channel videos right on your site quickly – we’re talking minutes, not a long drawn-out process.
From my experience, trying to get an entire YouTube channel’s worth of videos to show up nicely on a website using manual methods can be quite a challenge.
That’s exactly where I’ve found YouTube Feed Pro to be a lifesaver. It takes all the difficulty out of embedding your channel. You don’t need any coding skills, and all your videos appear looking great on your pages, automatically updating as you add new content to your channel.
Ready to easily share your complete YouTube channel library directly on your website? Here’s what I suggest doing next:
- Pick up your copy of YouTube Feed Pro. (Remember, you can try it without risk thanks to the 14-day money-back guarantee!)
- Follow the easy setup steps shown in the article.
- See how great your full YouTube channel feed looks on both desktop and mobile devices.
- Enjoy having fresh video content automatically pulled from your channel onto your site.
Displaying your YouTube channel feed is an excellent way to keep visitors engaged with all your video content and encourage them to watch more.
Got questions about embedding your YouTube channel feed on your website using YouTube Feed Pro? Ask away in the comments below!


