


 Social Wall
  Feed Analytics

Are Elementor YouTube videos not working on your site?
Your YouTube embeds can be broken due to outdated versions of the Elementor plugin, conflicts with third-party optimization or caching plugins, and theme-level script errors.
Regardless of the cause, this is a common problem for WordPress users and extremely frustrating to deal with.
In this comprehensive guide, we will walk you through the most effective troubleshooting steps to fix your YouTube embeds in Elementor.
We will also show you a more reliable, performance-friendly method for displaying YouTube videos on your site.
- First: Is Your YouTube Embed Broken or Just a Cache Issue?
- How to Fix YouTube Videos Not Working in Elementor
- Step 1: Update Your Version of Elementor
- Step 2: Check for Self-Hosted Source Errors
- Step 3: Enable YouTube Privacy Mode for Compliance
- Step 4: Fix Autoplay Not Working in Elementor
- Step 5: Change Your WordPress Theme
- Step 6: Solve Plugin Conflict with Elementor
- Step 7: Disable JavaScript Deferral in Optimization Plugins
- Step 8: Create a YouTube Video Feed
First: Is Your YouTube Embed Broken or Just a Cache Issue?
Before changing your settings, determine if the video is truly broken and quick fixes that you can apply instantly.

Check the “Incognito” Test
Often, YouTube videos appear to be “not working” because of your logged-in administrator session or local browser cache.
- Open an Incognito/Private Window in your browser
- Visit your live URL (not the Elementor editor)
If the video works here, then your site and video embeds are fine.
You just need to clear your site’s cache (WP Rocket, LiteSpeed, etc.) and your browser cache.
Editor-Only Errors
If you see an error only inside the Elementor editor but the video works on the live site, this is a known session conflict.
Go to Elementor » Settings and click on the Advanced tab.
Look for the “Switch Editor Loader Method” option and Enable it.

This changes how Elementor loads the preview and usually bypasses the connection block.
In case your video embeds still don’t work after this, you can move on to our full guide below.
How to Fix YouTube Videos Not Working in Elementor
We’ll go through the different steps you can take to fix YouTube videos on your Elementor website.
Step 1: Update Your Version of Elementor
If you’re not using the latest version of Elementor, some features like the video widget might not work properly on your website.
To solve this, you can just update your version of Elementor.
First, navigate to the Plugins » Installed Plugins menu from your WordPress dashboard and look for the Elementor plugin on the list.
If there’s a notice that asks you to update the plugin, click on the Update Now button.

Wait a few seconds for the plugin to update and you can check if your video is playing or not on Elementor.
As a bonus, you can also click on the Enable auto-updates button to always have the latest version of this plugin.

If you’re still facing issues, you can move on to step 2 and try changing your website’s theme.
To learn more, you can look at this guide on how to update WordPress plugins.
Step 2: Check for Self-Hosted Source Errors
A common reason for a blank video player is selecting the wrong source in the Elementor widget.
If this is set to “Self-Hosted” while using a YouTube link, the video will not load.
First, open your page in Elementor and click on the video widget to see its settings.
Check the Source dropdown on the left panel.
- YouTube: Use this if you are pasting a link from a YouTube channel.
- Self-Hosted: Use this only if you have uploaded a video file (like an MP4) directly to your WordPress Media Library.

If you have a YouTube link but the source is set to Self-Hosted, change it back to YouTube.
If you want to host the video yourself to avoid YouTube’s player branding, upload the file to your site and ensure Self-Hosted is selected.
Once the source matches your video type, click the Update button to save your changes.
Step 3: Enable YouTube Privacy Mode for Compliance
If your YouTube video is blocked by a browser extension or a local privacy firewall, enabling Privacy Mode can often restore the connection.
To enable this, click on your Video widget in the Elementor editor and scroll down on the left panel.
Find the toggle labeled Privacy Mode and switch it to Yes.

This setting tells YouTube not to store visitor information unless they actively play the video.
Step 4: Fix Autoplay Not Working in Elementor
Since 2018, most modern browsers (Chrome, Safari, and Firefox) block videos from playing automatically to prevent intrusive audio.
To get autoplay working again, you must follow the “Muted Autoplay” rule.
First, click on your video widget and go to the Video Options tab.
Under Video Options, ensure Autoplay is toggled to Yes.
Then, toggle the Mute to Yes as well.

With that, your video should be autoplaying on mute when visitors open this post or page.
Step 5: Change Your WordPress Theme
Some themes are not compatible with the Elementor page builder, which can lead to video errors on your site.
The solution? You can simply switch to one of the default WordPress themes and then test your videos.
First, open your WordPress dashboard and then navigate to the Appearance » Themes menu.

Here, look for a default WordPress theme like Twenty Twenty-Two and hover your mouse over it.
Now click on the Activate button to switch your theme.

With that, you can go ahead and see if your WordPress Elementor videos are working correctly.
Step 6: Solve Plugin Conflict with Elementor
A common reason why your YouTube video is not playing in Elementor might be due to conflicts with your other plugins.
To deal with this, you can open the Plugins » Installed Plugins menu from your WordPress dashboard.

Now, click on the check box on the top-left to select all the plugins on your site at once.

Once you do that, use the drop-down menu above the check box to select the Deactivate option.

You can then click on the Apply button to the right to deactivate all the plugins on your website.

Now that all of your plugins are inactive, look for Elementor on the list and then click on the Activate button.

After that, you can go ahead and check if your YouTube video works properly. If you’re still facing the same error, you can skip to the final section.
If this solves your problem, you can activate the remaining plugins one by one to find which one is causing the problem.
Once you find the conflicting plugin, you have 3 options to choose from:
- Switch to another page builder plugin
- Remove the plugin that’s not compatible with Elementor
- Use another way to display YouTube videos
Just go to step 4 to learn how to embed YouTube videos on your site while keeping all of your WordPress plugins.
Resolve Slider Revolution Script Conflicts
If you have Slider Revolution installed, it may be preventing Elementor’s YouTube widget from loading.
This happens because Slider Revolution often “forces” its own version of the YouTube API onto the entire page, which creates a conflict with Elementor’s scripts.

To test and fix this, follow these steps:
- Navigate to Slider Revolution » Globals from your WordPress sidebar.
- Look for the setting labeled “Include libraries globally” or “List of pages to include libraries”.
- Turn OFF the “Include libraries globally” option.
- Alternatively, ensure “Put JS to Footer” is enabled.
Step 7: Disable JavaScript Deferral in Optimization Plugins
If you use optimization plugins like LiteSpeed Cache or WP Rocket, your YouTube videos might not load.
This happens because the scripts required to play them are being delayed, and it’s pretty easy to fix.
You just need to exclude Elementor’s video scripts from being deferred.
For LiteSpeed Cache Users:
Navigate to LiteSpeed Cache » Page Optimization and click on the JS Settings tab.

Look for the JS Defer option and set it to Off.
Now click on Save and open your website again to see if your video appears.

To keep the feature active while fixing the video, click on the Tuning tab at the top.
Look for the JS Excludes option here and add the following to the list:
elementor/assets/lib/video-youtube/video-youtube.js
[www.youtube.com/iframe_api](https://www.youtube.com/iframe_api)
Now save and clear your cache before opening your website to check on your video embeds.
If you’re using WP Rocket, it’s a similar process as well.
Go to Settings » WP Rocket » File Optimization to open the plugin settings.
From here, disable the Delay JavaScript Execution feature.
Once you’ve updated these settings, clear your website cache and refresh your page to see if your videos work.
Step 8: Create a YouTube Video Feed
If the above steps haven’t solved your problem, there’s an easy solution that you can use.
With YouTube Feed Pro, you can display a feed of YouTube videos on your site in just a few clicks.

As the best YouTube feed plugin in the market, it comes with a simple guided flow that’ll take you through the whole process of creating, customizing, and embedding YouTube feeds.
That way, you can engage your visitors with content from YouTube channels, playlists, favorites list, live streams, and much more.

Plus, YouTube Feed Pro will automatically copy the design of your Elementor website, so your videos will perfectly match your branding.
Want more control over the design of your YouTube video feed?
You also get a live editor that you can use to change the feed layout, color scheme, button design, number of videos, and much more — no need to touch a single line of code.

As you can see, YouTube Feed Pro makes it easier than ever to grow your YouTube following and engage your visitors.
With that, let’s see how you can use this plugin to fix YouTube videos not working on your Elementor site.
Step 1: Install Feeds for YouTube Pro Plugin
First, get your copy of Feeds for YouTube Pro here. Once you have the plugin, install and activate it on your site.
Not sure how? You can just check out this step-by-step guide on how to install WordPress plugins.
After the plugin is ready, you can move on to step 2 and create a new YouTube feed.
Step 2: Create a YouTube Video Feed
With this plugin, you can create a feed of YouTube videos in just a few clicks.
First, open the YouTube Feed » All Feeds menu from your WordPress dashboard and then click on Add New.

Next, you can choose the type of YouTube feed that you want to embed. You have 6 options to choose from here:
- Channel: Choose a YouTube channel and show its videos
- Playlist: Embed videos from a YouTube a playlist
- Favorites: Display the videos that you’ve marked as your favorites
- Search: Show YouTube search results on your website
- Live streams: Embed YouTube live-streaming videos using your new feed
- Single videos: Select specific videos and then show them on your site
To continue, select the YouTube feed type you prefer and then click on Next.

For our example, we’ll use a YouTube playlist feed.
Now that you’ve created a YouTube feed, you move on to the next step and connect your account as well.
Step 3: Connect Your YouTube Account
By connecting your YouTube account, your new feed can display YouTube videos on your website.
And the best way to do that is to connect your YouTube API key.
Don’t have an API key yet? You can follow this beginner-friendly guide on creating a YouTube API Key
Once you have the key, copy it and then paste it into your popup here.
Finally, click on Add to connect your YouTube account.

Next, you can choose the source for your YouTube feed. Depending on the feed type you picked, this can be a YouTube channel, playlist, favorites list, search term, and more.
We’ll use a YouTube playlist for our example.
First, open the playlist on your browser and then copy the code at the end of the URL.
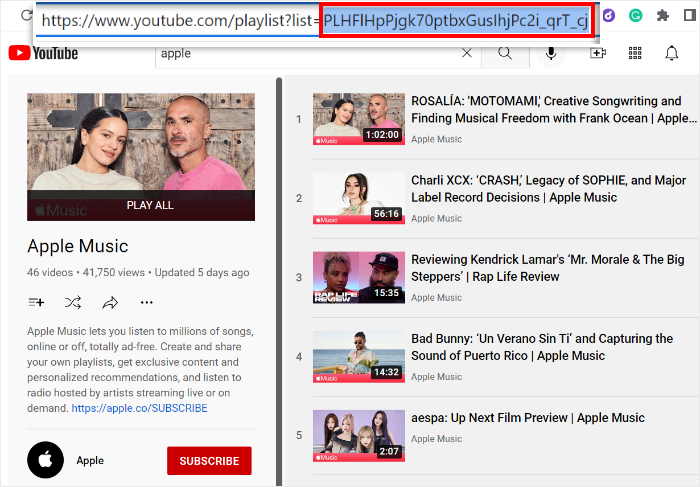
Once you do that, open your WordPress site once again and then paste the code into the Playlist ID field.
Then, click on the Next button to finish adding your source.

As you can see, YouTube Feed Pro makes it easy to create a new video feed and then connect it to your YouTube account.
In step 4, you can customize how this YouTube feed looks on your Elementor website.
Step 4: Customize Your YouTube Feed
YouTube Feed Pro comes with a collection of feed templates that you can use to import a beautiful design for your feed.
You can select your feed template from these 8 options:
- Default
- Carousel
- Cards
- List
- Gallery
- Latest Video
- Showcase Carousel
- Widget
Once you choose the template, click on Next to continue.

After you do that, you can use the live feed editor to customize your feed in detail.
Towards the left, you can see the options to set your feed layout, colors, header style, number of videos, subscribe button, and more.

Towards the right, you can find the real-time preview of your YouTube Elementor feed.
If you want to start the customization, click on the Feed Layout option on the left.

Here, you can choose from 4 different layouts for your YouTube feed: Grid, Gallery, List, and Carousel.
Let’s look at each of these layouts below.

If you want to show lots of YouTube videos on your Elementor site, you can select the grid option.
This will show the YouTube videos in rows and columns like this:

Next, you have the gallery layout, which puts the focus on a single YouTube video while showing smaller thumbnails of other videos.
It’s a great way to highlight a specific video on your site.

Want to show large YouTube videos in a single column?
You can just use the list layout in that case.

You can also turn your YouTube videos into a YouTube slideshow with the carousel layout.
This can give your visitors another way to interact with your website.

After you select the feed layout, click on Save to confirm your changes.
You can then click on the Customize button to continue the customization.

Using YouTube Feed Pro, you can also set the colors of your YouTube feed.
To do that, click on the Color Scheme option on the left.

You can now choose from 4 different color scheme options for your YouTube feed:
- Inherit from Theme: Copy the colors of your Elementor website
- Light: Pick a light background and dark font for your feed
- Dark: Show a dark background along with light-colored font instead
- Custom: Manually pick all the colors yourself

After you choose your color scheme, click on the Save button at the top.
Using the remaining options here, you can set your header design, load more button, subscribe button, number of videos, and much more.
Finally, click on Save once you’re happy with the design of your YouTube feed.
Now, you can move on to the final step and display YouTube videos on your site.
Step 5: Embed YouTube Feed on Elementor
In this step, you can start embedding your YouTube feed directly from the live feed editor.
First, click on the Embed button to open the feed’s embed options.

Now, you can choose from different ways to embed your YouTube video feed.
To continue, click on the Copy button here.

Now, you can choose where you want to embed your YouTube feed’s embed code. You can use a WordPress page, post, sidebar or footer.
We’ll use a WordPress page for our tutorial here.
For that, navigate to the Pages » Add New menu from your dashboard.
After that, click on the Edit with Elementor button at the top.

Doing that will open the page in the Elementor page builder. From here, you can use an Elementor widget to embed your YouTube feed.
Using the search bar on the left, look for the “shortcode” widget.

You can then find the Shortcode widget in the search results below.
Now, drag the widget and then drop it on the page on the right.

Once you do that, just paste your shortcode into the Enter your shortcode field on the left.
Doing that will embed your YouTube feed on this Elementor page.

After that, click on the Publish button, and your YouTube video feed will now be online.
You can now open your website to see how your YouTube videos look.

And there you have it!
Now you know how to fix YouTube videos that are not playing in Elementor. You can then keep visitors engaged with relevant video content.
If you want to add videos to your site, the best option in the market is YouTube Feed Pro. You can create, customize, and embed beautiful YouTube feeds in just a few simple clicks.
Ready to add YouTube feeds to your site? Get YouTube Feed Pro today!
Looking for more ways to build a powerful website? Check out our list of the best WordPress website builders.
If you thought this was helpful, why not follow us on Facebook and Twitter for more informative social media tips and tricks?


