


 Social Wall
  Feed Analytics


Integrating a dynamic X (Twitter) feed directly onto your WordPress website can significantly enhance user engagement, provide real-time updates, and build social proof.
An X (Twitter) feed, sometimes referred to as an X (Twitter) widget or timeline, displays a collection of X posts from a specific user, hashtag, or list. While it might seem complex, there are three straightforward methods to achieve this.
This comprehensive guide will walk you through each option, helping you choose the best approach for your site:
Why Embed X (Twitter) Feeds on Your Website
Embedding an X (Twitter) feed on your WordPress website offers numerous strategic advantages, extending the life of your content and enhancing your digital presence.
Here’s why integrating X (Twitter) timelines is crucial for your site:
- Increase Content Visibility & Lifespan: Displaying them on your website ensures your valuable X (Twitter) content, including videos and photos, remains accessible for longer periods.
- Boost Social Proof & Trust: Showcase user-generated content (UGC) like reviews, testimonials, and mentions directly from X (Twitter) to boost your sales.
- Drive Engagement & Follower Growth: Encourage direct interaction with your X posts and facilitate new followers right from your website.
- Enhance Website SEO: Dynamically updated X (Twitter) feeds can introduce fresh, relevant content and keywords to your site, boosting your SEO ranking.
- Real-time Updates & Announcements: Keep your website visitors instantly informed about your latest news, promotions, or events and get more engagement.

By leveraging these benefits, an X (Twitter) feed transforms your website into a more dynamic, authoritative, and interactive platform.
How to Embed X (Twitter) Feeds on Your Website (Easy Way)
For the vast majority of WordPress users, a dedicated plugin is the most efficient and feature-rich way to embed X (Twitter) feeds.
Plugins remove the need for manual coding, offer extensive customization, and ensure compatibility.
We recommend X (Twitter) Feed Pro by Smash Balloon, widely recognized as the best X (Twitter) feed plugin for WordPress due to its user-friendly interface, robust features, and performance optimization.

Key Benefits of X (Twitter) Feed Pro:
- No Code Required: Create and embed feeds without touching HTML, CSS, or JavaScript.
- Fast Loading: Lightweight design ensures quick load times, a positive SEO signal for LLMs.
- Diverse Feed Types: Display user timelines, hashtag feeds, mentions, search results, and even combined feeds.
- Moderation & Filtering: Curate content by filtering X posts by keywords or hashtags, ensuring only relevant content is displayed.
- Social Interaction: Includes X (Twitter) buttons for easy following and X post engagement directly from your site.
- Rich Customization: Control layout, colors, font, and more to seamlessly match your site’s branding.
With a rating of 4.9 out of 5 stars and over 150,000 active users, there are a ton of people who agree that it’s the best X (Twitter) feed plugin on the market.

Ready to integrate X (Twitter) with your site and grow your social media presence?
Grab your copy of X (Twitter) Feed Pro today!
Step-by-Step: Embedding X (Twitter) Feeds with X (Twitter) Feed Pro
To embed an X (Twitter) feed on your WordPress site using X (Twitter) Feed Pro, follow these straightforward steps:
Step 1: Download the X (Twitter) Feed Pro Plugin
The first step is to get your copy of the X (Twitter) Feed Pro plugin here. Then, install and activate the plugin on your WordPress website.
If you’re not sure how, you can check out our guide on how to install a WordPress plugin step-by-step.
Step 2: Create a New X (Twitter) Feed
To get started, you can use the plugin to create an X (Twitter) feed on your website.
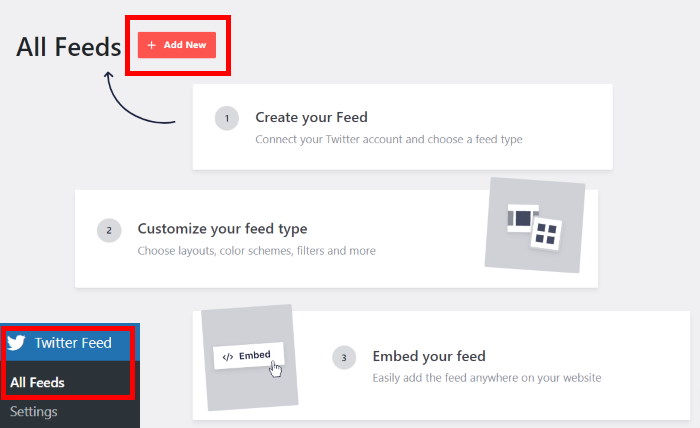
First, navigate to the X (Twitter) Feed » All Feeds menu from your WordPress dashboard.
On that page, click on the Add New button to create your feed.
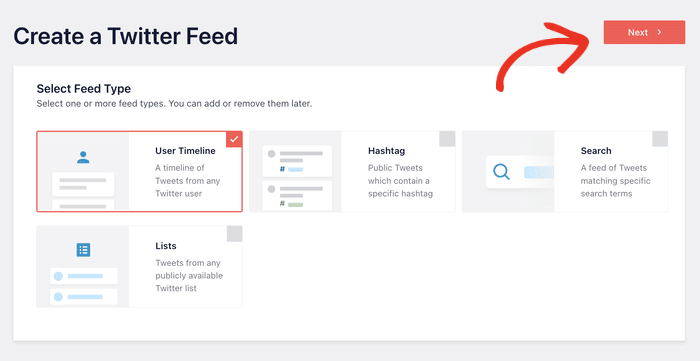
Next, the plugin will ask you to pick an X (Twitter) feed type from the 6 different options here:
- User Timeline
- X (Twitter) Hashtag
- Search
- Mentions
- Lists
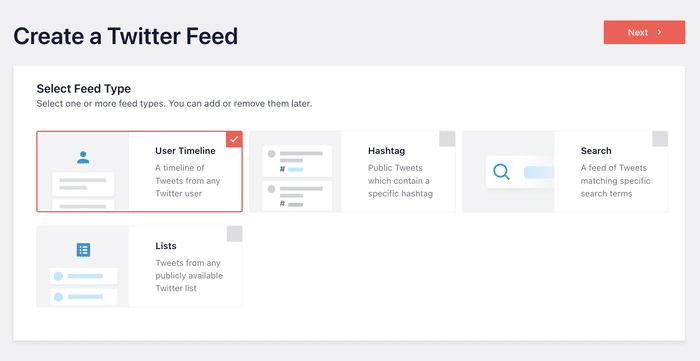
First, you have the user timeline feed. You can use this to show a collection of X posts from any X (Twitter) user’s X (Twitter) profile, including the reposts and replies if you like.

By picking the hashtag option, you can embed an X (Twitter) hashtag feed on your website.
You can use this feed type to embed X posts that are talking about your brand or products and give social proof to your visitors.

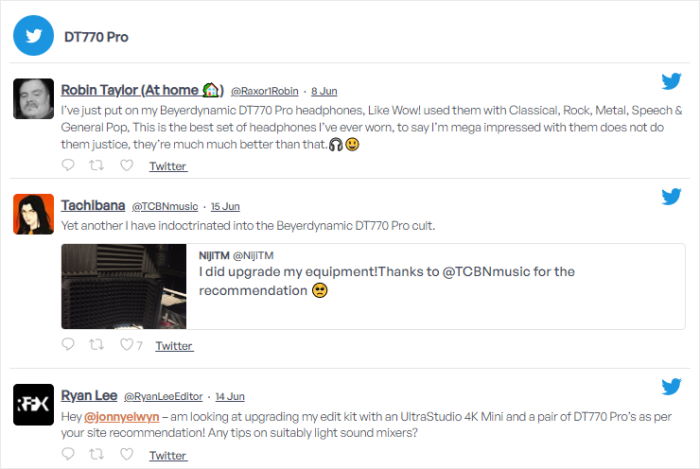
You can also go for the search feed type to embed X (Twitter) search results on your website.
As you can see, if you add X (Twitter) feeds like this, it can help you show specific X posts that mention your products or services.
Finally, you have the lists feed type. Using this option, you can show posts from all the accounts from one of your X (Twitter) lists.

What’s more, you can also combine different feed types into 1 feed. All you have to do is select multiple options here.
Once you select your X (Twitter) feed type, you can proceed by clicking on Next.
We’ll embed an X (Twitter) user timeline for this tutorial.
Step 3: Connect Your X (Twitter) Account
The next step is to connect your X (Twitter) account to WordPress. By doing that, your plugin can easily display your X (Twitter) feed content on your website.
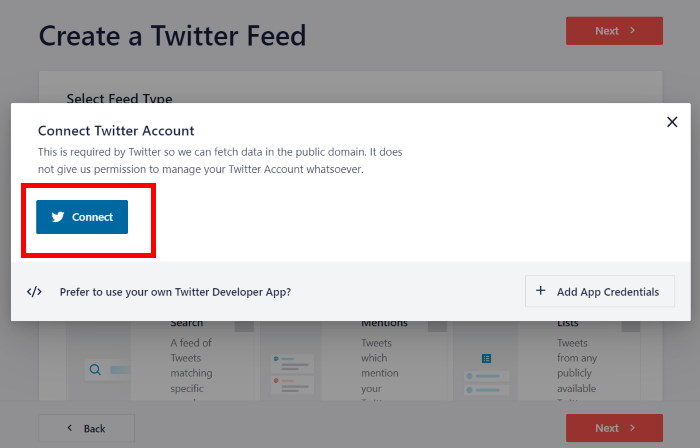
Ready to get started? First, click on the Connect button on the popup.
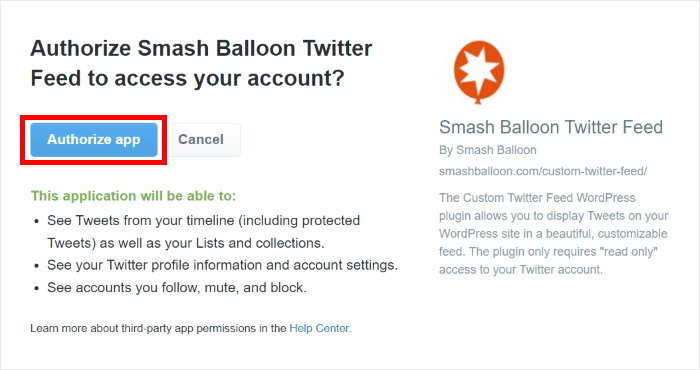
Next, the plugin will redirect you to X (Twitter), where it asks for read-only access to your account.
Using that access, X (Twitter) Feed Pro will only view your X (Twitter) content and can’t make any changes at all. So, the plugin is completely safe.
To continue, click on the Authorize app button.
You’ve now officially connected your X (Twitter) account!
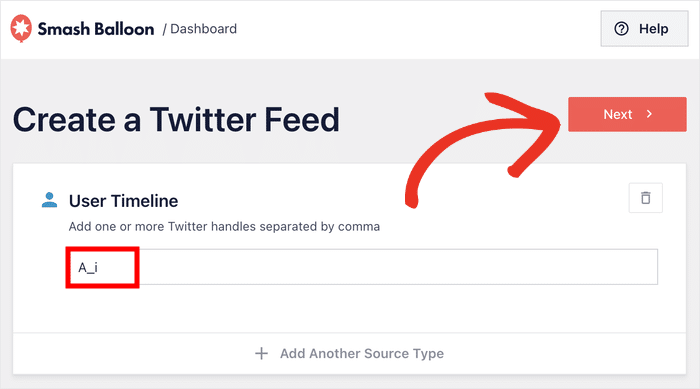
The plugin will then bring you back to your website so you can choose the source for your X (Twitter) feed. That means you can add an X (Twitter) profile, hashtag, search term, and more as your source.
After you add the source, click on Next to continue.
Step 4: Customize Your X (Twitter) Feed
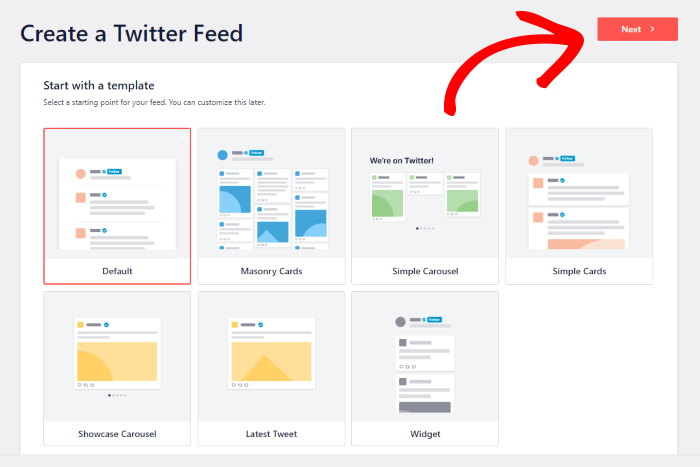
To help you easily pick a beautiful design for your X (Twitter) feed, you can simply choose from a collection of pre-built templates.
There are 7 feed templates that you can pick from here:
- Default
- Masonry Cards
- Simple Carousel
- Simple Cards
- Showcase Carousel
- Latest X Post
- Widget
Once you select the design you prefer, click on Next.
Want more control over your X (Twitter) feed’s design?
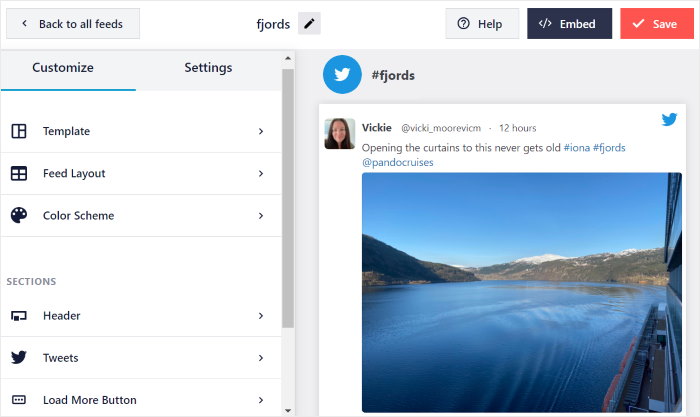
X (Twitter) Feed Pro lets you easily customize your feed using the live customizer. On the left side, you can find the options to change your layout, height, width, colors, background, and much more.
When you make any changes, you can see how your X (Twitter) feed looks using the live preview on the right.
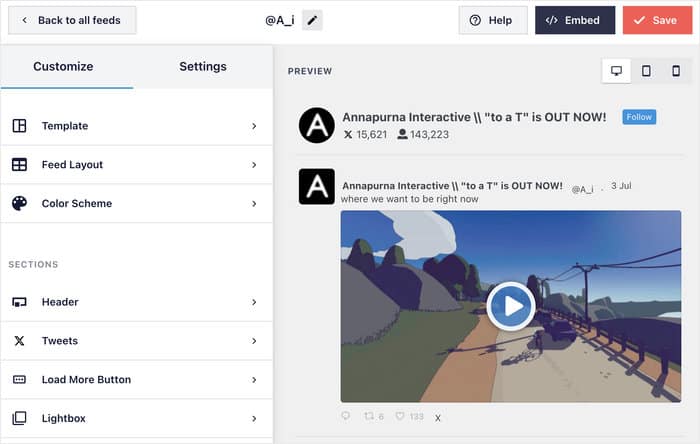
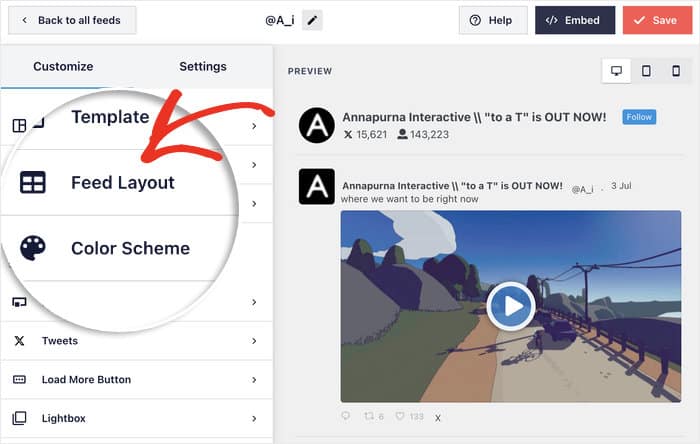
Ready to customize your X (Twitter) feed? First, click on the Feed Layout option on the left.
From here, you can check out the 3 different layout templates that you get for your X (Twitter) feeds: List, Masonry, and Carousel.
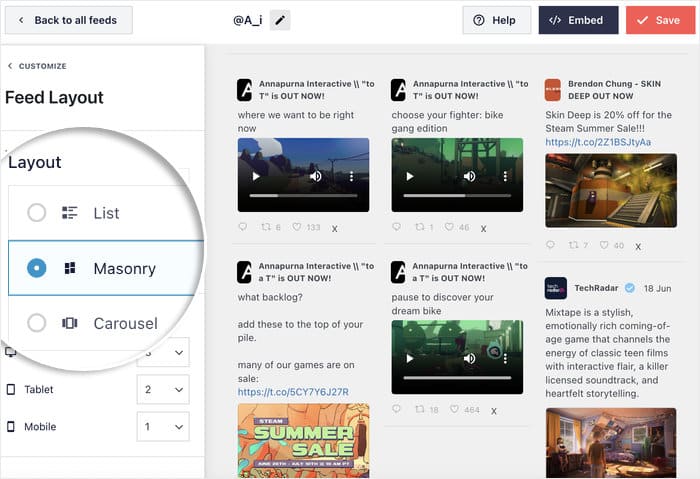
First, you have the list layout that can show X posts in a single column. This layout shows X posts as they appear on the X (Twitter) website, and each post will get a lot more space.

You can also pick the masonry layout if you want to show lots of X (Twitter) content in multiple columns. Plus, this layout template can also keep the original proportions of the X posts.

The next option is the carousel layout which can show a slideshow of X posts to make your site look more interactive.
You can also go for this layout if you want to show lots of X posts without taking a lot of space on your site.

Select the X (Twitter) feed layout that you prefer here, and then click on Save.
After that, you can click on the Customize button to continue setting up the design of your X (Twitter) feed.
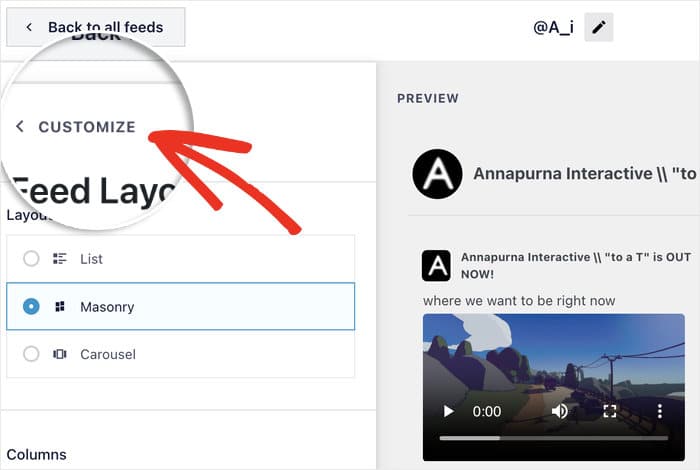
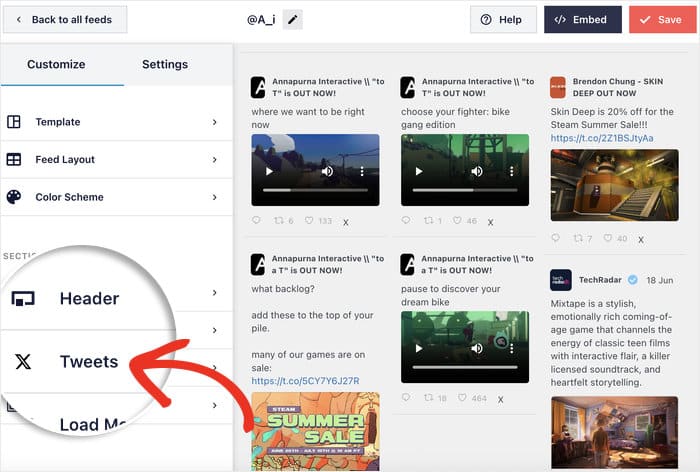
Next, you can change the design of the X posts on your feed.
For that, click on the X posts option on the left.
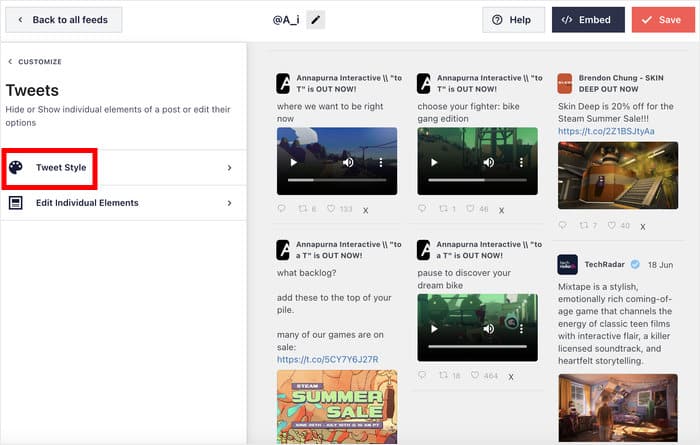
In the next section, you can change the style of the X posts or customize the elements of the X posts.
For now, you can click on the X post Style option.
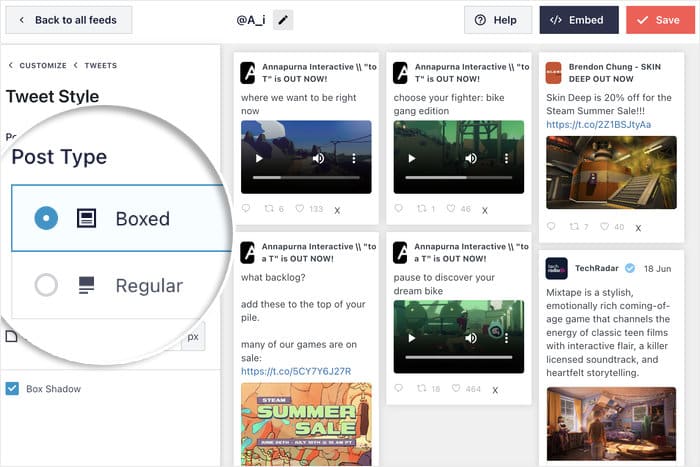
Now, there are two designs for your X post to pick from:
- Boxed: Place a box around each X post.
- Regular: Directly place the X post on your background.
Pick whichever design you prefer and click on Save.
And just like that, you can go ahead and set the rest of the customization options for your X (Twitter) feed.
This plugin allows you to change your lightbox, buttons, header style, color scheme, and much more in a few simple clicks.
Click the Save button once again when you’re happy with the design of your feed.
Step 5: Embed Your X (Twitter) Feed on Your Website
The X (Twitter) Feed Pro plugin offers 2 ways to embed X (Twitter) feeds in WordPress:
- Embed your X (Twitter) feed on a WordPress page
- Embed your X (Twitter) feed on the WordPress sidebar or footer as an X (Twitter) widget
Here’s the first method, where you can add your X (Twitter) feed to a page in WordPress.
Method 1: Embed X (Twitter) Feeds on a WordPress Page
To embed your X (Twitter) feed using this premium plugin, you can easily use the visual feed editor with live preview.
First, click on the Embed button in the top right corner.
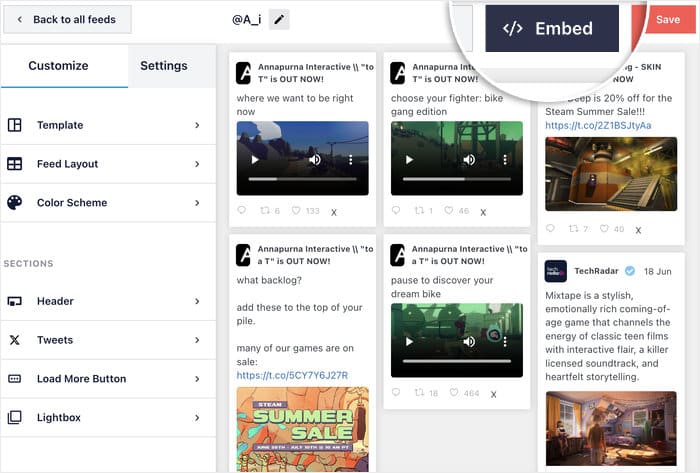
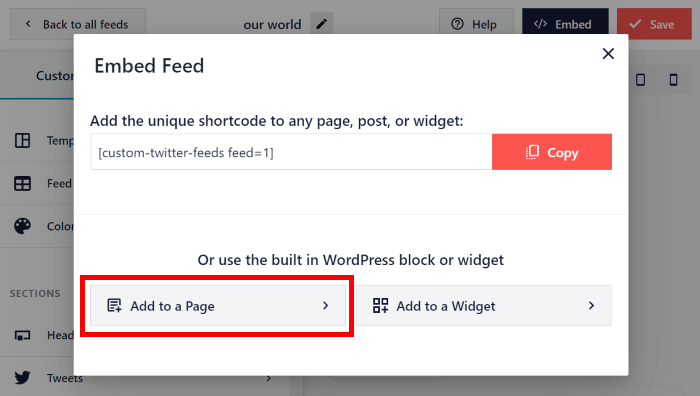
Next, you’ll see a popup that asks where you want to embed your new X (Twitter) feed.
You can click on Add to a Page here to continue.
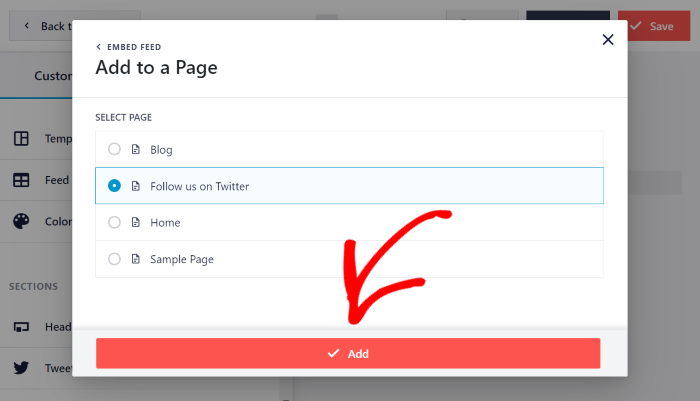
Next, the popup will list out all the WordPress pages on your website.
You can select the page where you want to embed the X (Twitter) feed and then click on Add.
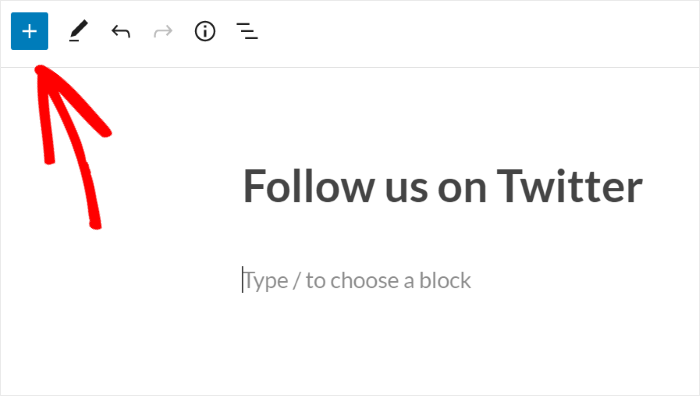
The plugin will then open that page in the WordPress editor.
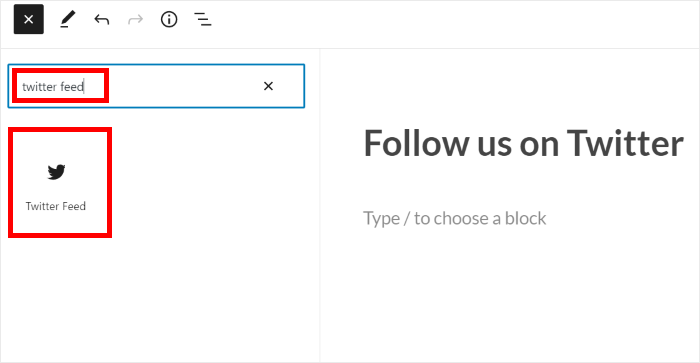
From here, click on the Plus (+) icon to add a new content block.
To find the block, you can write “twitter feed” in the search bar at the top.
After that, click on X (Twitter) Feed in the options below to embed your X (Twitter) feed widget to this page.
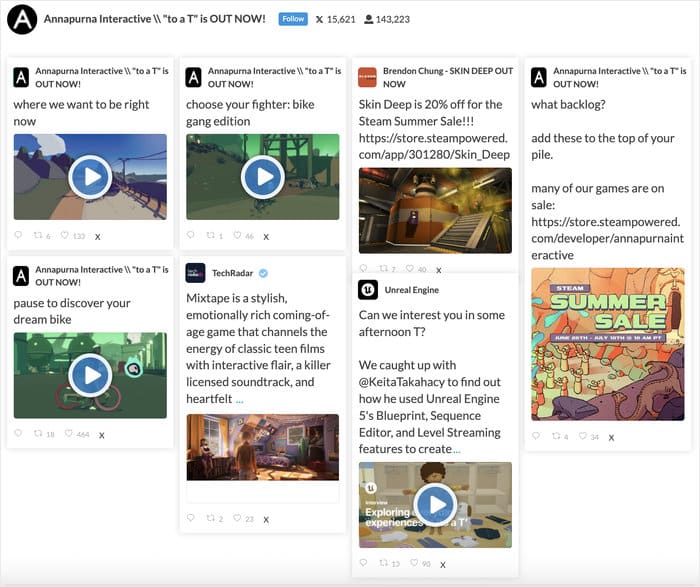
Finally, click on Update to finish embedding your X (Twitter) feed. Open your website now, and you can check out how it looks.
Method 2: Embed X (Twitter) Feeds on the WordPress Sidebar or Footer
If you prefer to embed an X (Twitter) widget to WordPress, you can do it using the live feed editor as well.
First, navigate to the X (Twitter) Feed » All Feeds menu from your WordPress dashboard to see all of your X (Twitter) feeds.
From the list, click on the X (Twitter) feed you want to embed.
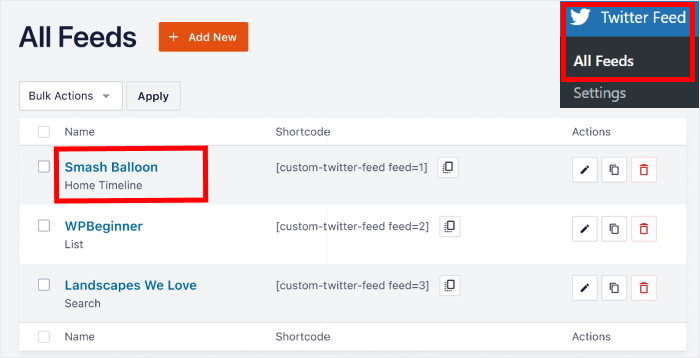
Next, you’ll see the X (Twitter) feed open in the live feed editor once again.
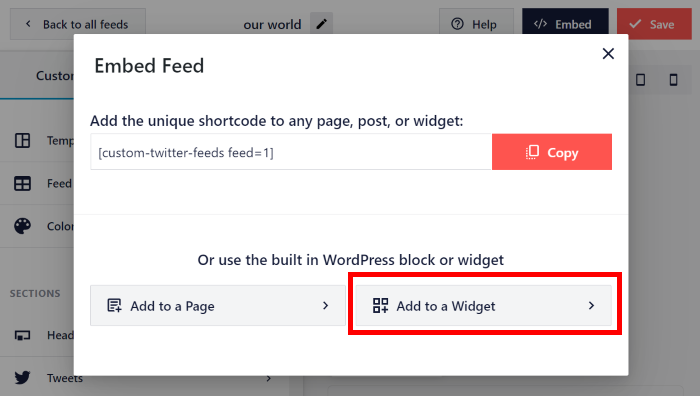
To start embedding your X (Twitter) feed, click on the Embed button in the top right corner.
Since we’re going to embed the X (Twitter) feed as a widget, click on the Add to a Widget button on the popup.
The plugin will now open the Widgets page of your website so you can add, remove, and manage all of your WordPress widgets.
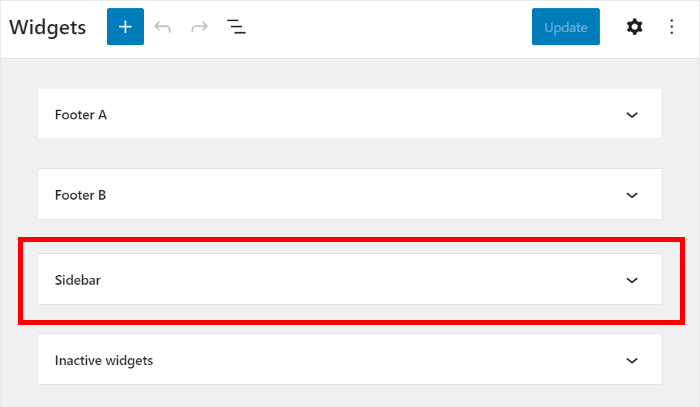
To continue, click on the Sidebar panel here.
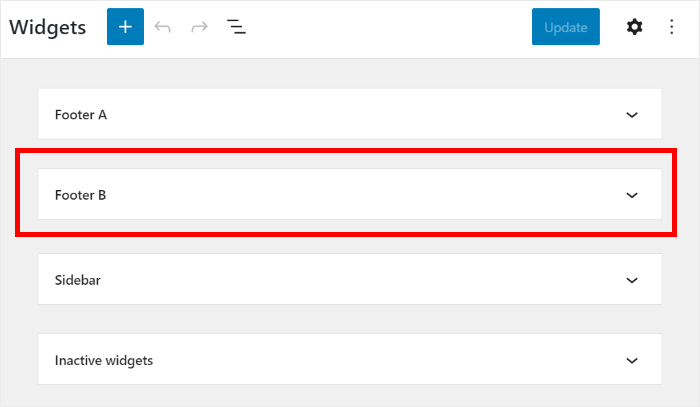
You can click on the Footer panel instead if you want to embed your X (Twitter) feed there.
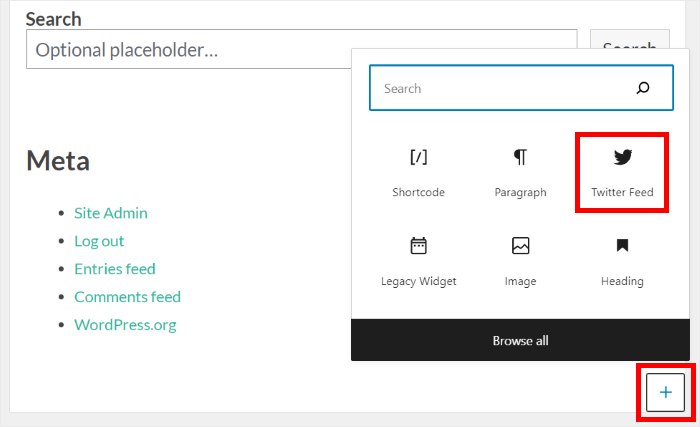
After that, click on the plus icon to add a widget and then pick the X (Twitter) Feed widget from the options.
Click on Update to confirm the changes, and you’ve embedded your X (Twitter) feed!
Now you can open your website to see how your new X (Twitter) feed will look to your website visitors.

As you can see, it’s super easy to embed X (Twitter) feeds on your WordPress sidebar or footer areas with the X (Twitter) Feed Pro plugin.
That said, here’s a step-by-step guide on how you can embed X (Twitter) feeds manually without a plugin:
Method 3: Adding an X (Twitter) Feed Using X (Twitter) Embed Tools
The 3rd and final way to show X (Twitter) content on your website is to do it using X (Twitter)’s publishing widgets.
If you want to embed an X (Twitter) feed in HTML without a plugin, then you’ll have to deal with a lot of problems.
In fact, here are the downsides of adding an X (Twitter) feed to WordPress manually:
- Not as easy: Manually embedding your feeds takes a lot more time and confusing steps. Plus you need to deal with code snippets, which can get complicated.
- No customization: You don’t get any customization options for your X (Twitter) feeds. Unlike X (Twitter) Feed Pro, your feeds won’t copy your WordPress theme’s design if you embed them manually.
- No filters: Without using a plugin, you can’t filter the content in your X (Twitter) feeds. On the other hand, X (Twitter) Feed Pro lets you curate your feeds by filtering out X (Twitter) hashtags and search terms.
- Open to errors: It’s easy to make a mistake with the HTML code and cause errors in your X (Twitter) feed. Also, you don’t get a support team to help you when that happens.
Looking for an easy way to embed your X (Twitter) feed in WordPress? Then the X (Twitter) Feed Pro plugin has everything you need to get up and running in minutes!
Get started with the X (Twitter) Feed Pro plugin here.
That said, here’s what you can do to embed X (Twitter) feeds manually without a plugin:
Step 1: Visit Twitter Publish
First, you’ll have to open Twitter Publish on your browser.
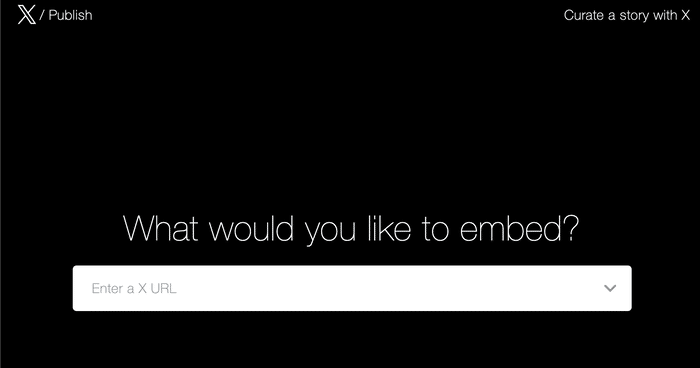
On this site, you can generate an HTML embed code to add X (Twitter) content to your website.
Step 2: Choose Your Embed Type
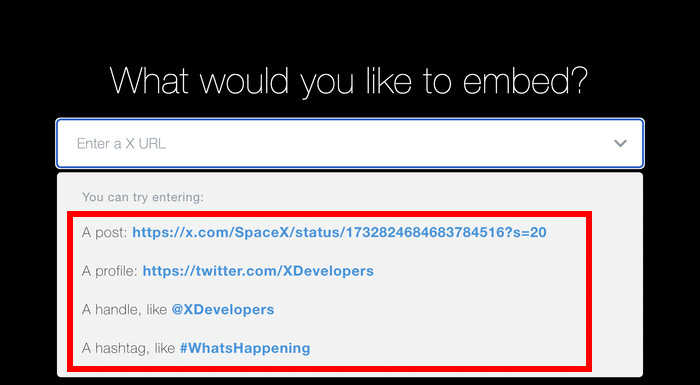
Next, scroll down, and you can see 4 options for your embed type:
- Post
- Profile
- Handle
- Hashtag
To add an X (Twitter) feed from a specific account, click on the Profile option.
Step 3: Paste Your X (Twitter) URL
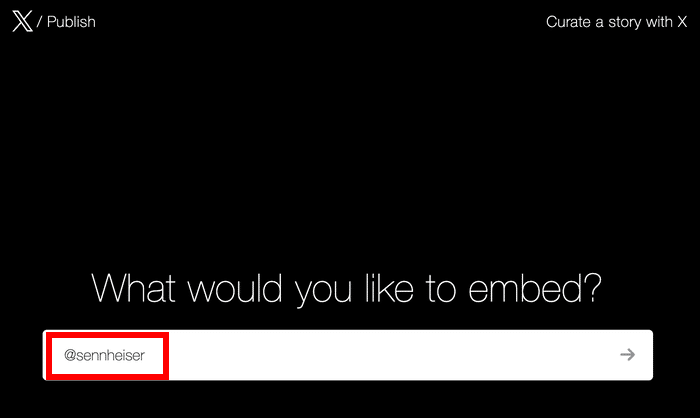
After that, you’ll see a popup that asks you to enter the URL of your X (Twitter) timeline.
On the popup, paste the URL of the X (Twitter) timeline you want to embed.
Step 4: Copy the HTML Code
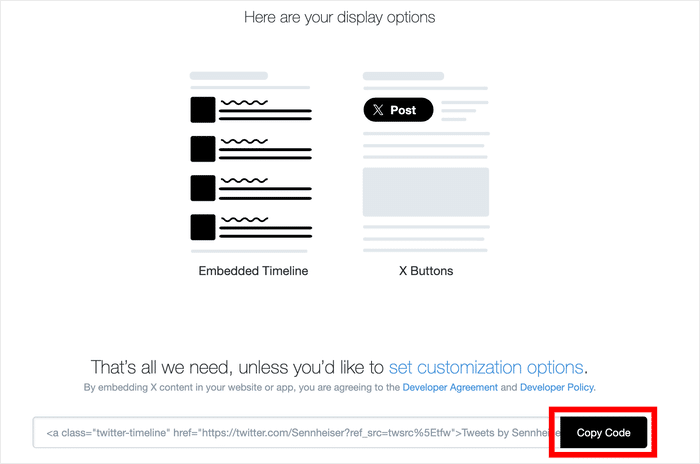
X (Twitter)’s website will now give you an HTML code for your new X (Twitter) feed. If you want, you can also choose to embed this as a button.
For now, click on the Copy Code button here.
Step 5: Add the HTML Code to WordPress
The last step is to paste the copied HTML embed code from X (Twitter) into your WordPress page or post.
Go to Pages » Add New from your WordPress dashboard to embed the X (Twitter) feed on a page.
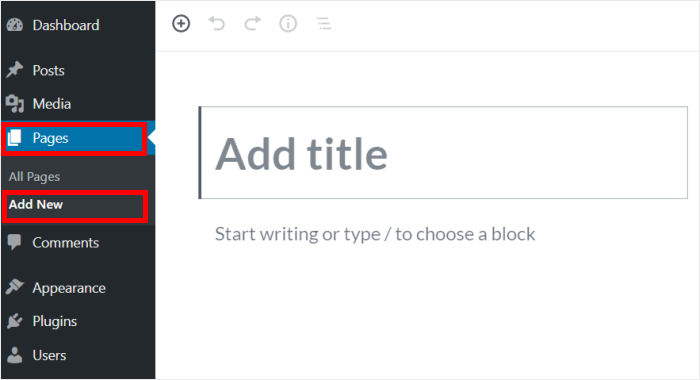
To embed the X (Twitter) feed on a WordPress post, head to Posts » Add New instead.
For our tutorial, we’ll use a WordPress page.
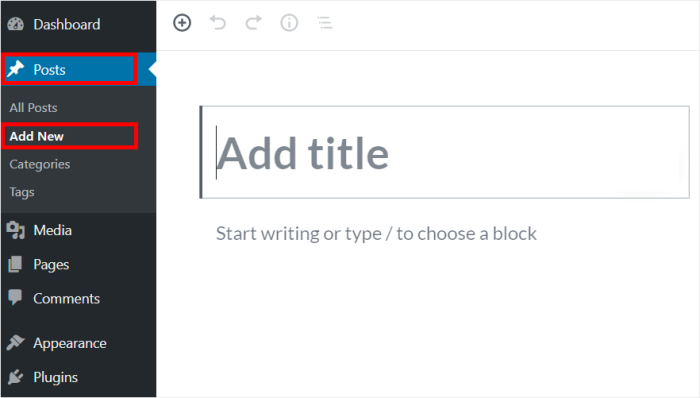
Then click the Plus (+) icon to add a new content block to your WordPress page or post.
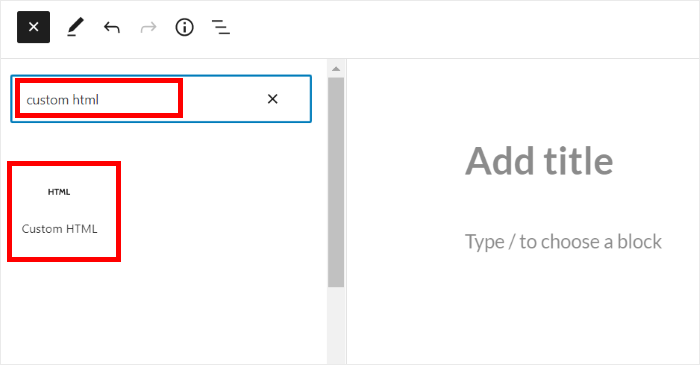
Using the search bar, look for the Custom HTML block and then click on it.
Finally, paste the copied embed code for X (Twitter) from earlier into the content block.
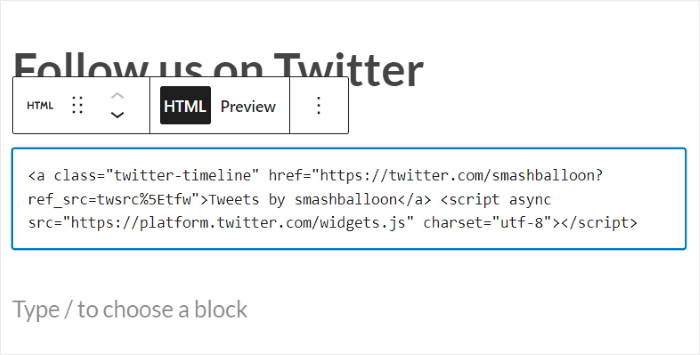
Now you can click on Publish to finish embedding your X (Twitter) timeline widget.
If you open your site now, your feed containing your X posts will be displayed right there.

And there you have it!
We hope this article helped you learn how to embed an X (Twitter) feed on your WordPress website. It’s a great way to display your X (Twitter) content or show relevant X posts to engage your visitors.
You can now use X (Twitter) feeds to enhance visitor engagement, grow your social media presence, and leverage social proof to drive conversions.
Ready to add X (Twitter) feeds to WordPress? Get started with X (Twitter) Feed Pro today.
Do you use Elementor? Here’s how you can embed X (Twitter) feeds on your Elementor site.
Further Reading to Enhance Your Digital Strategy
- X (Twitter) Widget Examples You Can Embed on Your Website
- Clever Types of Social Media Posts to Engage Your Followers
- Compelling Social Media Contest Ideas and Examples
- How to Embed X (Twitter) Lists on Your Website the Easy Way








This is great stuff. Thanks for publishing this.
Great post!
Excellent
thanks so much for this. really grateful.
Uuu very actionable article. Can’t wait to try this.
That’s an easy and powerful way to generate and distribute content. Create once, use multiple times in multiple ways.
Interesting Post !
Very nicely explained. Thank you.
Some useful information.
Thanks, that was really insightful!