Interested to know how to embed YouTube videos in your WordPress blog posts, homepage or widget-ready areas?
With around 92% of people using YouTube as their video streaming platform for research, it’s a smart social media marketing move to add YouTube videos to your website to boost visitor engagement and reach more viewers.
There are different ways to integrate YouTube content into your site, so it can be hard to know which method to pick, especially if you’re not familiar with WordPress.
Here at Smash Balloon, we created this YouTube video embed guide so we can use our 11-year personal experience with social media feeds to help you display YouTube videos.
By following our step-by-step guide, you can embed multiple YouTube videos and YouTube feeds on WordPress in just a few minutes. Yes, even if you’re a WordPress newbie!
How to Embed YouTube Video Feeds in WordPress (Best Way)
Tired of embedding single YouTube videos?
In this guide, we’ll teach you how to effortlessly embed YouTube video feeds on your WordPress site.
Usually, if you want to embed a feed of your YouTube videos without a plugin, you’ll need to hire a developer to help you.
That’s because manually embedding YouTube feeds in WordPress requires coding knowledge, which isn’t something every website owner has experience with.
But don’t worry.
There’s a better and easier way that lets you add engaging video feeds to your WordPress site in just a few clicks — use a WordPress YouTube plugin to embed YouTube video feeds on your website.
YouTube Feed Pro is the best YouTube feed plugin for WordPress that lets you create, customize and display YouTube feeds on your website — no coding needed, so perfect for WordPress beginners!

This WordPress YouTube feed plugin automatically inherits your site’s existing theme.
This means your YouTube feeds will look great right out of the box, with NO technical knowledge of CSS, HTML or other coding languages required.
YouTube Feed Pro also has a visual feed editor with tons of customization, layout, and styling options, so you can easily customize your YouTube video feeds to match your branding — simply by clicking!
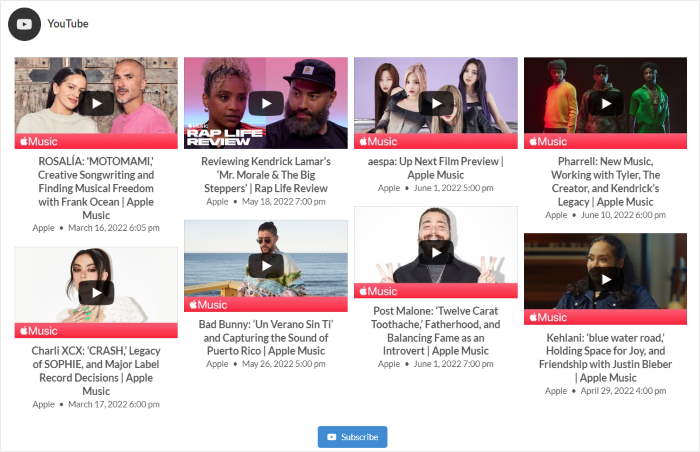
And it’s not just regular video feeds you can embed either. Since it extends the functionality of your site, YouTube Feed Pro also lets you:
- Combine feeds from multiple YouTube channels in a single feed
- Show a feed of current and future YouTube live streams so you won’t have to embed individual videos each time you go live
- Build customized video feeds using advanced YouTube search queries
You can also turn your feed’s video data into a custom post type, so your videos show up in your regular WordPress posts feed and site search.
The best part?
You can even use the plugin to change whether your embedded YouTube video autoplays or plays on click — even if you’re not tech-savvy.
We recommend the lazy loading feature, so YouTube Feed Pro will only load a video once the user clicks on it.
As you can see, YouTube Feed Pro lets you create, customize and embed related videos on your site even without knowledge on coding, HTML code or iFrame. It’s the quickest way for newbies to display their YouTube content on WordPress.
Showcase the power of embedded YouTube feeds when you get started with YouTube Feed Pro now!
Step-by-Step Tutorial on How to Embed YouTube Feeds
Now that you know why embedding YouTube video feeds in WordPress is easier with a plugin, let’s look at how to do it in a few steps below.
Step 1: Install and Activate YouTube Feed Pro on WordPress
To begin, get your copy of YouTube Feed Pro here and then install the plugin on your WordPress site.
Not sure how? You can check out this step-by-step guide to installing a WordPress plugin if you need some help.
Step 2: Create a New YouTube Feed
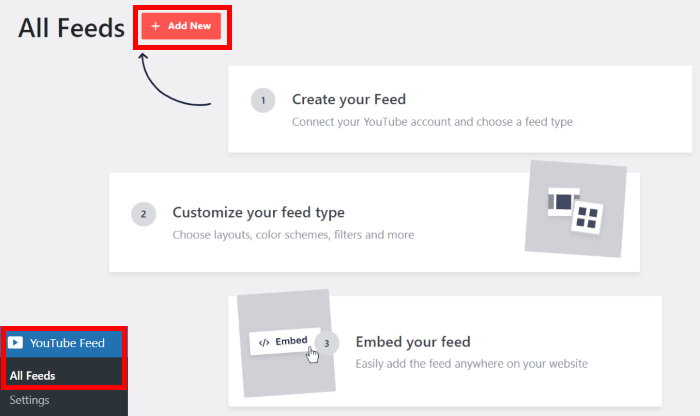
Once you’ve installed and activated YouTube Feed Pro, navigate to YouTube Feed » All Feeds menu and then create a new feed by clicking on the Add New button.
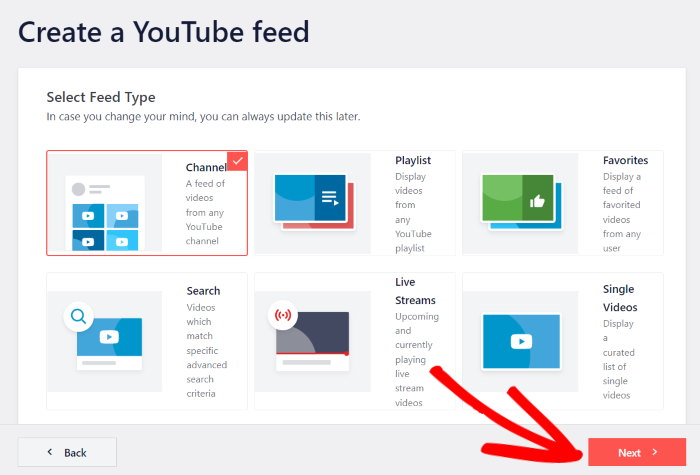
After that, you can choose the type of YouTube feed that you want to display in WordPress. With YouTube Feed Pro, you get a few feed options to pick from:
- Channel: Show multiple videos from a selected YouTube channel
- Playlist: Choose a YouTube playlist and show its videos on your site
- Search: Show a feed of videos that have specific search words or phrases
- Live Streams: Display ongoing and past live streams from a YouTube channel
- Single Videos: Show a feed of individually chosen videos
Choose your feed type here and then click on Next to continue.
For our example, we’ll use a Channel feed here.
Step 3: Add a Source for Your YouTube Feed
Next, you can add a source for your YouTube feed so that it can show YouTube videos on your WordPress site.
You can add your source by selecting any of the 2 options here:
- Add your API key
- Connect your YouTube account
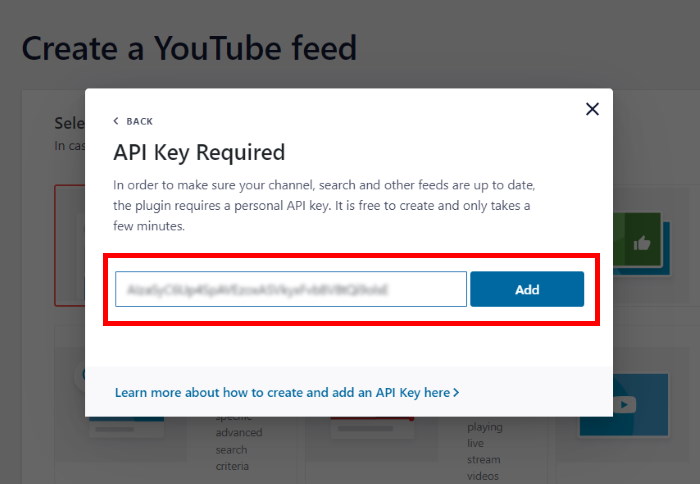
To get access to all the YouTube feed types available, you can click on the Add API Key option here.
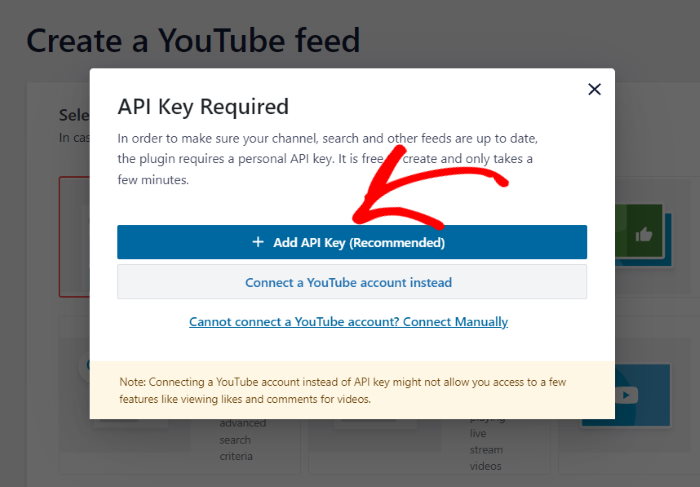
You can learn how to do that in this guide to creating and using YouTube APIs. Once you’ve followed the guide on creating your YouTube API, simply paste the API key into the popup and click on Add.
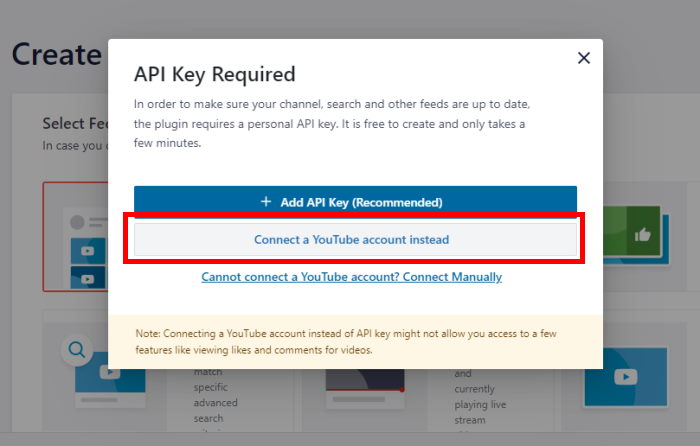
Or, you can click on the Connect a YouTube account instead button. This way, you can use your own YouTube account instead of creating an API key.
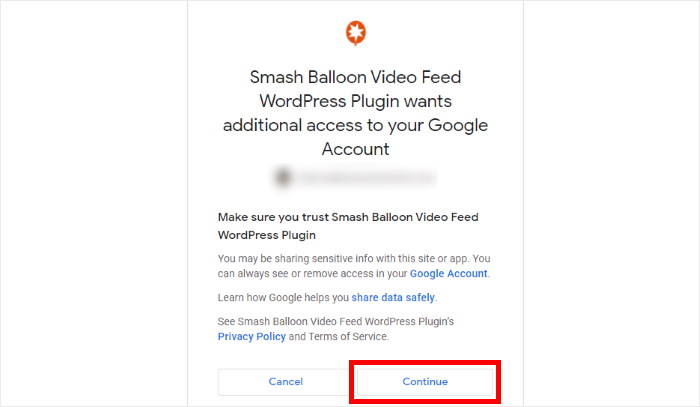
Next, the plugin will open YouTube and ask for read-only safe access to your account. Using this access, it can’t actually make any changes and will only view your YouTube info.
To proceed, click on the Continue button on the popup.
Next, you can pick which YouTube channel, playlist, live stream, single video, and more that you want to embed.
For a YouTube channel, just open the channel in your browser and look for the URL at the top.
In that URL, look for /user/ or /channel/ and copy everything after that.
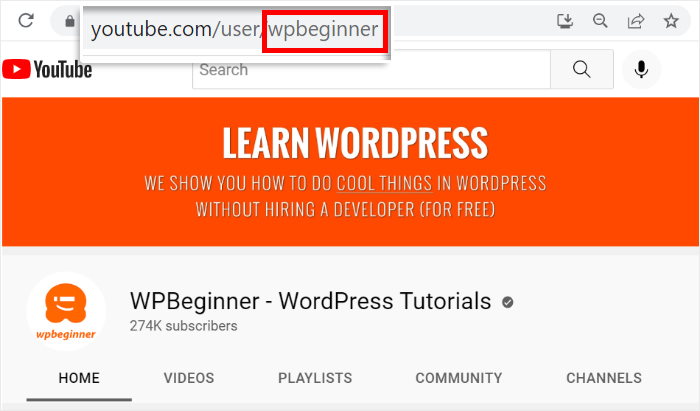
Then, return to your website once again and then paste it into the popup before clicking on Next.
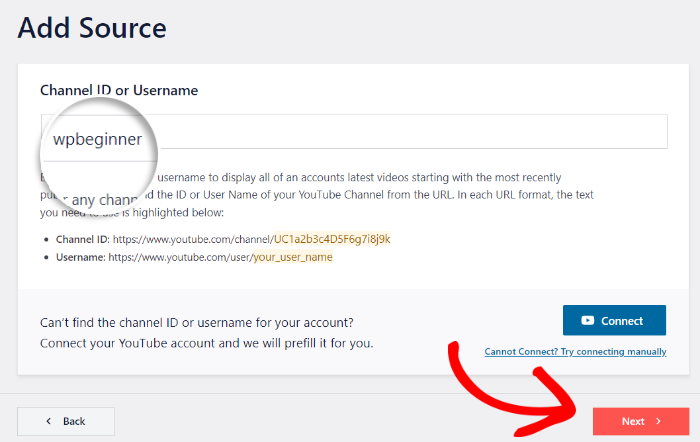
With that, you’ve created a YouTube feed and connected it to a source so it’s ready to be embedded on your WordPress website.
Ready to embed your YouTube feed? Feel free to skip to Step 5.
Want to customize how your YouTube feed looks? Let’s go directly to Step 4 below.
Step 4: Customize Your YouTube Video Feed
Now you’re ready to move on to customizing your feed. To get started, you can choose from a collection of feed templates with unique designs.
Simply click on a template you prefer and then click on Next.
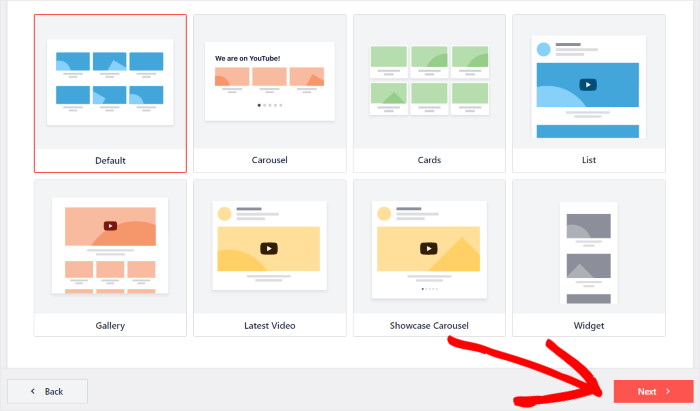
Next, YouTube Feed Pro will open a visual feed customizer that you can use to set the design of your new feed.
From here, you can find the customization options on the left panel of the feed customizer. You can use these options to change your feed layout, formatting, color scheme, header design, feed size, and much more — just by clicking.
When you use these customization options, you can keep track of the changes with the help of the live preview on the right.

Ready to customize your YouTube feed? First, click on the Feed Layout option on the left panel to get started.

From here, you can pick from the different ways to display your YouTube feed. With this plugin, you get 4 layout options: Grid, YouTube Gallery, List, and Carousel.

Choose any layout you prefer, and then click the Save button.
After you do that, click on the Customize button at the top to continue editing your feed.
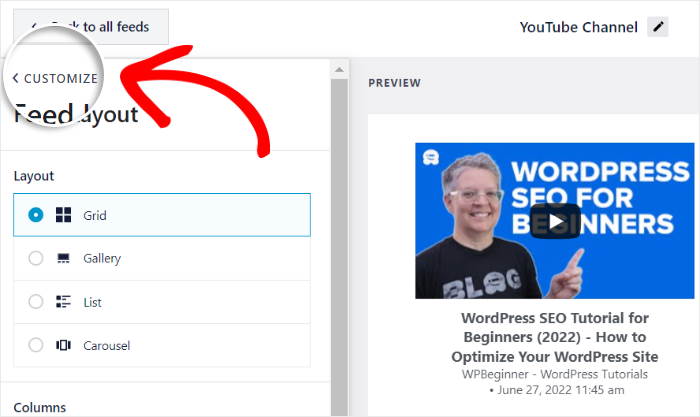
You can now use the remaining customization options for your YouTube feed. Just click on the Header option on the left to continue.

To show a header at the top of your YouTube feed, you can toggle the Enable option here.
Below that, you can choose between a Standard header with your channel name and icon and a Text header.
You can also choose to show your Channel Description or the number of Subscribers.

Finally, click on Save to confirm your new header design.
You can then use the remaining customization options to set your color scheme, feed size, post style, load more buttons, and much more.
Then when you’re happy with your feed, click on the Save button once again.
Finally, you can move on to the final step and embed the YouTube feed in WordPress.
Step 5: Embed Your YouTube Feed on WordPress
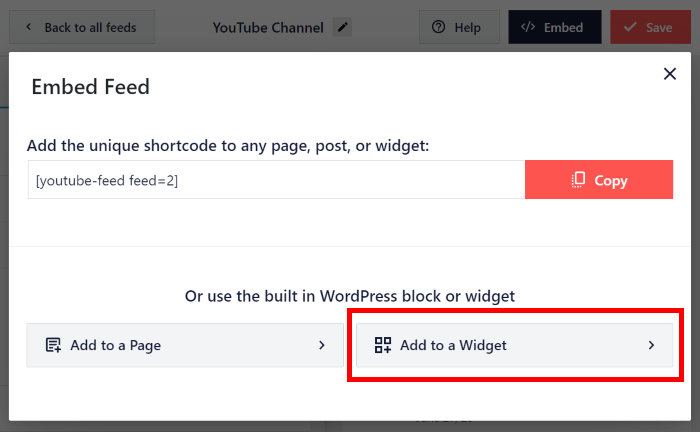
To embed a YouTube video feed in WordPress, start by clicking on the Embed button at the top of the live feed editor.

You can now pick the location of your YouTube feed here.
If you want to embed the YouTube feed on a WordPress page or post, click on the Add to a Page option here.
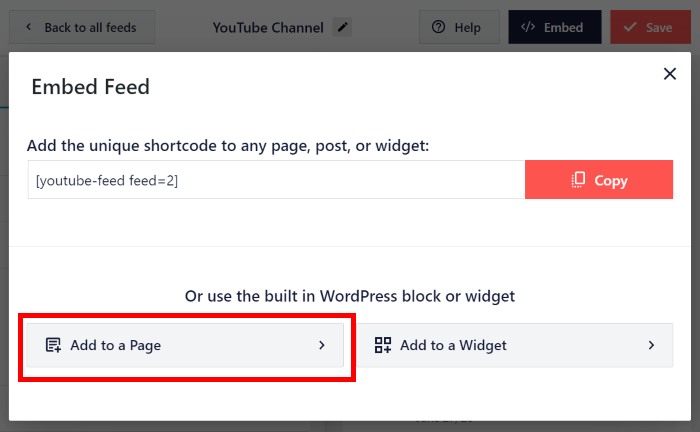
You can also embed YouTube feeds on your sidebar or footer as a YouTube widget. For that, click on the Add to a Widget option instead.
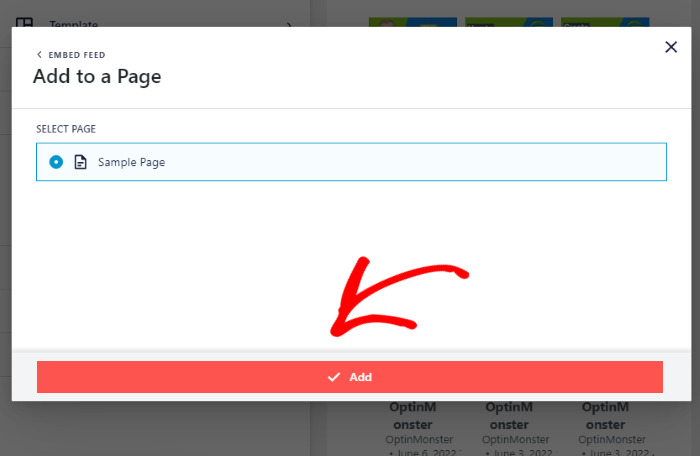
We’ll go with a WordPress page for this tutorial. Next, select the page where you want to embed your YouTube feed and click on Add.
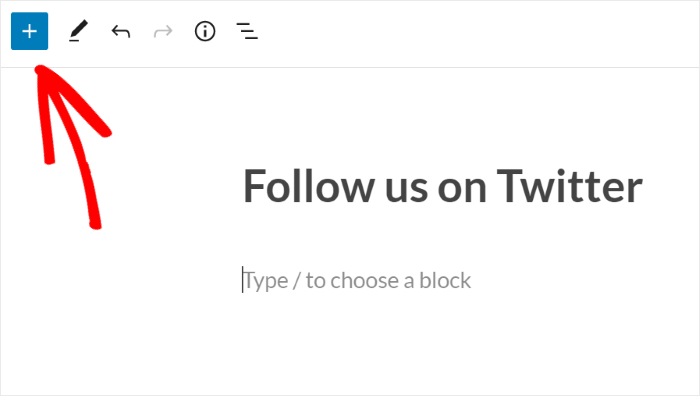
The plugin will now open that page in the WordPress content editor. Then within the editor, click the plus (+) icon to add a new block in WordPress.
Then in the search box, type “youtube feeds” to locate the Feeds for YouTube block.
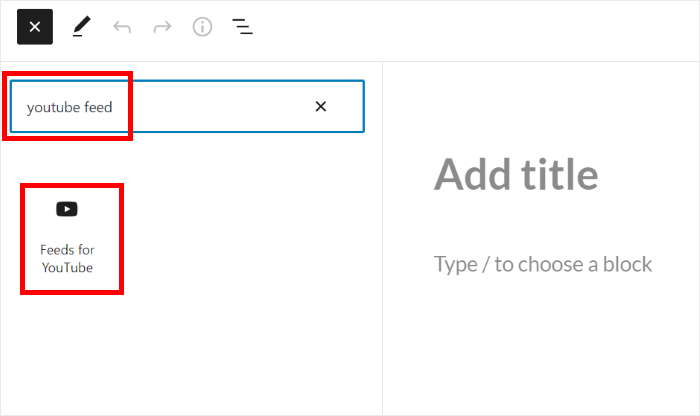
When you click the block in Gutenberg editor, WordPress automatically adds your YouTube video feed into the content editor with a preview of how it’ll look on your live website — no shortcode needed.
Now click on the Update or Publish button at the top, and your YouTube feed will be online.
If you open your website, you’ll be able to see what your feed looks like. You site visitors can simply click on your video thumbnail and it’ll playback the video, right on your site.

You now know how to embed a YouTube video in WordPress, and with the help of Smash Balloon’s powerful YouTube Feed Pro plugin, you can have complete control over what content to display on your site and how it looks.
You can then get more subscribers, boost your views, convert visitors, and much more to grow your business with ease.
Ready to embed multiple YouTube videos on WordPress? Get started with YouTube Feed Pro here.
Why You Need to Embed YouTube Videos on Your WordPress Site
According to our in-depth research on social media marketing statistics for online businesses, viewers consume 1 billion hours of videos on YouTube every day.
This makes YouTube videos a popular way to promote your business, reach more target customers and boost brand awareness for your business.
But it’s not enough to upload your YouTube videos on YouTube alone.
With videos and shorts worth 500 hours being uploaded on YouTube daily, competition on this social platform is incredibly tough. That’s where embedding your YouTube videos on your WordPress site comes in the picture.
Here are the top reasons why it’s important for you to add your YouTube videos to your site:
- Increase YouTube Followers – Since your site visitors are already interested in your brand, they’re more likely to watch your videos and subscribe to you, so you can grow your YouTube channel.
- Boost Brand Trust – Embedding YouTube feeds of customer video testimonials on your WordPress builds trust in your brand, increases your conversions and convinces your site visitors to buy from you.
- Get More Engagement – When you display YouTube videos on your site, you can get more video comments and increase watch hours on YouTube.
- Improve Your Site’s SEO – Embedded YouTube videos increase the time your site visitors spend on your site, which can help improve SEO and rank you higher in search engines.
- Optimize Your Site Speed – Instead of uploading YouTube videos directly to WordPress, you can simply display a YouTube feed of your channel’s videos so you get a lightweight site that loads fast.
How to Embed YouTube Videos Manually in WordPress
The following methods for embedding YouTube videos in WordPress will show you how to manually add video content to the new WordPress block editor, the classic editor, and sidebar widgets.
1. Use Block Editor to Embed YouTube Videos on WordPress Pages
WordPress comes with a handy feature called auto-embeds, which lets your website automatically get the embed code from YouTube so you can display the video content in a blog post or page.
To embed a YouTube video in a WordPress blog post or page, all you need is to follow the steps below:
1. Go to the YouTube video you want to share and copy its link.
You can do this by clicking the YouTube video’s share button or by copying its video link directly.
2. Paste the YouTube video link to the WordPress page you want.
Next, go ahead and create a new post or page in WordPress.
Or, you can go ahead and edit the WordPress post or page where you want to add the video. In this step, paste the YouTube video URL into the WordPress editor.
As soon as you paste the YouTube link, WordPress finds the embed code and instantly displays the YouTube video inside the content area.
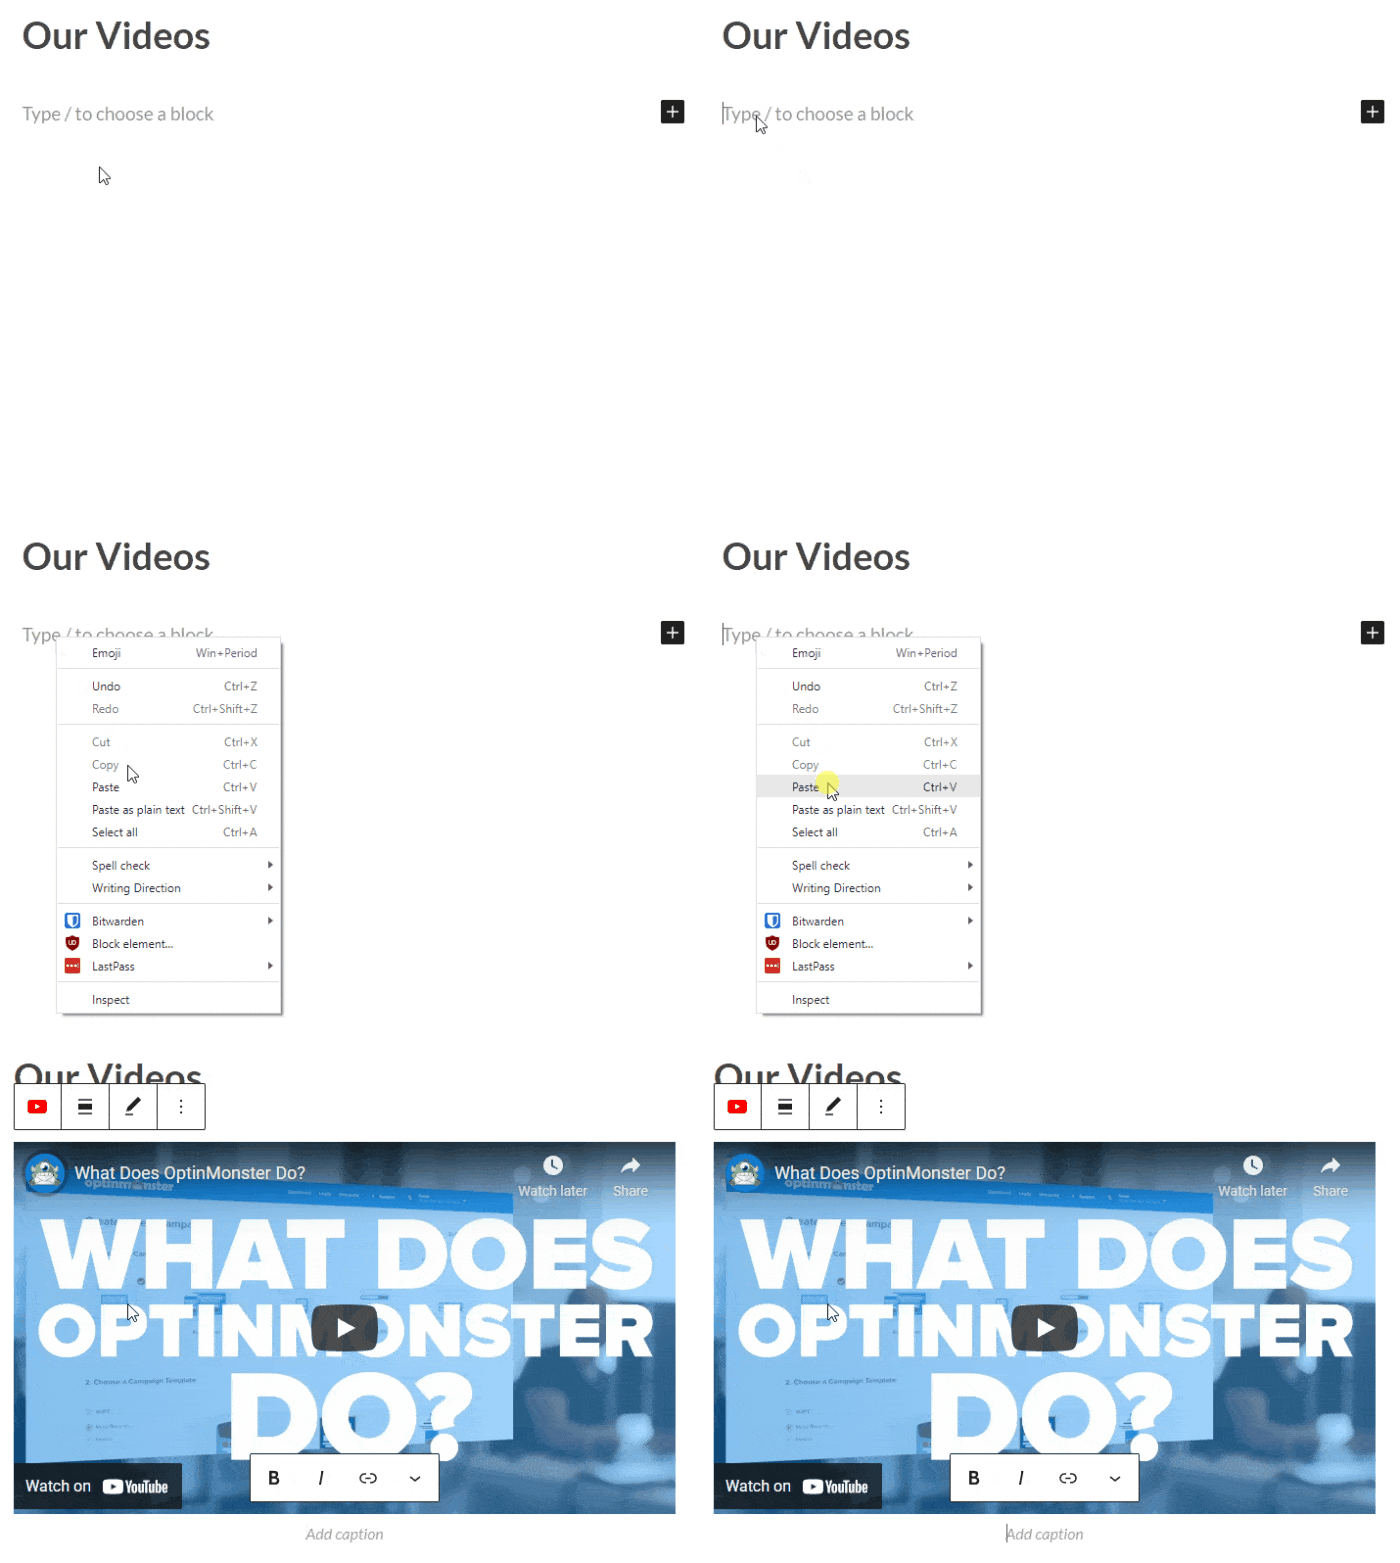
Now when you save the post and click the Preview button, you’ll see the embedded YouTube video as visitors would see it on your website.

Pretty easy, right?
Once you’ve added your video, it’s easy to change its settings using the block toolbar and media settings column on the right-hand side of your screen.
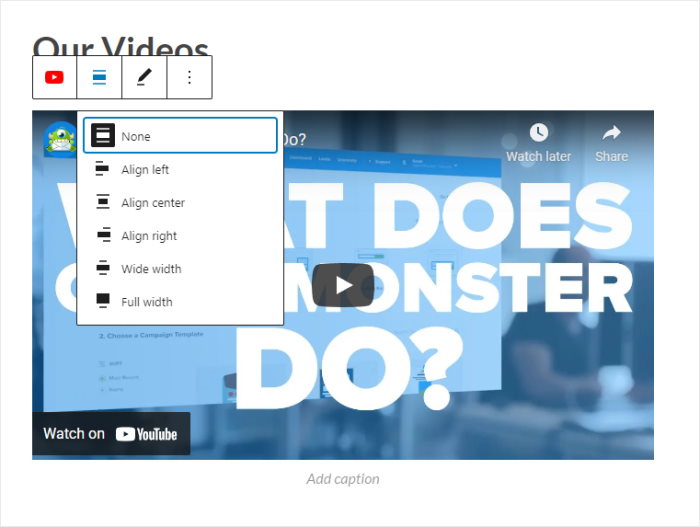
From there, you can adjust the video width, change the alignment, make it full-width, and more. You can also add a caption to accompany the video and preserve the aspect ratio for people browsing on mobile devices — but I recommend you do this only if you’re familiar with coding.
It’s only possible to use the WordPress auto-embed feature for white-listed video platforms, which include:
- YouTube
- Instagram oEmbeds
- Dailymotion
- Facebook oEmbeds
- Tumblr
- TED
- Vimeo, and more
Now, what if you want to manually add YouTube video gallery feeds to your website’s sidebar areas? We’ll talk about that in the next tutorial below.
2. Use Widget Editor to Embed YouTube Videos on WordPress Sidebar or Footer
Similar to WordPress posts and pages, you can add a YouTube video as a widget in your WordPress sidebar, footer or other widget-ready areas by following the simple steps below.
1. Visit your WordPress widgets area.
To get started, copy the YouTube link of the video you want and navigate to Appearance » Widgets from the WordPress dashboard so you can access your widgets area.
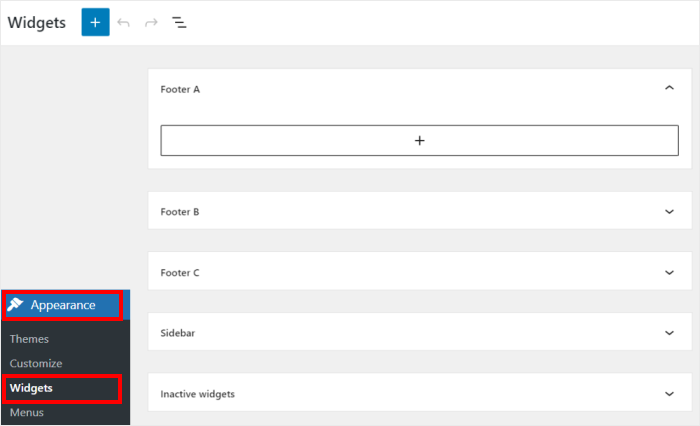
2. Choose to embed YouTube videos on your sidebar or footer area.
Next, depending on your WordPress theme settings, you can pick the widget area where you want to display the YouTube feed.
To show your YouTube video on the sidebar, click on the Sidebar panel.
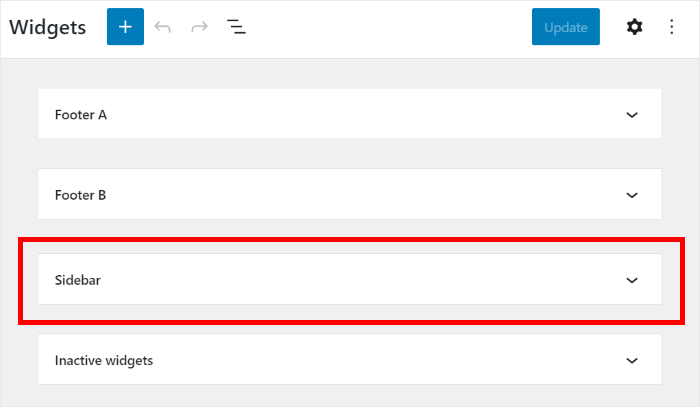
Or you can select Footer instead if you want to embed your YouTube video on your site’s footer.
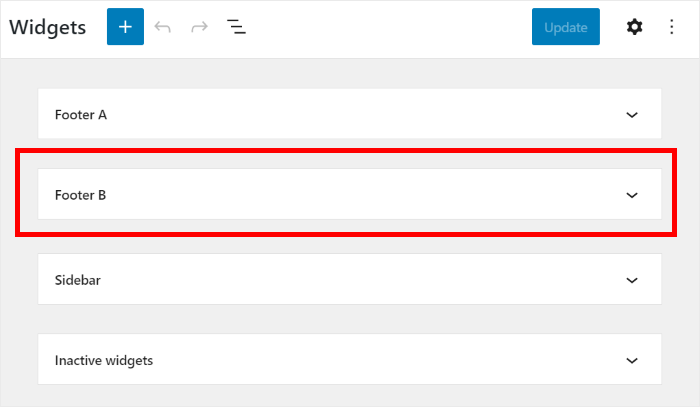
We’ll use the sidebar for our example in this YouTube embed tutorial.
3. Paste your YouTube URL to your widget.
Once you’ve selected the sidebar area, you can now click on the plus (+) icon at the bottom to add a widget.
From the options, select the Paragraph widget and then paste the link to your YouTube video.
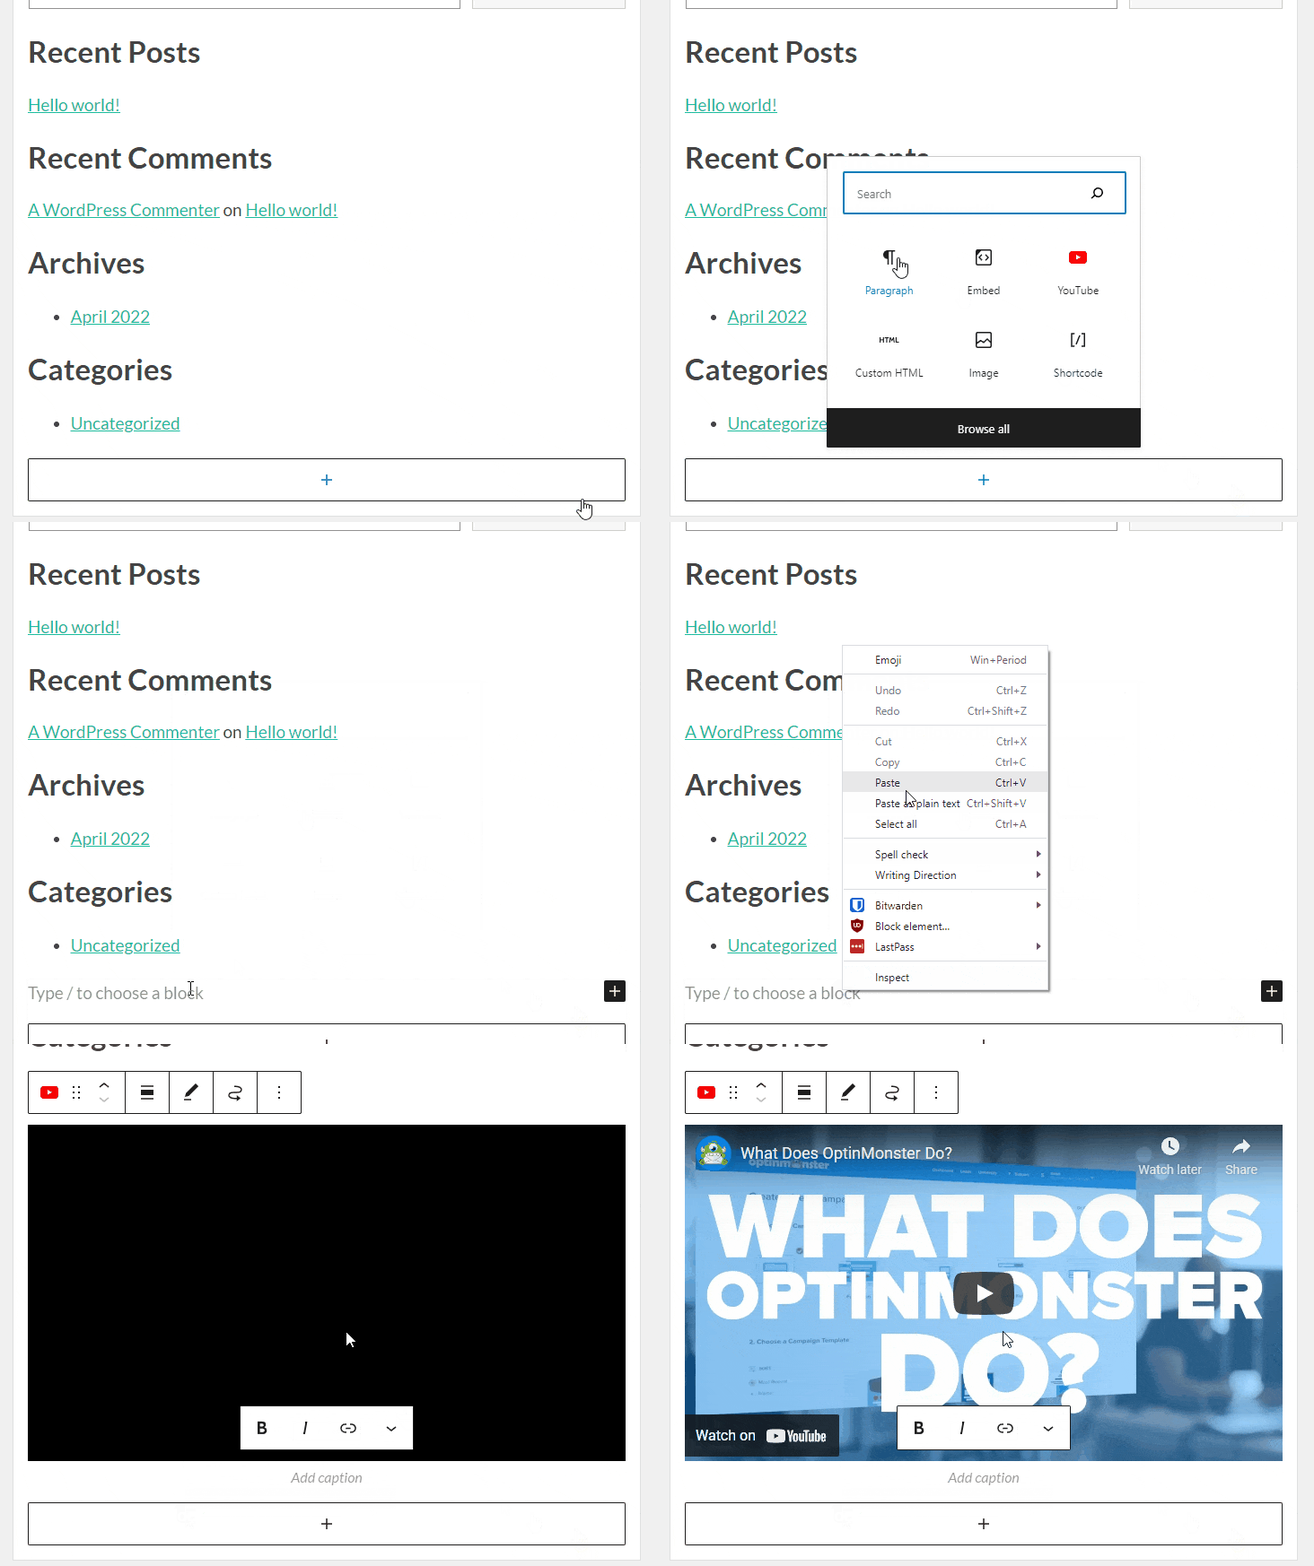
WordPress will automatically find the embed code and display a preview of your video inside the widget’s editor area.
Make sure you click the Update button to store your widget settings. Then you can visit your website to see your Youtube video quickly embedded in your website’s sidebar.
Top WordPress Tutorials on Embedding YouTube Content
Have an Elementor website? Here’s how to embed YouTube videos in WordPress Elementor.
You may also want to read this next post on how to add a YouTube playlist to Elementor or how to display a YouTube feed on Thrive.
While you’re here, you can also see this list of the best web hosting companies for your small business website.
Are your embedded videos not showing up? This article on how to fix YouTube embed not working can help you.


