Are you looking for easy ways to display a Facebook events calendar on your website?
Showing your Facebook page’s events calendar on your WordPress site is a great way to inform visitors about important dates, such as product launches or upcoming promotions.
But, with my years of experience working in social media marketing, I know that embedding a Facebook events calendar on your website can be complicated.
In this article, I’ll show you how to display a Facebook events calendar in WordPress using 2 different methods:
- Why Embed Facebook Events on Your Website?
- Display Events With the Facebook Page Plugin Widget
- Display Facebook Events with a WordPress Plugin [Best Way]
Why Embed Facebook Events on Your Website?
The biggest reason to embed Facebook events on your website is to tell site visitors about upcoming events so they can join.
In fact, here are some other great reasons to embed Facebook events on your website.
- You can get your website visitors to follow your Facebook page by showing them interesting events.
- Adding relevant Facebook content on your site shows visitors that you’re actively engaging with your community.
- Displaying Facebook events on WordPress keeps people on your site for longer, which is better for your site’s SEO.
- You can boost Facebook page engagement and help your content appear higher up in the news feed, raising awareness and increasing traffic to your page.
Display Events With the Facebook Page Plugin Widget
The 1st method uses Facebook’s official developer tool for embedding aspects of your Facebook page on your website.
The downside is that this method involves copying and pasting code snippets to WordPress. Plus, you don’t have a dedicated support team who will help you.
If you don’t want to deal with coding, you can try the other embedding techniques in this article.
Step 1: Use the Facebook Page Plugin Code Generator Tool
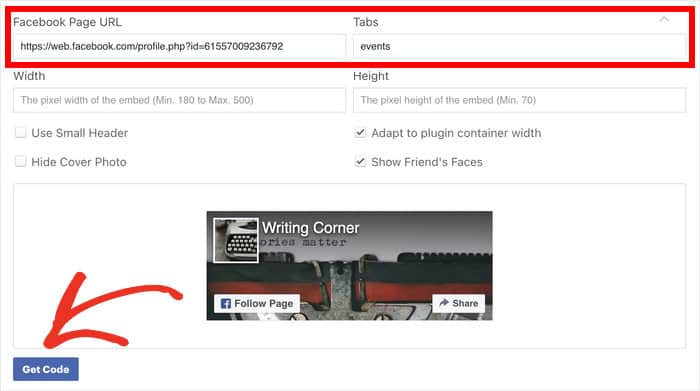
The first step in adding a Facebook event calendar widget to your website is to visit the page plugin code generator tool here.
Next, enter the link to your page on the Facebook Page URL field.
Then write “events” in the Tabs field before clicking on the Get Code button.
Step 2: Generate the Facebook Event Code
You’ll see a popup with the different codes that can help you embed the events.
For now, click on the iFrame tab at the top.
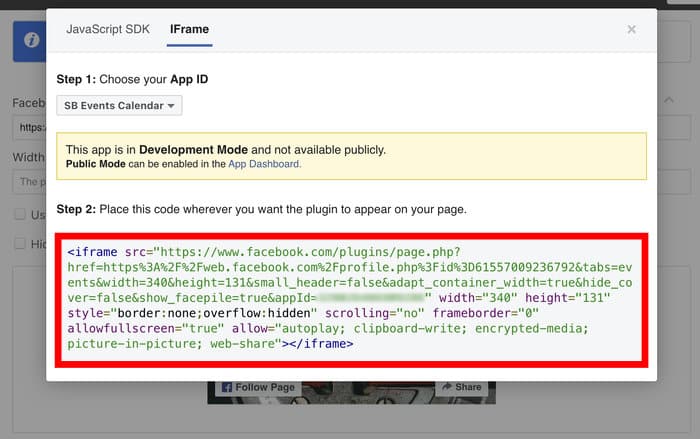
You might want to paste the code into a blank text file or notepad on your computer so you don’t lose it.
Step 3: Paste the Facebook Event Code on Your Website
The next step is to embed the Facebook event code on your website.
On your website, head to your admin area and decide where you’d like to display your Facebook events calendar.
We’ll add our calendar to a widget in our site’s sidebar for this tutorial.
To start, head to the Appearance » Widgets menu from your WordPress admin area.
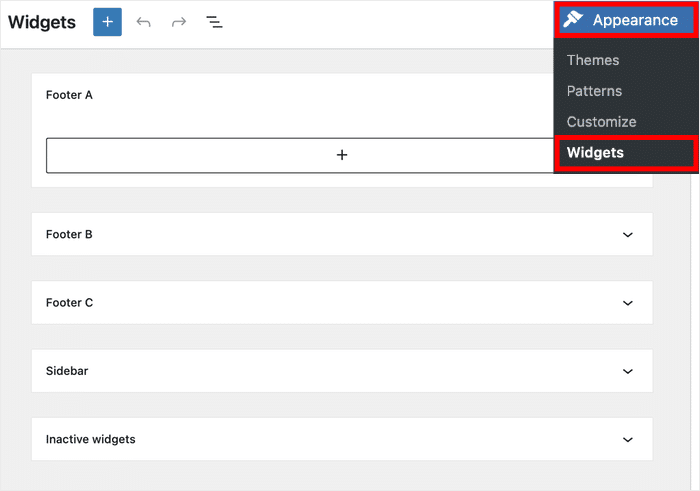
Next, you can choose between the Sidebar or Footer for your new WordPress events calendar. We’ll go with the sidebar for this tutorial.
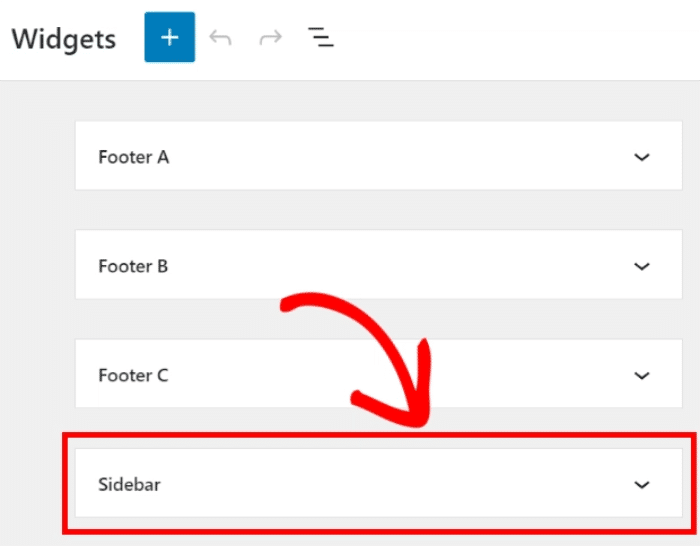
After that, click on the plus (+) icon to add a new widget to your website. Then, select the Custom HTML widget from the options.
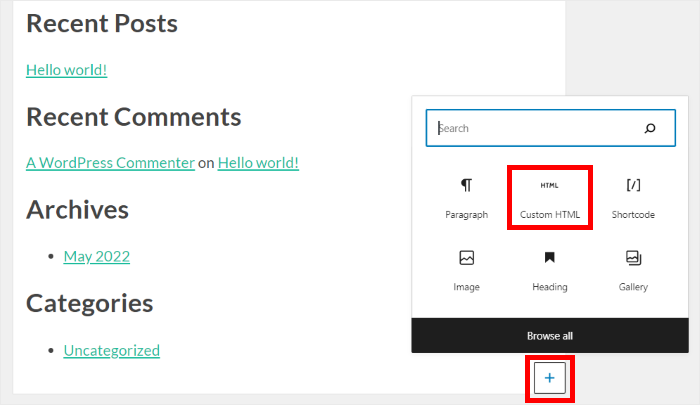
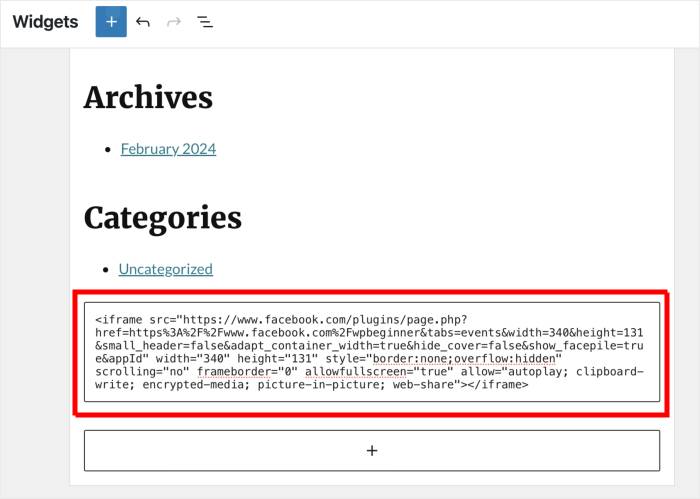
Finally, paste your iFrame code snippet from earlier into the new widget.
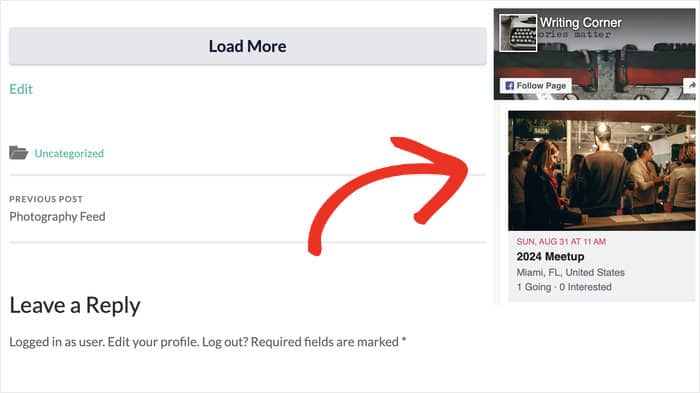
You’ll see your Facebook events displayed in your sidebar when you navigate to your main website.
As you can see, it can be a bit annoying to deal with all the embed codes. Plus, there are some other downsides as well:
- You can’t really customize your Facebook widget, and it might clash with the design of your website.
- The widget is dependent on Facebook, so it’ll go offline if Facebook is dealing with technical issues.
- Since this events widget has a generic design, you’re missing out on a chance to make your site stand out.
- If you want to show multiple Facebook widgets, you’ll have to keep track of lots of embed codes.
- With this method, you can’t control which posts or events show up on your WordPress website.
Display Facebook Events with a WordPress Plugin [Best Way]
For the next method, I’ll use a Facebook feed plugin to display Facebook events on a website.
That way, you can let the Facebook plugin automatically fetch the events and add them to your website in a beautiful feed — no need to hire a Facebook developer or deal with coding!
And the best option that you can use to showcase engaging Facebook events feeds on your site is the Smash Balloon Facebook Feed Pro plugin.
As the best Facebook feed plugin for WordPress, it can help you seamlessly integrate your Facebook content like events feeds with WordPress in just minutes.
Besides displaying Facebook events on your site, this Facebook feed WordPress plugin has the following features:
- Display multiple Facebook feed types on your site, including Facebook posts, photos, video feeds, Facebook live streams and more
- Control the information displayed in your feeds, such as headers, dates, descriptions, and more
- Easily manage and display multiple Facebook account feeds on a single website
- Completely customize your feed’s look and feel with Facebook feed templates like slider and styling options to match your website branding
- Supports lots of feed types, so you can create a Facebook album feed, video feed, and much more.
- Display your feeds beautifully on mobile devices with the mobile-friendly design
- Show Facebook reviews on your website to establish social proof and increase sales for your business.
Even better, you can do all that without having to write a single line of code, making it super-easy for beginners to get started with.
Here’s our video tutorial that’ll show you the simplest way you can embed your Facebook events in WordPress.
Want a text guide instead? We’ll go through the step-by-step guide on embedding Facebook events below!
Step 1: Install Smash Balloon Facebook Feed Pro
Get your copy of Facebook Feed Pro and then install and activate the plugin to get started.
If you need help with that, take a look at our step-by-step guide on how to install a WordPress plugin.
Step 2: Create Your Facebook Events Calendar Feed
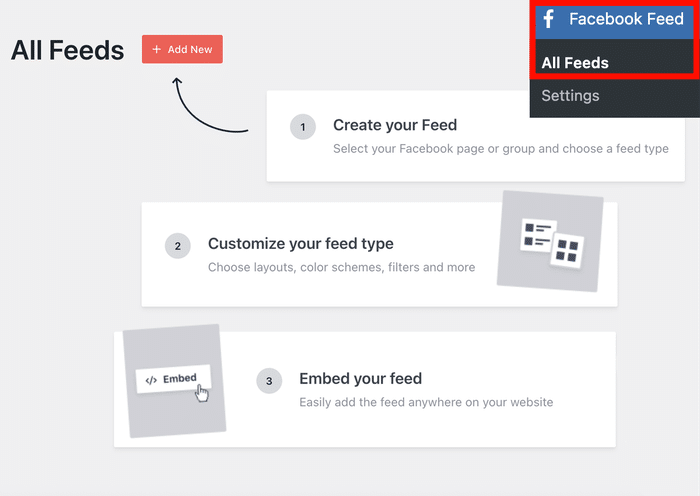
Once you’ve installed and activated the plugin on your site, go to the Facebook Feed » All Feeds menu from your dashboard.
To start creating your Facebook events calendar, click on Add New.
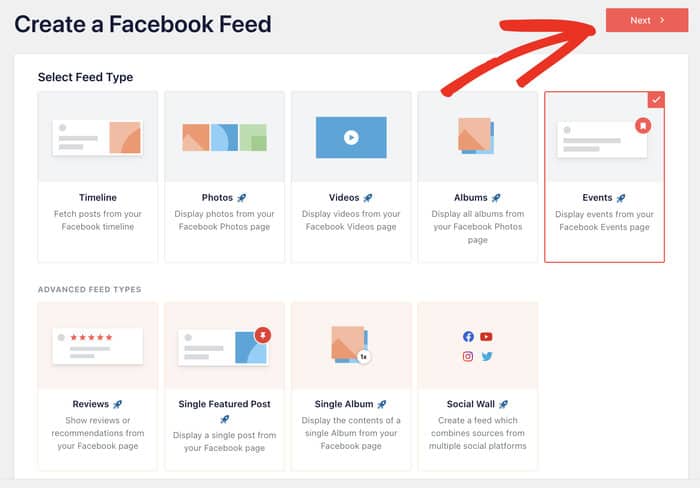
After that, you can see that 9 different types of feeds are available here, including a timeline feed, photos feed, videos feed, events feed, reviews feed, and much more.
Next, you can select Events from a list of options and then click the Next button to proceed.
Step 3: Connect to Your Facebook Page
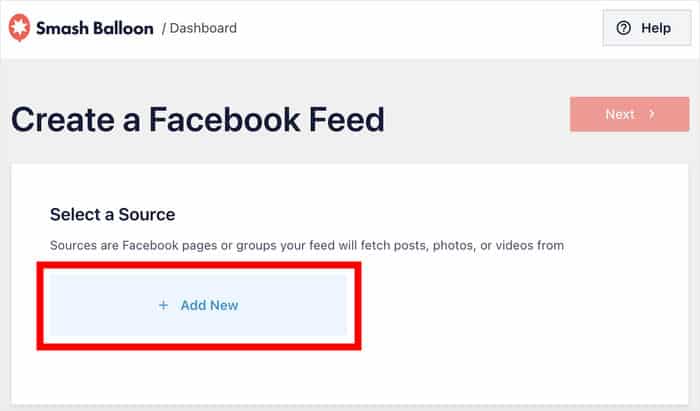
Once you’ve created your feed, you can choose the source for your events. This will be the Facebook page where you’ve planned your events.
To do that, click on the Add New button.
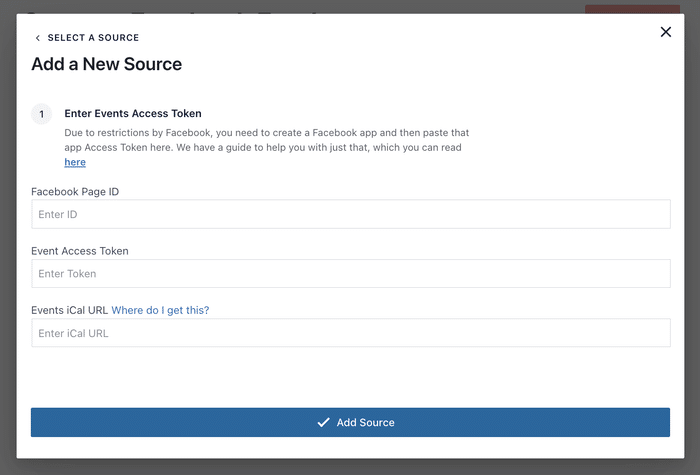
You can now see a new pop-up where you’ll have to add 3 things:
- Facebook Page ID
- Event Access Token
- Events iCal URL
We’ll show you how to get all 3 of these below:
Get Your Facebook Page ID
To get your page, open your Facebook page and then click on the About tab at the top.
After that, click on the Page Transparency option, and you can find the Page ID on the right.
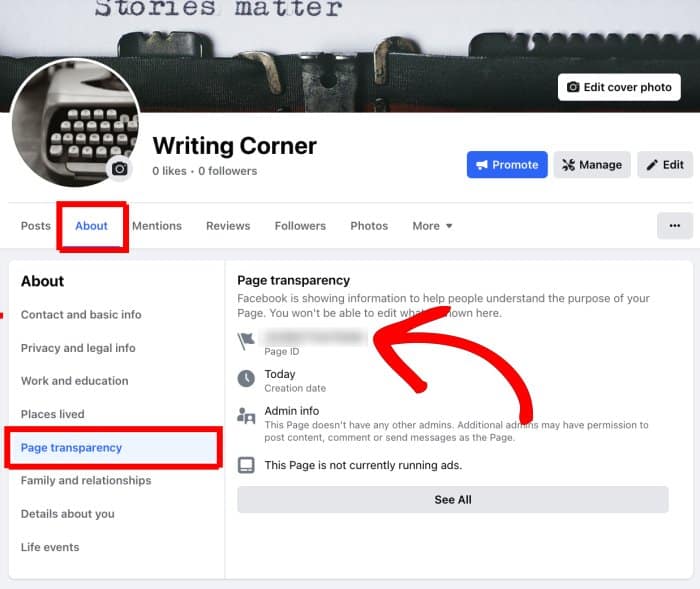
Now that you have your Page ID, remember to save it somewhere safe before you continue.
Get Your Event Access Token
The next step is to get your Event Access Token.
In case you don’t have one yet, check out our step-by-step guide on how to create a Facebook Events Access Token.
You can also follow this video guide:
Get Your Events iCal URL
To get the iCal URL, open your Facebook homepage and make sure you’ve logged in as your Facebook page.
Then, click on the Events option on the left to continue.
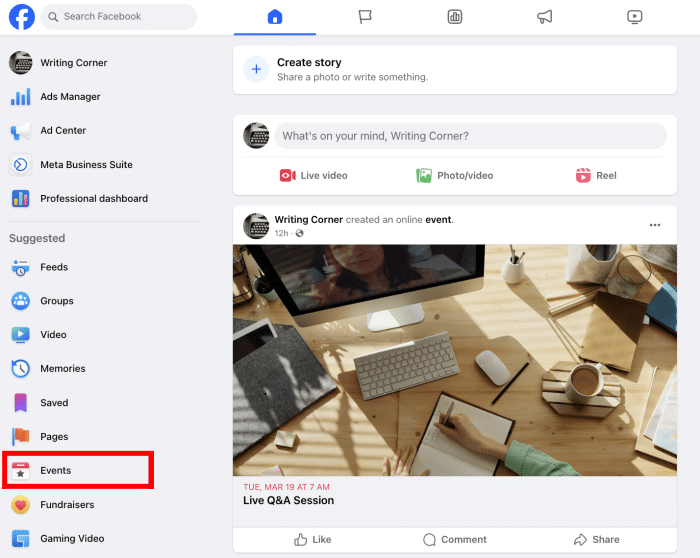
Now, click the Your Events option on the left to bring up the active events you’ve planned.
All you have to do now is copy the URL of the Add to calendar button on the top right.
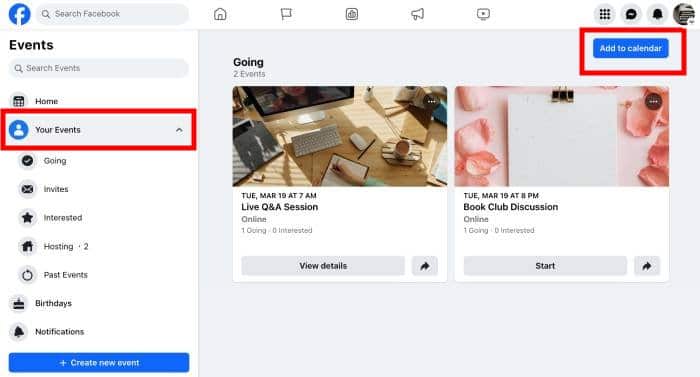
Once you’ve done that, return to your website and enter your Page ID, Event Access Token, and iCal URL.
Finally, click on the Add Source button below.
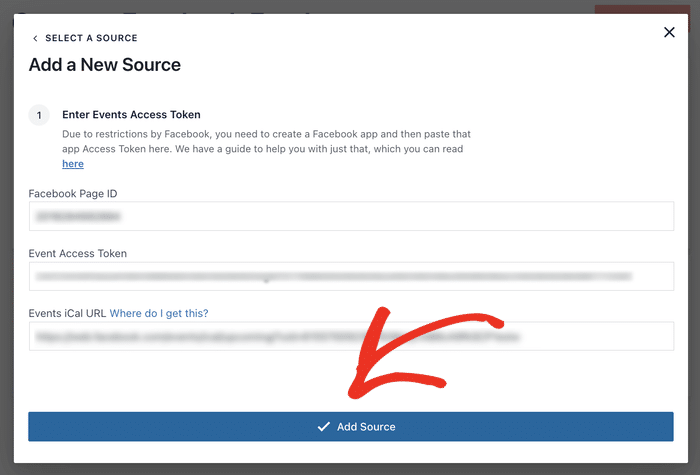
Now that you’ve connected this source, you can freely reuse it for any of your future Facebook feeds if you like.
To proceed, you can select the newly added source and click on Next.
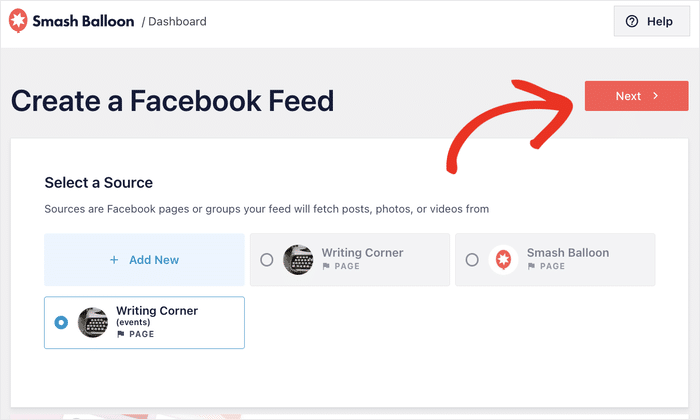
Step 4: Customize Your Facebook Events Calendar Feed
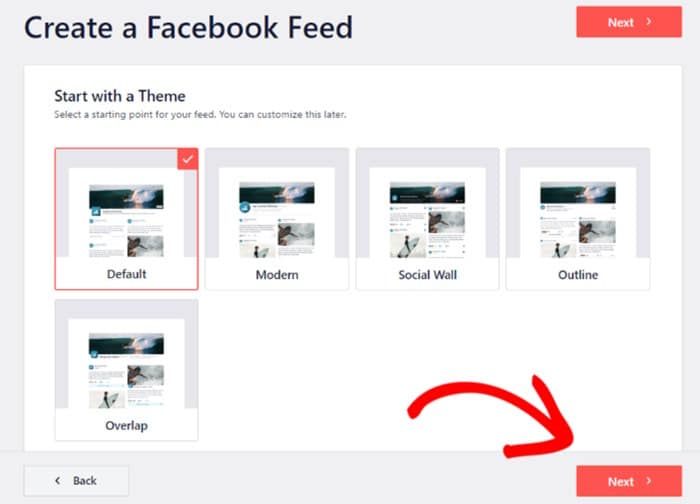
With that, you can move on and customize your events calendar. First, you can select a theme for your new Facebook feed.
You have 5 different Facebook themes to choose from:
- Default
- Modern
- Social Wall
- Outline
- Overlap
Feel free to select the theme and click on Next to continue.
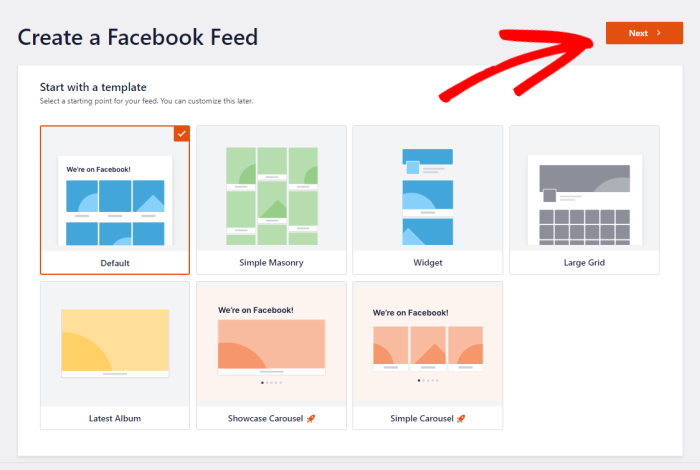
Next, the plugin will let you choose between 7 different feed templates. Each of these templates has a unique layout that you can import:
- Default
- Single Masonry
- Widget
- Large Grid
- Latest Album
- Showcase Carousel
- Simple Carousel
Now, you can select your template and then click on the Next button.
You can now see a live preview of your feed on the right, and the customization options are on the left.
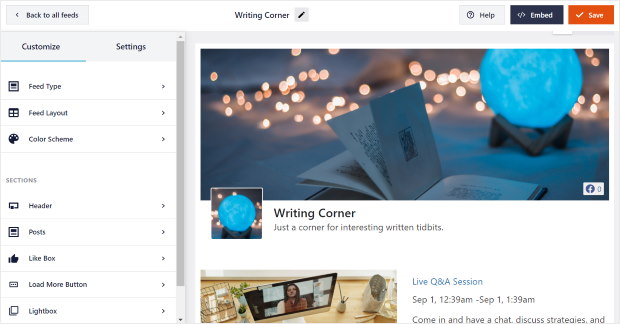
With these options, you can customize the feed type, layout, color, header design, post design, and a lot more.
First, select the Feed Layout option on the left.
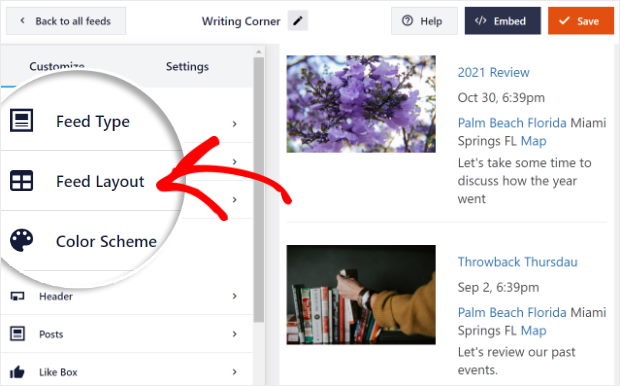
For your events calendar, you have 3 different layouts: List, Masonry, and Carousel.
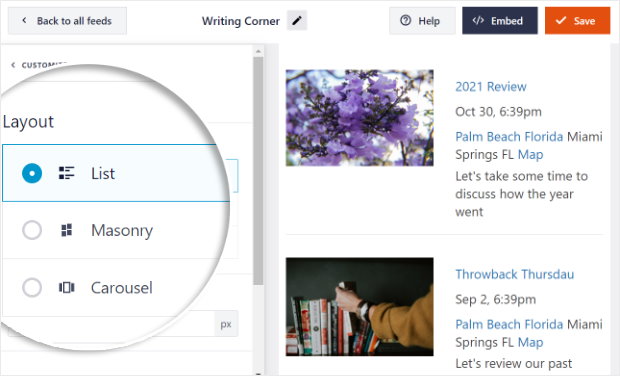
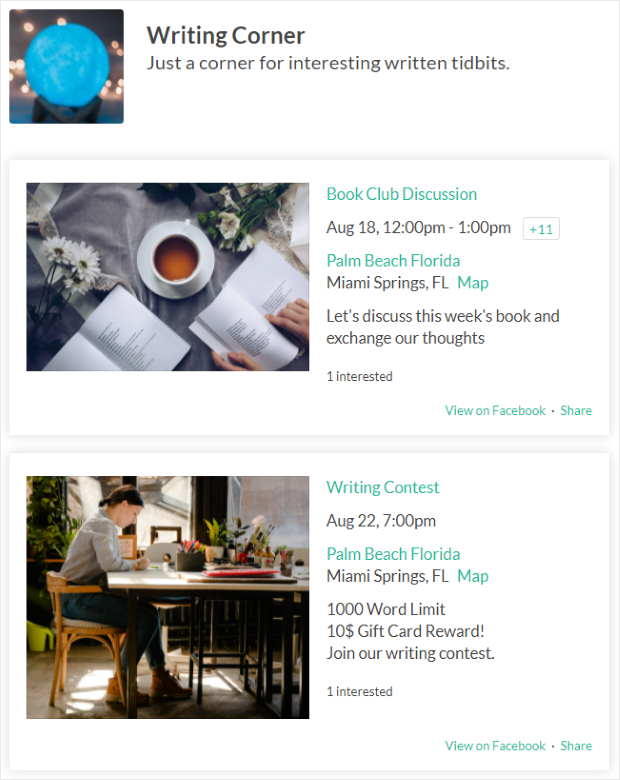
If you want your events to be listed one after another, you can go for the list layout.
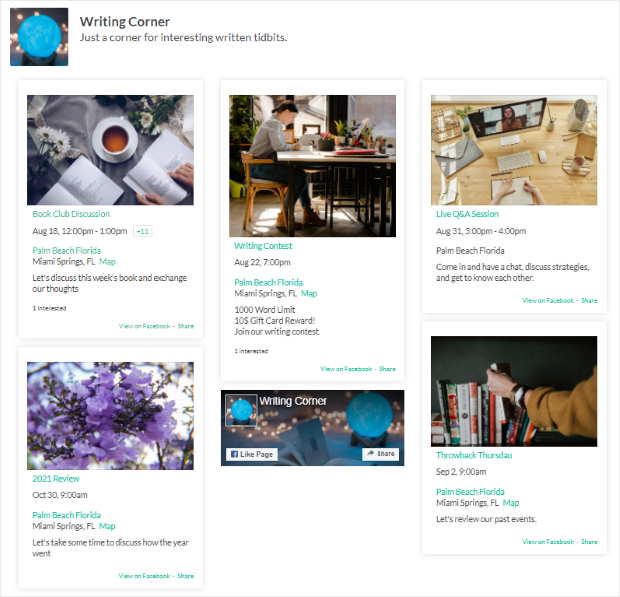
To show your Facebook events in columns instead, you can try the masonry layout instead.
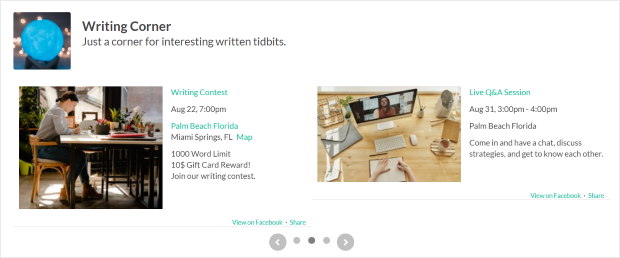
And there’s also a carousel layout where you can show events in a beautiful carousel slider.
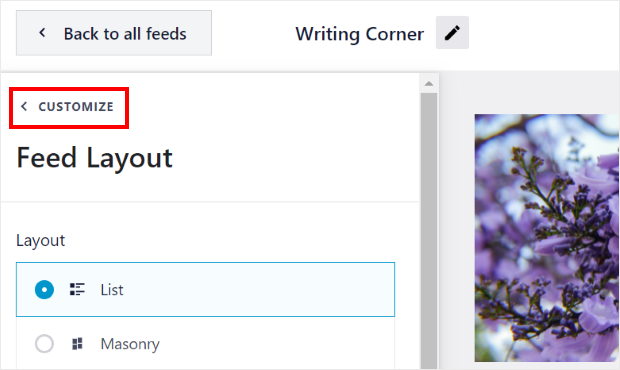
After you’ve picked the feed layout, click on the Customize option at the top to go back to the previous customization options.
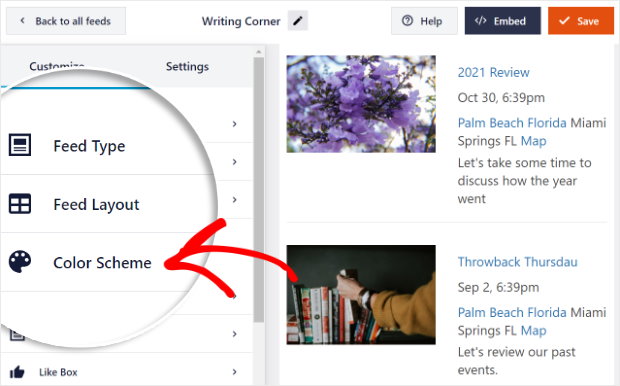
You can then pick the color scheme for your Facebook feed. To do that, select the Color Scheme option on the left.
Now, you can pick between 4 different options for your feed color.
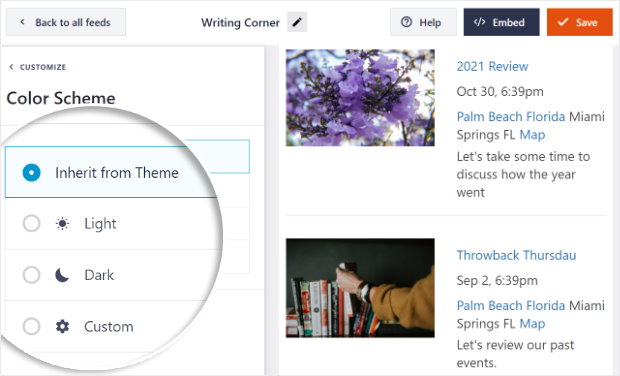
- Inherit from Theme: Copy the color scheme of your website
- Light: Have a light background with dark-colored text
- Dark: Turn the background dark with light-colored text
- Custom: Enter all the colors yourself
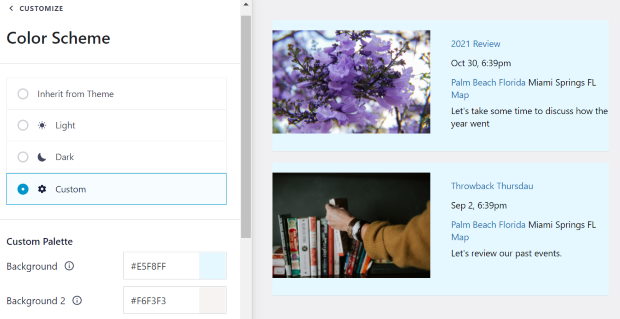
Then you can customize other parts of your events calendar, like the header design, feed size, margins, and a lot more.
Once you’re happy with the design of your Facebook events calendar, click on the Save button.
You can then go to the final step where we show you how to embed Facebook events in a website’s page, sidebar, or footer.
Step 5: Display Your Facebook Events Calendar
After you’re done customizing, you can now display your Facebook events calendar on your website. You have 2 options to display your Facebook page events on your WordPress.
Embed Facebook Events Calendar on Your Pages
How can you embed Facebook events in WordPress? To post your Facebook events calendar on your WordPress page, first, click on the Embed button in the top right corner of your live editor.
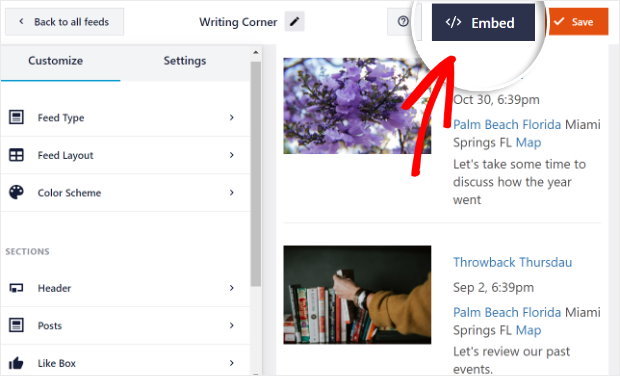
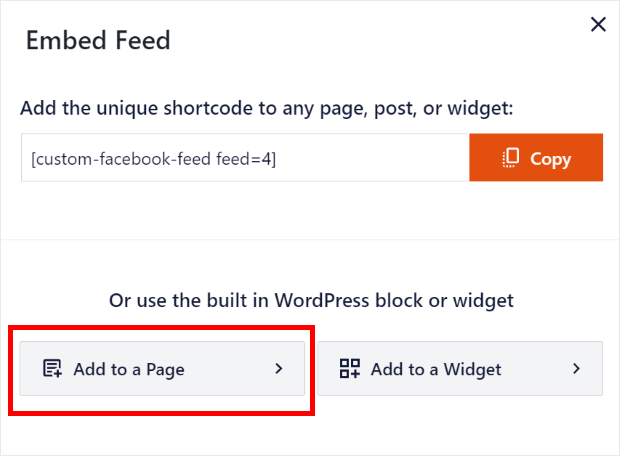
You can see a new popup to let you choose where to post your Facebook events calendar. There, you can click on the Add to a Page button to proceed.
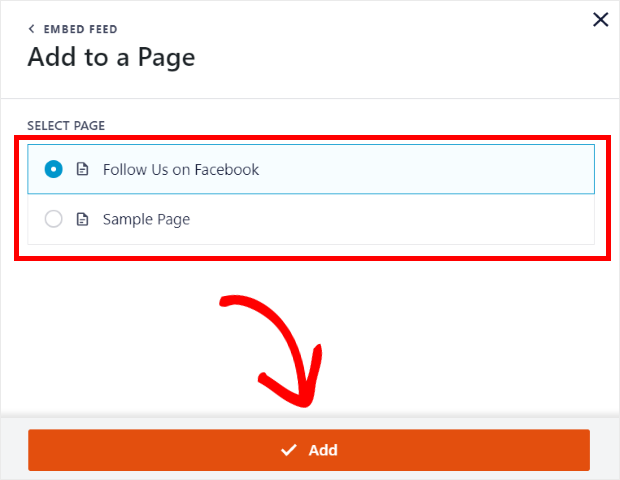
After you do that, you can now pick from your list of web pages. Make sure to select the one where you want to post your Facebook events calendar and click on Add.
Now, the plugin will send you to the page you’ve just chosen.
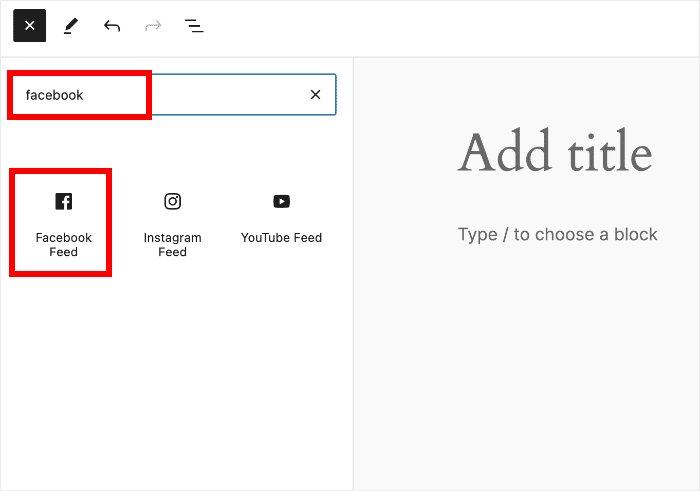
On this page, click on the small plus icon (+) and select the Facebook Feed widget in the dropdown menu to add your Facebook events calendar.
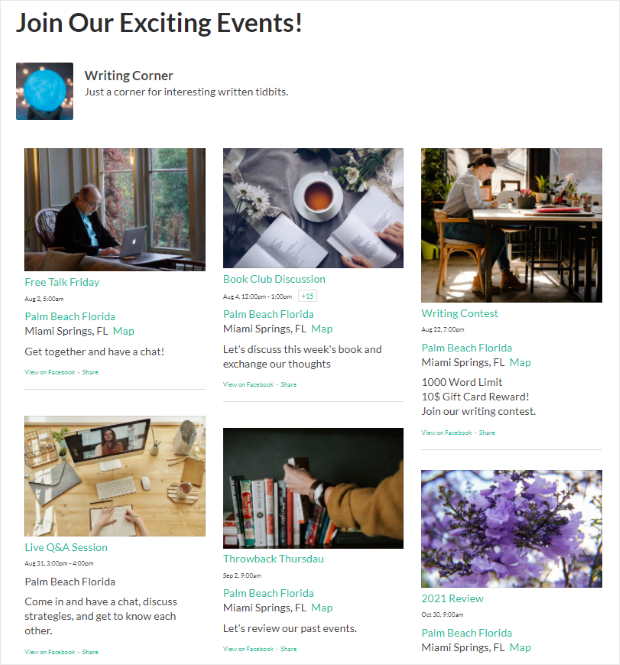
And you’ve now added your Facebook events calendar to your website! You can go ahead and visit your website to see how your Facebook page events calendar feed looks.
Next, we’ll show you how to embed Facebook event feeds on your website’s sidebar or footer using this plugin.
Now let’s take a look at how you can dispay facebook events widget on your website.
Display Facebook Events Calendar on Your Sidebar or Footer
The second way is to embed Facebook events in your website’s widget-ready areas like the sidebar or footer
To get started, you’ll first have to open your feed in the live editor.
Go to the Facebook Feed menu from your WordPress dashboard, and you can see all of your Facebook feeds listed.
From that list, click on your Facebook events feed.
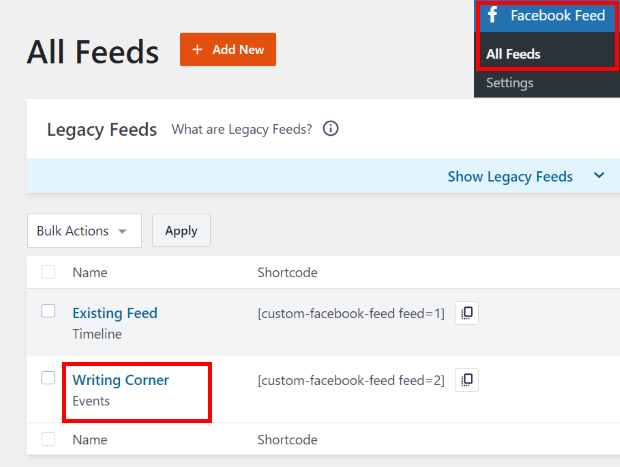
Now, you’ll be back in the Facebook feed plugin’s visual customizer. Here, go and click on the Embed button at the top.

Now, the plugin will show you a popup where you can choose the location of your Facebook events widget. You can simply click on the Add to a Widget button to continue.
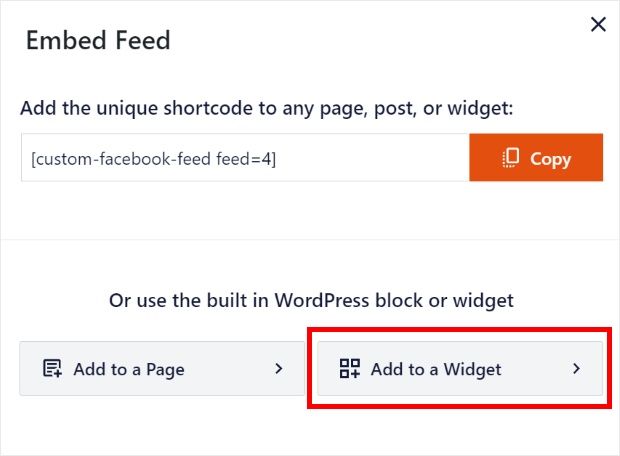
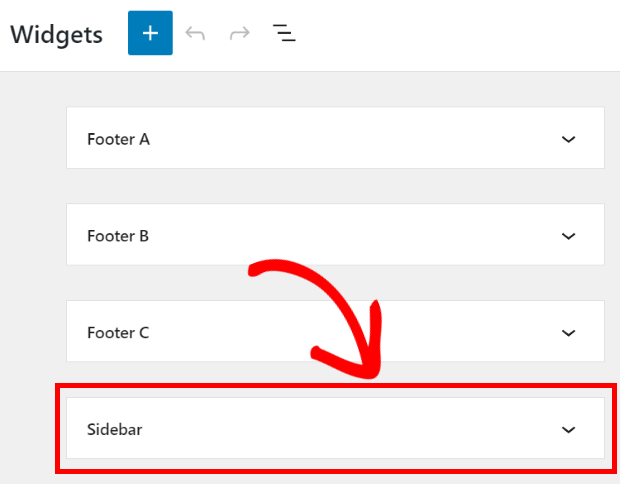
After you do that, the plugin will automatically send you to the widgets page. Here, you can add the Facebook calendar widget to your sidebar or footer. From the list of all the widget options, click on Sidebar.
To show your Facebook events calendar widget on your footer, you can click on the Footer option instead.
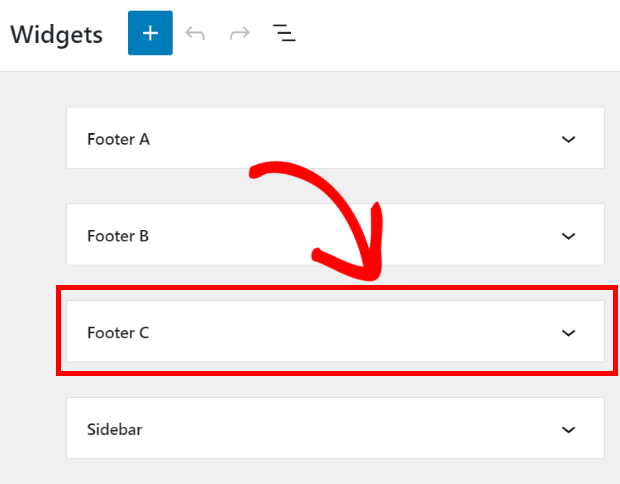
For now, we’ll post the Facebook events widget on the sidebar.
Once you click either the sidebar or the footer, you can see all the active widgets in a drop-down menu.
There, you can click on the plus icon (+) to add a new widget.
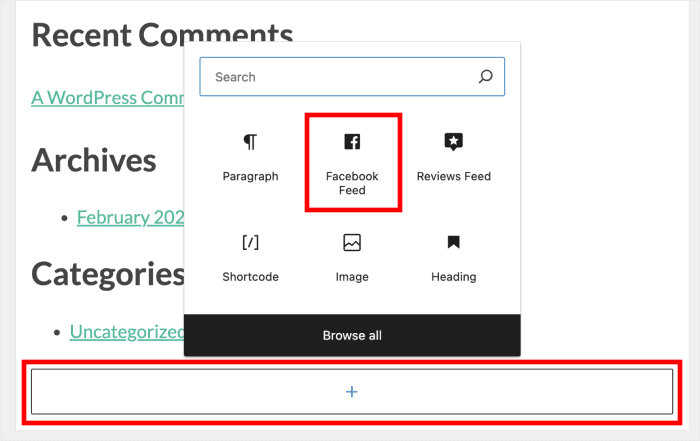
You can pick the Facebook Feed widget from the options to display your Facebook calendar widget on your website sidebar.
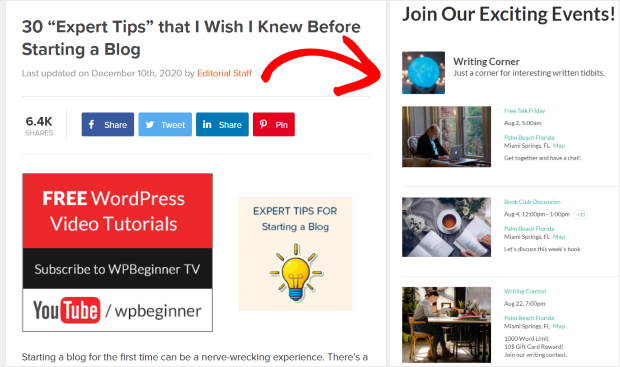
And you’re done! Feel free to check out your website’s front-end and see how your Facebook events calendar widget looks.
And that’s it!
We hope this article helped you learn how to display a Facebook events calendar on your website. Using Facebook Feed Pro, you can have an events calendar for your site in a few clicks.
In just minutes, you can boost your Facebook events, get more followers, engage your website visitors, and a whole lot more.
Ready to embed your events calendar? Get started with Facebook Feed Pro now!
Want to grow your followers and get more people joining your events? Check out this guide on how to get more Facebook followers.
Frequently Asked Questions
What is the alternative to Facebook events?
Some of the popular alternatives to Facebook events are Partiful, Eventbrite, and Howbout. While these are good places to create events, Facebook still has a huge advantage because of its massive userbase. So, you’ll have a much easier time reaching people.
How do I get people to see my Facebook events?
A quick and easy way to get more eyes on your Facebook events is to embed them on your website. That way, you can have your site visitors joining your events as well. Plus, you can do it in just minutes with a tool like Facebook Feed Pro.
Where is the event dashboard on Facebook?
To check out your events, you can open your page and select the Events tab at the top. If it’s not visible, you can select More before clicking on Events. To see the other events as well, go to the Facebook homepage and select the Events option on the left.
How do I get my event noticed on Facebook?
The simplest way to do that is to boost your Facebook following. More followers means more people checking out your events. To get started, you can use Facebook Feed Pro to embed your page on your website. That way, you can convert your visitors into followers.
More Facebook Marketing Tips and Guides
- Facebook Feed on Your Website: Best Examples You Can Steal
- How to Embed Facebook Reviews on Website (Beginner’s Guide)
- How to Add Instagram Chat to Your Website (Step-by-Step Guide)
- Best Facebook Plugins to Grow Your Business This Year
- Types of Facebook Posts Proven to Easily Boost Engagement



Hello I have a problem that came up.. since a short time.. I updated and the coming events came back .. but the past events doesnt show?? is it the short code that I should change or what?? please help, we need it.
THANKS Minna Wallin
https://reimersholmehotel.se/evenemang/
shortcode for past events I use this..
[custom-facebook-feed type=events pastevents=true]
Hi Minna,
I see that you’ve already reached out and gotten support via our team. 🙂
If you have any other concerns you’d like to be addressed, please feel free to contact our support team.
If you have a Smash Balloon license, you have access to our priority email support, so please submit a support ticket here: https://smashballoon.com/custom-facebook-feed/support/
Otherwise, we provide complimentary support in the Smash Balloon Social Post Feed forum: https://wordpress.org/support/plugin/custom-facebook-feed/
Hope this helps!
Your code generators are not displaying my events… What do I need to do? I have tried iframe as well as the javascript method.. I use godaddy. Seems that iframe is the better choice, but the events will not display! The timeline will display. Please help. Reply here so as to help others too please.
Hi Billy,
Thank you for contacting us! I’m sorry for the long delay in our response; your comment went out of our radar. This could happen if your events Access Token is not configured correctly, for that, you’ll need to follow this guide. If you have any other questions, feel free to contact us using the support form here https://smashballoon.com/support/
Thanks! 🙂