Want to add a WordPress social media review widget to your website to boost sales?
Showing your positive social media testimonials from Google, Facebook, and others on your site builds instant trust with visitors and provides powerful social proof.
But getting your social media review widgets to look just the way you want them on your website using the usual options from each social platform is complicated.
In my years of experience in social media marketing, I know that adding dynamic content like reviews from different social platforms to your website can be harder than it needs to be to get it all in one place, looking good, and working reliably.
That’s why this guide is here to show you the simplest way to display your social media review widget on your WordPress.
At Smash Balloon, we make the best social media feed and review plugins for WordPress. Our plugins make it super easy to show content like reviews from popular platforms on your website.
In this article, we’ll show you exactly how to use our easy method to add a social media review widget to your website.
Even better?
This guide walks you through everything step-by-step. It’s made for everyone, so you can quickly get your beautiful social media review widget on your site and start boosting sales. No coding needed.
In This Article
- What's a Social Media Review Widget?
- The #1 Social Media Reviews Platform
- Easiest Way to Add a Social Media Review Widget
- How to Add Social Media Reviews Widget to WordPress (Facebook)
- 3 Social Media Review Widget Examples
- Conclusion and Next Steps
- Popular WordPress Posts on Social Media Review Widgets
What’s a Social Media Review Widget?
A website widget lets you add content to your website’s sidebar, footer, and other widget-ready areas.
What kind of content can you add? You can show menus, contact forms, social media posts, popular post lists, social media feeds, banner ads, and more.
With a social media review widget, you can show reviews from social platforms on your website, like this:
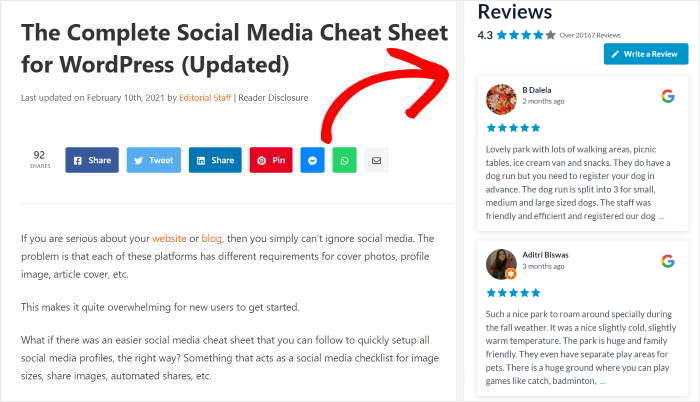
By showing reviews from popular platforms like Facebook, Google, Trustpilot, WordPress.org, Tripadvisor, and Yelp, you can show visitors that tons of real people are enjoying your products.
As a result, you can use the power of social proof to boost your business over time.
How can you show social media reviews on your site? By using a trusted WordPress reviews feed plugin. I’ll give you step-by-step instructions in this guide.
Now that you know what social media review widgets are, let’s talk about the #1 social media reviews platform for businesses.
The #1 Social Media Reviews Platform
Before you add the social media review widget, you need to confirm which social media reviews you want to show on your site first.
As the most popular social media platform, Facebook is still the undefeated champion reaching 66% of Internet users.
If you’re running a business, maintaining an active Facebook page to increase customer engagement can be a massive help.
Plus, according to our social media statistics, over 57% of shoppers say that social media influences their buying behavior, so showing Facebook reviews on your brand’s website can be an easy way to grow your sales.
That’s why in this post, I’ll give you full instructions on the easiest way to add a Facebook review widget to your website.
Easiest Way to Add a Social Media Review Widget
Since Facebook is the most popular social media reviews platform, I’m going to walk you through the steps of embedding a Facebook review widget on WordPress.
Want to embed other social media review widgets? You can check out the detailed instructions for each review platform below:
- How to Add Tripadvisor Review Widgets on WordPress
- How to Embed a FREE Google Review Widget on Your Website
- Add Yelp Reviews Widget to Your Website in 5 Steps
- How to Add a Trustpilot Widget to Your WordPress Site
- How to Show WordPress.Org Reviews on Your Website
In adding a Facebook review widget to WordPress, you can either:
- Embed manually, one by one: Spend lots of time copying and pasting single Facebook review codes — one by one, or…
- Use a plugin to display all reviews automatically: Add your Facebook reviews to your website in less than 5 minutes.
As you can see, the manual way can take a lot of time and effort, especially if you want to display lots of reviews on your site.
The solution? You can use the Reviews Feed Pro plugin to embed Facebook reviews in just minutes!
Plus, there’s no need for you to edit code or hire a developer to help you — just install the plugin and follow the 3-step guided flow to show social media review widgets easily!
You can add your Facebook reviews as a Facebook widget on your website’s widget-ready areas. Or, you can just paste the plugin’s shortcode right where you need the feed.
As the best WordPress reviews feed plugin, Reviews Feed Pro comes with lots of useful features, including:
- Super easy to set up: I’m not a coding expert, so I like that I can set up the plugin and start building and embedding Facebook review feeds in just minutes.
- Inherits your WordPress theme: Since the plugin automatically copies your website’s design, your social media review widgets will look beautiful and match your branding right out of the box.
- Responsive theme: All of your review feeds will be responsive and look great on any screen size and on any device.
- Handpick your reviews: Easily create custom review collections by manually adding reviews or selecting favorites from your existing sources to feature only the testimonials you choose.
- Live feed editor: To help you customize social media review feeds in a few clicks, you get a visual feed editor with a live preview.
- SEO-friendly: Your social media review widgets feeds are embedded directly on your website, so all the keyword-rich content can boost your SEO rankings.
- Ultra-fast loading: This reviews feed plugin efficiently requests data, so your reviews feed loads quickly, and your site will be lightning fast.
- Always updated: WordPress or Facebook updated their platforms? No worries. You can be sure that the plugin is also updated so you can continue working smoothly with them.
Start showing social media reviews widgets on your WordPress when you get started with Reviews Feed Pro now!
How to Add Social Media Reviews Widget to WordPress (Facebook)
Since Facebook’s the number 1 social media platform for reviews, I’ll use it for our example below.
Ready to add a Facebook reviews widget so you can use the power of social proof to supercharge your business? Start by following the tutorial below:
Step 1: Install and Activate the Reviews Feed Pro Plugin
To start, get your copy of Reviews Feed Pro here and then install the plugin on your WordPress website.
Don’t know how you can do this? Check out this guide on how to install a WordPress plugin for step-by-step instructions.
With that done, you can go ahead and create your new widget in step 2.
Step 2: Create Your Social Media Review Widget
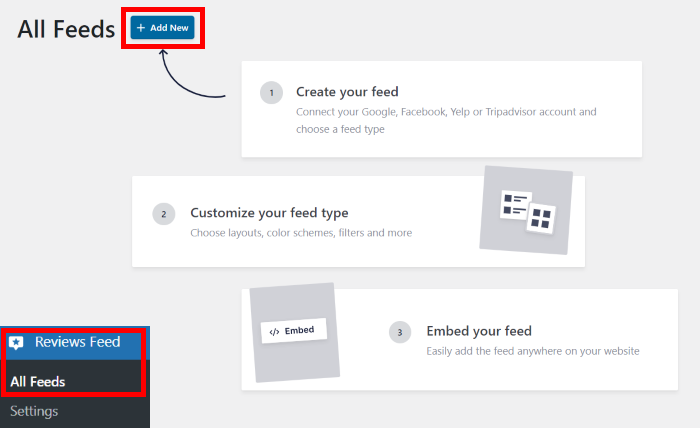
Now, it’s time to create your Facebook review widget using the plugin. First, go to the Reviews Feed » All Feeds menu from your dashboard.
On the new page, click on the Add New button in the top left corner.
After that, you can see the types of review feeds you can create with this plugin. Reviews Feed Pro lets you embed testimonials from Facebook, Tripadvisor reviews, Yelp, WordPress.org, Trustpilot and Google.
To continue, select the Facebook option here and then click on Next.
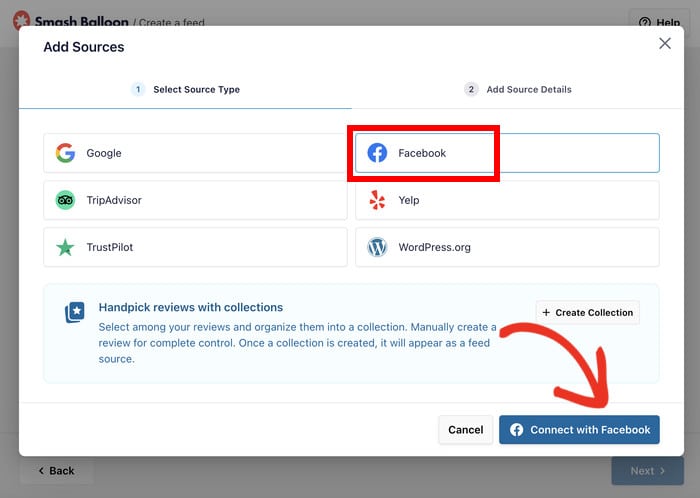
And now you’ve created your Facebook review widget. After this, it’s time to go to step 3 and connect it to Facebook.
Step 3: Connect Your Social Media Review Widget to Facebook
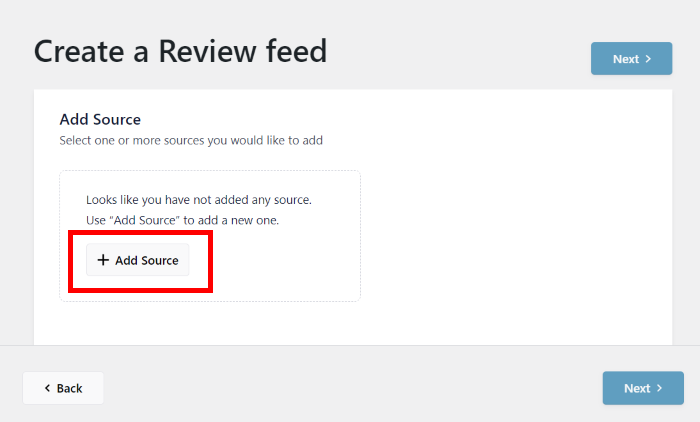
For your new Facebook review widget to work, you have to connect it to a Facebook page. To do that, click on the Add Source button on the popup.
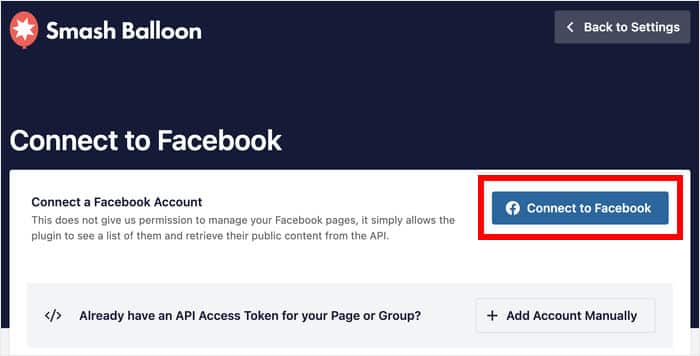
The next page offers options for connecting your Facebook account, including a standard method and an API key option for advanced users. For now, let’s go ahead and click on the Connect to Facebook button.
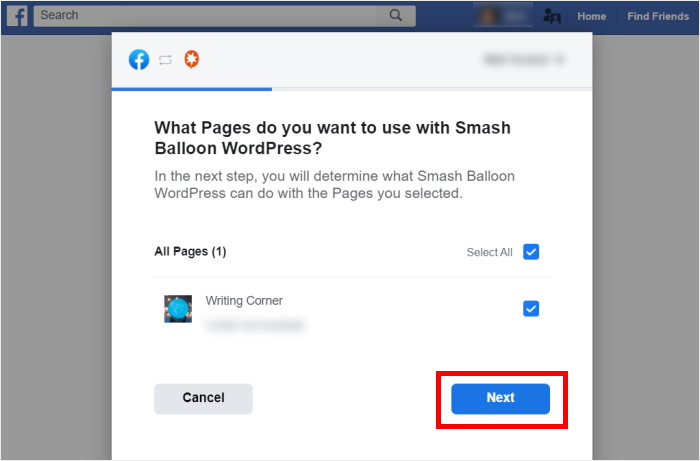
I’ll connect using a Facebook page for our example here. Simply select your Facebook page from the list and then click on Next.
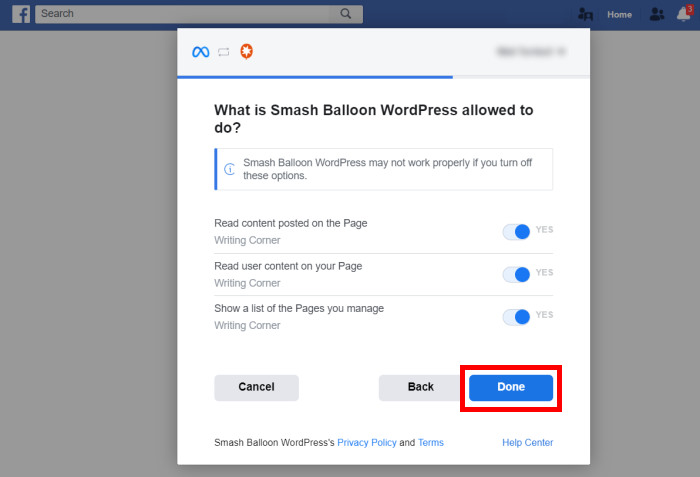
After you do that, Reviews Feed Pro will now send you to Facebook so you can give read-only access to the plugin.
Since the access is read-only, the plugin is completely safe, and it can’t make any changes to your Facebook account.
To finish giving the read-only access, click on Done on the popup.
You’ll now be back on your website, where you can confirm the new Facebook page as the source. Select the Facebook page that you connected and then click on Add Pages as Source.
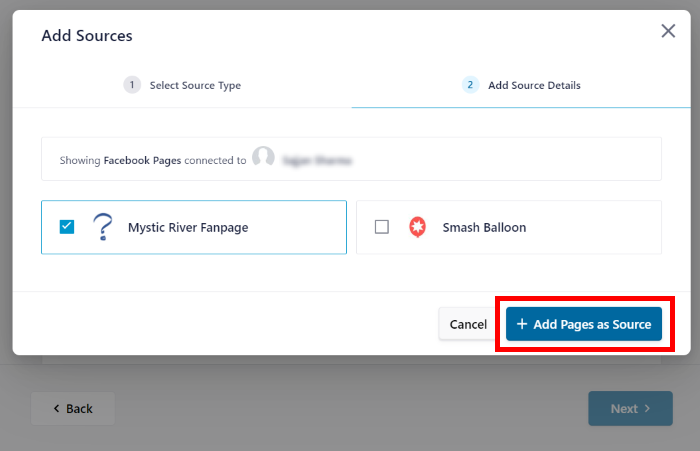
Honestly, I’m not a WordPress expert, so I like that Reviews Feed Pro lets me select this source directly from my website whenever I make new social media review widget from now on.
Finally, click on Next to connect your new reviews widget to this source.
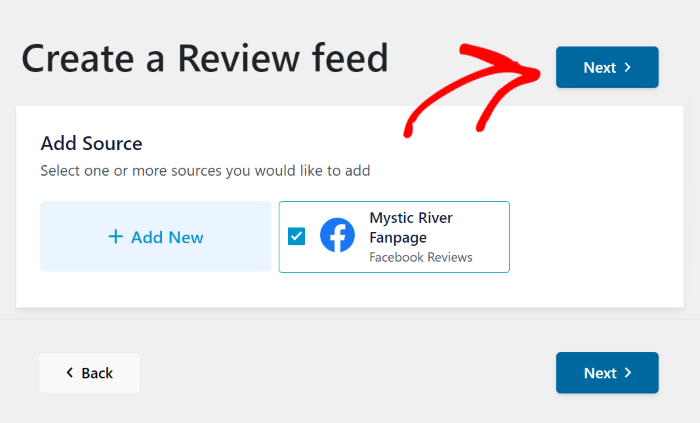
Once you do that, you can customize the design of your Facebook review widget in step 5.
Step 4: Customize Your Social Media Review Widget
To help you customize your review widget easily, this plugin allows you to import a pre-built template. Reviews Feed Pro comes with 7 different feed templates to choose from:
- Default
- Simple Cards
- Masonry
- Single Review
- Showcase Carousel
- Carousel
- Grid Carousel
All you have to do is select your feed template and then click on the Next button.
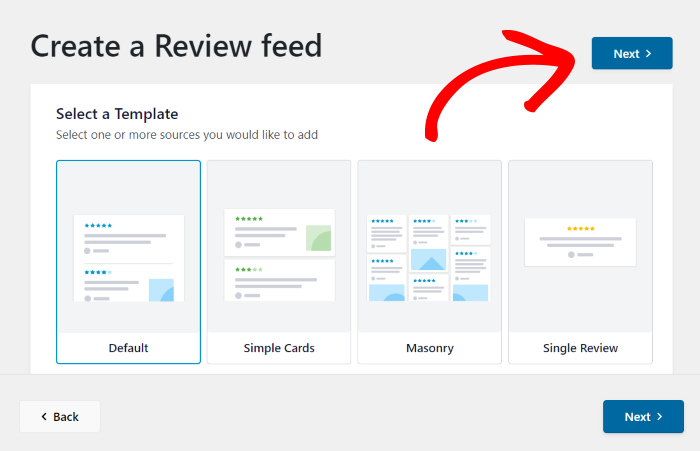
You will now see your Facebook review widget open in the visual feed editor.
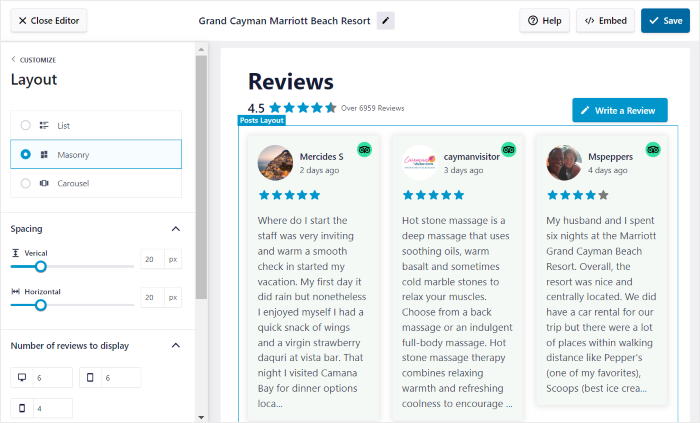
On the left, you can find all the customization options for your widget. That includes the feed template, layout, header style, review elements, and much more.
And on the right, you have a live preview where you can see how your social media review widget looks.
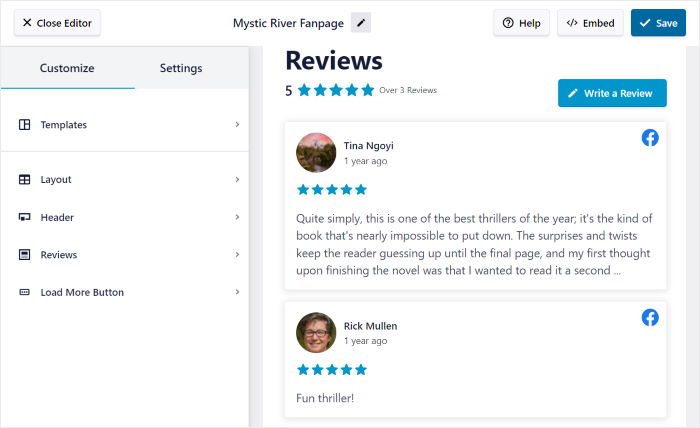
To start customizing, we can use the visual feed editor to change the layout of the reviews on your social media widget.
First, click on the Feed Layout option on the left panel.
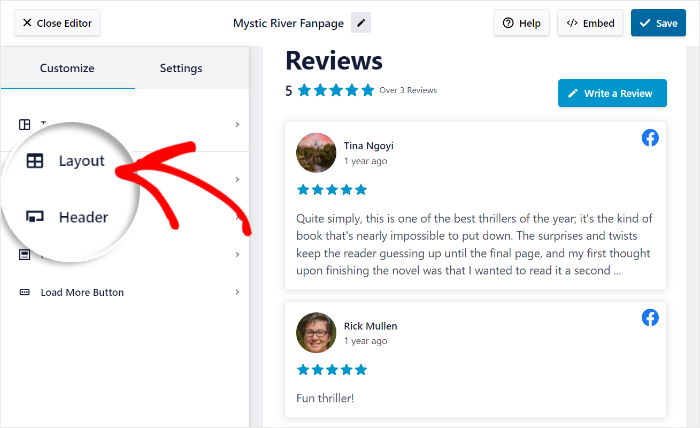
You can now pick from the 3 different layout options: List, Masonry, and Carousel.
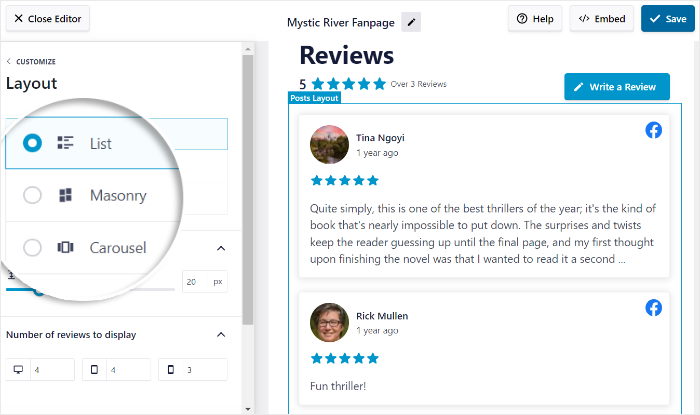
If you want each review to be more visible, you can show them in a single column using the list option.
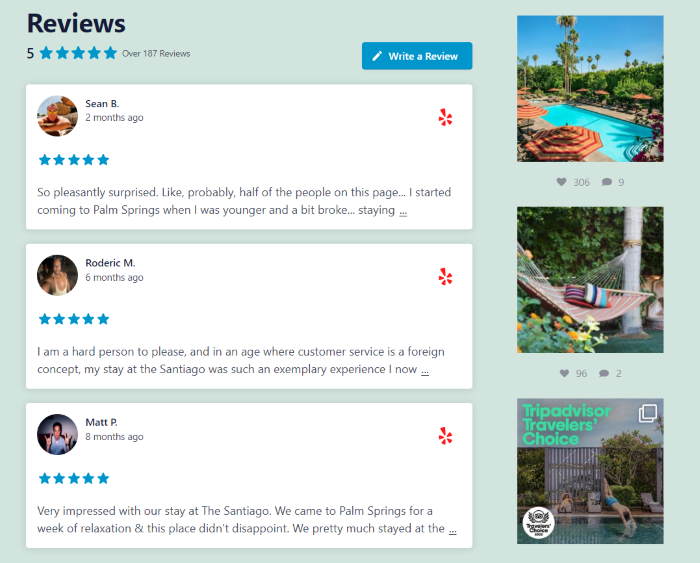
To show lots of Facebook reviews at once, you have the masonry option. In this layout, your reviews will appear in multiple columns.
Personally, my clients like using the masonry layout for their social media review widgets since this lets them display tons of reviews at a glance.
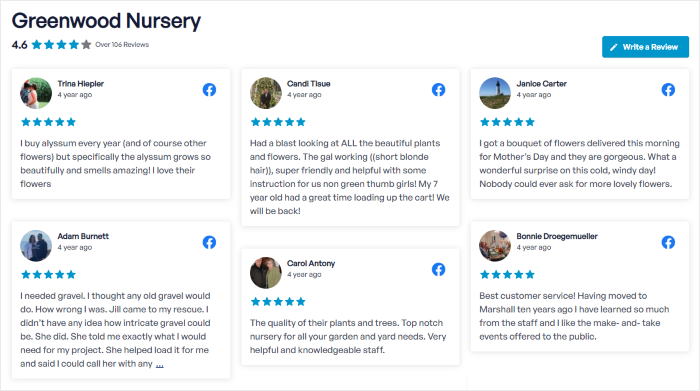
Finally, you can use a Facebook carousel to show all of your reviews. Your visitors will have another great way to interact with your site that way.

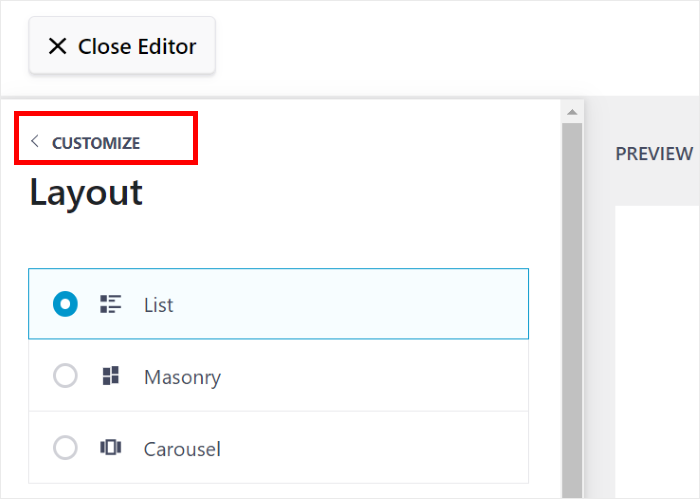
After you pick the layout for your review widget, click on Save to confirm your changes. To continue customizing, use the small Customize button to go back to the previous options.
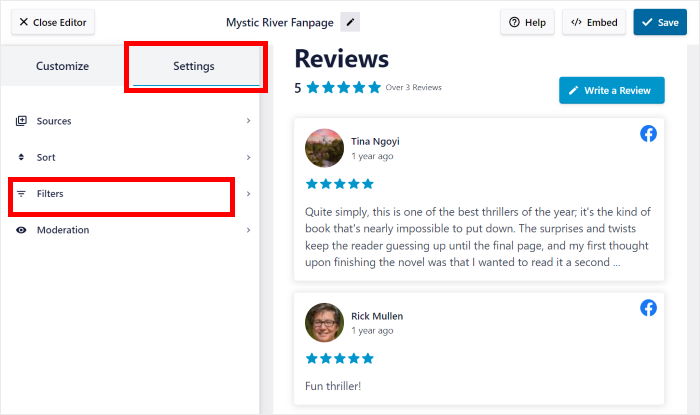
Now, you can use the settings to choose which reviews show up on your feed. Click on the Settings tab on the top and then select the Filters option to continue.
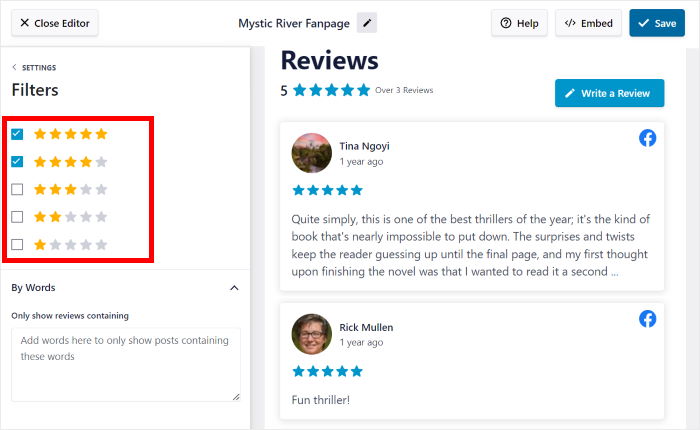
From here, you can use user-friendly filters to control the content of your reviews feed. For instance, you can check the boxes on the left to only show reviews with those specific ratings.
After you’re happy with your social media reviews feed, click on the Save button once more.
And just like that, you can customize the rest of your Facebook review widget. In a few clicks, you can use the options to edit your header style, review elements, number of reviews, and more.
Once you’re satisfied, click on Save and go to step 5, where you finally embed the reviews widget on your website.
Step 5: Embed Your Social Media Review Widget
Now that you’ve customized your Facebook review widget, it’s time to display it on your site. You can do that right from your visual feed editor. First, click on the Embed button at the top.
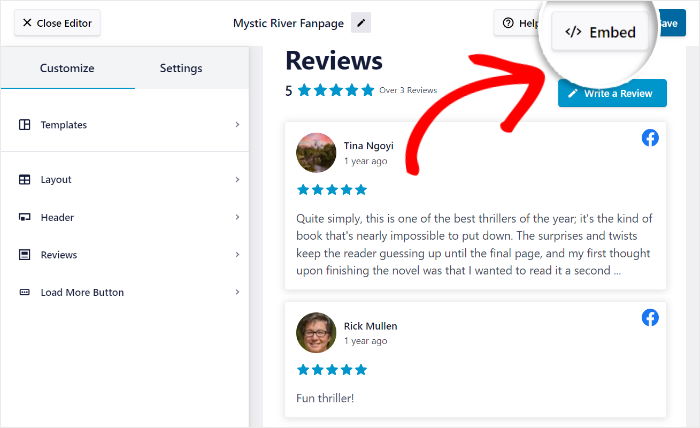
This will open a popup where you can choose the location of your review widget. The options include WordPress pages, posts, or widget-ready areas.
To continue, click on Add to a Widget here.
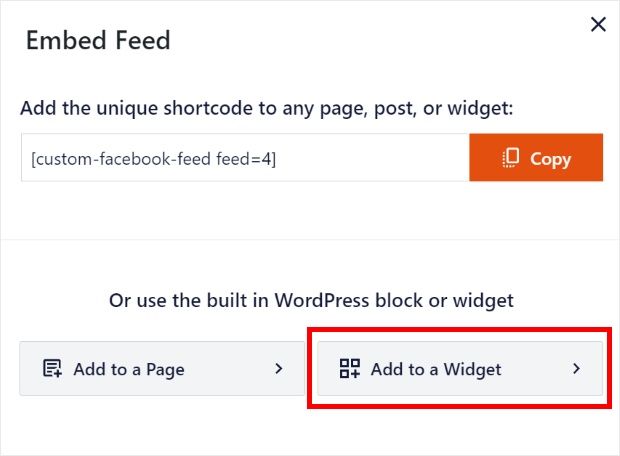
After you do that, the plugin will open the Widgets page that shows all of the active widgets on your website.
Now you can click on the Sidebar panel to add your new Facebook review widget on your website sidebar.
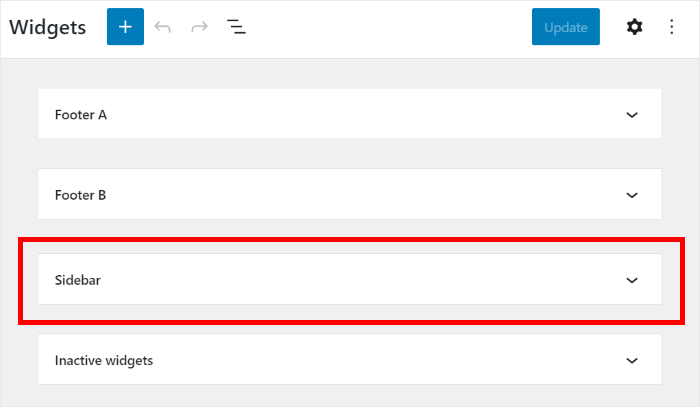
In this tutorial, we’ll use the sidebar to show our reviews.
You can also add your widget to other parts of your website. To do that, just click on the other panels on this page.
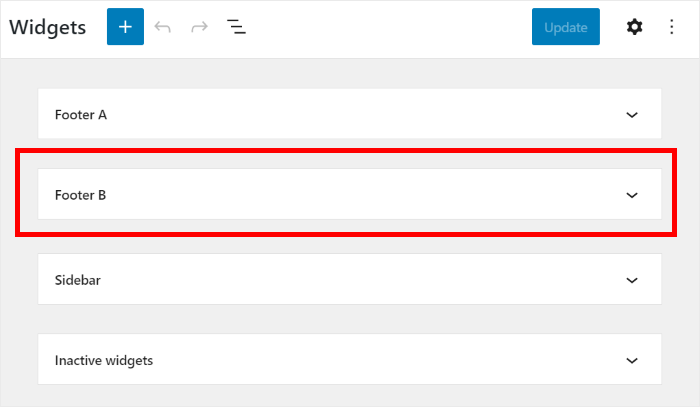
To add a new widget to the sidebar or footer, click on the plus icon (+) at the bottom. After that, select the Reviews Feed option from the options.
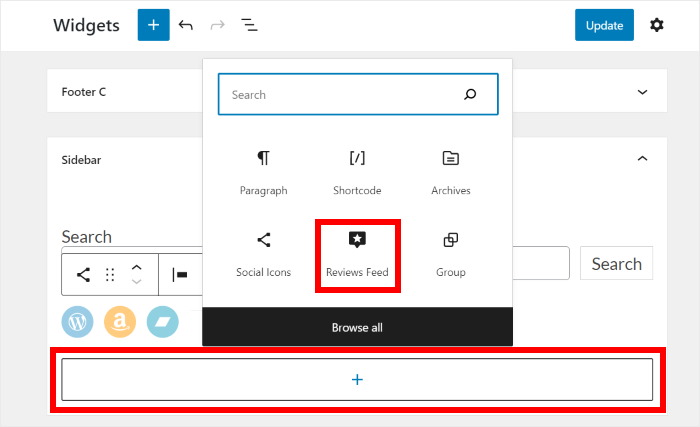
Finally, when you check out your website’s sidebar, you can now see your social media review widget displayed like this:
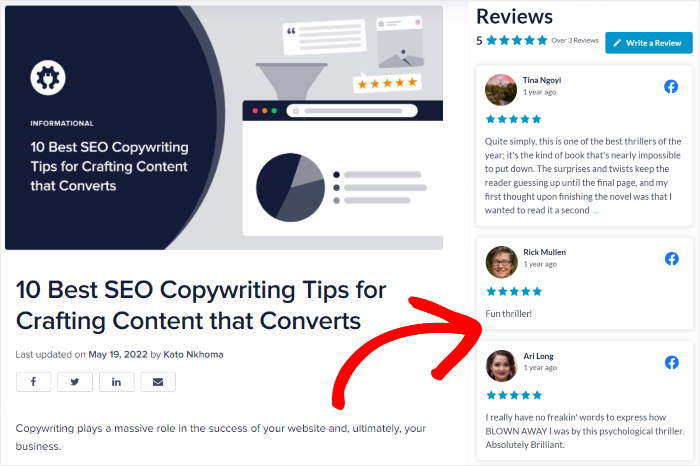
Using the plugin to display all your Facebook reviews is much better than embedding single reviews manually, right?
With the Reviews Feed Pro plugin, you can make similar review feeds to show content from Tripadvisor, Yelp, and Google Reviews.
All you have to do is select a different feed type and follow the same instructions as above.
3 Social Media Review Widget Examples
Already know how you can use Smash Balloon’s Reviews Feed plugin to add review widgets to your website?
Great! For more social media review widget examples, check them out below.
1. Add Instagram Product Review Posts from Real People
Aside from using words, customers can also use images to show their feelings about your brand. You can show an Instagram feed of your customers using your product by creating a branded hashtag.
For example, Lululemon created the hashtag #thesweatlife to encourage their users to post on Instagram using this hashtag.

User-generated content (UGC) is more convincing since it features real people who actually use your products. So, how can you show this nicely curated feed of Instagram reviews in your website footer?

To display Instagram reviews using hashtags, check out this tutorial on how you can easily display an Instagram hashtag feed on your WordPress.
2. Show Twitter Testimonials from Happy Customers
Another way you can show valuable feedback from your happy customers is by showing your Twitter feed.
By showing your Twitter feed, you can feature tweets that mention your Twitter username and display them on your website.
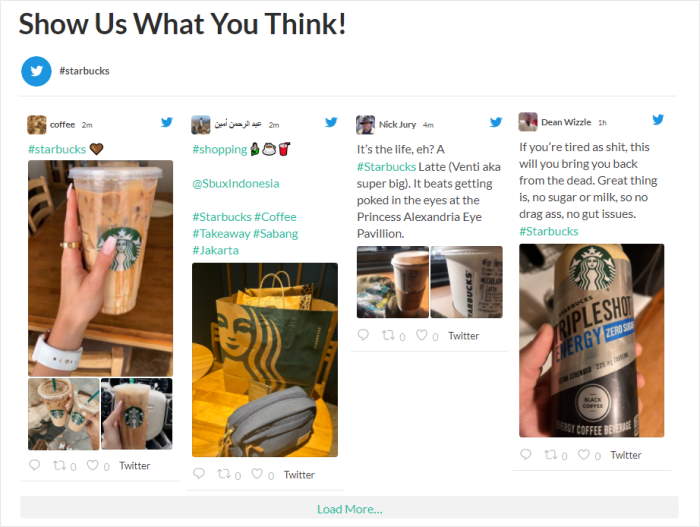
This is another great way to use social proof to boost your brand’s credibility — the more satisfied users you have, the more convinced your prospects will be to give you a chance.
You can also use Smash Balloon’s Twitter Feeds Pro plugin to display a Twitter review widget on your website. Here’s the complete tutorial on adding Twitter widgets to help you do this.
3. Display Video Testimonials on Your Sidebar
Did you know that 4 times as many customers would rather watch a product video than read about it?
Displaying your video testimonials on your WordPress can also help you get the attention of your site visitors.
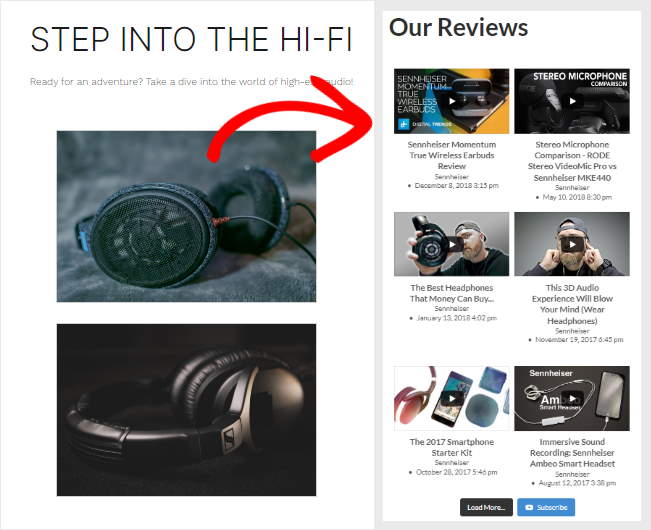
And video reviews aren’t just helpful in standing out from the crowd. You can use them for customer conversion, too. After all, 2 out of 3 people are more likely to buy after watching a video testimonial.
For you to add a YouTube widget to your website, check out this step-by-step tutorial so you can do this for your brand.
Conclusion and Next Steps
Adding a social media review widget to your WordPress site doesn’t have to be complicated.
With Smash Balloon’s Reviews Feed Pro, you can have a powerful review display up and running on your site in minutes, not hours.
I know that trying to gather reviews from different places like Google, Facebook, or Yelp and get them to show up nicely on your website can be tricky.
That’s exactly the kind of problem I see Reviews Feed Pro fix. It makes embedding your social media reviews widget simple. You don’t need any coding knowledge, and your reviews will look great on your pages, automatically updating with your latest feedback.
Ready to easily show off positive customer reviews from your social media platforms on your website? Here’s what I suggest doing next:
- Get your copy of Reviews Feed Pro. (Remember, you can try it risk-free with a 14-day money-back guarantee!)
- Follow the simple setup steps shown in the article.
- See how your new reviews widget looks on both desktop and mobile devices.
- Feel confident knowing your latest customer praise is always visible on your site.
Got questions about adding a social media review widget to your WordPress site using Reviews Feed Pro? Ask away in the comments below!
Popular WordPress Posts on Social Media Review Widgets
- How to Get Facebook Reviews for Your Business Page
- How to Fix Customer Reviews Not Showing Up on Google
- How to Display Facebook Reviews in Elementor
You can also check out our list of genius testimonial examples that you can copy.
