


 Social Wall
  Feed Analytics

From my experience in digital marketing, I know X (Twitter) is a great place to share quick updates and connect with your audience in real-time.
Whether you want to wow your site visitors or grow your following, an X (Twitter) timeline can be a great addition to your website.
Embedding this X (Twitter) timeline directly onto your website can bring that dynamic content to your own online space.
It might seem a bit tough at first (I know how annoying embed codes are) so I’ll keep things simple and walk you through 2 ways of embedding an X (Twitter) timeline.
Feel free to click on a section below if you want to skip ahead.
Why Embed an X (Twitter) Timeline on Your Website
When you make an X post, you have a small window of time when you can actively get engagement. And it’s not just me saying it; this is backed by research and scientific data.
“With our analysis, we can show that on average the peak of impressions per second is 72 seconds after an X post was sent and that after 24 hours, no relevant number of impressions can be observed for ∼95% of all X posts.”
– Jürgen Pfeffer, Professor of Computational Social Science & Big Data
But we’re not here to mourn our lost engagement. I’m bringing you a quick and easy way to keep getting X (Twitter) engagement long after posting.
You can embed your X posts on your website, and you can keep converting site traffic into views, likes, replies, and reposts – all without any active effort.

And that’s just the beginning. You can do a lot by embedding your X (Twitter) timeline on your website:
- Increase Time on Site: Visitors stay longer to scroll through your social content.
- Boost Follower Count: Users can follow you directly from your website without leaving the page.
- Social Proof: Displaying positive reviews and testimonials builds trust and boosts your sales.
- Fresh Content: Your site looks active and updated, which can boost your website’s SEO.
Method 1: How to Manually Embed an X (Twitter) Timeline
Let’s say you want to embed your X (Twitter) timeline on your website and reap all the benefits that I just outlined. The process goes something like this:
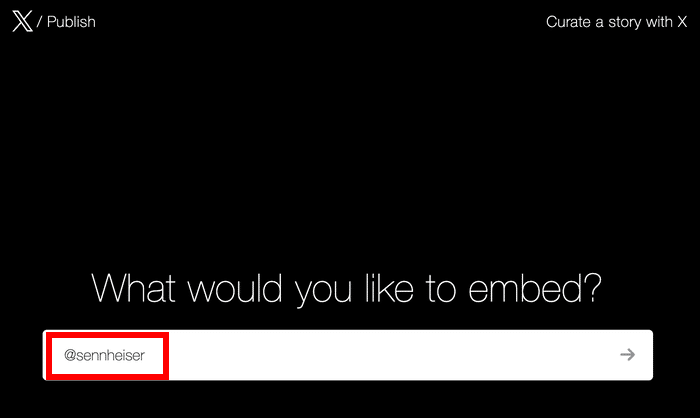
- Step 1: Use the Twitter publish page to generate an embed code for your timeline.
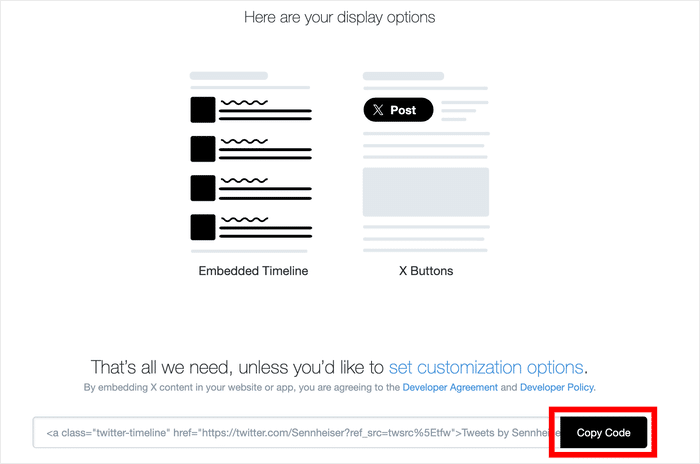
- Step 2: Change the embed size and language using the basic customization options
- Step 3: Tweak the code if you want to customize how your X (Twitter) embed looks.
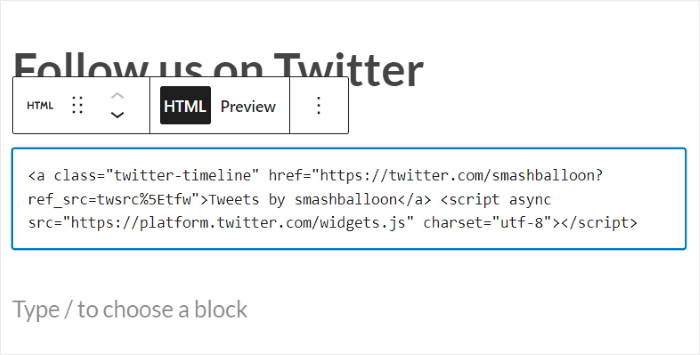
- Step 4: Open the WordPress page or post where you want to embed the X posts.
- Step 5: Manually insert the code from earlier into this page or post.
- Step 6: Continue tweaking the code until you’re satisfied with your timeline.
Now, this isn’t too crazy of a process, but there are a few obvious downsides to consider:
- Lack of Design Options: If you’re not used to coding, you can’t really control the design of your embedded X (Twitter) timeline.
- Lack of Control: This method doesn’t let you control which X posts are embedded, so you can’t really highlight important X posts.
- Lack of Customer Support: Let’s say something breaks on your site when you’re inserting the code. You won’t have a support team to help you fix things.
- Lack of Reliability: If X (Twitter) goes offline for a bit (which is possible), then your embed will also stop working.
Method 2: Easiest Way to Embed an X (Twitter) Timeline
The most efficient way to add an X (Twitter) timeline to WordPress is by using the Smash Balloon X (Twitter) Feed Pro plugin.

With this plugin, you can create a lot more powerful X (Twitter) timeline feeds with a much simpler process.
In fact, I was able to create, customize, and embed an X (Twitter) timeline in literal minutes – and without touching a single line of embed code.
Here are a few more highlights of this X (Twitter) feed plugin:
- On top of embedding X (Twitter) timelines, you can embed X (Twitter) hashtag feeds and even search results.
- You can just follow the 3-step guided flow and have an X (Twitter) feed ready to go in a few clicks with zero coding.
- The plugin comes with a collection of templates with unique designs for you to import in a single click
- You can moderate your feed and set up filters to choose which X posts will show up on your website.
- For more control over your X (Twitter) timeline, you get a live editor with tons of customization options to play with.
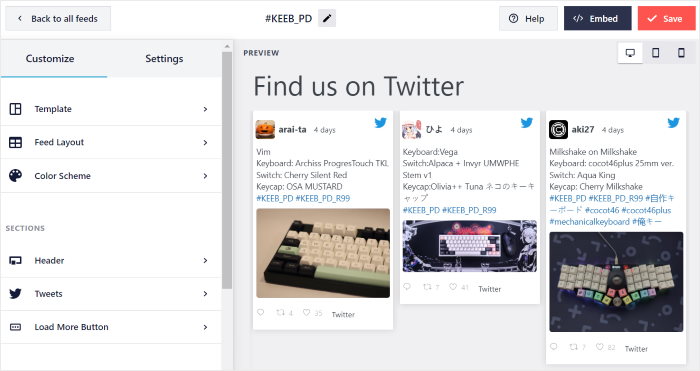
X (Twitter) Feed Pro is a pretty lightweight tool as well. I had tons of X posts, photos, and videos, on my website, and everything was loading as fast as ever.
I don’t expect much optimization from WordPress plugins, so this was a pleasant surprise.
All in all, X (Twitter) Feed Pro is a really handy tool. The glowing 4.9/5 stars rating from over 150,000 active users does a pretty good job of showing how useful it can be.

You can grab your copy of X (Twitter) Feed Pro here and test out the plugin yourself.
There’s a 14-day money-back guarantee with no questions asked, so you get plenty of time to check if it’s the right fit for you with zero risk.
How to Embed an X (Twitter) Timeline (Using a Plugin)
Now, let’s see how you can use the plugin to embed X (Twitter) timelines on your website. I’ll go through it step-by-step, so, let’s get started:
Step 1: Download the Smash Balloon X (Twitter) Feed Pro Plugin
First, go and grab your copy of the X (Twitter) Feed Pro plugin from here. Once you have the plugin, you can then install and activate it on your website.
If you need a quick refresher, you can look at this guide on how to install a WordPress plugin step-by-step.
Step 2: Create a New X (Twitter) Feed
In this step, you can create a new feed that you can use to show your X (Twitter) timeline.
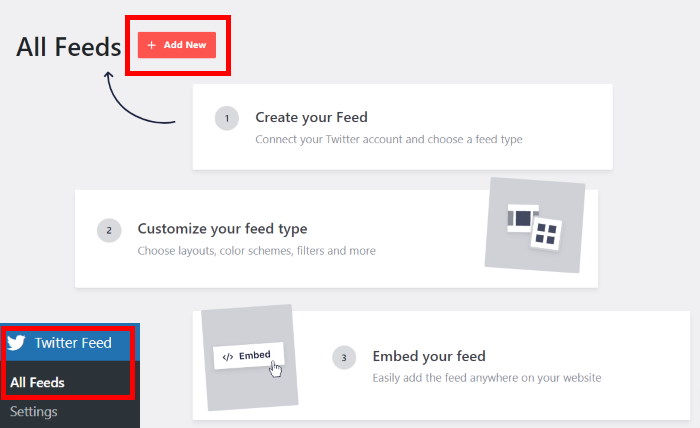
To get started, navigate to the X (Twitter) Feed » All Feeds menu from your WordPress dashboard and then click on the Add New button.
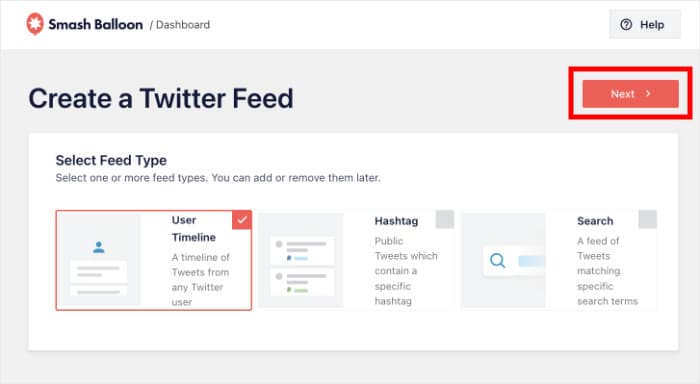
After you do that, X (Twitter) Feed Pro will ask you to choose the type of content you want to show on your feed. There are 3 options here:
- User Timeline: Pick an X (Twitter) account and show their timeline
- Hashtag: Display X posts with your selected hashtags
- Search: Enter search terms and embed the search results
Let’s go ahead and select the User Timeline option for now and then click on Next.
Step 3: Connect Your X (Twitter) Timeline
Now that you’ve created a feed, you can connect it to your X (Twitter) account so that it can show the X posts from your timeline.
To do that, click on the Connect button on the popup.
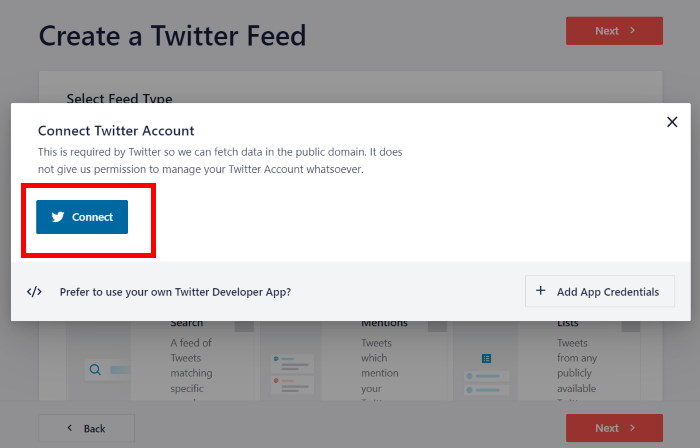
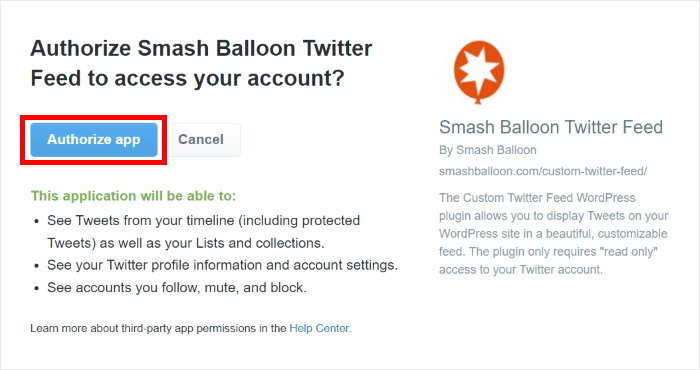
This will open the X (Twitter) website, where you can connect your account to the X (Twitter) Feed Pro plugin. You can do this by giving the plugin read-only access to your account.
Using this access, the plugin can only view our content and can’t make changes at all, which is a pretty big relief.
So, click on the Authorize app button.
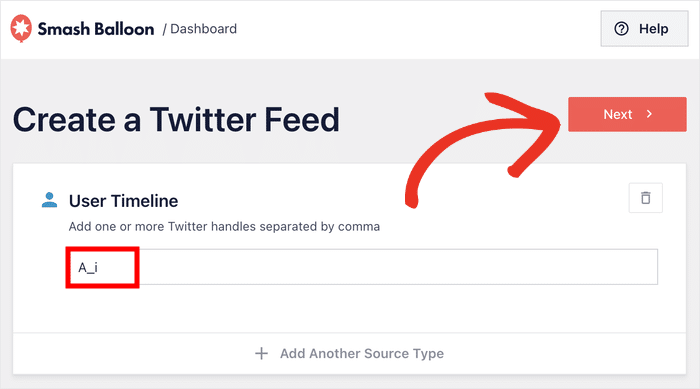
Next, you can select which X (Twitter) timeline you want to show on your website. You can enter your own X (Twitter) account name or pick to show the timeline of any other X (Twitter) user.
Just enter the X (Twitter) profile name into the popup and then click on Next.
Step 4: Customize Your X (Twitter) Timeline Feed
In a few seconds, the plugin will do its magic and create an X (Twitter) timeline feed that automatically matches your design. It’s one of the features I like the most, since it’s such a massive time saver.
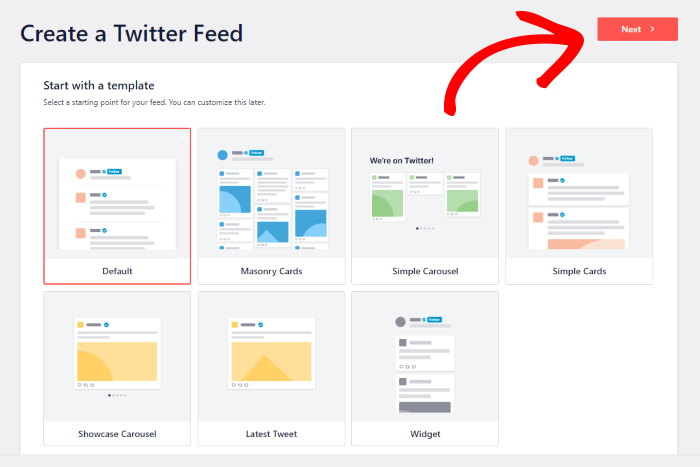
You also get different ways to customize the newly created X (Twitter) feed. First, you can pick from a collection of feed templates to import for your feed:
- Default
- Masonry cards
- Simple carousel
- Simple cards
- Showcase carousel
- Latest X post
- Widget
Just pick a feed template whose design you prefer and then click on Next.
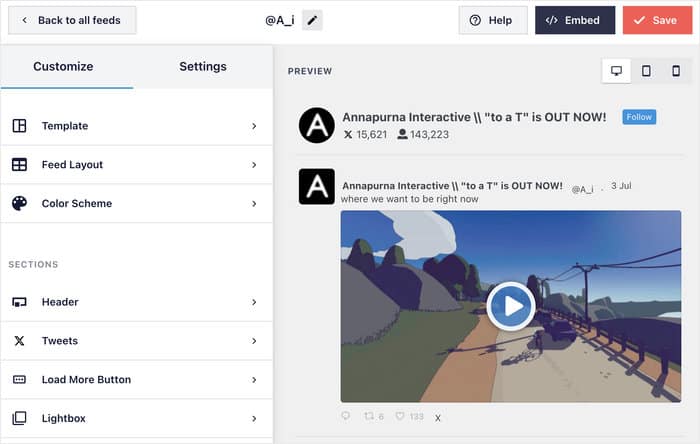
After you pick the template, X (Twitter) Feed Pro will send you to the live feed editor, where you can change how your X (Twitter) timeline looks before embedding it.
Towards the left, you can find the customization options to change your feed layout, background, number of X posts, colors, header style, load more button, and much more.
On the right, you can see a live preview of your X (Twitter) timeline feed. Whenever you make any changes, you can see the results using the real-time preview.
I’ll quickly go through a few major options to show you how the customizer works.
First, click on the Feed Layout option on the left.
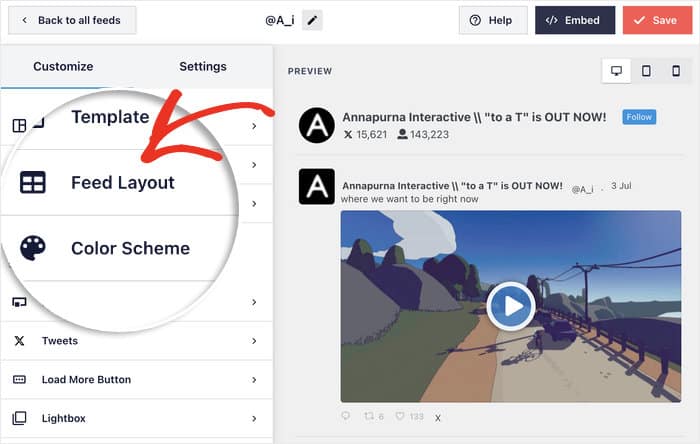
Now, you can choose from 3 different feed layouts for your timeline feed:
- List: Great for making each X post clearly visible
- Masonry: Can display tons of X posts at the same time
- Carousel: Makes your website interactive with a slider
Below the layout options, you can find the options to choose how many posts you show on your timeline feed at once.
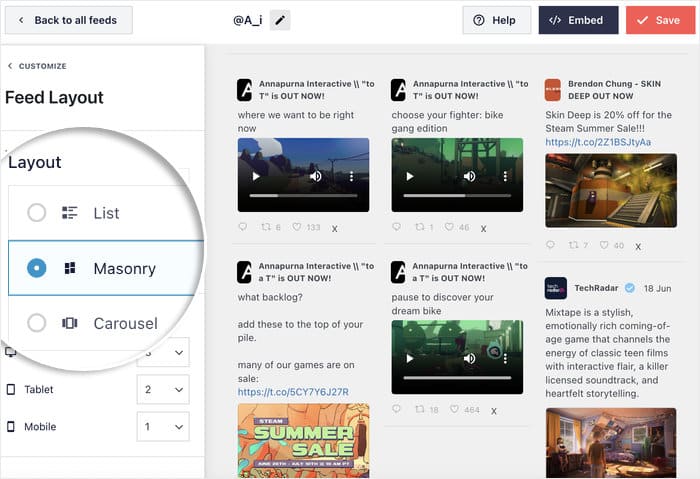
You can pick the list layout to show a single column of X (Twitter) content that is similar to the look of the official X (Twitter) website.
Plus, all of your X posts will be more clearly visible this way.

Next, you have the masonry layout, which shows lots of X posts at once in multiple columns.
It’s a great way to show a gallery of X (Twitter) photos and videos on your website.

Finally, you have the carousel layout that you can use to turn your X (Twitter) timeline into a beautiful slideshow.
As a result, you can easily make your website more interactive.

After you select the timeline feed layout, click on Save to confirm the changes.
You can then continue customizing your X (Twitter) timeline using this live feed editor. To do that, first, click on the Customize button at the top.
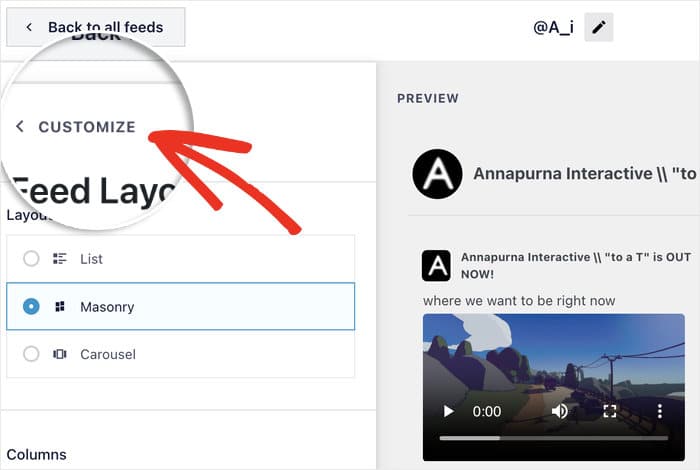
After changing the layout, I’ll show you how to change the design of your X posts.
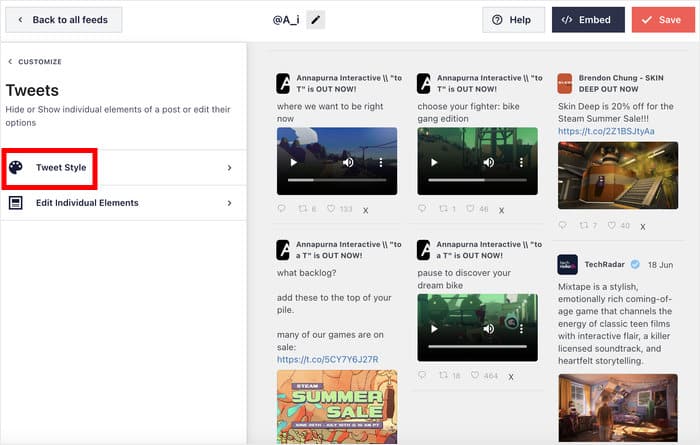
For that, click on the X posts option on the left.
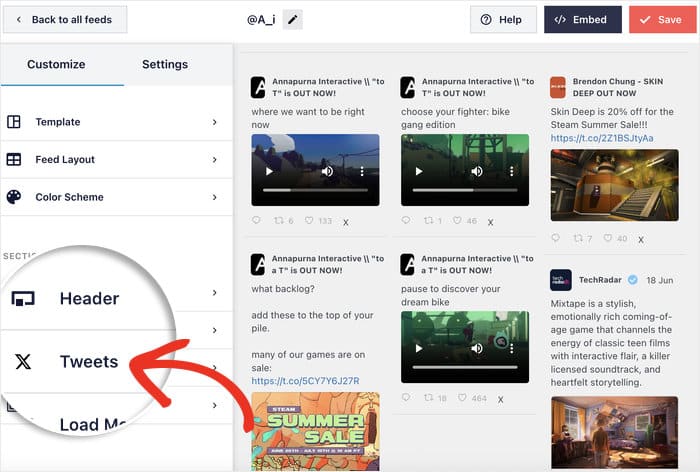
From here, you can customize the general style of the X posts, or design each of the elements in these X posts instead.
For this example, I’ll go with X post Style here to keep things short.
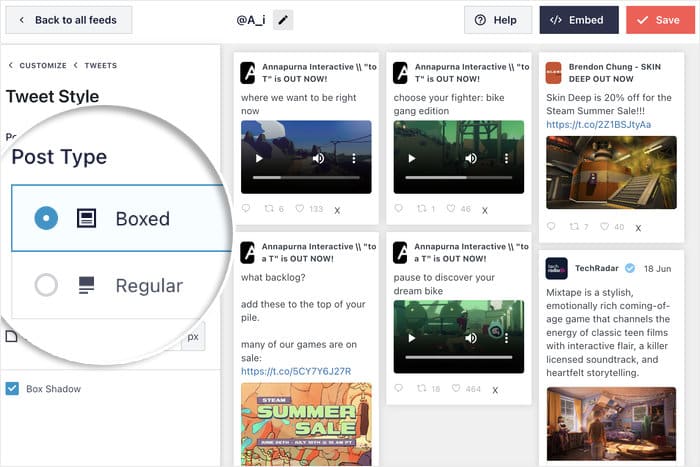
Now, you can choose between 2 types of designs for X (Twitter) posts:
- Boxed: Place a box around each of your X posts
- Regular: Embed the X posts directly on the background
I’ll pick the Boxed layout here. You can also change the color and margins of the box around the X posts.
Like before, Save your changes before you continue.
This is basically how the whole customizer works. Pick the design option, check how it looks on your right, and tweak the design until you’re happy with your X (Twitter) timeline feed.
Finally, click on the Save button before moving to the final step.
Pro Tip: If you are placing the timeline in a sidebar, you can disable the “Header” and switch to a list layout so it fits cleanly on your website.
Step 5: Embed an X (Twitter) Timeline on Your Website
With the plugin, you get to choose from 2 ways to add X (Twitter) timelines to your site:
- Add an X (Twitter) feed timeline on a WordPress page
- Add an X (Twitter) feed timeline on the WordPress sidebar or footer as an X (Twitter) widget
We’re going to show you both ways to embed X (Twitter) timelines below:
Embed an X (Twitter) Timeline on a WordPress Page
Using the live feed editor, you can start embedding your X (Twitter) content with ease.
First, click on the Embed button at the top of the editor.
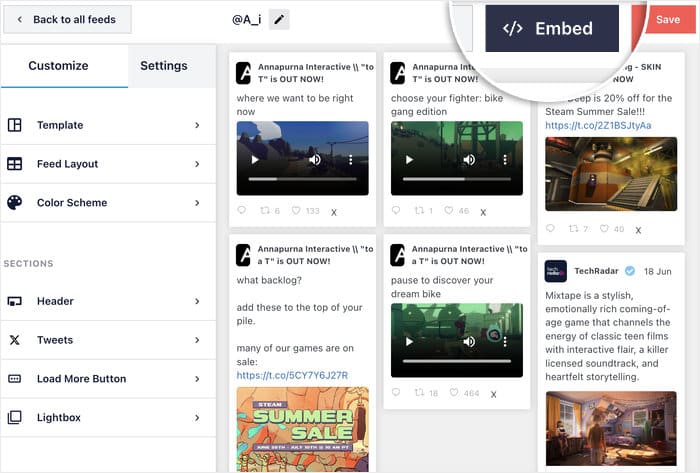
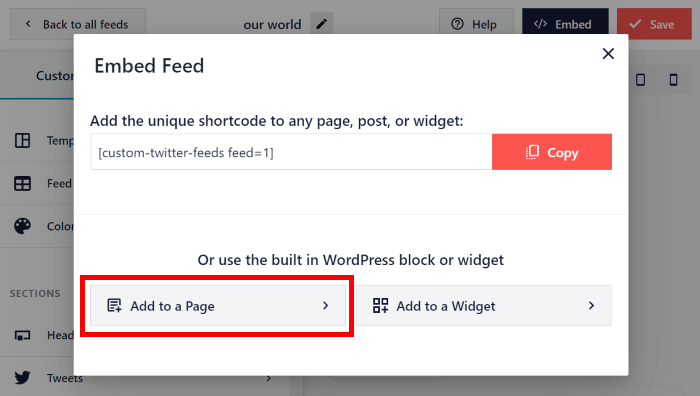
This will open a new popup where you can choose to embed your timeline on a page, display it as a widget, or manually copy the shortcode.
To continue, you can click on the Add to a Page button.
Now, you’ll see all the pages on your WordPress website.
Simply choose the page where you want to show your timeline and then click on the Add button below.
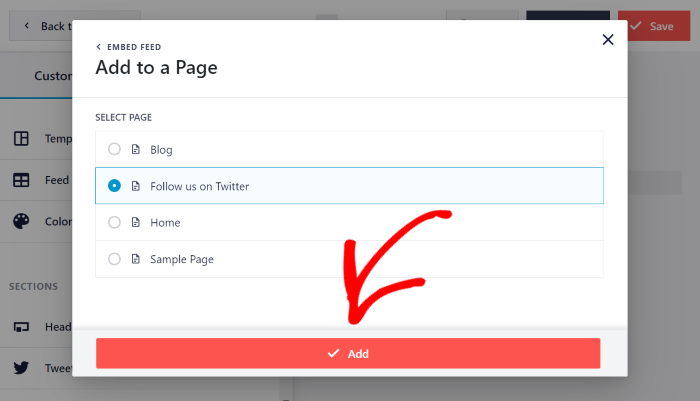
Once you do that, X (Twitter) Feed Pro will open the page in the WordPress editor.
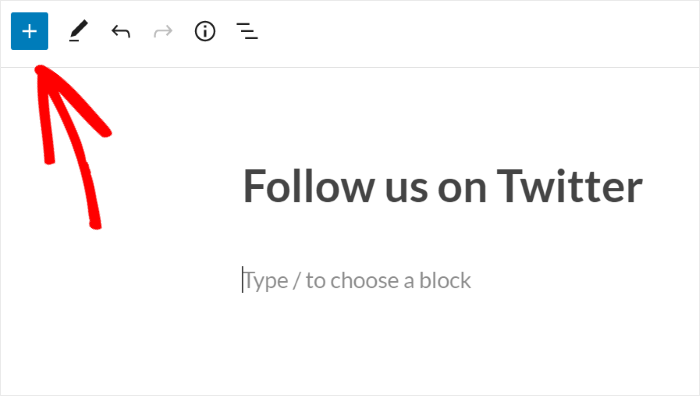
You can then add a new content block by clicking on the plus (+) icon.
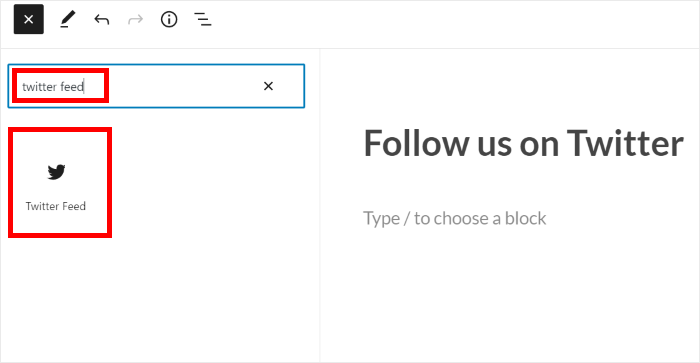
Using the search bar at the top, search for the “twitter feed” block.
Then click on the X (Twitter) Feed block from the search results below to embed your X (Twitter) timeline on this page.
To confirm your changes, remember to click on the Update button at the top.
Just like that, you’ve embedded the X (Twitter) timeline on your WordPress page. Now you can open it to check how it looks to your visitors.
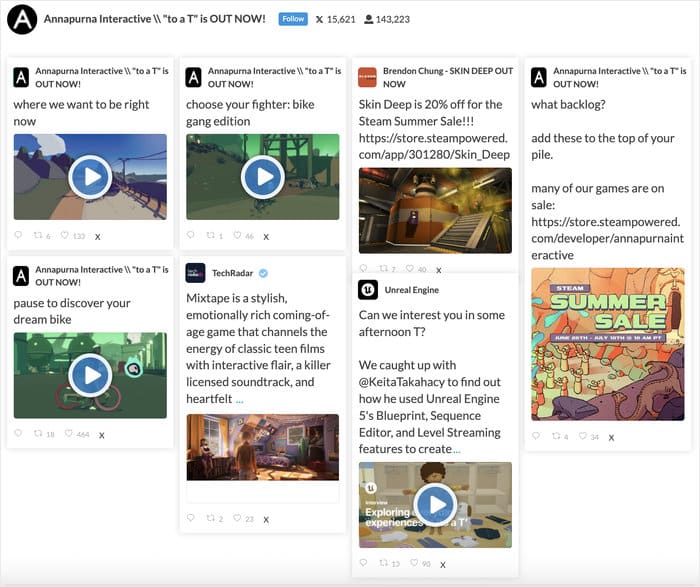
Embed an X (Twitter) Timeline on the WordPress Sidebar or Footer
You can also use X (Twitter) Feed Pro to show your timeline on your website’s sidebar or footer as an X (Twitter) widget.
To do that, you can use the live feed editor just like before.
If you want to open your X (Twitter) timeline feed in the live feed editor, just open the X (Twitter) Feed » All Feeds menu from your WordPress dashboard.
You can now see all of the feeds that you’ve created using the plugin.
To continue, simply click on the X (Twitter) timeline feed that you want to embed.
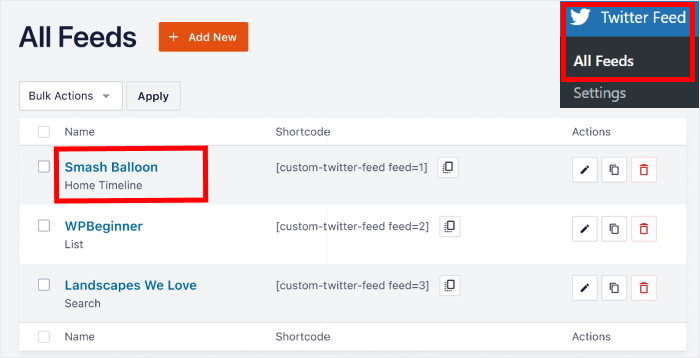
Clicking on it will open your X (Twitter) timeline feed in the live feed editor once again.
From there, click on the Embed button in the top right corner.
You can now choose the part of your website where you want to show X (Twitter) content.
This time, click on the Add to a Widget button to continue.
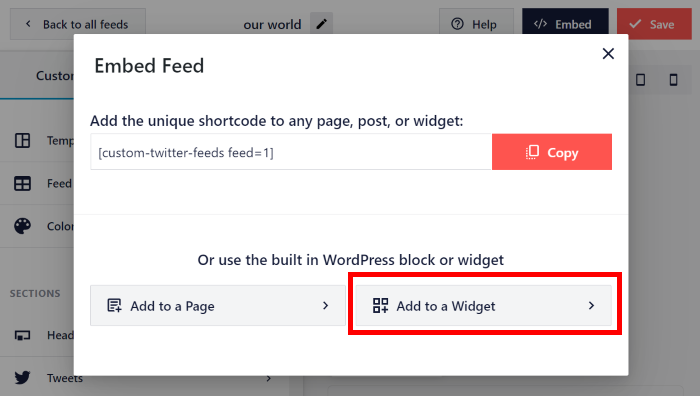
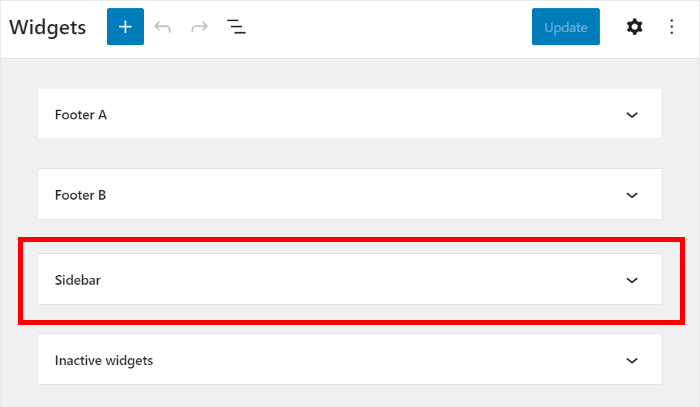
Doing that will send you to the Widgets page of your website. Now, you can choose between the Sidebar and Footer here.
For this example, I’ll pick Footer but the process is the same for either of them.
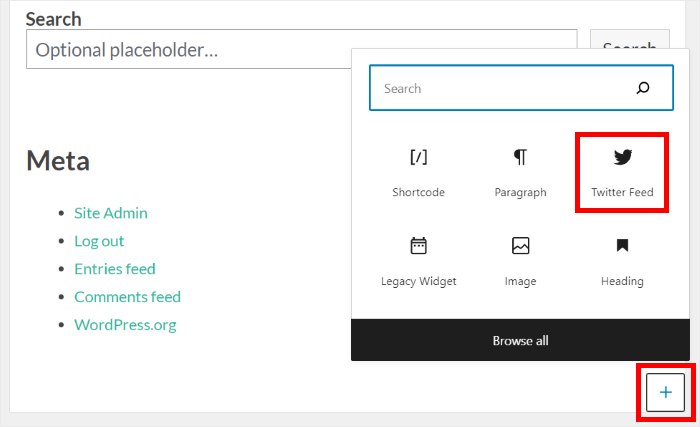
Next, create a new widget by clicking on the plus icon (+) at the bottom.
Finally, select the X (Twitter) Feed widget to embed your timeline.
Now, you can save your changes by clicking on the Update button at the top.
Just like that, you’ve created, customized, and embedded an X (Twitter) timeline on your WordPress website. To see how it looks, you can open your website and check.
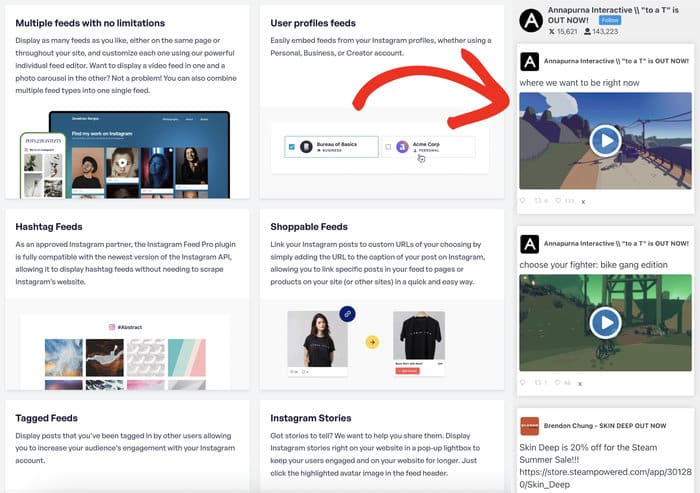
With that, you should be able to embed X (Twitter) timelines on your website. Like I said, it’s a pretty easy process if you’re using the right tool.
Just remember to keep a flow of engaging X posts going, and you can repost them on your website and keep getting engagement with ease.
Ready to display X (Twitter) timelines on your site? Get started with X (Twitter) Feed Pro today.
If you want more ways to integrate X (Twitter) with your website, we’ve got a list of the best X (Twitter) widgets to embed on your website.
Frequently Asked Questions
How does a Twitter timeline work?
Your Twitter timeline will show you a list of tweets from the accounts you follow, along with other recommended tweets. If you open any profile, Twitter will show you a timeline of all the tweets and retweets they’ve done.
How do I embed a Twitter post?
There are 2 ways you can do this. Option 1 is to generate an embed code, tweak the code, and insert it into your website. If this seems like a hassle then you can let a plugin like Twitter Feed Pro embed tweets for you instead. It’s quick, easy, and requires no coding. I personally go with the second option since it sidesteps the hassle of embed codes.
How many followers do you need to get a blue tick on Twitter?
I’ve got good news for you – there’s no follower requirements to get the blue tick. You just need to subscribe to X Premium and fit the eligibility criteria (more on that below.)
How can I buy a blue tick on Twitter/X?
Before you can get the blue tick, you’ll need to subscribe to X Premium. As long as your account is complete, active, secure, and non-deceptive, you’ll get a blue tick afterwards.
Other Social Media Guides and Tutorials
- Best TikTok Plugins for WordPress Websites (Must-Haves!)
- How to Add Instagram Feed on Your Website (Easiest Way)
- Best Link in Bio Tools for Instagram to Grow Your Followers
- How to Set Up Shoppable Instagram Feeds (For Small Businesses)








When embedded on a website, Twitter timeline is not showing latest tweets like earlier when a user is not logged into Twitter.
Any solution?
Hi Mango,
Thank you for contacting us! This could be a caching issue; for us to check this further, please open a support ticket using our form here: https://smashballoon.com/support/
Thanks! 🙂