


 Social Wall
  Feed Analytics


Embedding X (Twitter) content on your site is one of the easiest ways to add real-time social proof.
But when embeds stop working, it’s frustrating since you’re creating a worse impression of your brand. The good news is that the fix can be much simpler than you expect.
In this guide, I’ll walk you through the most common reasons X (Twitter) embeds stop working in WordPress and exactly how to fix each one.
You can learn how to deal with the URL mismatch bug, the oEmbed proxy error, Gutenberg and Elementor-specific issues, and more.
Why Is My X (Twitter) Embed Not Working?
X (Twitter) embeds break for a handful of specific reasons. Here are the most common ones:
- X.com vs. Twitter.com URL mismatch: WordPress cached your embed against the old
twitter.comURL. After the rebrand, that cache goes stale and the embed fails. - WordPress oEmbed proxy error: A security plugin or host firewall is blocking WordPress’s REST API, which it needs to fetch X post data.
- Plugin conflict: Another plugin is interfering with the oEmbed request or the block rendering.
- Outdated WordPress version: Older WordPress versions have known oEmbed bugs that have since been patched.
- Host-level restrictions: Some hosting providers block outbound requests that WordPress needs to load external embeds.
- API changes: X (Twitter) has made repeated changes to its API and oEmbed endpoint since 2022. Embeds that worked before can break without warning when these change.
Between the API changes, technical issues, WordPress updates, a lot of site owners are facing problems with X (Twitter) embeds recently. If yours have stopped working, this guide will help you fix them.
Why Add X (Twitter) Embeds to Your Website?
X (Twitter) is one of the fastest-moving sources of real-time content on the internet. So, embedding it on your site gives you a way to use that momentum directly.
Here’s what you can actually do with X (Twitter) embeds:
- Show Announcements: Embed your own X posts to surface your latest news, launches, or updates directly on your site without manually updating the page.
- Build Social Proof: Embed positive reviews, product demonstrations, and first impressions to show visitors that real people trust your brand.
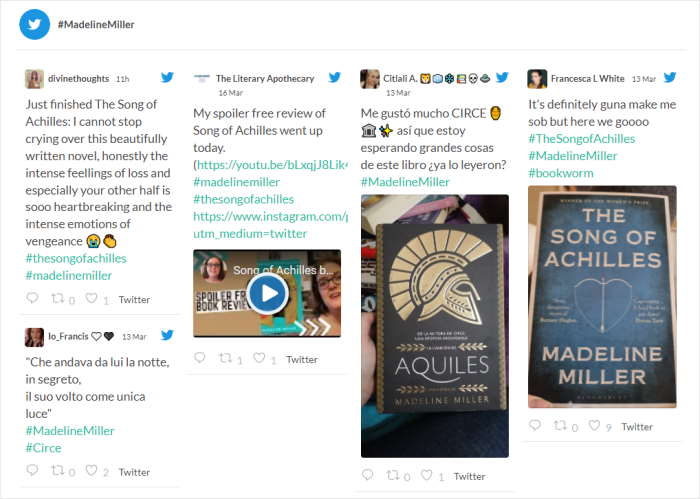
- Drive X (Twitter) Engagement: Every embedded X post is an opportunity for visitors to like, repost, or follow you without leaving your site.
- Add Credibility: Embedding X posts from industry figures, press, or happy customers is more convincing than writing it yourself.
How to Fix X (Twitter) Embeds Not Working in WordPress
In case your WordPress X (Twitter) embeds are not working properly, we’ve put together a simple guide to help you out.
Just follow the steps below if your embedded X (Twitter) feed isn’t working.
Step 1: Update Your WordPress Website
WordPress regularly gets new updates that add features, fix bugs, change settings, and much more.
But if your site isn’t up-to-date, you won’t have access to all these latest functionalities. Plus, the older features that you’ve got on your site can stop getting official support.
The good news? You can fix this issue in just a few clicks.
First, navigate to your WordPress dashboard and click on the Please update now button at the top.
If this button isn’t on your site, you can Step 2: Fix Plugin Conflicts because your WordPress site is up-to-date.
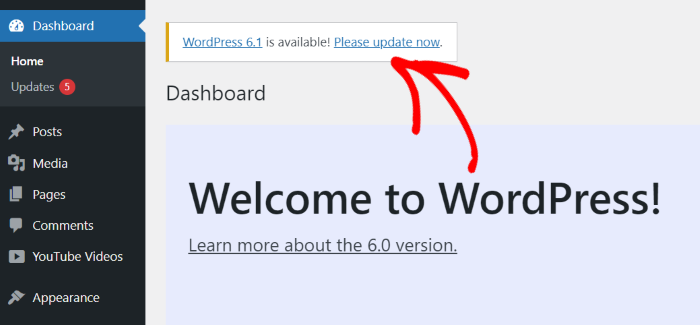
Once you click on the button, your website will show you more information about this update.
To continue, click on the blue Update button that shows the WordPress version you’re updating to.
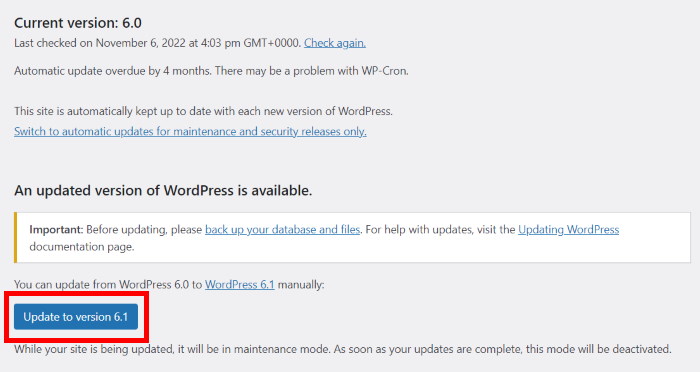
Now, all you have to do is wait for a few minutes, and your website will automatically be updated to the newest version.
You can then open your website in a browser (like Chrome or Firefox) and check if your X (Twitter) embeds are working.
If you’re still facing errors, it’s time to go to the next step.
To learn more, you can take a look at our guide on how to safely update your WordPress website.
Step 2: Fix Plugin Conflicts
While there are tons of amazing plugins that add useful features, some of them can cause problems on your website.
And sometimes, other plugins can stop your site from connecting to X (Twitter) API and break your embeds.
To solve this issue, you can try temporarily deactivating all of your plugins and check if that fixes your X (Twitter) embeds.
Ready to get started? First, open the Plugins » Installed Plugins menu from your dashboard area.
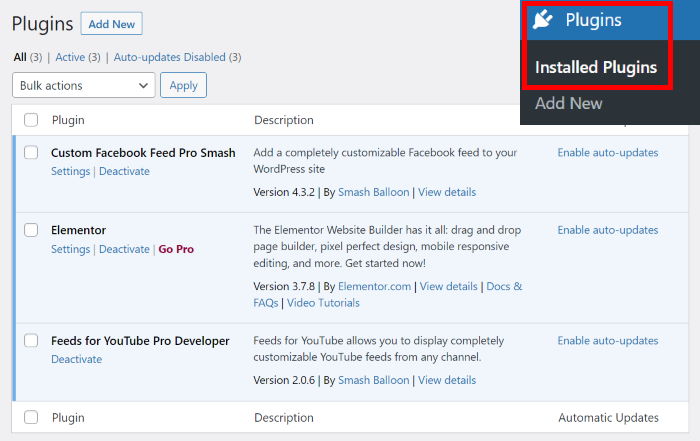
You can now see all the plugins that you’re currently using for your WordPress site.
Now that you’re here, look for the checkbox on the top left and click on it.
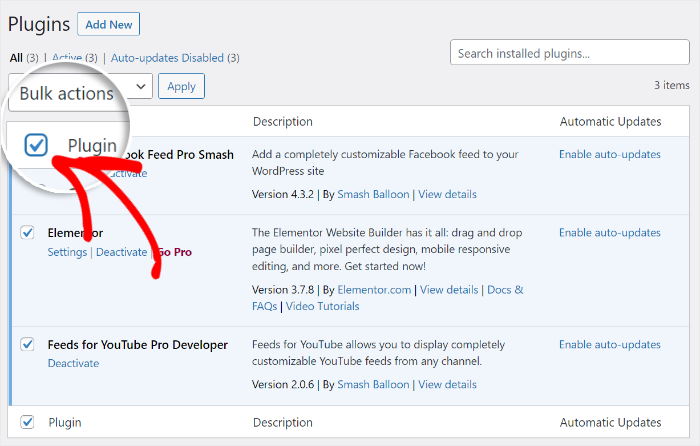
Doing that will select all the plugins on your website at once.
Next, open the drop-down menu at the top and then click on the Deactivate option.
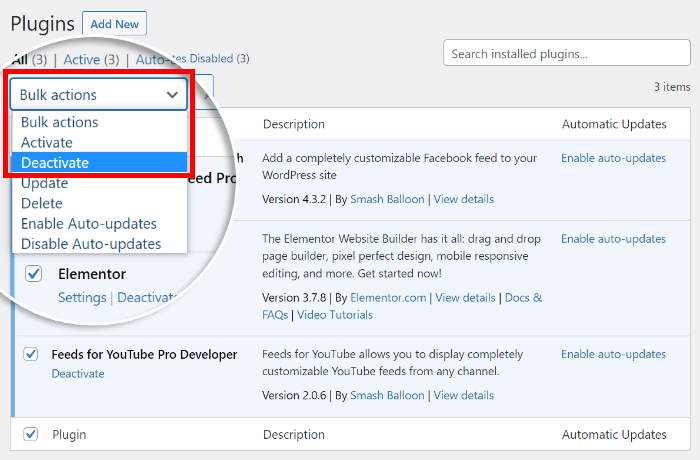
Finally, you can temporarily deactivate all of your plugins by clicking on the Apply button.
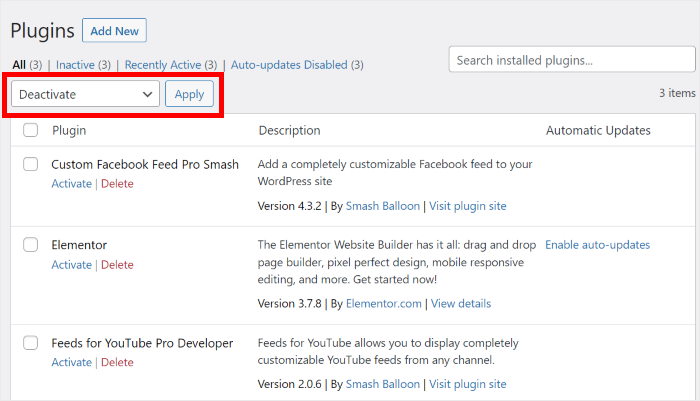
Now that all of your plugins are inactive, open your website and see if your embedded X (Twitter) feeds aren’t working. If they’re working fine, then it’s time to find the plugin that’s causing the errors.
For that, Activate your plugins one by one while checking your X (Twitter) embeds each time.
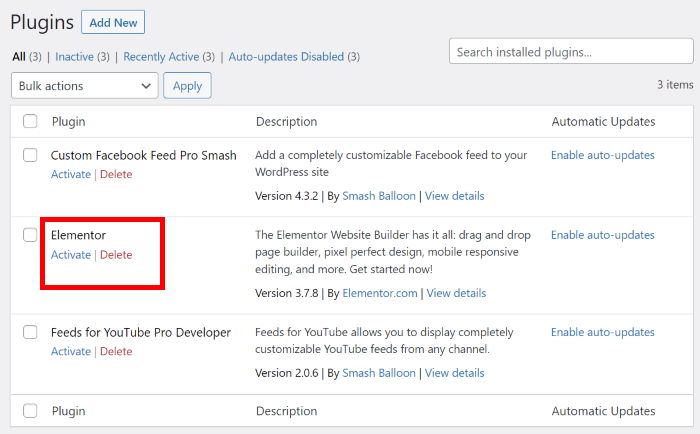
Once you find the malfunctioning plugin, you can replace it with a better WordPress plugin, so your website continues working fine.
If deactivating the plugins didn’t fix X (Twitter) embeds on your site, you can move on to step 3 for the next method.
Step 3: Fix the X.com vs. Twitter.com URL Mismatch
This is one of the most common reasons X (Twitter) embeds break after the platform rebranded to X, and it’s easy to miss.
When Twitter became X, the domain shifted from twitter.com to x.com. But WordPress caches oEmbed data based on the exact URL you originally pasted.
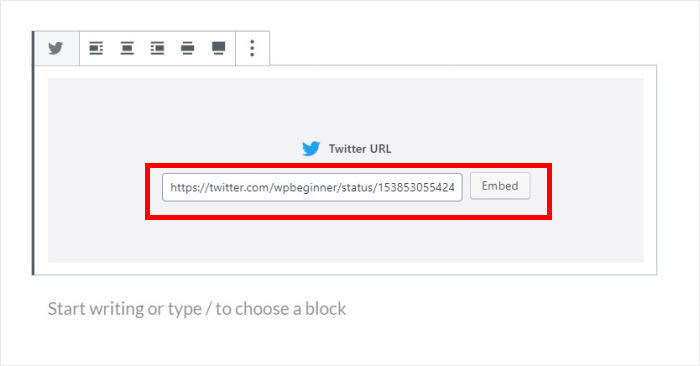
That means if you embedded an X post using a twitter.com URL, WordPress stored that embed against that specific URL.
If the platform now redirects it to x.com, the cached data can go stale and the embed stops rendering.
How to fix it:
- In your WordPress editor, find the X post embed and delete it completely
- Go to the post on X (Twitter) and copy the updated URL. It should now start with
x.com, nottwitter.com - Paste the new
x.comURL directly into the WordPress editor on its own line - Clear your site’s cache (via your caching plugin or hosting dashboard)
- Preview the page to confirm the embed is rendering
If you’ve updated the URL and embeds are still broken, you may also need to flush WordPress’s oEmbed cache.
You can do this by adding this to your functions.php temporarily:
add_filter( 'oembed_ttl', function() { return 1; } );Remove that line after the cache clears.
Step 4: Contact Your Web Hosting Service
Some web hosts have security features that can prevent X (Twitter) embeds from loading on your website.
To solve this, you’ll have to contact your hosting service and ask them to help you out.

Alternatively, you can switch to another WordPress hosting service that works perfectly with X (Twitter) embeds.
If you don’t want to move your site to another host yet, you can go to the final step for an easier way to display X (Twitter) content on your site.
Step 5: Fix the oEmbed Proxy Error
If you’re seeing the error “Sorry, you are not allowed to make proxied oEmbed requests” in your WordPress editor or in your browser console, this is a WordPress REST API permissions issue, not something on X (Twitter)’s side.
This error appears when WordPress tries to fetch the oEmbed data for an X post, but something blocks the REST API request. Common causes:
- A security plugin (like Wordfence or iThemes Security) is blocking REST API access for non-logged-in users
- A firewall or web host is restricting outbound REST API requests
- The REST API is disabled site-wide by a plugin or snippet in
functions.php
How to fix it:
- Check if your REST API is disabled. Go to
yoursite.com/wp-json/in a browser. If you see a JSON response, the REST API is working. If you get an error or empty page, it’s been disabled, so check your security plugin settings. - Allow REST API access. In Wordfence: Firewall » Blocking and make sure REST API access isn’t blocked. In iThemes Security, check “WordPress Tweaks” for a “Disable REST API” toggle.
- Test with plugins deactivated. Temporarily deactivate your security plugin and see if the embed loads. If it does, your security plugin is the culprit.
Once the REST API is accessible again, delete and re-paste the X post URL in the editor to force a fresh oEmbed fetch.
Step 6: Gutenberg Block Editor: X (Twitter) Embed Not Working
If you’re using the WordPress block editor (Gutenberg), there are a few extra things that can cause X (Twitter) embeds to break that are specific to how blocks handle oEmbed.
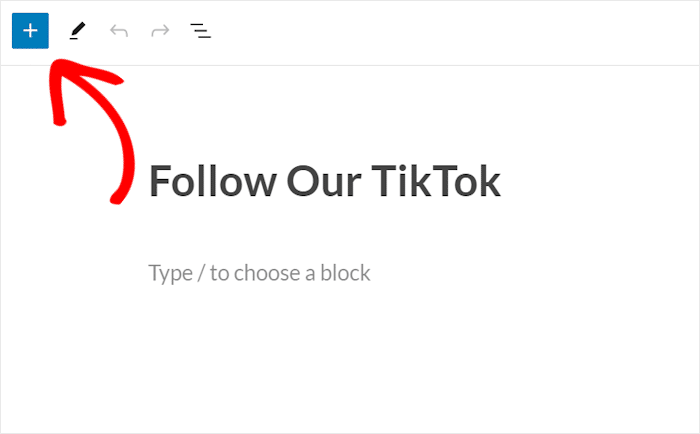
Problem: Embed shows a plain URL, not the X post card
This usually means WordPress didn’t recognize the URL as an embeddable X (Twitter) link. Fix it by:
- Deleting the block entirely
- Adding a new “Embed” block (not a paragraph block)
- Searching for “Twitter” or “X” in the embed block picker, or choose the generic “Embed” option
- Pasting your
x.comX post URL into the embed block URL field - Clicking “Embed“
Problem: Embed worked before, now shows a broken card or spinner
This is typically a cached oEmbed issue in Gutenberg. Try this:
- Switch the block to HTML view (three-dot menu > “Edit as HTML”)
- Delete the block content and switch back to visual view
- Re-add the embed block with the current
x.comURL - Update and check preview
Problem: “Preview unavailable” message in the editor
This is a Gutenberg editor-only display issue and doesn’t always mean the embed is broken on the front end. Preview your page to confirm if it works properly.
Step 7: Install X (Twitter) Feed Pro
Now that you’ve tried the above steps, you can use a simple workaround to fix X (Twitter) embeds. Just use a WordPress plugin that can automatically display X (Twitter) content on your site.
And the best plugin that you can use for that is X (Twitter) Feed Pro.

With the help of this plugin, you can create, customize, and embed X (Twitter) feeds on your WordPress site in just minutes, no need for HTML embed codes.
Since the plugin embeds tons of X posts at once, you don’t have to copy the X (Twitter) URL for each X post.
In just a few clicks, you can show X posts from a profile, home timeline, X (Twitter) list, hashtag, search results, and much more.

Unlike manually embedded X posts, the plugin can automatically copy the design of your website. This means your X posts will perfectly match your branding.
Plus, you get tons of different ways to customize how the X posts look on your website.
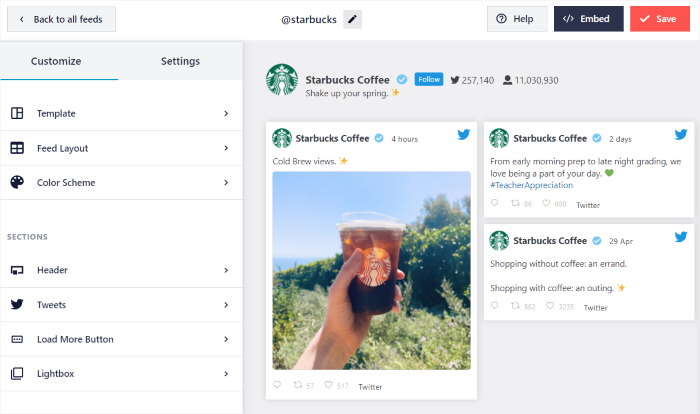
You can import a pre-built design or use a live feed editor to change your layout, color scheme, header, button style, number of X posts, and much more.
The best part? You get a premium support team with this plugin who can always help you out and answer any questions.
Ready to join over 150,000 users already using the plugin? Grab your copy of X (Twitter) Feed Pro here!
With that, we can go ahead and see how you can use the plugin to add X (Twitter) embeds to your website.
How to Display X (Twitter) Feeds on Your Website (Easy Way)
All you have to do is follow the step-by-step guide below, and you can have a feed of X (Twitter) embeds on your site.
Step 1: Install and Activate X (Twitter) Feed Pro
You can get started by grabbing your copy of X (Twitter) Feed Pro here and then downloading it on your computer.
Next, install and activate the plugin on your WordPress site. To learn more, see our step-by-step guide on installing WordPress plugins.
Step 2: Create an X (Twitter) Feed
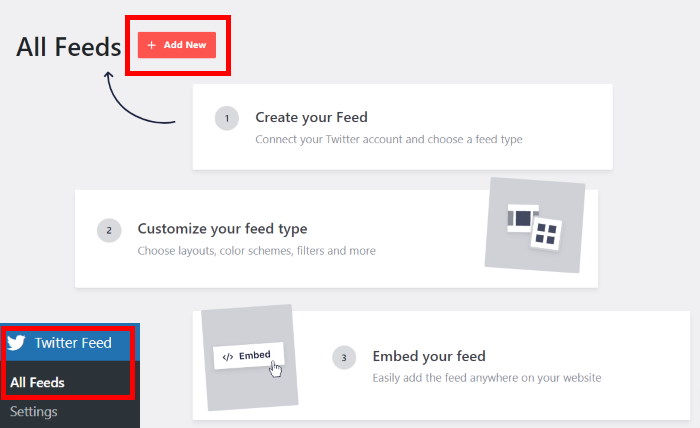
To create a new X (Twitter) feed for your site, all you have to do is follow the plugin’s 3-step guided flow.
From your WordPress dashboard, navigate to the X (Twitter) Feed » All Feeds menu to get started.
Once you do that, just click on the Add New button that you can find at the top.
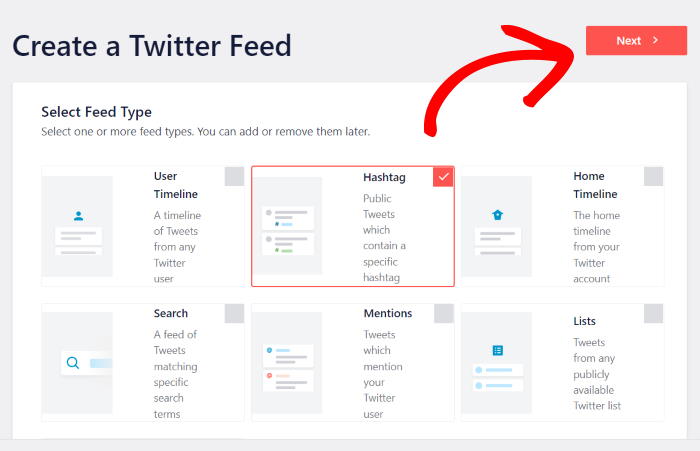
Next, you get to decide the type of X (Twitter) feed that you’d like to create. Here are the 6 options to choose from:
- User Timeline: Embed the X (Twitter) timeline from selected profiles
- Hashtag: Display X posts with specific hashtags on your site
- Home Timeline: Show your own X (Twitter) content with an embedded timeline
- Search: Add X (Twitter) search results to your website
- Mentions: Display X posts that have mentioned your brand
- Lists: Choose X (Twitter) lists and display their content
Want to use more than one option for your feed? You can select multiple feed types in that case.
Click on the Next button after selecting your feed type here.
For our tutorial, we’ll go with the hashtag feed type.
Step 3: Connect Your X (Twitter) Account
Using this plugin, connecting your feed to an X (Twitter) account only takes a few clicks.
You can get started by clicking on the Connect button.
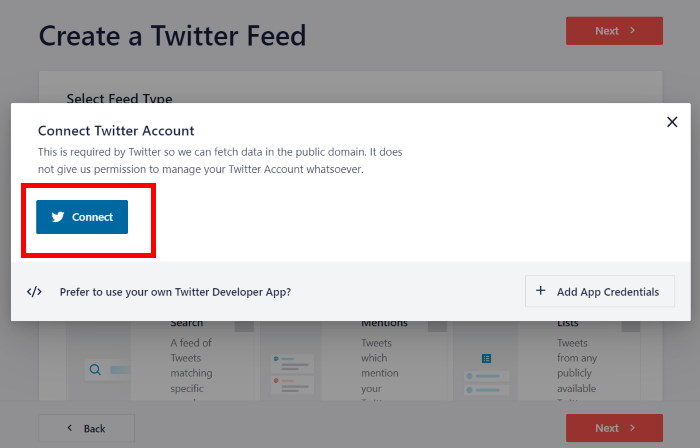
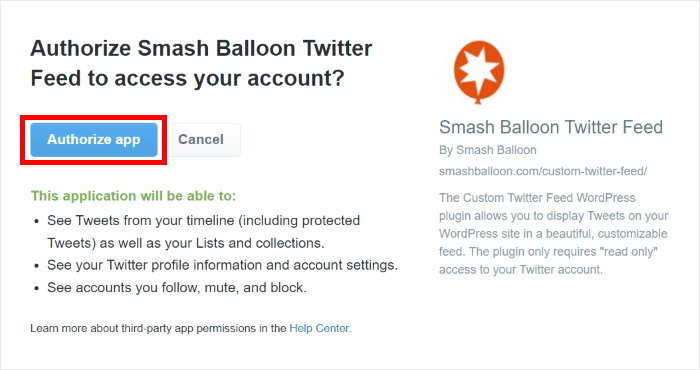
Clicking on that redirects you to X (Twitter), where the plugin will ask for read-only access to your account. The plugin can then view X (Twitter) content, but it won’t be able to make any changes to your account.
As you can see, Smash Balloon’s X (Twitter) Feed Pro is safe to use.
To give read-only access to the plugin, click on the Authorize app button.
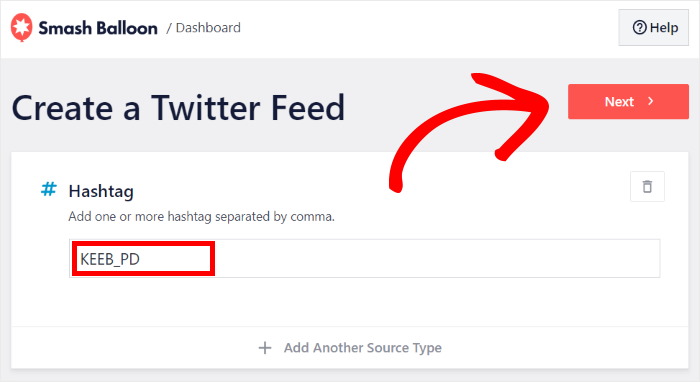
You’ll then be back on your website, where you can select a source for your new X (Twitter) feed. This can be a user profile, hashtag, search term, X (Twitter) list, and more, depending on the feed type you pick.
As an example, we’ll use an X (Twitter) hashtag as our source.
To continue, enter your source into the popup and then click on Next.
Step 4: Customize Your X posts
X (Twitter) Feed Pro also makes it quick and easy to change the design of your feeds — even if you’re new to WordPress.
To get started, you can choose a feed template and import its design for your feed:
- Default
- Masonry
- Simple Carousel
- Simple Cards
- Showcase Carousel
- Latest X posts
- Widget
To continue, select the template you prefer and then click on the Next button.
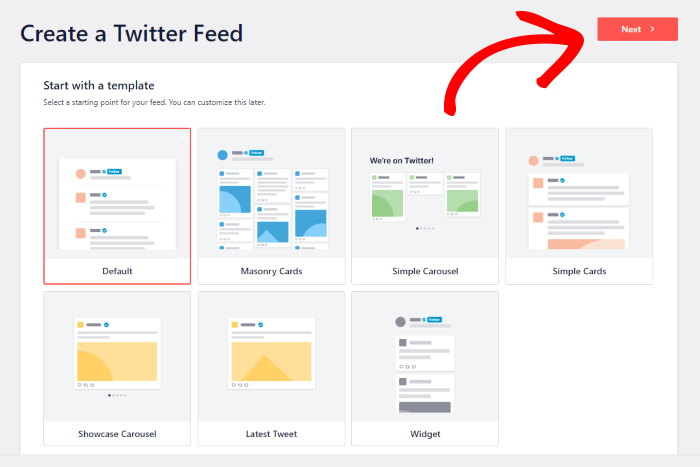
Once you do that, the plugin will enable the template for your feed and then send you to the live feed editor.
From here, you can customize your feed layout, header style, lightbox option, color schemes, and much more using the options on the left.
You can see a real-time preview of your X (Twitter) feed on the right to help track your changes.
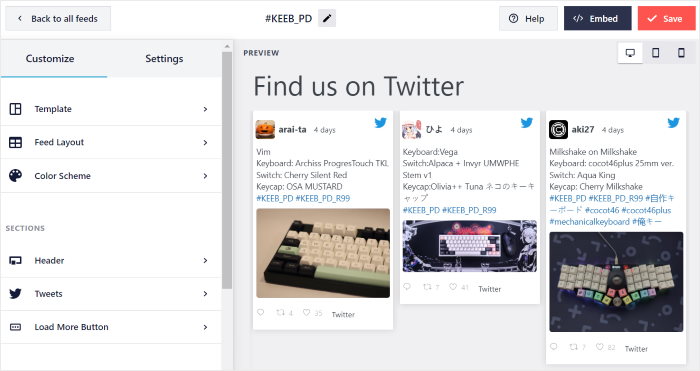
You can now use the live feed editor to set the layout of your X (Twitter) embeds.
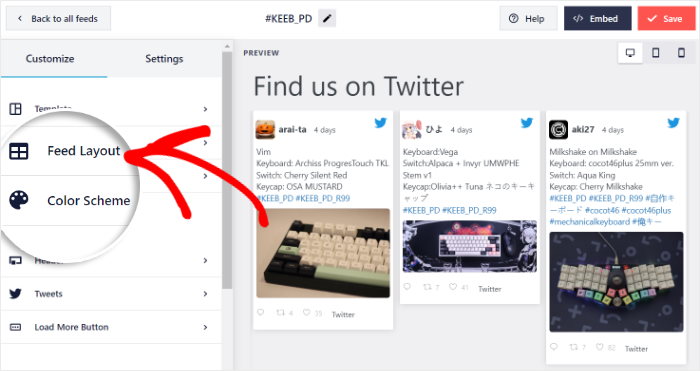
First, click on the Feed Layout option on the left.
X (Twitter) Feed Pro makes it easy to set your layout with 4 options that you can pick from:
- List
- Carousel
- and Masonry.
Let’s look at these layouts in detail below:
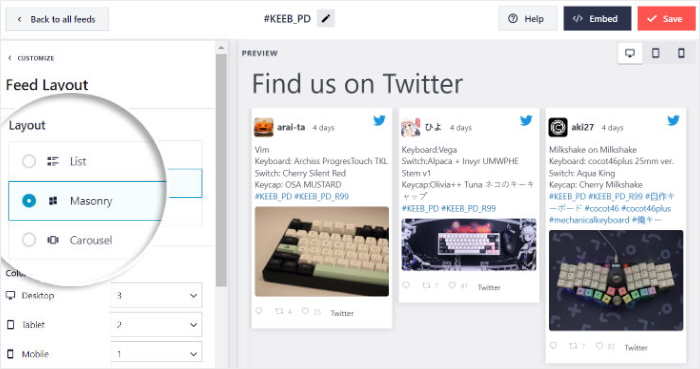
If you want your feed to resemble the official X (Twitter) website, then you can use the list layout.
As a bonus, your X posts will be clearly visible on your site.

Want your website to show lots of X posts in different columns?
You can choose the masonry option in that case.

Next, you have the carousel layout, which turns your X (Twitter) feed into a slideshow.
As a result, your website will be more interactive and engaging for your visitors.

Don’t forget to save your changes by clicking on the Save button at the top.
To continue designing your X (Twitter) embeds, click on the Customize button at the top.
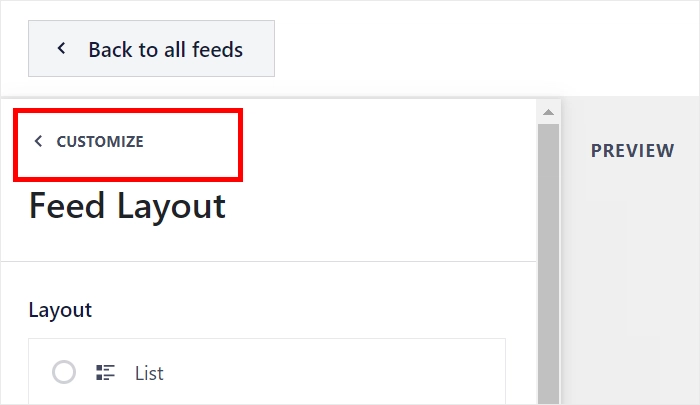
Now, let’s use the plugin to change the color of the X (Twitter) feed.
You can click on the Color Scheme option on the left to get started.
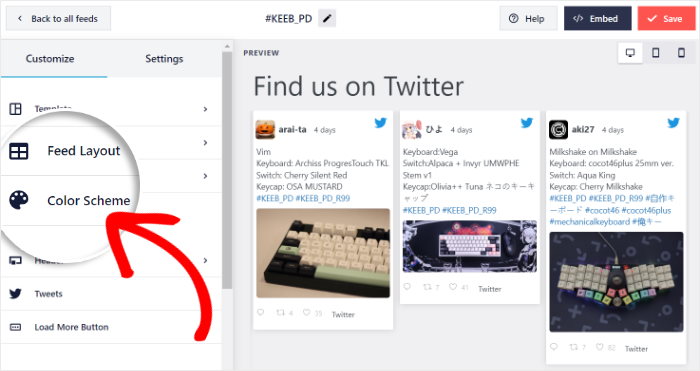
With the help of X (Twitter) Feed Pro, there are 4 color schemes to choose from:
- Inherit from Theme: Copy the colors of your website
- Light: Pick a light background and dark font color
- Dark: Show a dark background along with a light color for the font
- Custom: Manually pick the colors for the background, font, X (Twitter) link, and more
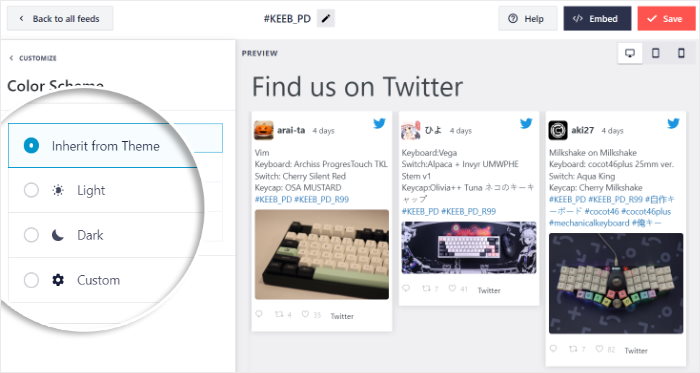
Remember to click on Save once you pick the color scheme you prefer.
After that, you can use the remaining customization options to change your header style, number of posts, X (Twitter) button design, and much more.
Once you’re happy with the design of your X (Twitter) feed, click on the Save button.
Step 5: Embed Your X posts in WordPress
So far, you’ve created your X (Twitter) feed, added a source, and customized its design. You’re now ready to embed the X (Twitter) feed on your website.
For that, you have 2 options to choose from:
- Add X (Twitter) embeds to a WordPress page
- Add X (Twitter) embeds to a WordPress sidebar or footer
Add X (Twitter) Embeds to a WordPress Page
Using the live feed editor, you’ll have an easy time embedding this X (Twitter) feed on your website.
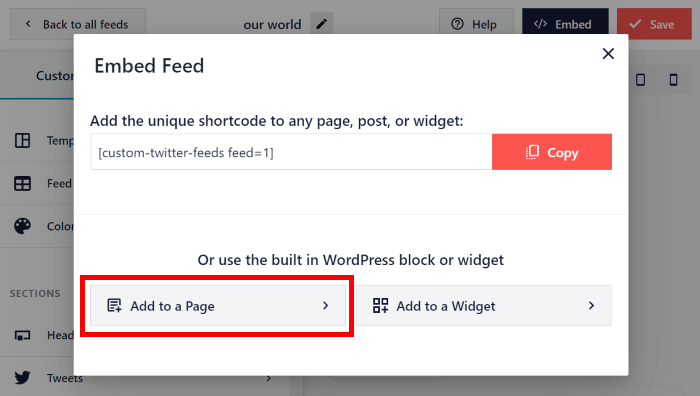
To get started, all you have to do is click on the Embed button.
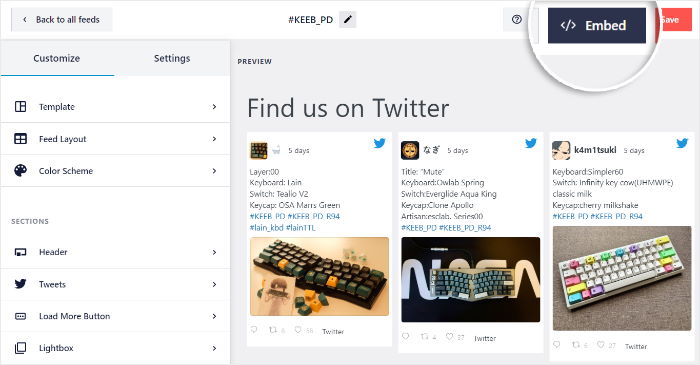
To help you choose the location for your X (Twitter) embeds, the plugin will show you a popup with the embed options. You can also copy your X (Twitter) feed’s shortcode from here.
From here, click on the Add to a Page button to continue.
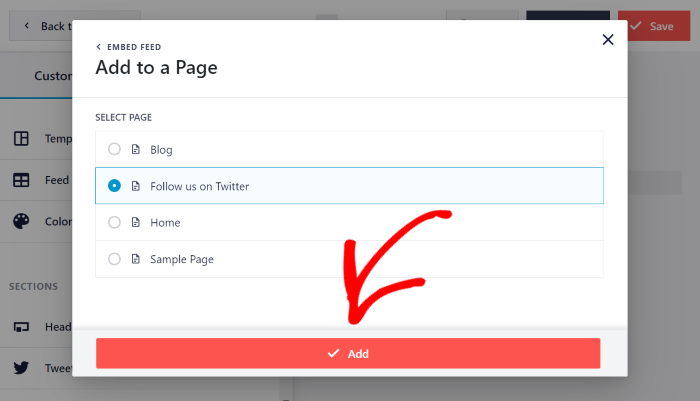
Once you do that, X (Twitter) Feed Pro will show you a list of pages from your WordPress website.
After choosing a page from the list, click on the Add button below.
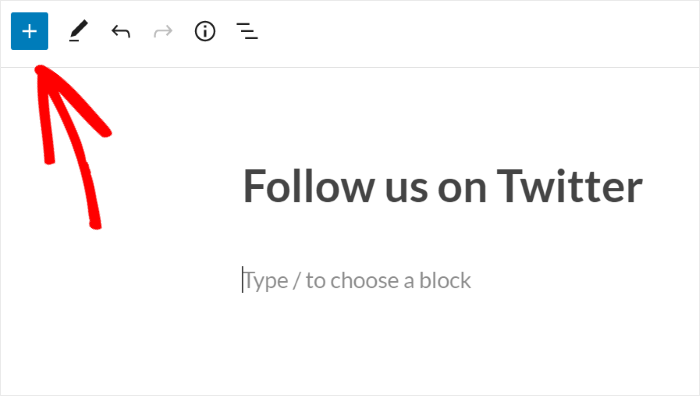
Now, the plugin will open the page in the WordPress editor so you can add a content block to display X (Twitter) embeds.
First, click on the plus icon (+) to add a new block to the page.
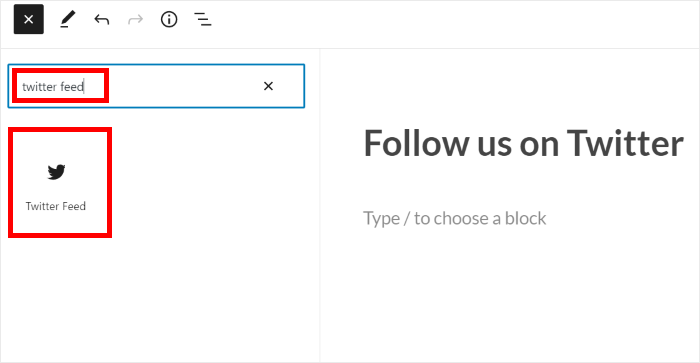
Then, use the search bar at the top to look for the “twitter feed” block.
Once you do that, you can add the X (Twitter) embeds by clicking on the X (Twitter) Feed block below.
To confirm your changes, click on the Update button at the top.
Just like that, your X (Twitter) feed will be displayed on your website, just like in this screenshot:
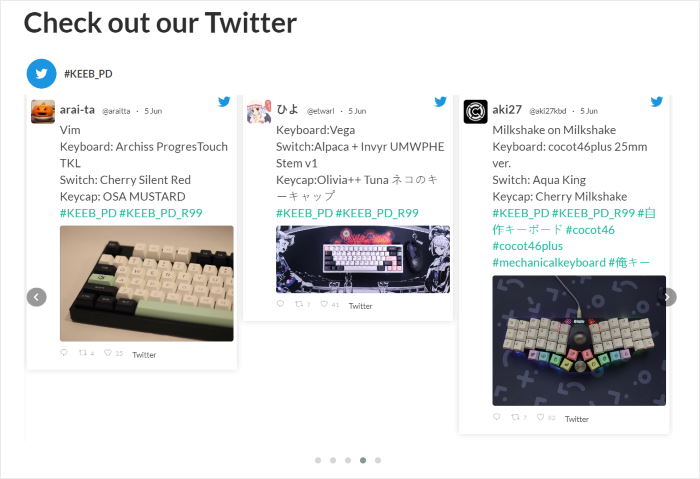
As you can see, embedding X (Twitter) content on a WordPress page is super easy with this plugin.
Now, let’s go ahead and check out the next method of embedding X (Twitter) feeds.
Add X (Twitter) Embeds to the WordPress Sidebar or Footer
With the help of an X (Twitter) widget, you can also show X (Twitter) embeds on your sidebar or footer areas.
And the first step is to open the X (Twitter) feed in the live feed editor once again.
To get started, open the X (Twitter) Feed » All Feeds menu from your WordPress dashboard and click on your X (Twitter) feed from earlier.
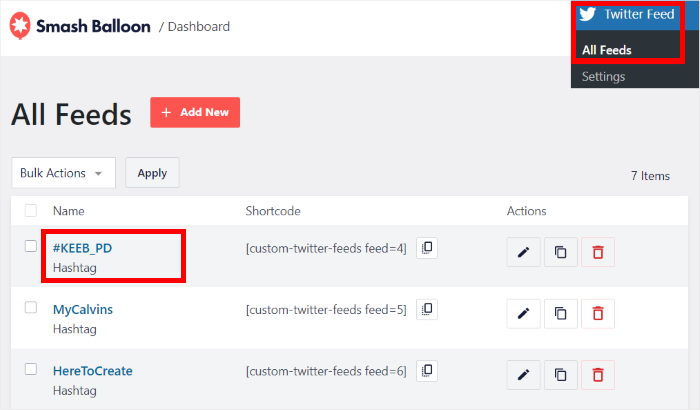
You can open any of the X (Twitter) feeds in the live feed editor this way.
Next, click on the Embed button at the top of the editor.
Doing that will open a popup with the embed options for this X (Twitter) feed.
On the popup, click on the Add to a Widget button to continue.
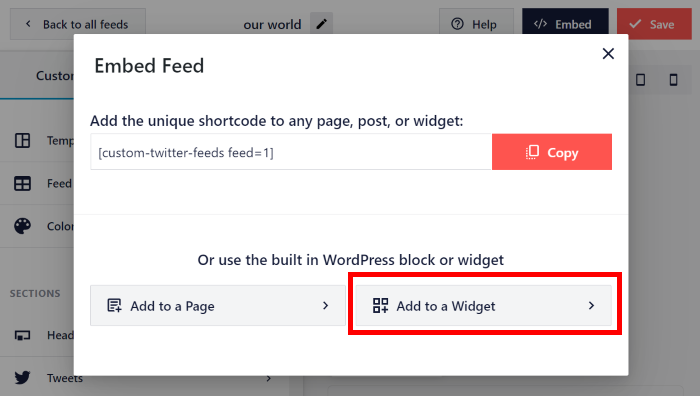
That way, the plugin will open the Widget page of your website. From here, you can choose between the sidebar or the footer for your X (Twitter) embeds.
Click on the Sidebar panel if you want to add X (Twitter) embeds to your sidebar area.
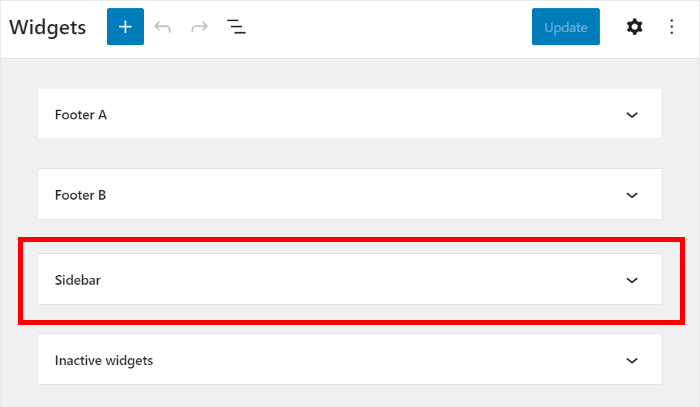
We’re going to use the sidebar for our example below.
Alternatively, you can click on the Footer panel to show X posts in your footer areas.
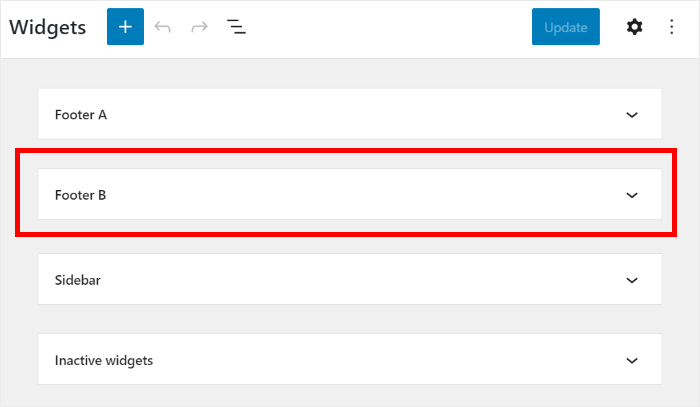
After you pick the location, add a new widget by clicking on the plus icon (+) below.
Finally, select the X (Twitter) Feed widget from the options to embed your X (Twitter) feed.
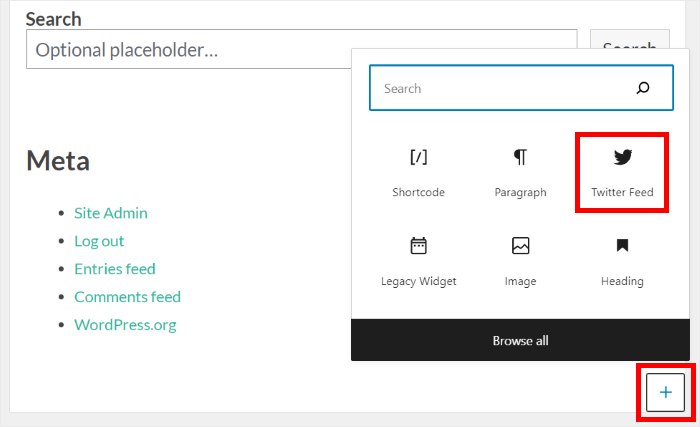
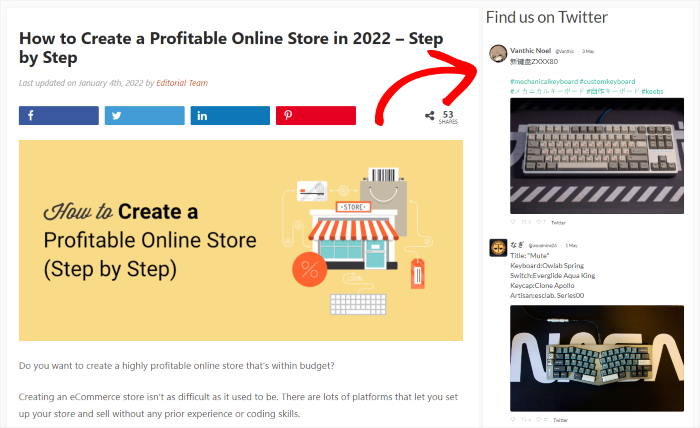
To save your new widget, click on the Update button. Just like that, you’ve embedded X (Twitter) content on your website’s sidebar or footer areas.
Now, you can open your website and check how your X (Twitter) widget looks.
How to Embed X (Twitter) Content in Elementor
Elementor doesn’t use WordPress’s native oEmbed system the same way the block editor does, which is why X posts that work fine in Gutenberg can fail in Elementor.
Here’s the most reliable method for embedding X posts in Elementor:
Method 1: Use the HTML widget
- Go to the X post on X (Twitter) and click the three-dot menu > “Embed post”
- Copy the
<blockquote>embed code from X (Twitter)’s embed page - In Elementor, drag an HTML widget onto your page
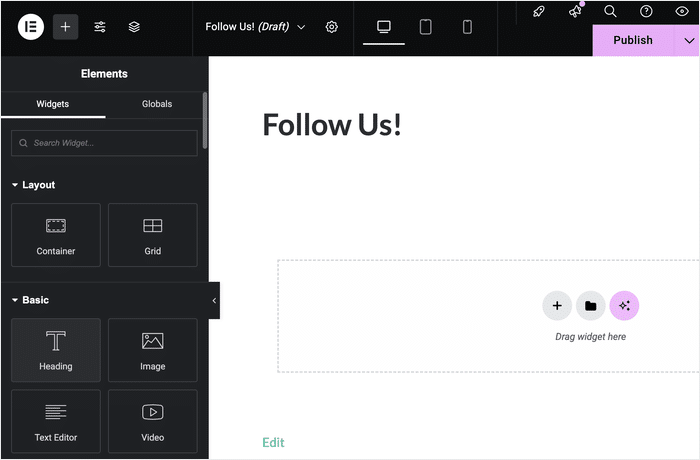
- Paste the full embed code (including the
<script>tag at the bottom) into the widget - Click Update and the X post will render in the preview and on the front end
The downside is that this method can run into all the problems we discussed earlier.
For a better solution, you can try the plugin method for Elementor as well.
Method 2: Use an X (Twitter) Feed
For showing multiple X posts or a full feed in Elementor, the HTML widget approach gets repetitive fast.
A better option is Smash Balloon’s X (Twitter) Feed Pro, which generates a shortcode you can drop into Elementor with ease.
To do that, add a Shortcode widget in Elementor and paste in the X (Twitter) Feed Pro shortcode.
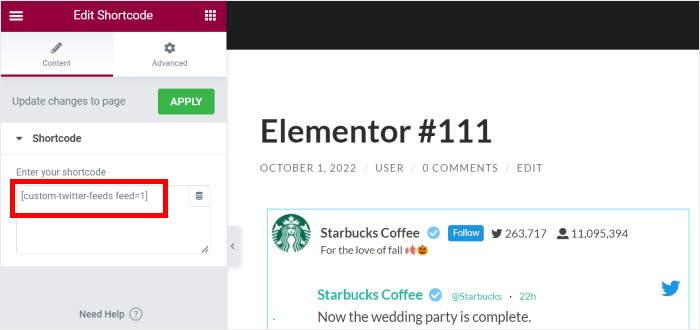
The feed will render and update automatically without any code changes needed.
You get a full feed, not just one X post, with automatic updates and full design control.

And that’s it for now!
Now you know how to fix your X (Twitter) embeds if they’re not working properly on your website. With these proven steps, you’ll be able to engage your visitors with relevant X (Twitter) content in no time.
And with the help of X (Twitter) Feed Pro, it’s easier than ever before to show X (Twitter) content on your WordPress site. All it takes is a few clicks, and you can create, customize, and embed beautiful X (Twitter) feeds.
Ready to fix your X (Twitter) embeds? Get X (Twitter) Feed Pro here.
While you’re here, you can look at our list of the best ways to make money on X (Twitter).
Frequently Asked Questions
Why is my Twitter/X embed not showing on my website?
The most common reason is a stale oEmbed cache caused by the twitter.com to x.com domain change. Delete the embed, copy the tweet URL from x.com (not Twitter.com), paste it fresh into your editor, and clear your site cache. If it still doesn’t show, check whether a security plugin is blocking your WordPress REST API.
Does Twitter oEmbed still work in 2026?
Yes, but it’s unreliable compared to how it worked before the rebrand. X has made several changes to its oEmbed endpoint and API since 2022, which means embeds can stop working without warning after platform updates. Using a dedicated plugin like Smash Balloon’s Twitter Feed Pro avoids this problem entirely, since it pulls content through the API directly rather than relying on oEmbed.
Why are X.com URLs not embedding in WordPress?
WordPress’s oEmbed system recognizes `x.com` URLs, but cached embeds that were originally created with `twitter.com` URLs may not update automatically. Delete the old embed block, paste the current `x.com` URL, and force a cache refresh. Also make sure your WordPress version is up to date, as earlier versions had known issues with X URL recognition.
How do I fix a broken Twitter embed in WordPress?
Start with these checks in order: (1) update WordPress to the latest version, (2) check for the twitter.com/x.com URL mismatch and re-paste with the current x.com URL, (3) deactivate plugins one by one to find a conflict, (4) check if your host or a security plugin is blocking REST API access. If none of those work, use Twitter Feed Pro to embed your content without relying on native oEmbed at all.








Hi!
Does your plugin work to embed Twitter Collections? Can I see any example?
Thank you!
Hi David,
Thank you for contacting us! Unfortunately, Twitter collections are not supported; however, using the PRO version of our plugin, you can display a Twitter list or create a timeline feed with multiple Twitter accounts added, which could work the same as the collections.
Please let me know if you have any other questions, and I’ll be happy to help.
Best regards 🙂
I am using twitter feed pro but the issue is its not working on the desktop safari.
Hi Sheryar,
Kindly send us a support request using the form on our website here, including the System Info.
To obtain this information, follow the steps on this page.
We ask you to use our form, as the System Info contains other website information and the Access Token for your connection, which we do not suggest posting here.
Thanks! 🙂