Want to know an easy way to add an Instagram feed to your WordPress website without using a plugin?
Displaying your Instagram feed on your site allows you to boost your account’s exposure without a lot of work. It also gives you a fresh way to engage with your prospects.
Plus, based on our research, showing your Instagram content can increase your customer conversion rate in the long run.
Here’s the short answer based from my personal experience: It’s not possible to embed a feed without a plugin unless you know how to code an app yourself.
In this post, I’ll show you how to embed a single Instagram post in WordPress without a plugin.
If you want to embed an Instagram feed, the best and easiest way to do that is with a plugin, so I’ll show you that, too.
Don’t worry, using this plugin won’t slow down your site. It’s designed to be ultra-fast.
In This Article
Quick Comparison: Plugin or No Plugin?
| Feature | Using Smash Balloon’s Instagram Feed Pro | Not Using a Plugin |
| 🛠️ Setup Complexity | Super easy setup! Set up and embed your feed in under 5 minutes. | Requires approval as an app developer, and involves complex coding. |
| 💻 Coding Requirements | No coding required. Best for non-techies! | Significant coding needed, including JavaScript and HTML. |
| 🚀 Access to Features | Full access to advanced features like multiple Instagram feeds and hashtag feeds. | Limited to displaying a single feed of the most recent 20 images. |
| 🎨 Customization | Easily customize layouts and styles to match your brand — in just a few clicks! | Customization is tricky without advanced coding skills. |
| 📞 Help and Support | Access to a helpful support team ready to assist you with embedding your Instagram feed on WordPress | No dedicated support, rely on trial and error or hire a developer. |
| ✨ Takeaway | Want a quick and easy way to display your Instagram feed? Try Instagram Feed Pro today! | Be prepared for a complex process with limitations if going without a plugin. |
How to Embed an Instagram Post in WordPress Without a Plugin
You can only display your Instagram feed to WordPress without a plugin if you’ve been approved as an app developer with Instagram first.
With that said, it’s easy to embed a one Instagram post in WordPress without a plugin. Let’s get started.
Step 1: Pick the Instagram Post You Want to Display
First, you need to log into your Instagram account. If you don’t have the login details, you can visit the Instagram profile.

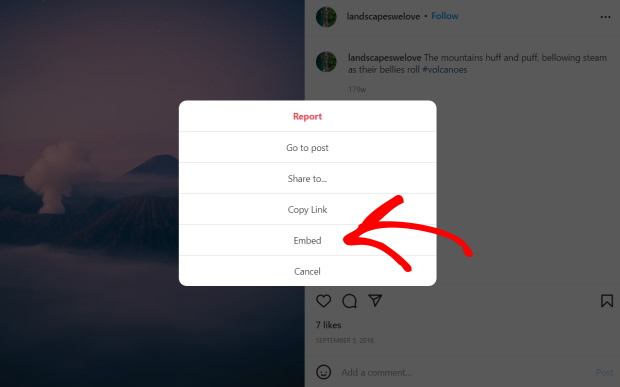
Then, click on the Instagram post you want to embed on your website. In the top right corner of the post, you’ll see 3 dots that look like this ⠇.

Click the dots and select Embed from the menu that appears.
Now, you can see the embed code for the Instagram post on a popup. If you want to embed the caption along with your post, check the Include caption option here.
After that, just click on the Copy Embed Code button.
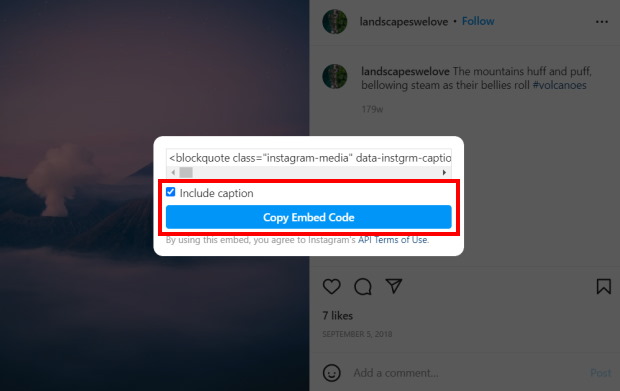
You’ve now copied the embed code of the Instagram post. Now open your WordPress site so you can paste this code into a post or page.
Step 2: Make a New Page on WordPress
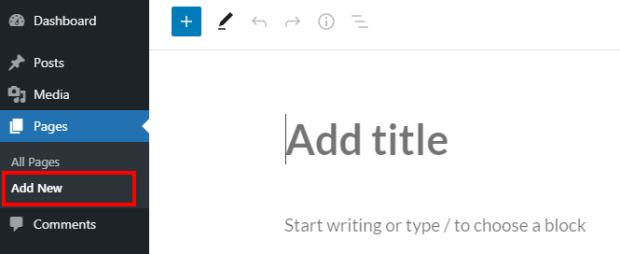
Next, go to your WordPress dashboard and navigate to Pages » Add New to create a new page.
You can also use a WordPress post here instead. For that, go to Posts » Add New from your dashboard area.
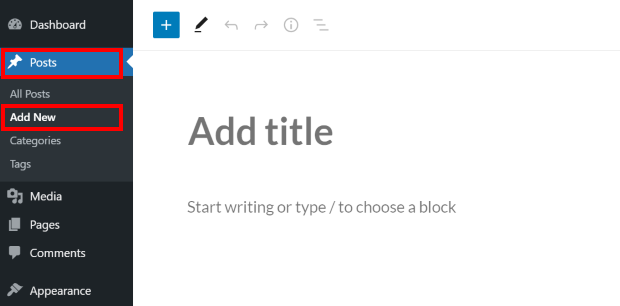
Now that you have the WordPress editor open, you can paste your Instagram embed code from earlier.
Step 3: Paste Your Embed Code
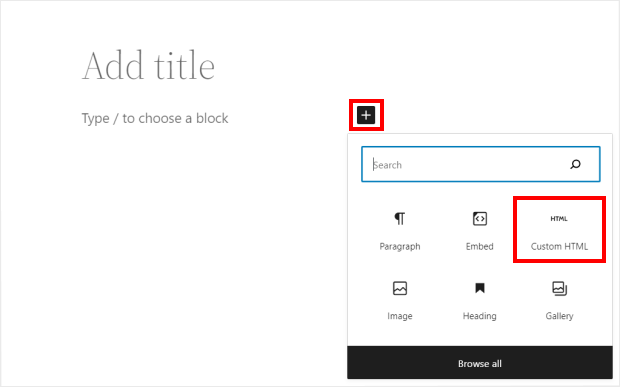
To paste the embed code, first, click on the plus icon (+) and select the Custom HTML block.
Now paste the embed code into the Custom HTML block. To check how your Instagram post looks, you can click on the Preview button at the top.
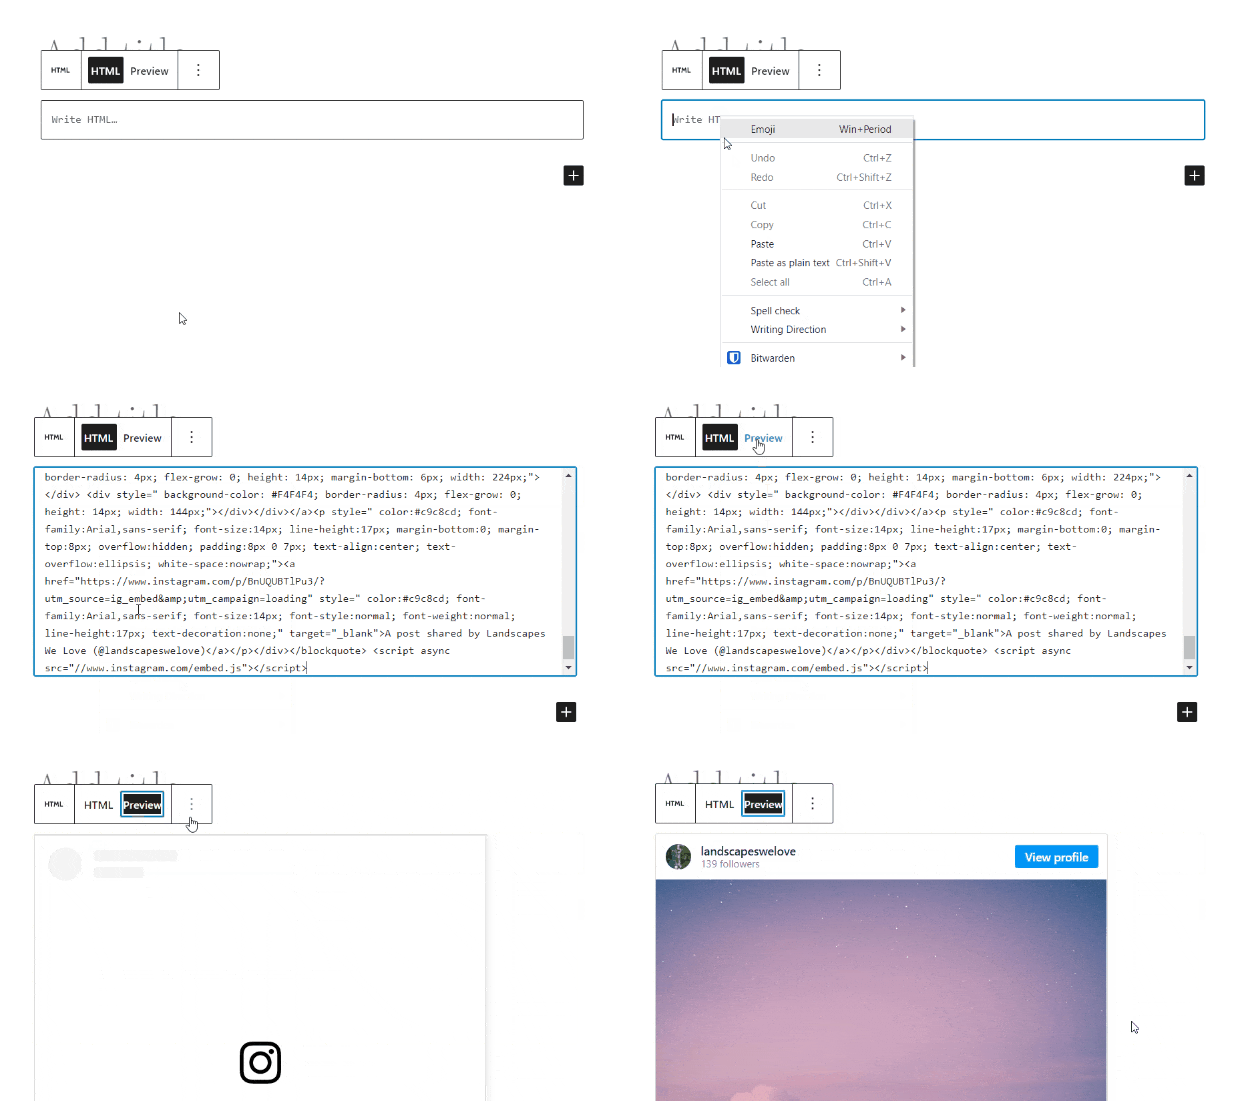
Once you’re happy with how it looks, click on Publish to see your Instagram post embedded on your website.
Having trouble with manual Instagram embeds? Here’s how you can fix Instagram embed issues in WordPress.
And that’s it! You’ve now learned how to embed your Instagram posts on WordPress without using a plugin.
The next question is: Is it better for you to use a WordPress plugin or not when adding your Instagram feed to your website?
3 Reasons to Use an Instagram Plugin
Maybe you know someone who had a problem with using a plugin on their website, so now you’re scared to use it, too.
Perhaps random people on the Internet gave you not-so-helpful advice telling you that plugins slow down your site, so you shouldn’t use them.
Or maybe you used a plugin before, and it was great. But when you needed their help with an issue, no one gave you the solution to your problem?

Whatever your reason may be for not wanting to use a plugin, the truth still stands:
It’s much harder and more complicated when you don’t use an Instagram WordPress plugin in embedding your Instagram feed on your website.
Here are 3 real reasons why:
1. Without a Plugin, It’s Harder to Display Your Instagram Feed
Back when I wasn’t in Smash Balloon, I thought about just manually embedding my Instagram feeds on my personal site.
But when I started doing it, I realized that it’s complicated because if you don’t use a WordPress social media plugin, you need to:
- Register as an app developer with Instagram: They need to review your application and approve you only if you meet their standards. Yikes.
- Register a new client on the Instagram Developers website: Plus, you have to set up Implicit Authentication after.
- Generate an access code: To do this, you have to authenticate your own app and grant access to your media.
- Use JavaScript: And work on HTML codes, too.
The worst part about this?
After spending a lot of your time and effort into doing all these, you can only show your last 20 images in your feed. What a bummer.
Meanwhile, if you use a WordPress plugin to embed an Instagram feed on WordPress, you can easily:
- Download and install an easy-to-use plugin: You can try Smash Balloon’s Instagram Feed Pro plugin, it’s the best Instagram plugin for WordPress.
In under 5 minutes, you can easily add your Instagram feed on WordPress. Yes, without tackling confusing HTML code snippets and JavaScript!
Plus, you can also customize how your Instagram feeds look on your website with just a few clicks.
And if you’re using Instagram Feed Pro, your feeds can automatically copy the design of your website and match your branding.
Embed your Instagram feed in a few minutes when you get started with Instagram Feed Pro here!
2. It’s More Time-Consuming if You Don’t Use a Plugin
Want to add an Instagram feed to WordPress without using a plugin?
You need to set up Implicit Authentication for every website you want to display your Instagram feed on.
So if you want to show your Instagram feed to 3 different websites, you have to do Implicit Authentication 3 times.
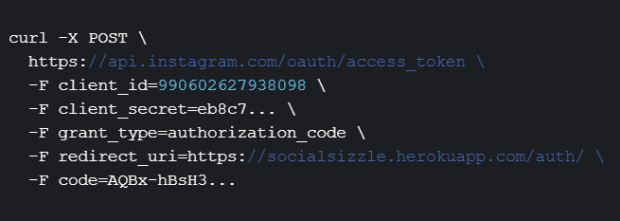
What’s more disappointing is your access is limited, too. You can only display your own Instagram feed.
What if you want to display accounts that you don’t own?
You need to contact the account’s admin and ask them to get their own Client ID first. Then, you have to go through the complicated process we mentioned before. See #1 again for a refresher.
Now, don’t be too down, though! We’re here to tell you the good news.
Showing your Instagram feed on your website is easier, faster, and better — if you choose to use a great plugin like Smash Balloon’s Instagram Feed Pro.
Want to hear another piece of good news? You can use the plugin to display multiple feeds on your website.
You simply need to connect the Instagram accounts you want to show to the plugin, and they’ll take care of the rest.
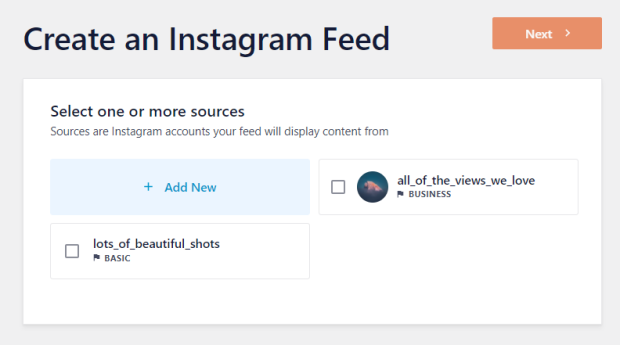
Easy-peasy. And that’s because you decided to use an Instagram feed plugin that’s designed to integrate Instagram content on your site in a few clicks.
3. Without a Plugin, You’re Left on Your Own
What if you still went ahead and tried to add an Instagram feed to your website without using a plugin — even after reading the real reasons above?
If you have any issues registering as an app developer or generating an access code, you need to contact Instagram directly.
There’s no 100% guarantee that they’ll solve your problem, though.
What if you messed up your website’s HTML code? Or you can’t figure out how to do JavaScript?
Well, you can either study HTML or hire a developer to help you — but these options cost a lot of time and money.
And it doesn’t make sense to invest thousands of dollars just to add a simple Instagram feed on your WordPress, of course.
If you choose to use Smash Balloon’s Instagram Feed Pro plugin, though, you’ll know you’re in great hands.
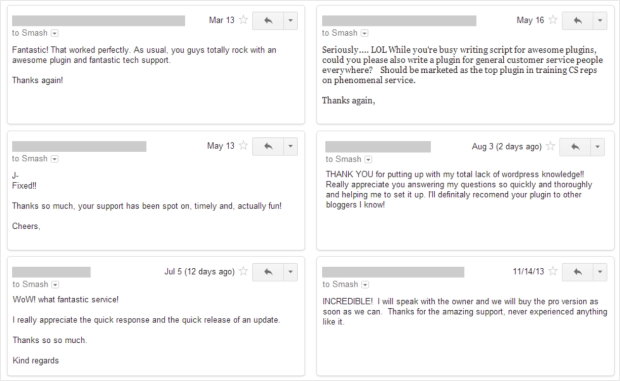
The plugin’s customer support team is composed of WordPress experts who’ll gladly help you, every step of the way.
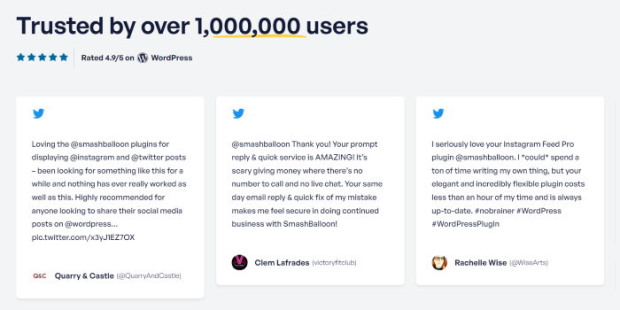
With over 1,000,000 active users and a strong 4.9-star rating, the plugin must be doing something right, don’t you think?
If you’re looking for an easy way to add your Instagram feed to your website, you can use the Instagram Feed Pro plugin instead. It’s easier and faster. You can set it up and display your feed in under 5 minutes, remember?
Plus, using a plugin is better than wasting your precious time with confusing HTML.
It’s also way cheaper than hiring an expensive developer to do it for you.
With only one Instagram feed plugin, you can use Instagram Feed Pro to also:
- Inherit your website’s theme so you use the same font, color, and style on your feed — automatically
- Embed branded hashtag feeds to engage visitors with relevant Instagram photos and videos
- Display as many Instagram feeds as you’d like on your website
- Embed Instagram reels feed on WordPress
- Use an amazing live feed customizer to change the design of your Instagram feeds
- Showcase Instagram mentions on your website
- Make shoppable Instagram feeds to boost sales
…and so much more. Check out everything that Instagram Feed Pro can do for you here.
Now that you’ve read about it, you may be asking, “How easy is it really to display an Instagram feed on my website using a plugin?”
Let’s move on to the next section below to answer your question, shall we?
How to Embed Your Instagram Feed in WordPress
In under 5 minutes, you can easily set up the Instagram Feed Pro plugin to display your feed on your site. Here’s how you can do this:
Step 1: Download and Install Instagram Feed Pro
First, you need to get your own copy of Instagram Feed Pro here. Then you can go ahead and install it on your WordPress website.
Not sure how to install a plugin? Check out this helpful tutorial on installing WordPress plugins so you can easily do this.
Once you’ve installed and activated your plugin, go to the next step.
Step 2: Create a New Instagram Feed
After that, you can now create an Instagram feed using the plugin.
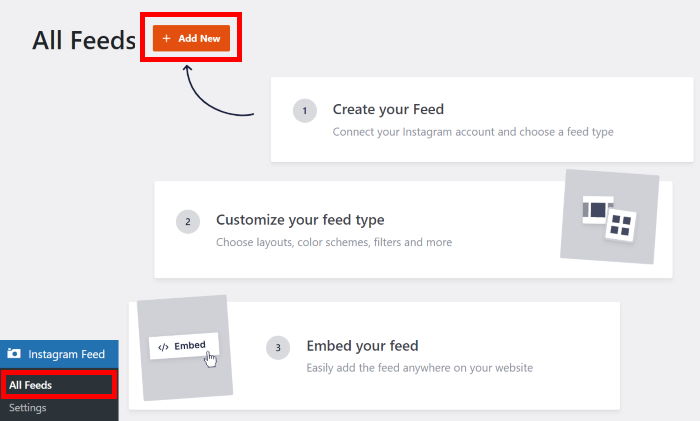
First, navigate to Instagram Feed » All Feeds from your WordPress admin dashboard.
On this page, click on the Add New button.
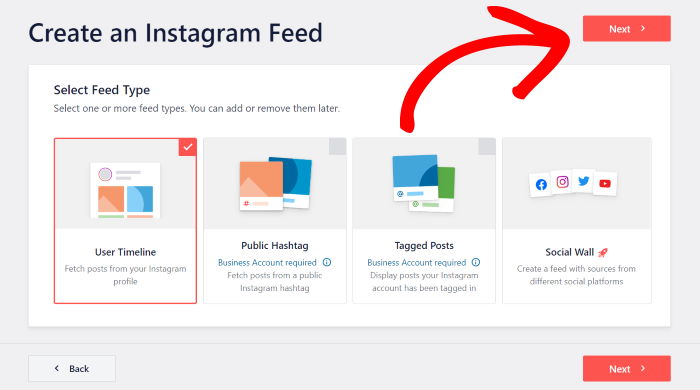
You can now select your Instagram feed type from 3 options:
- User Timeline: Display your latest Instagram posts on your website
- Public Hashtag: Show Instagram posts with specific hashtags
- Tagged Posts: Embed photos and videos that your Instagram account is tagged in
You can select multiple options and combine different feed types into one.
Once you’ve selected your feed type, click on Next to proceed.
For this tutorial, we’ll select a user timeline here.
In a few clicks, you now have a new Instagram feed that the plugin will create for you. You can proceed to step 3 and connect it to your account on Instagram.
Step 3: Connect Your Instagram Account
Next, you can choose to connect a creator or business account to this plugin.
Here’s a handy guide on upgrading your Instagram account if you want to learn more.
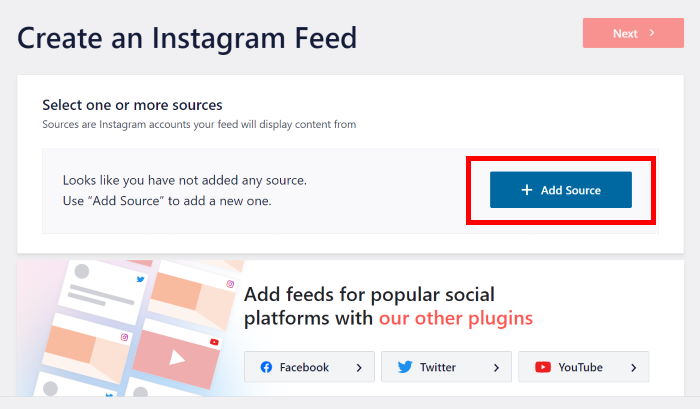
To get started, click on the Add Source button.
There are 2 types of Instagram connection that you can choose from:
- Business Basic: Embed photos and reels from your profile
- Business Advanced: Get more feed types, like hashtag feeds, shoppable feeds, and more
After picking an option, click on Connect to proceed.
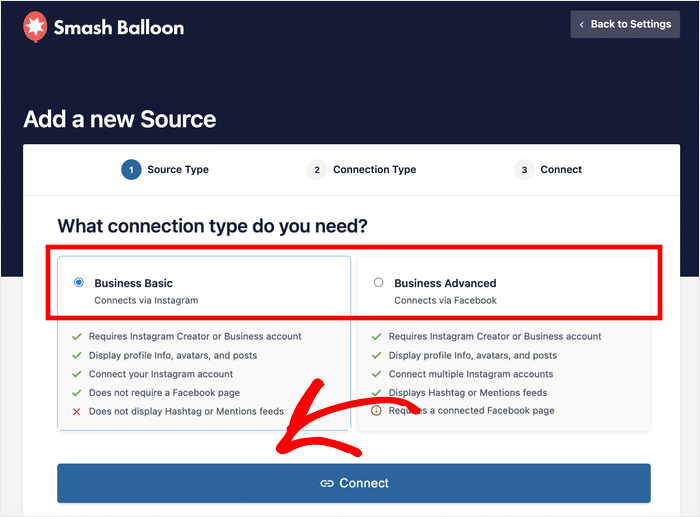
Now, you can open Facebook or Instagram to finish connecting your account.
For this tutorial, I’ll go ahead and click on Connect with Instagram.
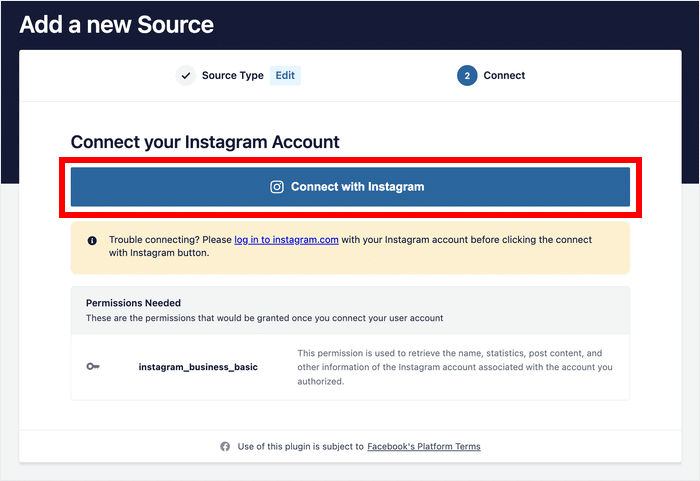
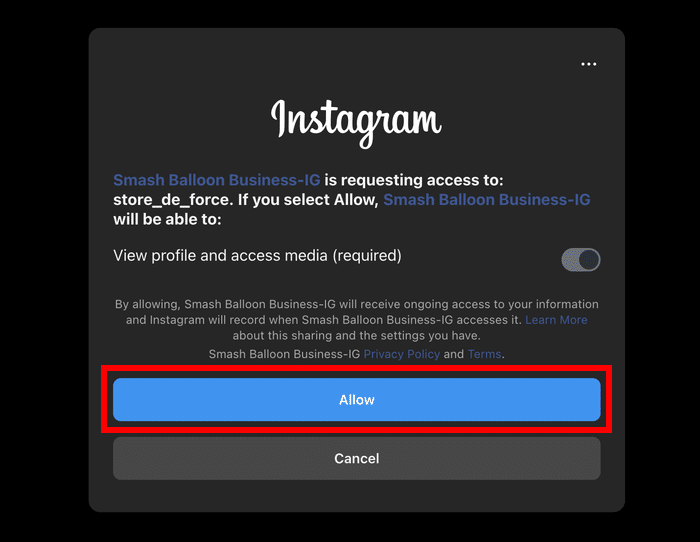
You can now give read-only access to the plugin so it can embed content from Instagram. With this access, Smash Balloon can only view your posts and can’t make any changes at all.
So, it’s completely safe to use Smash Balloon.
Click the Allow button on the popup to give the read-only access.
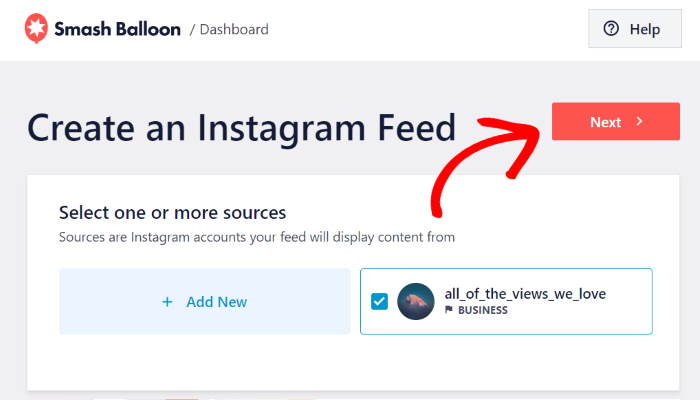
The plugin will now bring you back to your website so you can finish connecting your new feed to Instagram.
For that, click on the Next button, and you will confirm this Instagram account as a source for your new feed.
Step 4: Customize Your New Instagram Feed
After connecting your Instagram account, you’ll see your feed open in the visual feed editor with live preview.
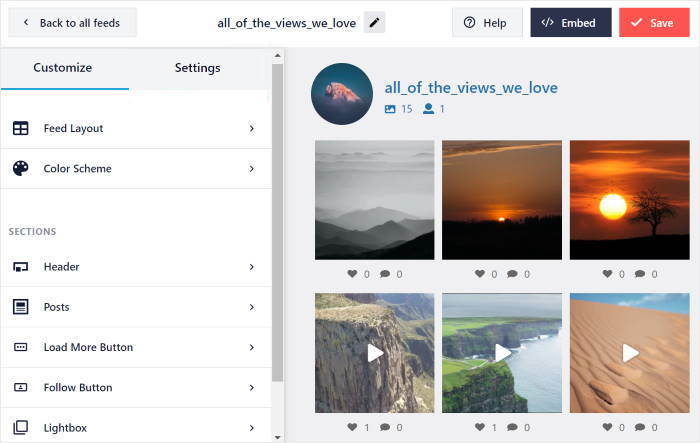
On the left, you can see the customization options for your Instagram feed. You can use these options to change your feed layout, header style, color scheme, post style, and much more.
When you change the customization options of your Instagram feed, you can see how it looks using the live preview on the right side of the customizer.
Let’s go ahead and begin designing our Instagram feed.
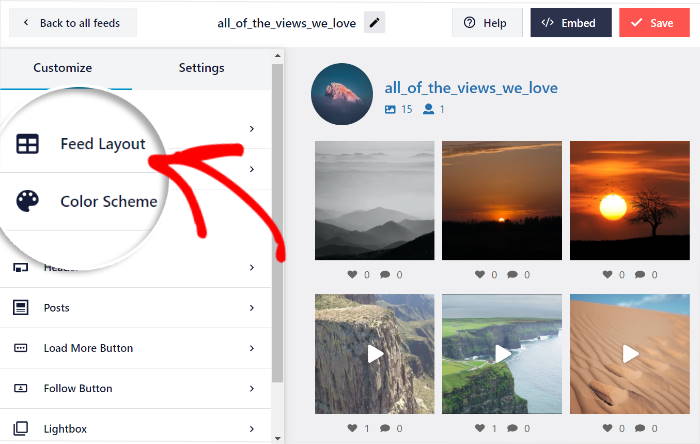
I usually start by personalizing my Instagram feed’s layout. To do this first, click on the Feed Layout option to get started with the customization.
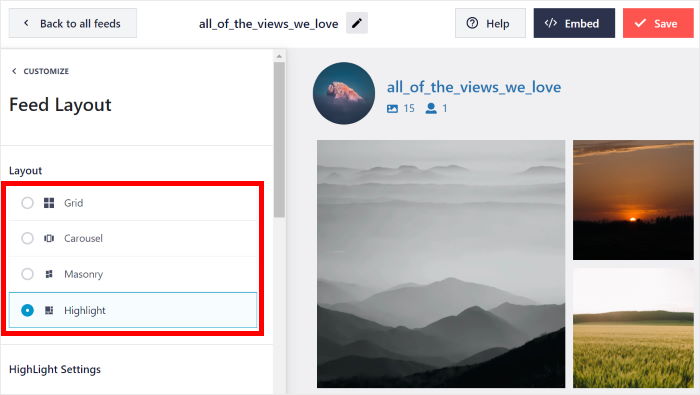
You can now choose from 4 options for your feed layout: Grid, Carousel, Masonry, and Highlight.
The first option is the Grid layout which shows your Instagram posts in rows and columns.
Since all your photos have the same size, your Instagram feed looks clean if you pick this layout.
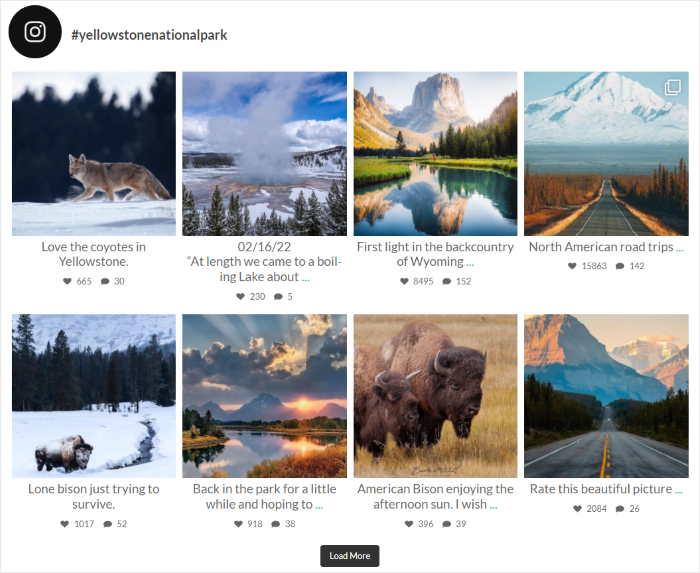
With the Carousel layout, you can display an Instagram slider on your website. That way, you give your visitors another way to interact with your site and boost your engagement.
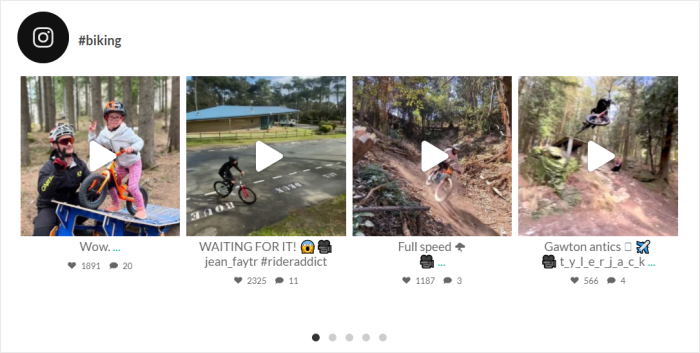
Want to show Instagram posts with their original proportions? You can choose the Masonry layout then.
It’s a great way to embed Instagram galleries on your website and show the whole photo to your visitors.

Finally, you have the Highlight layout that can make specific Instagram posts highly visible. Using this layout, you can show off your best products in your shoppable Instagram feeds.

Once you’ve chosen your layout, remember to click on Save Changes.
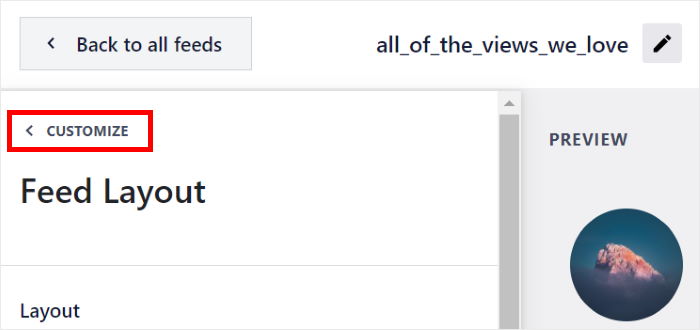
To return to the main customization options, click on the small Customize button.
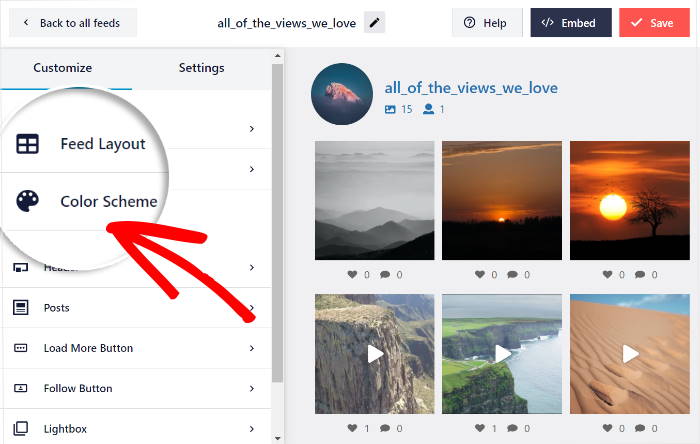
After that, you can click on the Color Scheme option to pick the colors for your Instagram feed.
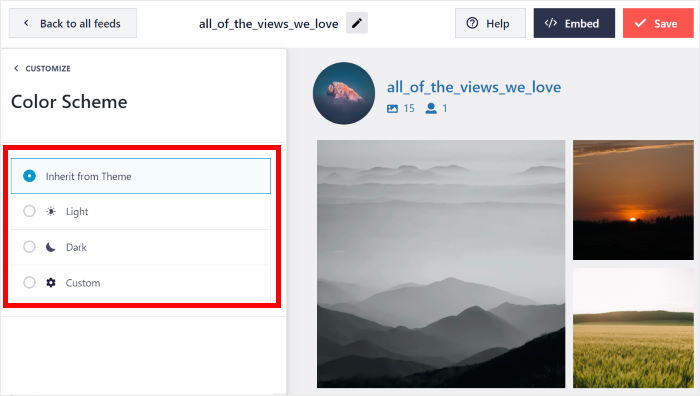
With Instagram Feed Pro, you can choose from 4 different color schemes:
- Inherit from Theme: Inherit the colors of your website
- Light: Show a light background along with a darker font
- Dark: Choose a dark background and a light font color
- Custom: Pick all the colors of your Instagram feed manually
Once you’re happy with the color scheme, click on Save.
This way, you can use the remaining customization options to set the post layout, header style, feed size, lightbox, and much more. And once you’re done with customization, click on Save again.
Step 5: Embed Instagram Feed on Your Website
Finally, it’s time to embed your Instagram feed on your website. With this plugin, you have 2 super easy ways to do that:
- Embed Instagram feed on your page
- Embed Instagram feed on your sidebar or footer
Embed Instagram Feed on Your Page
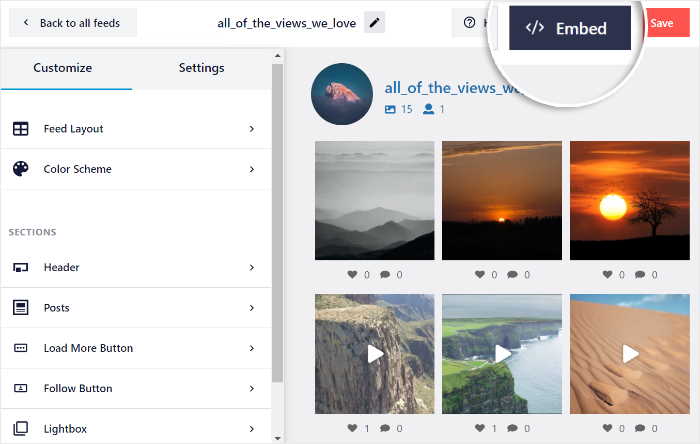
You can start embedding your Instagram feed right from your live feed editor. To get started, click on the Embed button at the top.
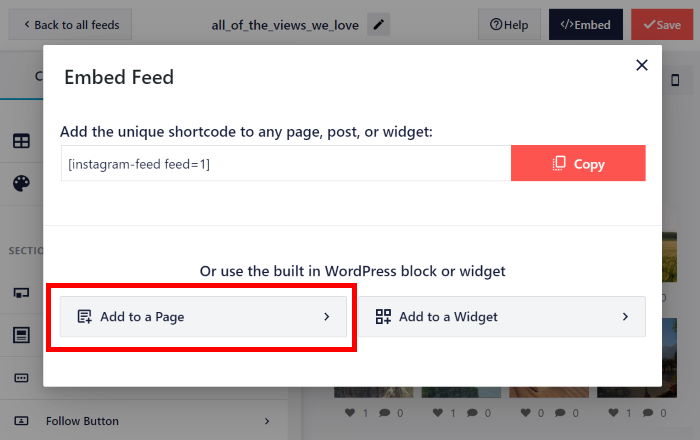
Next, you can choose where to embed your Instagram feed on a new popup. Click on the Add to a Page button to continue.
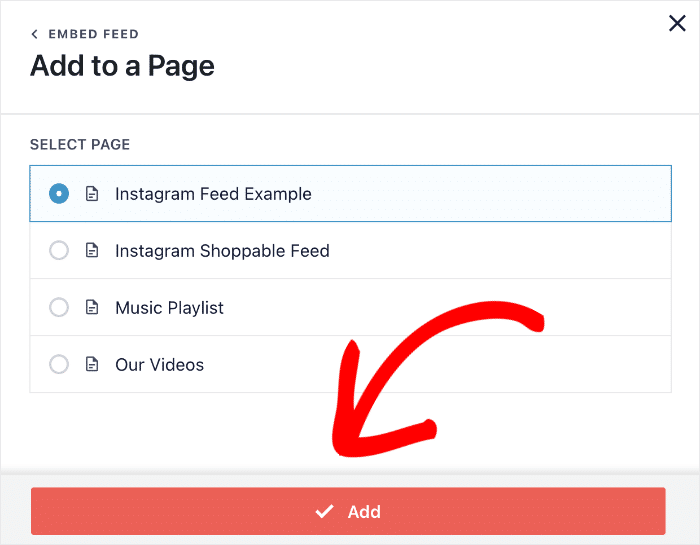
Next, select the page where you want your Instagram feed and then click on the Add button.
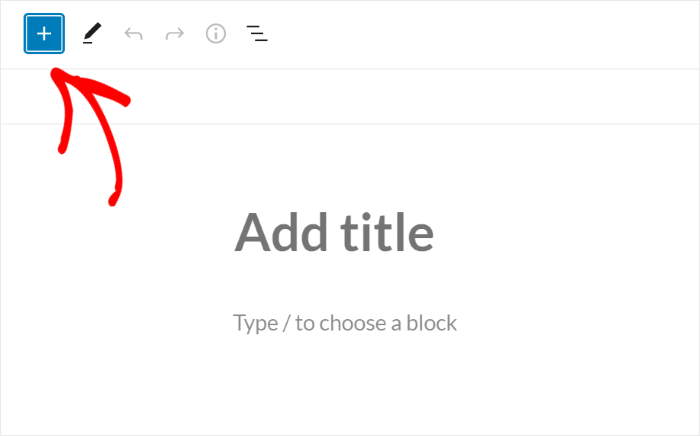
Now, the plugin will send you to that page so you can embed your Instagram feed.
To do that, click on the small plus (+) icon and add a new content block to the page.
Now, use the search bar to look for “Instagram” and then click on the Instagram Feed option in the search results.
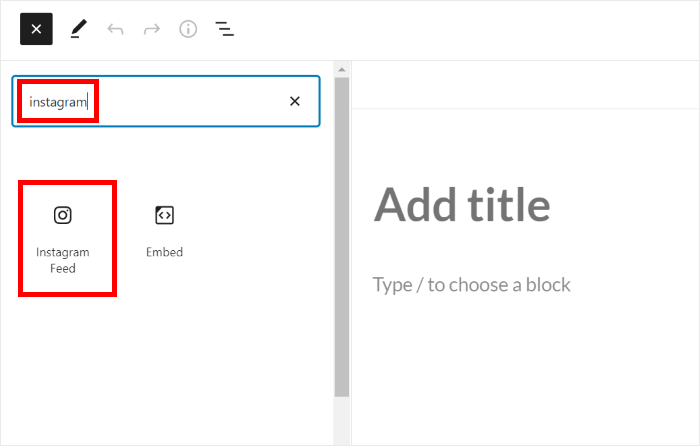
Finally, click on Publish and your Instagram feed will be live.
By simply following the steps in this tutorial, you now have an Instagram feed on your WordPress page. You can now open your website and see how your Instagram feed looks.

After that, let’s see how you can embed your Instagram feed on the sidebar or footer of your website.
Embed Instagram Feed on Your Sidebar or Footer
You can also embed Instagram Feeds on your sidebar or footer areas as an Instagram widget.
First, open your Instagram feed in the live feed editor. If it’s not open already, use your WordPress dashboard to navigate to the Instagram Feed » All Feeds.
Now click on the Instagram feed that you created earlier.
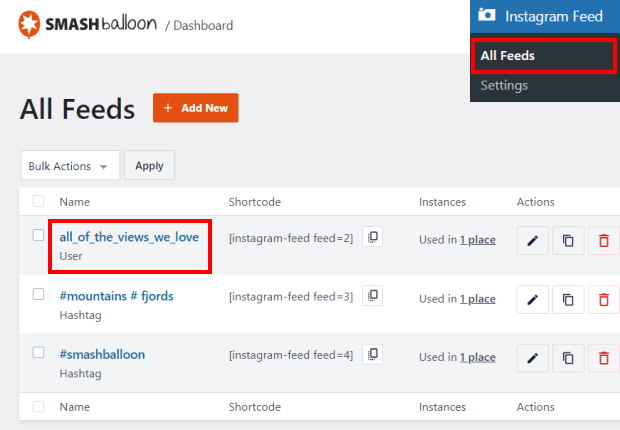
You’ll now see the Instagram feed open in the live feed editor.
Click on the Embed button in the top right corner to start embedding your feed.

After that, you’ll see a popup that asks where you want to embed your feed.
On the popup, click on the Add to a Widget button.
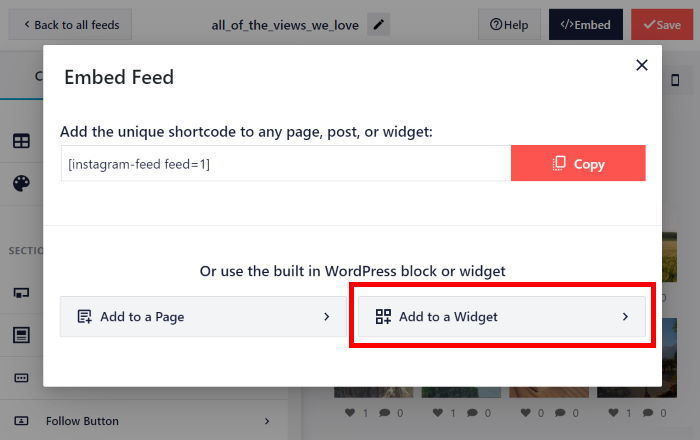
The plugin will now open your Widgets page so you can add the Instagram feed widget.
To embed your Instagram feed on the sidebar, you can go ahead and click on the Sidebar panel here.
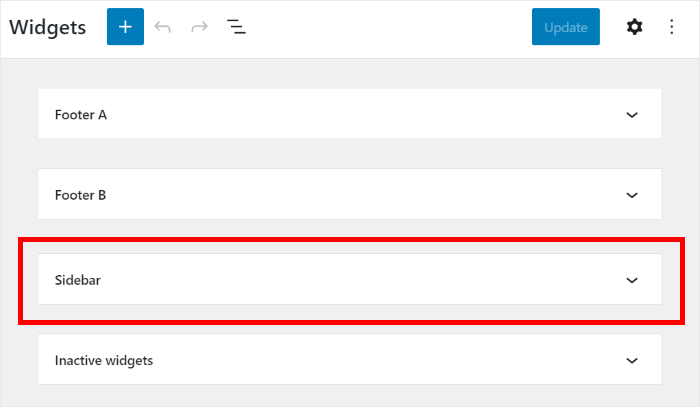
If you want to embed your Instagram feed on the Footer instead, click on a footer panel.
For this tutorial, we’ll embed the Instagram feed on the website footer.
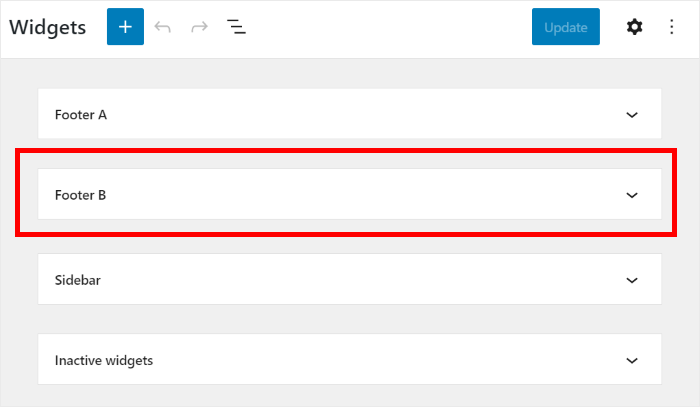
Now, click on the plus icon (+) here to add a new widget, and then select the Instagram Feed widget from the options.
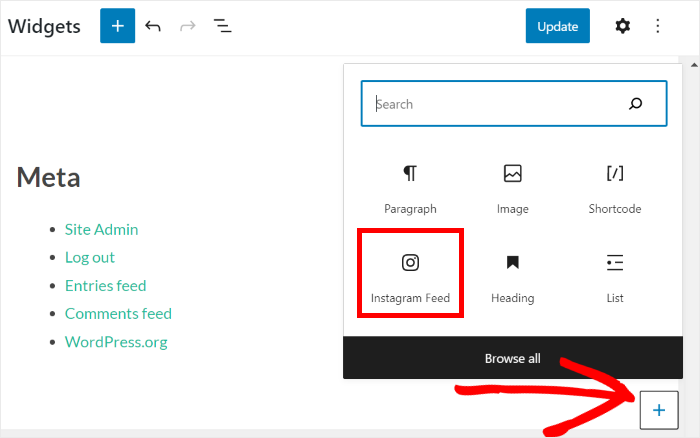
Go ahead and click on Update to publish your Instagram feed widget on your website.
When you open your website, you can see how it looks.
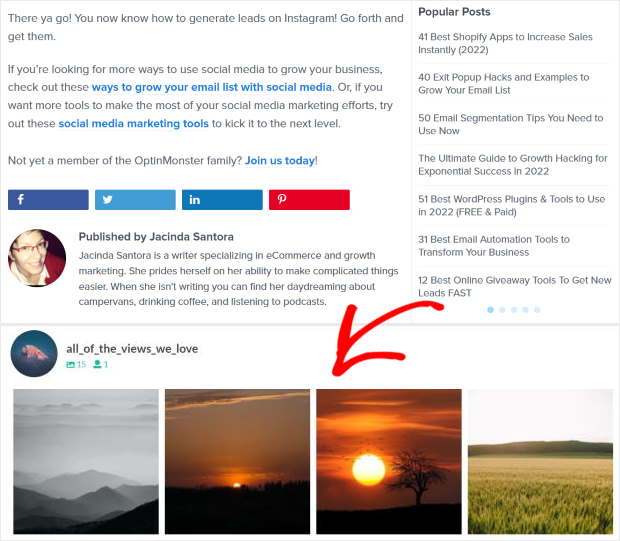
And that’s it!
In this article, you’ve learned how to add an Instagram post to your website without using a plugin.
You also know how to embed an Instagram feed to WordPress using a plugin, so you can boost your account’s engagement and increase your website traffic, too.
Want the easiest way to display your Instagram feed on your website?
Get started with Smash Balloon’s Instagram Feed Pro now!
Want to take it a step further and display all your social media feeds? This next article about adding social media feeds to WordPress is for you.
You may also like this next post on how to get more views for your Instagram reels.
Finally, if you enjoyed this article, feel free to follow us on Twitter and Facebook for more social media marketing tutorials.


