Social Wall
  Feed Analytics

If you’re working to grow your business, blog, or online presence, you’re probably using social media, and X (Twitter) is likely part of that.
As a digital marketer, I know that getting your content noticed on platforms like X (Twitter) is a constant goal.
When you share a link to your website on X (Twitter), you want it to stand out and grab people’s attention. That’s where X (Twitter) Cards come in. They transform your regular X post links into rich previews, often with images, titles, and descriptions.
If you want to make your website links on X (Twitter) more effective and visually appealing, you’re in the right place.
In this step-by-step guide, I’ll show you exactly how to add X (Twitter) Cards to your website. I’ll share the simple process I’ve used to set up X (Twitter) Cards on WordPress, so you can make every website link you share on X (Twitter) work harder for you.
In This Article
- Why Use X (Twitter) Cards for Your Website
- How to Add X (Twitter) Cards for Your Website (Easy Way)
Why Use X (Twitter) Cards for Your Website
If you want to reach a lot of new people for your brand, X (Twitter) can be a fantastic place.
After all, based on our research on social media marketing statistics, X (Twitter) has over 330 million users so it’s a massive social media platform with tons of potential customers.
But getting started with X (Twitter) can be tough — especially if your brand doesn’t have a large social media following already.
A simple and effective way to do that is by adding X (Twitter) Cards to your website. That way, your website visitors can easily check out your X posts and follow you.
Here are a few more ways you can start using X (Twitter) Cards for your website:
- By embedding relevant X posts, you can grab people’s attention and keep them engaged on your website.
- You can share X posts with the latest news and announcements about your brand and easily inform your visitors.
- Displaying your X (Twitter) timeline also shows people that you’re actively posting on X (Twitter), which means they’re likely to reach out to you there. This also helps you get more reposts.
- If you want to get more sales, you can use X (Twitter) Cards to embed reviews of your products and convince more people to buy
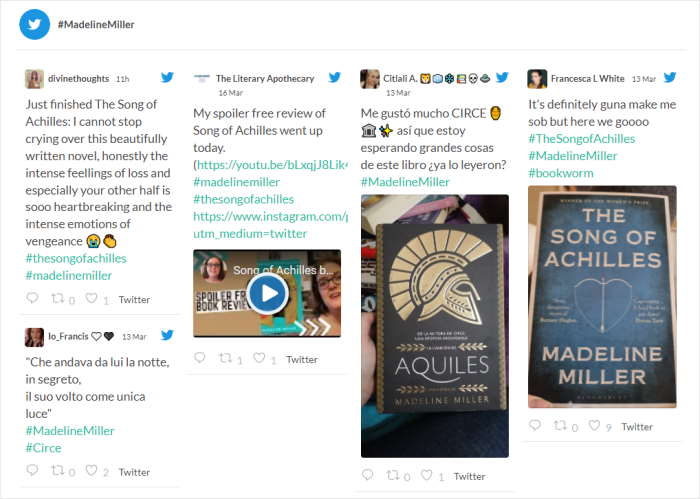
And that’s just the start. X (Twitter) Cards can be a fantastic way to get started with social media marketing, engage your followers and grow your business.
Let’s check out the easiest way to start displaying X (Twitter) content on your website.
How to Add X (Twitter) Cards for Your Website (Easy Way)
If you want to show X (Twitter) Cards to your website visitors, the best way is to use a WordPress plugin.
That way, you can embed as much X (Twitter) content as you want — with absolutely no coding needed.
And the best plugin to display X posts on your website is X (Twitter) Feed Pro.

Using this plugin, you can add X (Twitter) Cards for your website with ease and start engaging your visitors in no time.
X (Twitter) Feed Pro is the best X (Twitter) Feed plugin for WordPress. It’s designed to make it easy to display your engaging X (Twitter) content and keep your website visitors interested in your social media presence, working hand-in-hand with your efforts to improve your X (Twitter) strategy, like using X (Twitter) Cards.
All it takes is a few simple clicks, and you can create, customize, and embed a feed of X (Twitter) Cards on your website.
Just like setting up X (Twitter) Cards is straightforward, getting started with X (Twitter) Feed Pro is quick and easy. No complicated coding needed for either.
What’s more, you get tons of options when it comes to the type of X (Twitter) content you want to show.
You can show X posts from user timelines, embed your chosen X (Twitter) hashtags, show X (Twitter) search results, and much more.
The best part? Your X (Twitter) Cards will automatically match the design of your website using the plugin. That way, the X (Twitter) content will perfectly fit your branding.
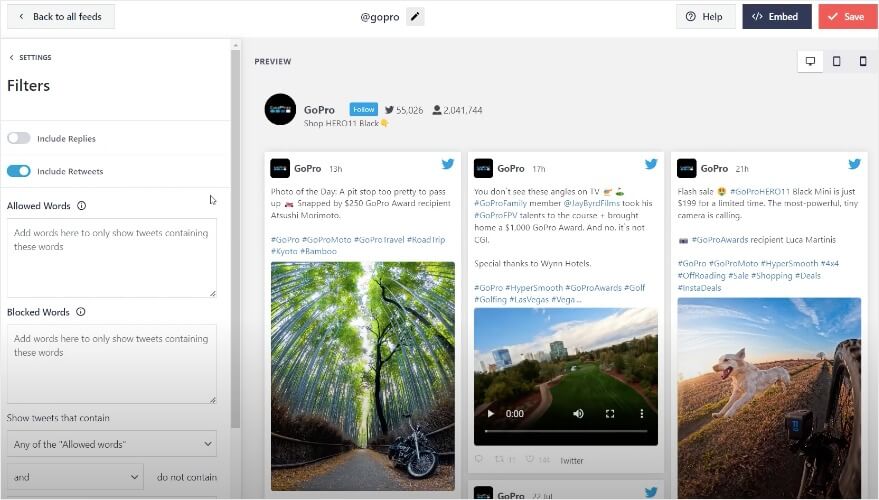
One thing I really appreciate about X (Twitter) Feed Pro is its visual feed customizer.
It allows you to easily tailor how your X (Twitter) Feed looks and what content it displays, giving you control over your website’s X (Twitter) integration, just like you control the appearance of your links with X (Twitter) Cards.
In just a few clicks, you can set your layout, color scheme, button design, header style, and much more.
Plus, this plugin comes with a team of WordPress experts who are always ready to help you out.
As you can see, X (Twitter) Feed Pro is really the best plugin to help you embed X (Twitter) content on your website.
In fact, some of the biggest brands in the world use Smash Balloon to embed social media feeds on their websites.

Ready to add X (Twitter) Cards for your website? Get your copy of X (Twitter) Feed Pro here.
With that, let’s check out how you can use the plugin to add X (Twitter) Cards to your website.
Step 1: Download the X (Twitter) Feed Pro Plugin
To get started, grab your copy of the X (Twitter) Feed Pro plugin and then download it on your computer.
After that, you can simply install and activate the plugin on your website.
If you want some help with that, just check out this tutorial on how to install a WordPress plugin step-by-step.
Once you’ve installed and activated the plugin, you can move on to step 2 below.
Step 2: Create a New X (Twitter) Feed
Now that your plugin is ready, you can use it to create a new X (Twitter) Feed on your website.
Using that feed, you can show tons of X (Twitter) Cards at once.
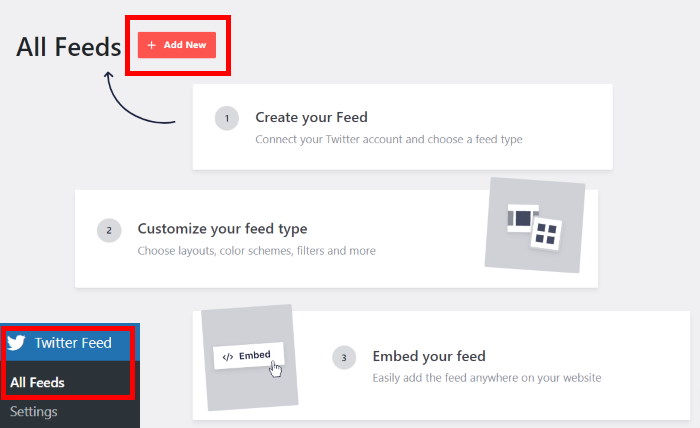
From your dashboard area, navigate to the X (Twitter) Feed » All Feeds menu to get started.
Now create a new feed by clicking on the Add New button.
After that, you can choose the type of X (Twitter) content you want to show on your cards. Here are the options you can choose from:
- User Timeline: Embed an X (Twitter) timeline on your website
- Hashtag: Show X posts with a chosen hashtag
- Home Timeline: Display the X posts from your homepage
- Search: Pick a search term and embed X posts with that term
- Mentions: Show X posts that tag your profile
- Lists: Embed X (Twitter) lists on your website
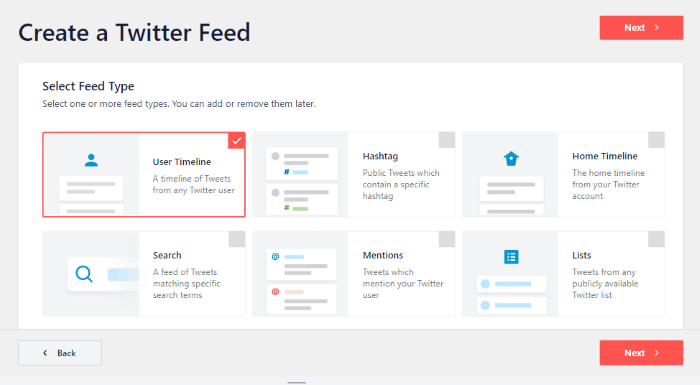
Select the option that you prefer from this list and then click on the Next button.
For this example, we’ll use a user timeline feed type.
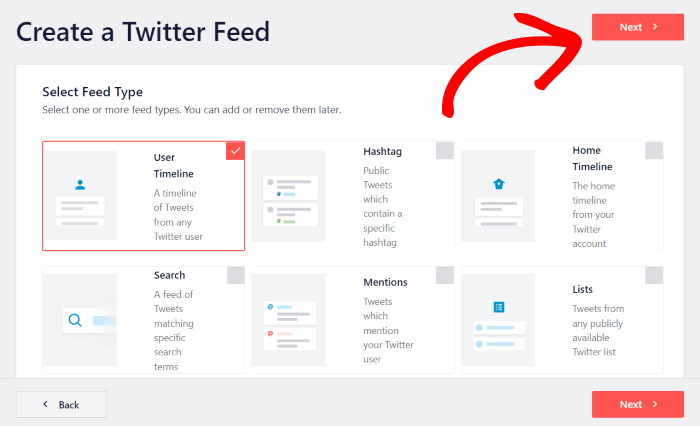
As you can see, you can create an X (Twitter) Feed in just a few clicks with this plugin,
In step 3, you can connect this feed to X (Twitter) so that it can display X (Twitter) Cards on your website.
Step 3: Connect Your X (Twitter) Account
To embed X (Twitter) Cards, you can connect this new feed to your X (Twitter) account.
For that, click on the Connect button to get started.
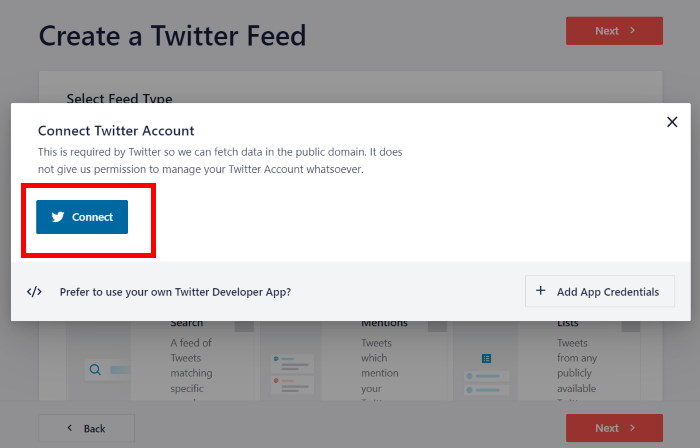
The plugin will then open X (Twitter) so you can finish connecting your account. For that, you can simply give read-only access to the plugin.
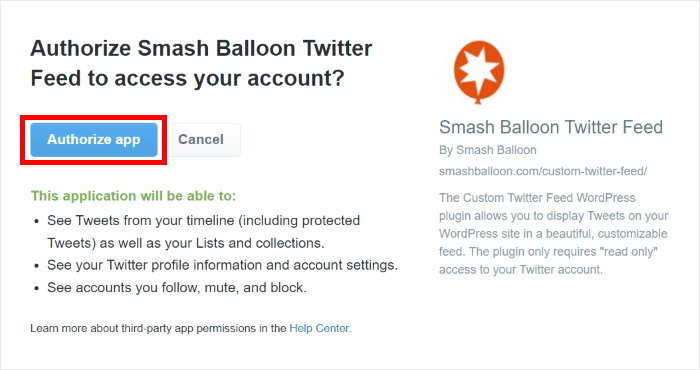
That way, your X (Twitter) account will be completely safe since the plugin can only view X (Twitter) info and won’t be able to make any changes at all.
To connect your X (Twitter) account, click on Authorize app here.
Now that you’ve connected your X (Twitter) account, it’s time to add the source.
The source can be the X (Twitter) profile, hashtag, list, search term, and custom X (Twitter) content that you want to display on your website.
Here, we’ve added the @starbucks X (Twitter) profile as the source. This will display X (Twitter) Cards from that user’s profile.
After entering the source in the popup, click on the Next button.
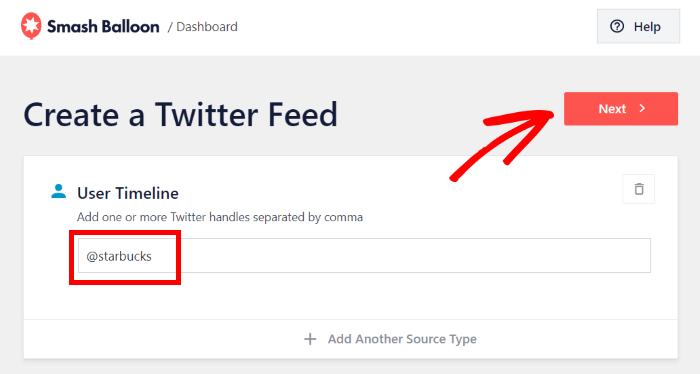
With that, you can move to step 4 and customize how your X (Twitter) Cards look on your website.
Step 4: Customize Your X (Twitter) Feed
To get started, you can choose to import a pre-built design for your X (Twitter) Cards. Here are the 6 options that you can choose from:
- Default
- Masonry Cards
- Simple Carousel
- Simple Cards
- Showcase Carousel
- Latest X Post
- Widget
After you select the template, click on Next to continue.
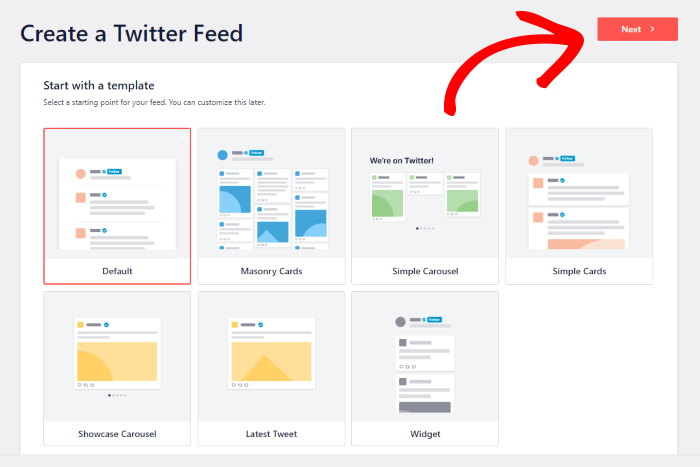
After you do that, X (Twitter) Feed Pro will send you to the live feed editor. From here, you can change the layout, colors, button design, lightbox, header design, and more for your X (Twitter) Cards.
Towards the right, you can find a live preview that shows how the X (Twitter) Cards will look for your website.
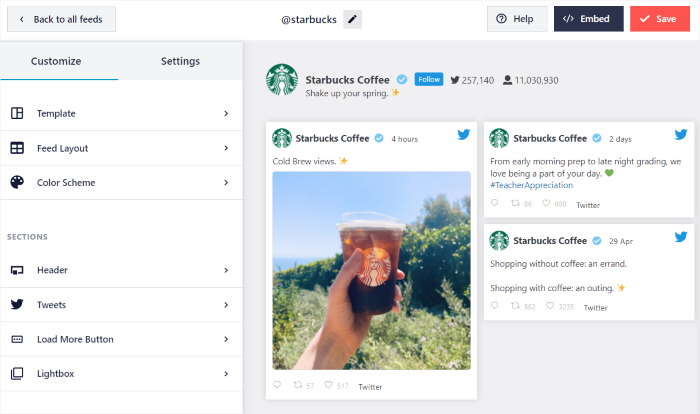
To get started with the customization, you can change the layout of the X (Twitter) Cards on your website.
Click on the Feed Layout option to do that.
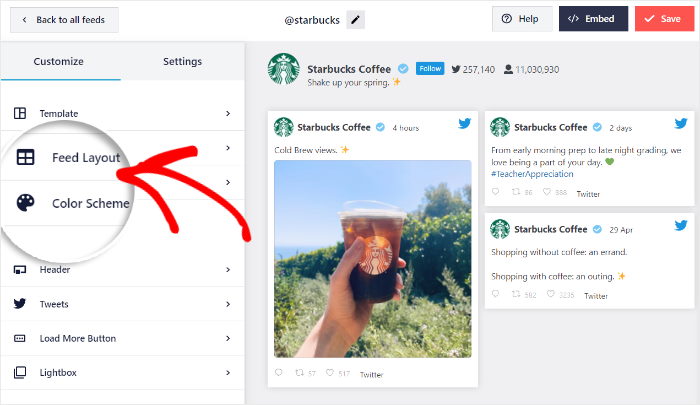
After that, you can choose between 3 layouts for your X (Twitter) Cards: List, Masonry, and Carousel.
Let’s take a look at them below:
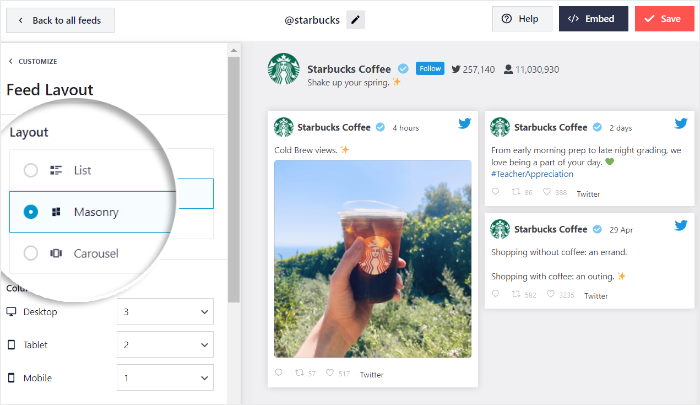
Using the list layout, you can show your X (Twitter) Cards in a single column — just like the layout of X (Twitter)’s official website.
This way, each X (Twitter) Card is clearly visible on your website.

Next, you have the masonry layout that can show X (Twitter) Cards in multiple columns.
It’s a great way to show tons of X (Twitter) Cards at once.

You can also pick the carousel layout and embed a slideshow of X (Twitter) Cards on your website.
This layout can help you make your website even more interactive.

After selecting your X (Twitter) Feed layout, click on the Save button at the top.
Next, you can continue setting up the design of your X (Twitter) Feed by clicking on the Customize button at the top.
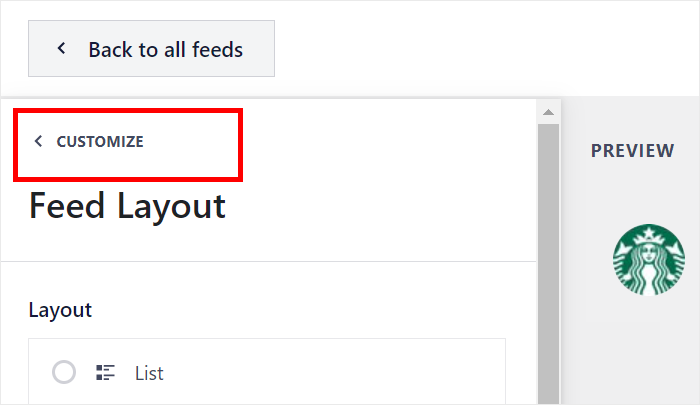
Now, you can use the live feed editor to change the colors of your X (Twitter) Feed.
Click on the Color Scheme option on the left to get started.
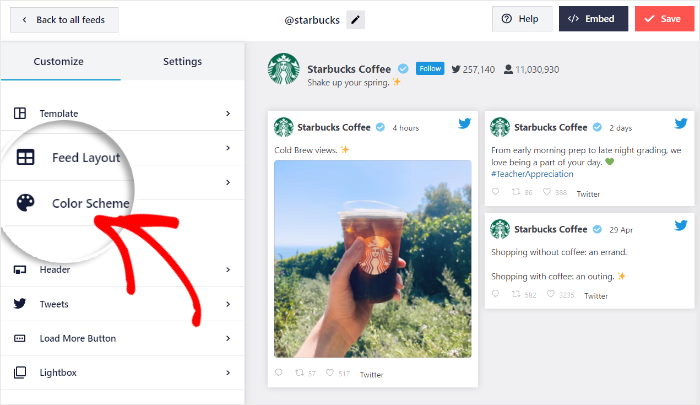
To change your colors, you can simply choose between 4 different color schemes here:
- Inherit from Theme: Copy the colors of your WordPress theme
- Light: A light background with dark font color
- Dark: Dark background on top of a light font color
- Custom: Manually pick all the colors yourself
Once you select your color scheme, click on the Save button.

You can then use the remaining customization options and change the header, button design, feed size, and much more in just a few clicks.
Finally, click on the Save button to confirm the new design of your X (Twitter) Feed.
You can then go to the final step and start embedding your X (Twitter) Cards on your website.
Step 5: Embed Your X (Twitter) Cards on Your Website
Now that you’ve customized how the X (Twitter) Cards will look, it’s time to embed them on your WordPress website
You can do that in 2 ways with this plugin:
- Embed X (Twitter) Cards on a WordPress page
- Embed X (Twitter) Cards on the WordPress sidebar or footer
Let’s take a look at both of the methods below.
Embed X (Twitter) Cards on a WordPress Page
Using the live feed editor, you can easily embed your X (Twitter) Cards in a few clicks — no coding needed.
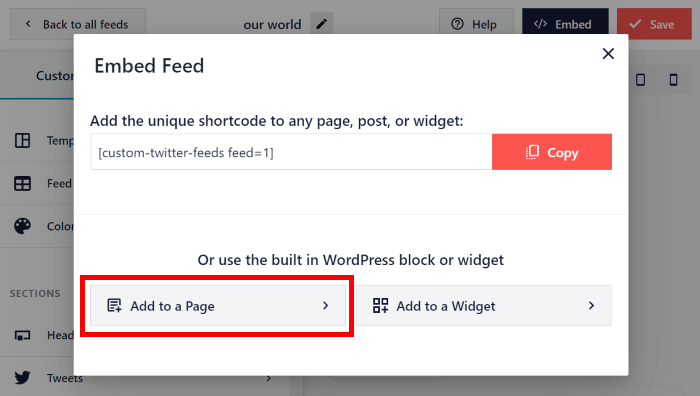
To get started, click on the Embed button at the top.
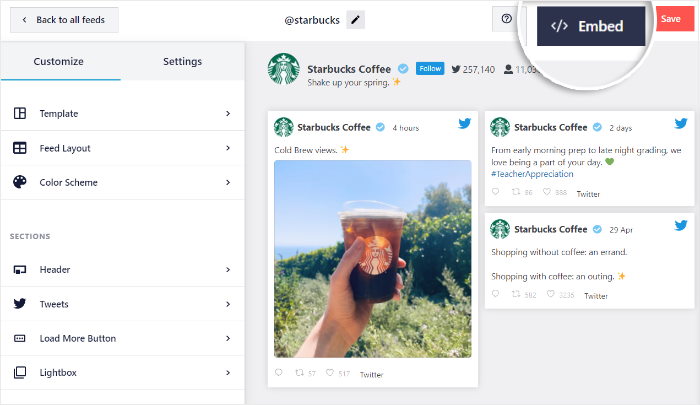
Once you do that, you’ll see a popup where you can choose the location for your X (Twitter) Cards.
Click on Add to a Page here to continue.
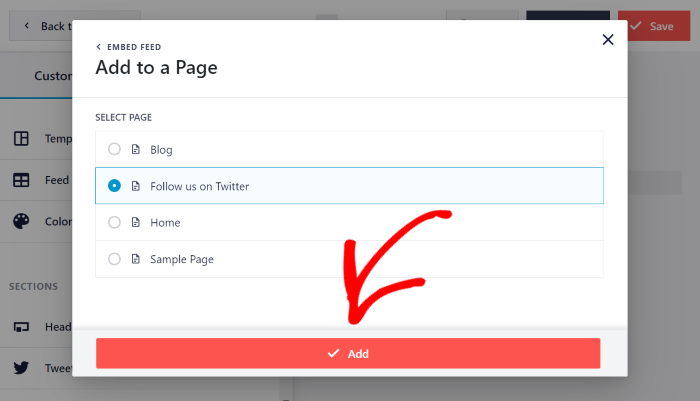
Next, you’ll see a list of all the WordPress pages on your website. You can now select the page where you want to embed the X (Twitter) Cards.
After you do that, click on Add to continue.
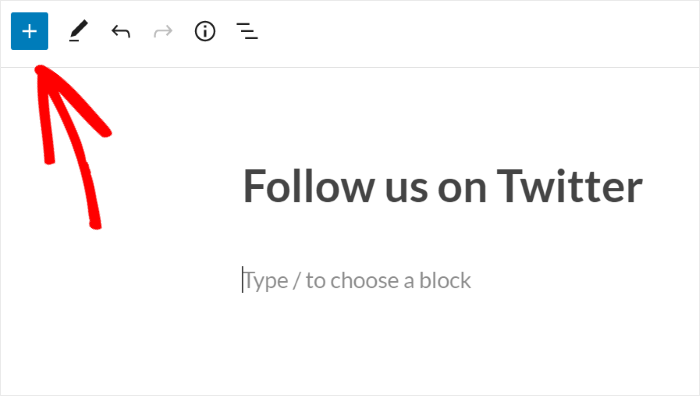
X (Twitter) Feed Pro will now open that page in the WordPress editor. Here, you can add a new content block by clicking on the plus (+) icon.
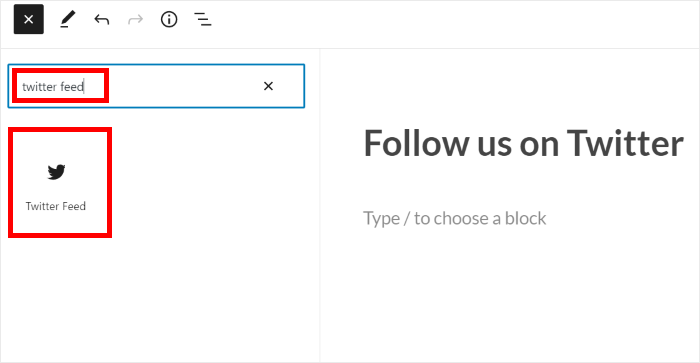
Write “X (Twitter) Feed” in the search bar at the top to look for the right content block here.
Then, click on the X (Twitter) Feed block from the options below.
Finally, click on the Update button, and your X (Twitter) Cards will be live on your website.
To see how it looks, you can just open your website and check for yourself.

Now let’s look at another way to add X (Twitter) Cards for your website using X (Twitter) Feed Pro.
Embed X (Twitter) Feeds on the WordPress Sidebar or Footer
Using this method, you can embed X (Twitter) Cards on your WordPress sidebar or footer as an X (Twitter) widget.
You can use the live feed editor for that as well.
First, navigate to the X (Twitter) Feed » All Feeds menu from your WordPress dashboard area.
You’ll then see a list of all the X (Twitter) Feeds on your website. Now click on the X (Twitter) Feed that you want to embed.
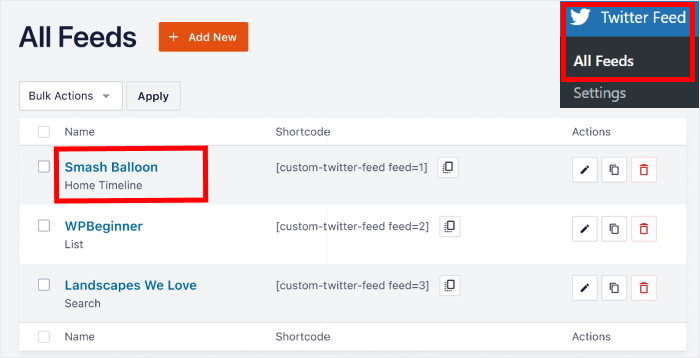
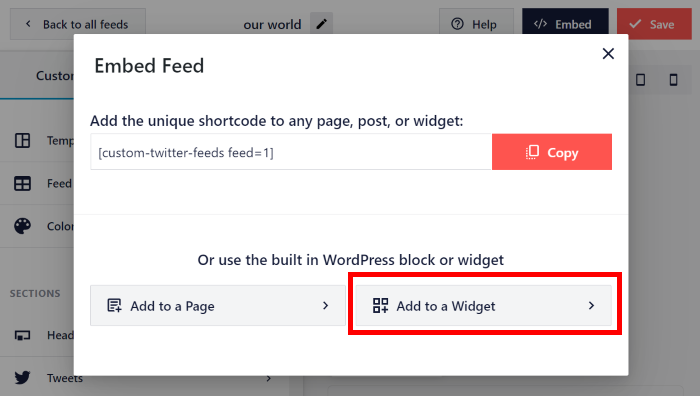
Doing that will open the live feed editor once again. Just click on the Embed button to start embedding your X (Twitter) Cards.
On the popup, click on the Add to a Widget to continue.
This will send you to your WordPress widgets page so you can add your X (Twitter) widget.
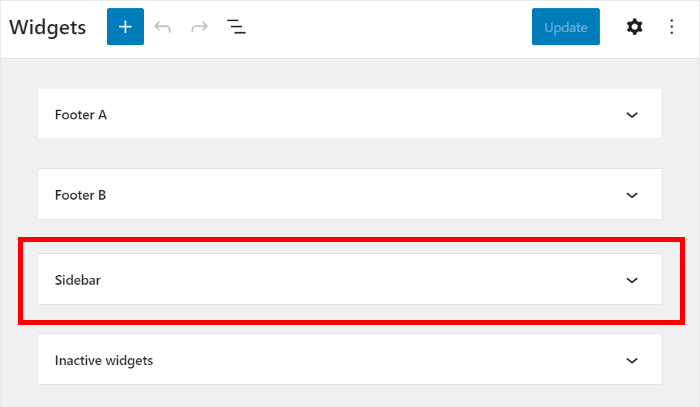
From here, you can choose between the sidebar and footer for your X (Twitter) Cards.
Want to show X (Twitter) Cards on your website sidebar?
Just click on the Sidebar panel.
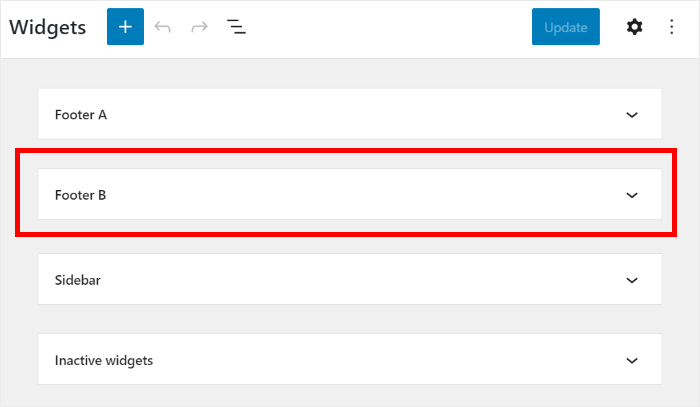
Or you can choose to display X (Twitter) Cards on the footer.
For that, click on a Footer panel instead.
Now you can add a new widget by clicking on the plus icon (+) at the bottom.
After that, select the X (Twitter) Feed widget from the options.
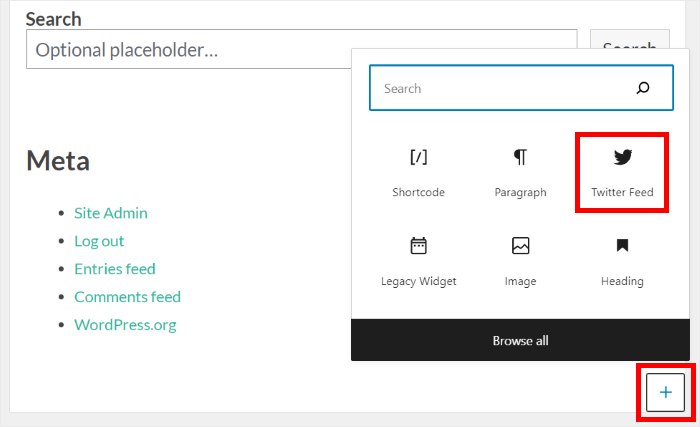
Finally, you can click on Update to save the changes.
Just like that, you’ve added X (Twitter) Cards to your website’s widget-ready areas. You can take a look by opening your website.
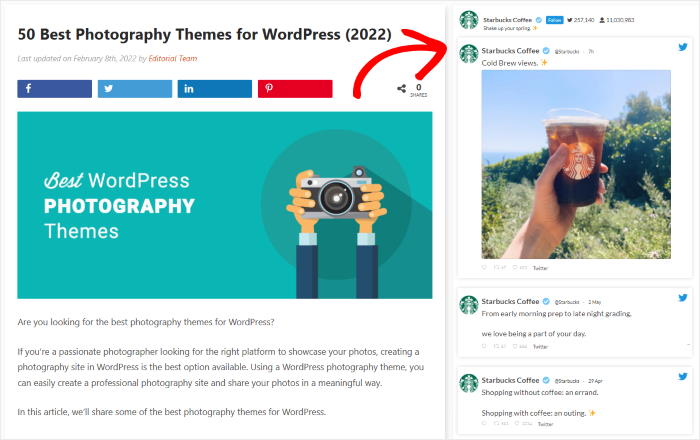
All in all, X (Twitter) Feed Pro is the best plugin if you want to add X (Twitter) content to your website with ease.
Now let’s see how you can embed X (Twitter) Cards without using a plugin.
Manually Add X (Twitter) Cards for Your Website
You can also add X (Twitter) Cards for your website using the manual way without using any plugin at all.
As a result, it can be a lot more time-consuming if you pick this method. After all, you’ll have to manually generate the X (Twitter) embed code and add it to your website.
On top of that, you won’t get customization options here, so your X (Twitter) Cards might not match your branding.
If you want to change how the X (Twitter) Cards look, you’ll have to tweak the code yourself or spend money on a developer.
What’s more, you won’t get a support team like with X (Twitter) Feed Pro. If adding the embed code to your site causes any errors, you won’t be able to ask a support team for help.
With that, let’s get started and see how you can manually add X (Twitter) Cards for your site.
Step 1: Visit Twitter Publish

To get started, open publish.twitter.com on your browser to go to the Twitter Publish website.
Here, you can use the X (Twitter) card generator to create an HTML embed code for X (Twitter) content.
Step 2: Choose Your Embed Type
If you scroll down, you can find 3 different embed options:
- Embedded X (Twitter): Add a single X (Twitter) Card to your site
- Embedded Timeline: Show X (Twitter) Cards from a specific timeline
- X (Twitter) Buttons: Embed X (Twitter) buttons
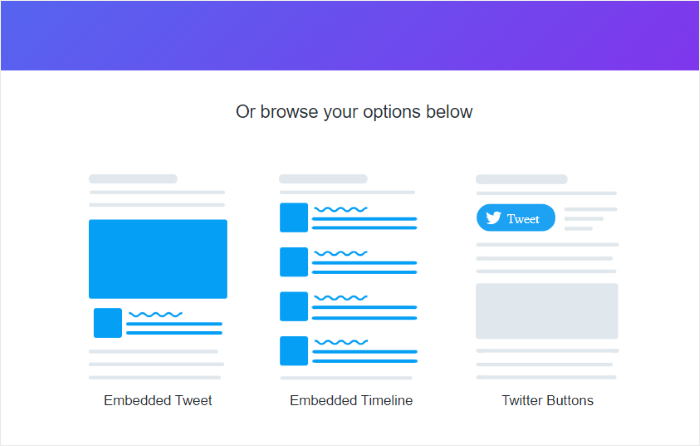
For our example, we’ll go with the embedded timeline option here.
Step 3: Paste Your X (Twitter) URL
After that, you’ll see an X (Twitter) card generator popup. There, you can simply enter the URL of the X (Twitter) timeline you want to embed.
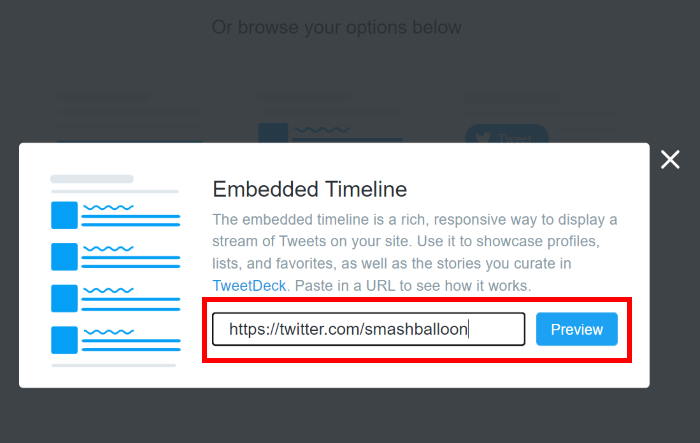
After you paste the URL of the X (Twitter) timeline on the popup, click the Preview button to continue.
Step 4: Copy the HTML Code
Finally, you can see the HTML code for your X (Twitter) Cards. You can also see a preview of how the X (Twitter) Cards will look on your website.
To continue, click on the Copy Code button.
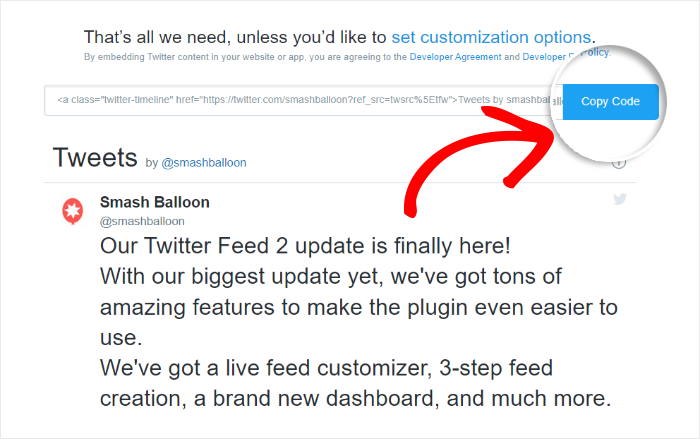
Finally, you can use this code to embed the X (Twitter) Cards in the next step.
Step 5: Add the HTML Code to WordPress
You can now paste the HTML embed code into your WordPress page or post.
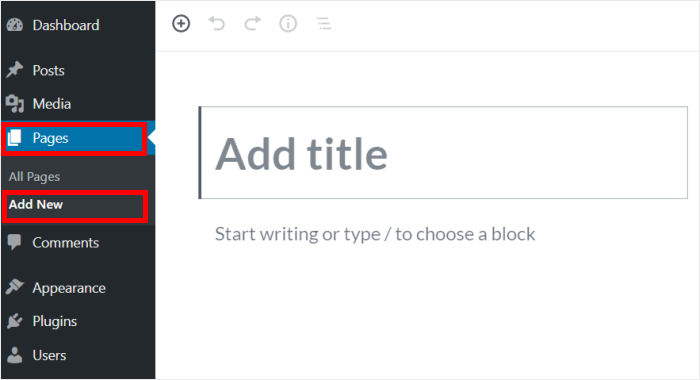
To use a WordPress page, click on the Pages » Add New menu from your dashboard.
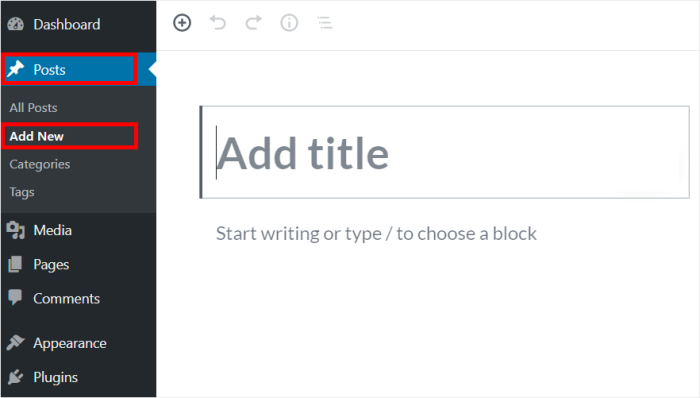
Or you can open the Posts » Add New menu from your dashboard to use the WordPress post.
For this example, we’ll go with a WordPress page.
Now add a content block on the page or post by clicking on the plus (+) icon.
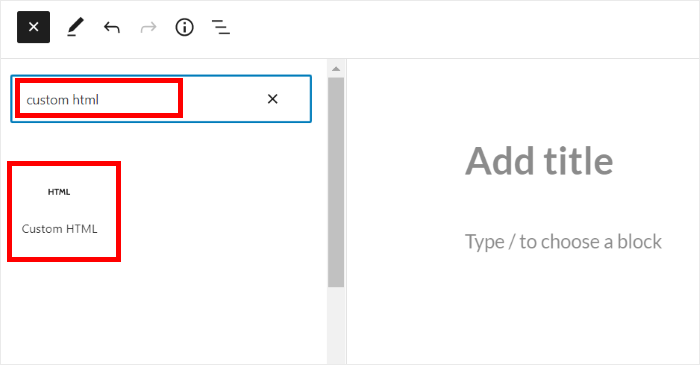
Finally, look for the search bar at the top and write “custom html” on it.
Then, select the Custom HTML block from the options below.
Now you can paste the copied X (Twitter) embed code into the HTML block.
Doing that will embed the X (Twitter) Cards on your website.
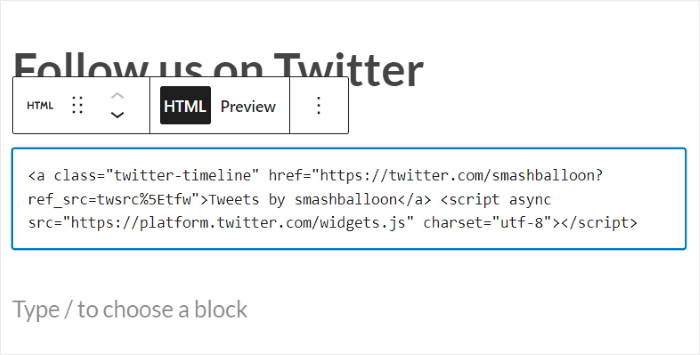
Finally, click on Publish to save your changes, and the X (Twitter) Cards will be online.
Just open your website to see how the X (Twitter) Cards look.

But if you want to embed just a single X (Twitter) Card, it’s a bit easier.
First, copy your X (Twitter) URL and then go back to your WordPress website. After that, simply paste your URL into your post or page.
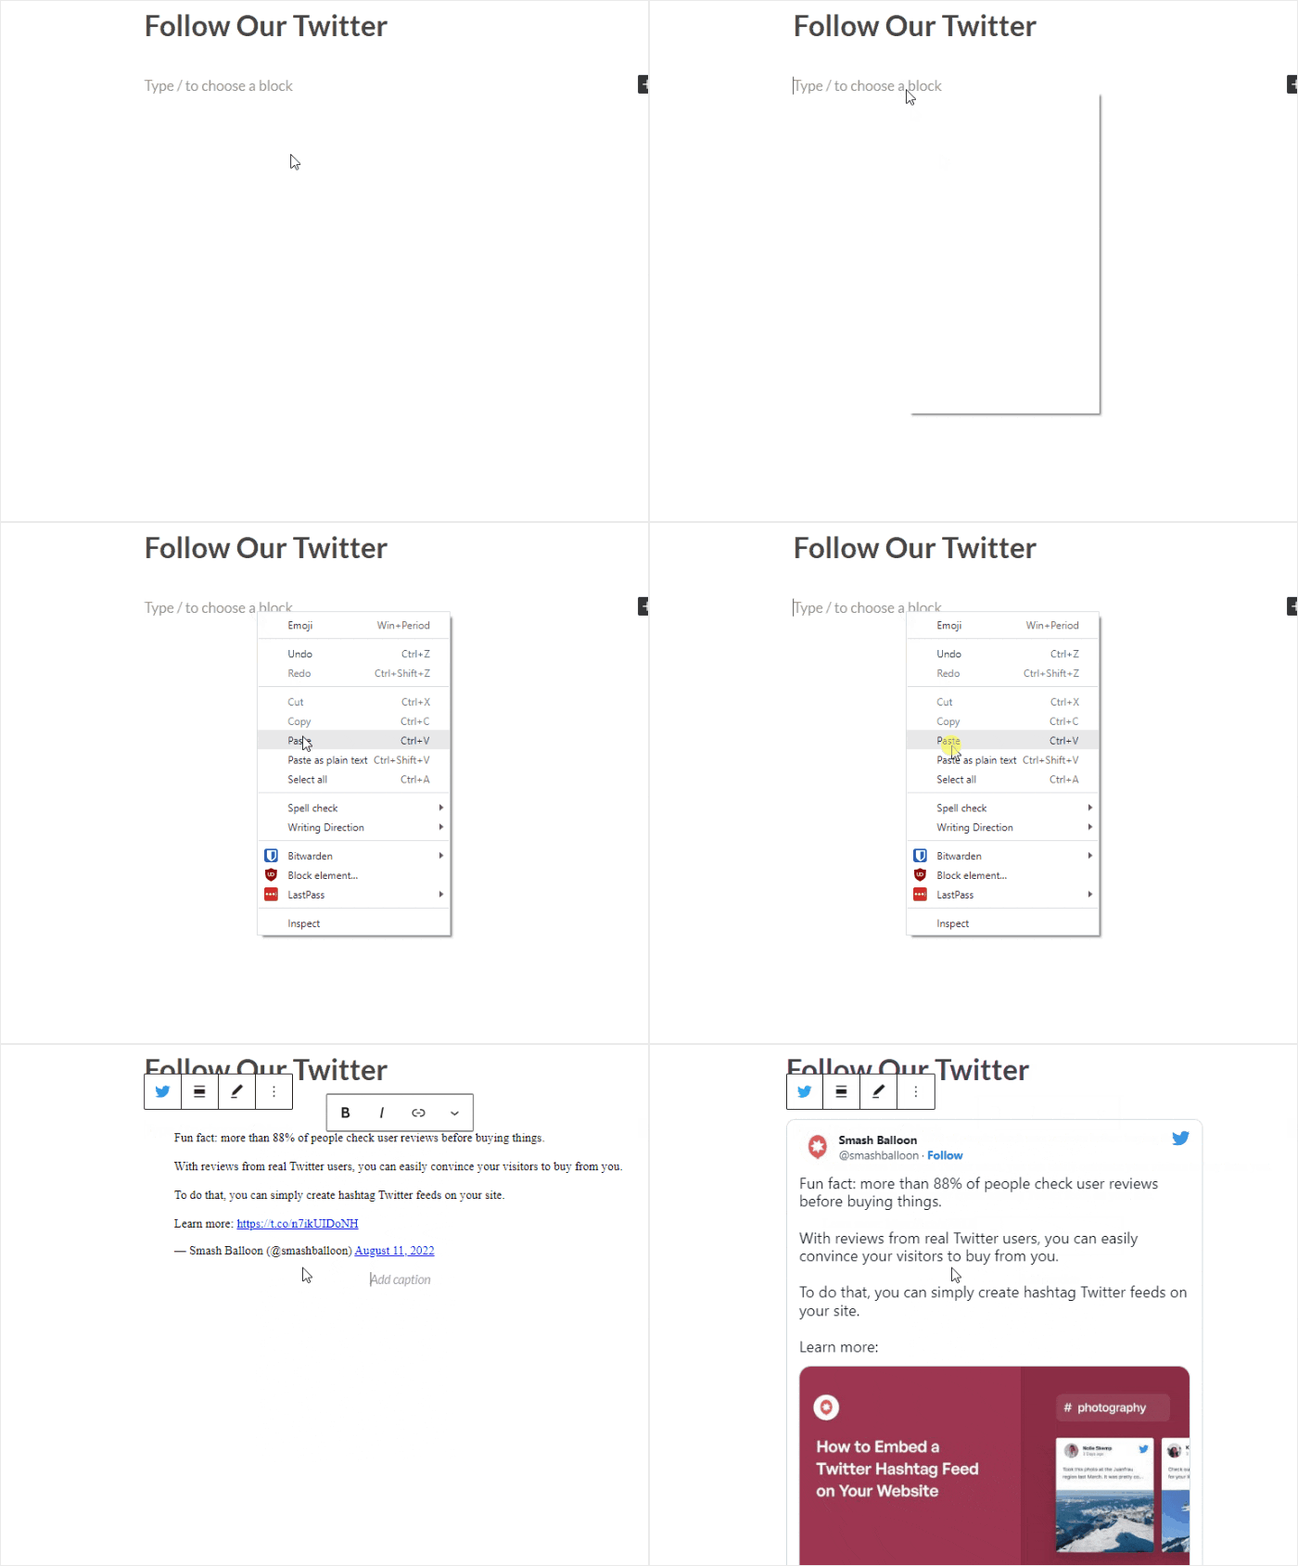
Like before, click on Publish to confirm your changes, and your new X (Twitter) Card will be online.
And there you have it!
As you can see, it’s super easy to add X (Twitter) Cards for your website using a WordPress plugin. With X (Twitter) Feed Pro, you can start displaying X (Twitter) content in just a few simple clicks — even if you’re a WordPress newbie.
You can then grow your social media following, engage your website visitors, and boost your sales as well.
If you want to start making the most out of X (Twitter) for your brand, check out our list of the best ways to make money on X (Twitter).
Do you have an Elementor website? Here’s how you can embed an X (Twitter) Feed on your Elementor site.
If this tutorial helped you out, follow us on Facebook and X (Twitter) for more helpful tips on social media marketing.