How to Embed Social Media Feed Widgets For Website [2023]
Home Blog How to Embed Social Media Feed Widgets For Website [2024]

How to Embed Social Media Feed Widgets For Website [2024]

How to Embed Social Media Feed Widgets For Website

Do you want to add social media feed widgets to your website?

If you’re looking for a place to market your business, social media can be a fantastic source of new customers and sales. 

And by integrating social media content into your website, you can get tons of new followers and interactions with ease.2

But if you’re not used to coding, adding a social media feed to WordPress can get pretty tough.

In this post, we’re going to help you out with a complete guide on how to add social media feed widgets to your website.

Here’s the table of contents for this tutorial. You can just click on a topic that you’re interested in to skip to that section:

Let’s get started!

Easiest Way to Embed Social Media Feed Widgets

With 4.7 billion users all over the globe, based on our detailed research on social media marketing statistics, social media can be a fantastic place to promote your business and get more customers.

From social networks like Facebook to video-sharing sites like TikTok, there are tons of different social media platforms available online.

If you want to grow your social media presence, you can simply use feed widgets and show your social media posts to your website visitors.

example of social media feed

That way, visitors can easily interact with your social media content and follow you for more. With more followers, you can also rank higher in social media feed algorithms and reach more people.

So, you can improve your visitor’s user experience and boost your online presence at the same time.

By adding fresh content from various social media networks, you can also improve your SEO and your site’s search engine rankings.

On top of that, you can also display user-generated content (UGC) like positive reviews, product demonstrations, testimonials, and much more.

youtube feed reviews example

That type of content can work as social proof, which you can use to convince visitors to buy from you and boost your conversions.

But adding social media feed widgets can get complex — especially if you’re not used to handling a lot of code.
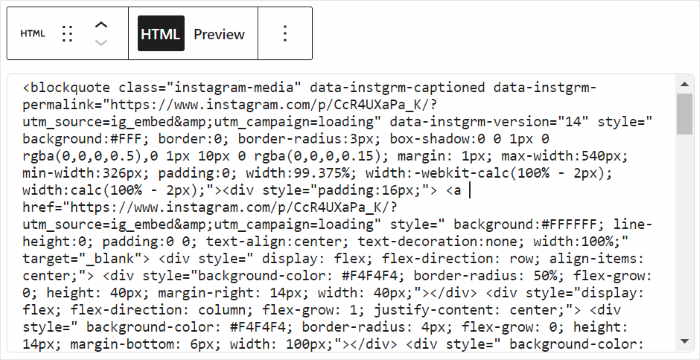
embed code for instagram

You’ll have to manually fetch the HTML embed code from the social networks and add them to your site, which can take a lot of time.

Plus, you might even have to hire a developer to customize your social media widgets. In fact, they might not even match your website’s branding.

The solution? You can just use social media feed plugins for your website.

After all, the variety of useful plugins is a huge advantage WordPress has over other website builders like Wix, Squarespace, and Weebly.

And when it comes to social media feed plugins, the #1 option in the market is Smash Balloon.

smash balloon social media feed plugin

With Smash Balloon, you can easily show content from Facebook, YouTube, Instagram, TikTok, and Twitter on your website.

In just a few simple clicks, you can create, customize, and embed social media feed widgets — no need to touch a single line of code.

And that’s just the start! Here are a few more reasons why Smash Balloon is the best social media feed solution for WordPress:

  • To create your social feed widgets, you can simply follow a 3-step guided flow that’ll take you through the whole process.
  • You get a user-friendly live feed editor to help you customize the design of your feed widgets with ease.
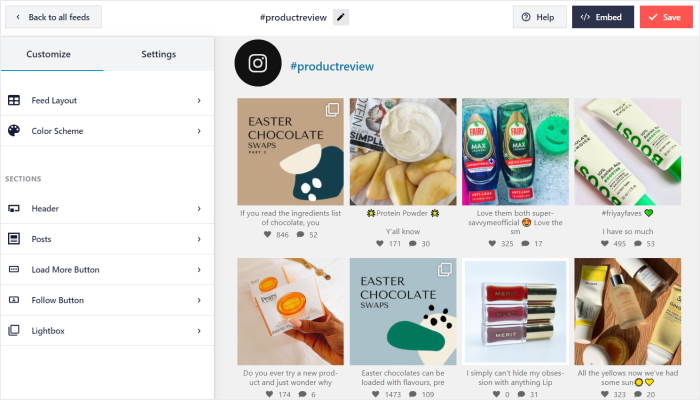
live feed editor smash balloon
  • You can embed as many social feed widgets as you want on your website with absolutely no limits.
  • Smash Balloon actually embeds posts instead of using iFrames, so search engines can recognize the keyword-rich content in your social feed widgets and boost your SEO.
  • Since the plugin is lightweight, your social feed widgets can also show as many posts as you want, and your website will load just as fast.

As you can see, Smash Balloon has tons of amazing features to help you grow your brand’s social media channels. In fact, 1,750,000+ business owners are already using Smash Balloon right now.

smash balloon users

Want to start creating social feed widgets easily?

Grab the Smash Balloon All Access Bundle and get the best social media feed plugins out there for cheap with this great pricing option.

With that, let’s see how you can use Smash Balloon to embed social media feed widgets on your WordPress site.

How to Embed Social Media Feed Widgets For Website

Now, we’ll show you the simplest way to integrate social media feeds to a website and embed content from the biggest platforms out there: Facebook, YouTube, TikTok, Instagram, and Twitter.

Let’s get started!

How to Add Facebook Feed Widgets to Your Website

To get started, grab your copy of the Facebook Feed Pro plugin here and then install it on your WordPress site.

If you’re not sure how to do that, you can check out our tutorial on how to install a WordPress plugin here.

After you install and activate the plugin, you can navigate to the Facebook Feed » All Feeds menu to create a new Facebook feed widget.

On that page, just click on the Add New button.

create a new facebook feed

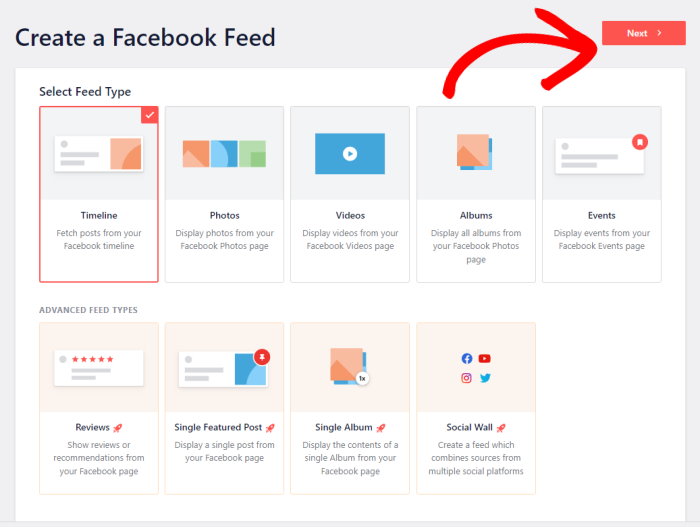
Next, Facebook Feed Pro will ask you what type of feed widget you want to create. Your widget can show Facebook page posts, photo galleries, events calendars, reviews, group posts, and much more.

To continue, you can pick your feed type from 9 different options:

After that, click on the Next button to proceed.

select your facebook feed type

For our example, we’ll use the timeline feed type for our Facebook widget.

In the next step, you can connect your feed widget to a source so that it can display Facebook content on your site.

Connecting Your Facebook Account

After creating a new feed widget using this plugin, it’s time to connect it to a source.

You can get started with that by clicking on the Add New button.

add source facebook feed pro

When it comes to the source, you have 2 options to choose from: a Facebook page or a group.

Select the option that you prefer and then click on Connect to Facebook.

connect to facebook using facebook feed pro

Once you do that, the plugin will send you to Facebook, where it will ask for read-only access to your account.

Using this access, Facebook Feed Pro can only view your content and won’t be able to make any changes to your account. It’s the same with the other plugins in this tutorial.

As a result, Smash Balloon plugins are completely safe to use.

To continue, select the page or group you want to connect to and then click Next.

select the facebook pages

Finally, click on the Done button on the popup to confirm the read-only access.

The Facebook Feed Pro plugin will send you back to your WordPress site once you do that.

allow read only access to facebook feed pro

You can then click on Add to confirm this page or group as the source for your Facebook feed widget.

After that, you can reuse this source whenever you make new Facebook feeds on your site.

confirm facebook feed source

Now, you can click on the Next button to finish adding your source and move on to the next step.

confirm source facebook feed pro

As you can see, Facebook Feed Pro makes it super easy to create feed widgets and connect them to Facebook.

On top of that, you also get user-friendly customization options to help you design your widgets.

Customizing Your Facebook Feed Widget

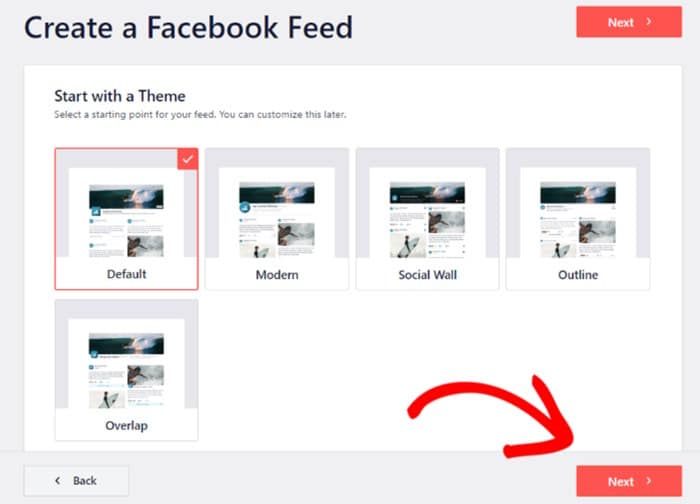
Once you’ve added your source, the plugin gives you pre-built themes that you can import for your Facebook widget.

There are 5 themes with unique designs that you can choose from: Default, Modern, Social Wall, Outline, and Overlap.

After picking the theme that you like, click on Next to continue.

choose facebook feed theme

After that, the plugin gives you different templates to choose from. Each template gives a unique layout for your Facebook feeds widget.

Just pick the template that you prefer and then click on Next.

select your facebook feed template

To help you customize your Facebook feed widgets further, this plugin comes with a live feed editor that you can use.

From there, you can set your feed layout, color scheme, header design, post style, and much more in just a few simple clicks — no need to edit the CSS or any other code.

On the right, you can also see a live preview of your Facebook feed. That way, you can track your customization in real-time.

live feed customizer facebook feed pro

Now that your live feed editor is open, you can use the customization options on the left to edit the design of your feed widget.

Click on the Feed Layout option to get started.

open feed layouts facebook feed pro

With Facebook Feed Pro, you have 4 different layouts that you can use for your feed widget:

  • List
  • Masonry
  • Grid
  • Carousel

Let’s check out what these layout options look like below.

feed layout options facebook social media feed widget

First, you have the list layout that can embed your Facebook posts in a single column. That way, your posts will be clearly visible to your visitors.

list layout for facebook feed

Next, you have the masonry layout that displays Facebook posts in multiple columns while keeping their original proportions.

On top of that, you can also show lots of Facebook content at once this way.

masonry layout facebook feed pro

If you want to embed a Facebook feed widget with visual content, you can use the Grid layout.

That way, you can show your posts in neat rows and columns.

grid layout facebook

Finally, there’s the Facebook carousel layout that can turn your widget into a slideshow.

Your website will then be more interactive to your visitors since they can scroll through the Facebook content.

facebook feed pro carousel layout

Just select the layout that you prefer and then click on the Save button to confirm your changes.

To continue setting up your Facebook feed widget, click on the Customize button at the top of the editor.

click on the customize button facebook

Next, you can start editing the colors of your new feed widget using the color scheme functionality.

For that, just click on the Color Scheme option on the left.

open color schemes facebook feed pro

To change your widget colors, you can simply choose from 4 different color schemes:

  • Inherit From Theme: Copy the colors of your WordPress theme
  • Light: Show a light background along with a dark-colored font
  • Dark: Use a dark background and lighter font color for your widget
  • Custom: Manually pick all the colors yourself
color scheme options facebook feed pro

Select the color scheme that you want and click on the Save button once again to continue.

Just like that, you can use the live feed editor to change your header design, post style, lightbox options, like box design, and much more.

Finally, click on Save to confirm your new design after you’re done with the customization.

You can now move on to the final step and embed this social feed widget on your website.

Embedding Your Facebook Feed Widget

In a few easy clicks, you can embed your new feed widget directly from the live feed editor.

First, click on the Embed button at the top to get started.

embed button for facebook social feed widget

Facebook Feed Pro will then ask you to pick the location of your new feed widget. You can choose to embed it on a WordPress page, sidebar, or footer.

To embed your Facebook feed widget on a page, click on the Add to a Page button.

add to a page facebook feed pro

Doing that will let you see a list of all the WordPress pages on your website.

Simply select the page that you prefer and then click on the Add button on the popup.

add facebook feed to wordpress example

Facebook Feed Pro will then open that page in the WordPress editor so you can embed your feed widget with ease.

For that, add a new block by clicking on the plus icon (+) and then select the Custom Facebook Feed widget.

Finally, click on the Update button to confirm your changes and your Facebook feed widget will be live on your site.

Your visitors can now check out all kinds of Facebook content directly from your website, just like this example:

example of facebook feed on your website

What’s more, you can also embed your feed widget on the sidebar or footer areas of your website.

To do that, first, navigate to the Facebook Feed » All Feeds menu from your WordPress dashboard area and then click on your feed widget from earlier.

open feed in the live customizer facebook

After that, you’ll see the Facebook feed widget open in the live feed editor once again.

You can now click on the Embed button in the top right corner to continue — just like before.

embed button for facebook social feed widget

This time, click on the Add to a Widget button on the popup, and the Facebook Feed Pro plugin will send you to the widgets page of your website.

add to a widget facebook feed

From here, you can add, remove, and manage the WordPress widgets on your sidebar or footer areas.

To show Facebook content on your sidebar, click on the Sidebar panel.

open sidebar panel

If you want to show your Facebook posts on the footer instead, click on Footer here.

We’ll go with a sidebar for this tutorial.

open footer panel

After that, you can click on the plus (+) icon to add a new widget and then click on Custom Facebook Feed here.

facebook social media feed widget

With that, you now have an engaging Facebook feed widget on your sidebar or footer as well. Just open your site to see how it looks.

facebook social media feed widget on the sidebar

Now, let’s go ahead and check out the easiest way to show YouTube videos on your website.

How to Add YouTube Feed Widgets to Your Site

When it comes to video content on the internet, YouTube is the #1 platform. Unlike other options like Vimeo, YouTube has over 2.6 billion users that you can try to reach.

The first step is to get the best YouTube feed plugin for WordPress: YouTube Feed Pro.

Once you have the plugin, install and activate it on your WordPress website, and you’re ready to create your YouTube feed widget.

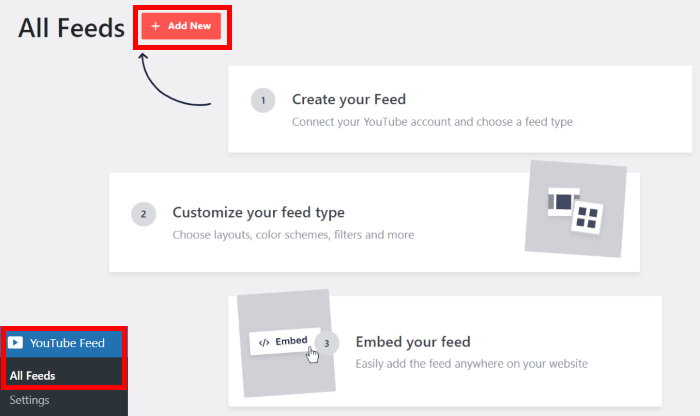
From your dashboard, go to the YouTube Feed » All Feeds menu, and then click on the Add New button.

add new youtube feed.

Next, you can choose the type of YouTube content you want to embed on your website. You get 6 options that you can choose from:

  • Channel: Display videos from a specific YouTube channel
  • Playlist: Choose a playlist and embed all the videos from there, including YouTube shorts
  • Favorites: Show all the favorite videos of your chosen YouTube channel
  • Search: Pick a search term and display the videos with that term
  • Live Streams: Embed older or ongoing livestreams on your site
  • Single Videos: Display specific YouTube videos using your feed widget

Select the type of YouTube content you prefer and then click on Next.

choose your youtube feed type.jpg

We’re going with a channel feed type for our example.

Now that you’ve created your YouTube feed widget, it’s time to connect it to YouTube in the next step.

Connecting Your Widget to YouTube

By connecting your feed widget to YouTube, you can start displaying video content on your website.

To do that, you can pick from 2 different methods:

  • Add a YouTube API key
  • Connect your YouTube account

By adding your YouTube API key, you can get access to all types of YouTube feeds, including YouTube playlists and live streams.

But if you connect your YouTube account instead, you’re limited to fewer options here.

To continue with the first option, click on the Add API Key button on the popup.

api key required youtube feed pro

If you don’t have an API key yet, you can follow our step-by-step guide on how to create a YouTube API key.

After that, paste your API key into the popup and then click on the Add button.

add api key youtube

If you want to use your YouTube account, then click on Connect a YouTube account instead.

connect your youtube account

This will send you to YouTube, where the plugin asks for read-only access to your YouTube account. That way, YouTube Feed Pro can view your info, but it won’t be able to make any changes.

Click on the Continue button on the popup to allow the read-only access.

allow read only access youtube feed pro

Just like that, you’ve created a YouTube feed widget on your WordPress site.

After that, go to https://www.youtube.com on your web browser and then open the YouTube channel, playlist, live stream, or more that you want to embed.

This will be the source for your YouTube feed.

For our example, we’ll embed a YouTube channel using our feed widget.

Once you do that, look for “/channel/” or “/user/” in the URL at the top and then copy the code after that.

copy the username youtube channel

Now open your WordPress site once again and then paste that code into the Channel ID or Username field.

To proceed, just click on the Next button on the popup.

enter source for youtube feed

Your YouTube feed widget is now ready. Since your social media feed widgets automatically inherit the design of your website, they will look amazing right out of the box.

In the next step, you can customize the design of your YouTube feed widget using the live feed editor.

Customizing Your YouTube Feed Widget

Before you get started, you can choose to copy the design of a pre-built feed template. YouTube Feed Pro gives you 8 templates to pick from:

  • Default
  • Carousel
  • Cards
  • List
  • Gallery
  • Latest video
  • Showcase carousel
  • Widget

Just pick the feed template that you prefer and then click on the Next button.

pick a feed template youtube feed pro

After that, the plugin will open your feed widget in the live feed editor. Towards the left, you can see all the customization options that you can use.

Using these options, you can edit your feed layout, color scheme, number of posts, header style, button design, and much more.

live feed editor youtube feed pro

You can also see a real-time preview of your YouTube feed widget on the right. Using this, you can easily track your changes.

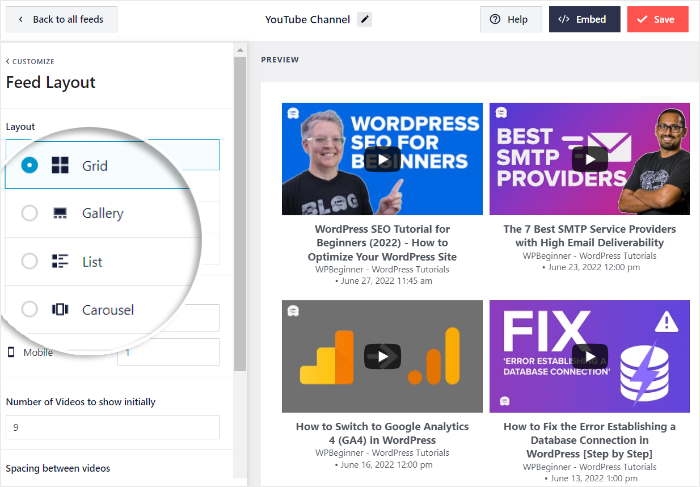
To get started, click on the Feed Layout option on the left.

open feed layout options youtube feed pro

By changing the feed layout, you can control how the YouTube videos appear on your website.

You can pick from these 4 feed layouts for your feed widget:

  • Grid
  • Gallery
  • List
  • Carousel
feed layout options youtube feed pro

If you want to show your YouTube videos in neat rows and columns, you can go for the Grid layout here.

You’ll be able to show tons of videos at once to engage your visitors this way.

grid layout youtube feed example

Want to put the focus on a single video? You can use the Gallery layout, which shows a large video with smaller thumbnails underneath it.

gallery layoute youtube video feed

Next, you have the List layout that you can use to show all the videos in a single horizontal column.

As a result, your video content will be clearly visible to any visitors.

list layout for youtube

You can also go for the Carousel layout, which turns your YouTube feed widget into a slideshow.

So, your visitors can interact with your site and choose which content they want to check out.

carousel layout youtube feed pro

After selecting your feed layout from these options, click on the Save button at the top to confirm your changes.

You can then click on the small Customize button in the top left corner to continue editing the design of your feed widget.

open customization options again

With YouTube Feed Pro, you can also choose to show a header over your feed widget and customize how it looks.

To do that, click on the Header option on the left.

open header options youtube feed

At the top, you can find the option to Enable or Disable your YouTube feed header.

Next, you have the Header Style option, where you can choose between 2 designs for your header:

  • Standard: Show the YouTube channel’s name and icon with other information.
  • Text: Write a heading and show it at the top of your feed widget

Under that, you can choose whether to show your Channel Descriptions or Subscribers on the header.

header options youtube feed pro

After you finish setting up your header design, click on the Save button once again.

With YouTube Feed Pro, it’s super easy to customize the design of your YouTube feed widget. You can now use the remaining customization options to change your colors, feed size, button design, and more.

Finally, click on the Save button once again to confirm your new design. After that, you can move on to the final step and embed the feed widget on your website.

Embedding Your YouTube Feed Widget

From the live feed editor, you can embed your new YouTube feed widget in just a few clicks.

To get started, click on the Embed button in the top right corner.

embed your youtube feed

On the popup, you can choose where you want to display the YouTube videos.

To embed the YouTube feed widget on a web page, click on Add to a Page.

embed to a page youtube feed

YouTube Feed Pro will then show you a list of the WordPress pages on your website.

Select the page you prefer and then click on the Add button.

select your page wordpress

The plugin will then send you to that WordPress page. To embed your feed widget, first, add a new content block by clicking on the plus (+) icon.

add a block wordpress page

Write “youtube feed” in the search bar at the top and then click on the Feeds for YouTube block in the search results below.

add youtube feed block to wordpress

Now click on the Update button, and your YouTube feed widget will be online.

Just like that, you now have a new social media feed widget that shows YouTube videos on your website.

youtube feed example

Want to embed a YouTube widget on your website sidebar or footer areas? You can do that from the live feed editor as well.

To get started, open the live feed editor once again.

Navigate to the YouTube Feed » All Feeds menu from your WordPress dashboard area and then click on your YouTube feed widget.

youtube feed live editor

Now that your feed widget is open in the editor, click on the Embed button in the top right corner again.

embed your youtube feed

You can then choose the Add to a Widget option on the popup to continue.

Doing that will open the widgets page of your WordPress website.

embed to a widget youtube feed pro

From here, you can add, remove, and edit the WordPress widgets on your sidebar or footer.

Depending on where you want to show your YouTube videos, click on the Sidebar or Footer panel.

open sidebar panel

We’ll show the video feed widget on your sidebar for this tutorial.

After that, add a new widget by clicking on the plus (+) icon and then select Feeds for YouTube.

add youtube widget to your site

Finally, click on Update to save your changes, and your YouTube widget will be live on your website.

If you open your site now, you can see how it looks.

show youtube video feed on your wordpress sidebar

Now you know how to embed social media feed widgets to show Facebook posts and YouTube videos.

Let’s take a look at the simplest way to embed TikTok videos on your website.

How to Add TikTok Feed Widgets to Your Site

First, get your copy of TikTok Feed Pro here before installing and activating the plugin on your website.

For a quick refresher on how to do that, you can check out our beginner’s guide on how to install WordPress plugins.

Once the plugin is ready, open the TikTok Feed » All Feeds menu from your dashboard.

Then, click on the Add New button at the top.

open live feed editor tiktok feed

Just like that, you now have a new TikTok feed widget for your website.

Connecting Your Feed Widget to TikTok

In this step, you can connect it to your TikTok account so you can start displaying your TikTok videos.

To get started, first, hit the Add Source button.

tiktok feed pro add source

Next, you’ll see the option to start connecting your TikTok account.

You can simply click on the Connect with TikTok button to continue.

connect with tiktok

Like other social platforms in this tutorial, the plugin will now ask for read-only access to your TikTok account.

Using this access, TikTok Feed Pro will view your TikTok content, but it won’t be able to make any changes.

So, you can click on the Authorize button to give the read-only access and connect your account.

TikTok Feed Pro will then bring you back to your website, where your TikTok account is listed as a source for your feed widget.

Just select your account here and then click on Next.

select your tiktok source

Now that you’ve created a TikTok feed widget and connected it to your account, you can customize how it looks in the next step.

Customizing Your TikTok Feed Widget

For a quick and easy way to create a beautiful TikTok feed widget, the plugin will let you import a feed template. You have 6 options to pick from, and each template has a unique look.

Once you select your template, click on Next to continue.

select your feed template tiktok

The plugin will then open your new feed widget in the visual customizer.

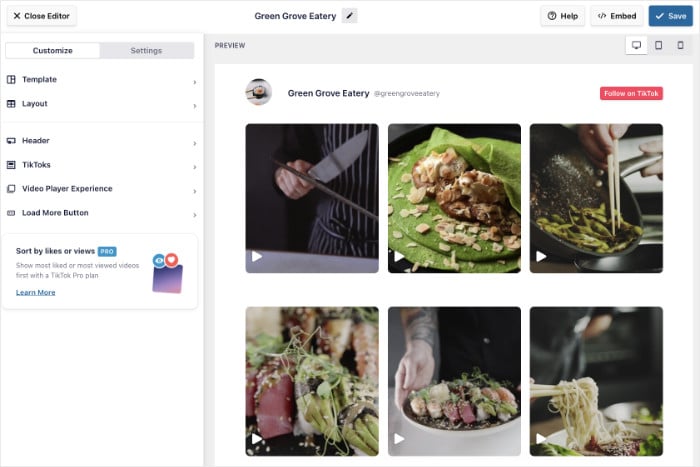
On the left, you can find all the options to customize how the TikTok videos will look on your website. You can change your layout, template, video elements, button design, and more in a few clicks.

live feed editor tikto feed pro

Whenever you make changes, the live preview on the right will show you how the feed widget will look in real time.

To get started, first, click on the Header option.

open header options for tiktok

You can then see all the options for your TikTok feed widget’s header on the left.

At the top, you can choose to Enable or Disable a header.

You can then choose which header elements are visible on your widget:

  • Profile Picture
  • Name
  • Username
  • Description
  • Stats
  • Button

Once you’re happy with the header, click on Save to keep the changes.

You can also customize each of the header elements in detail from here. For this tutorial, we’re going to edit the Profile Picture element in the header.

Using the dropdown menu, you can now change the Size of your TikTok profile pic.

Once you do that, you can change the position of the profile picture using the Padding and Margin options.

customize header profile titok feed

Remember to click on Save once more to keep your new profile picture settings.

After that, you can use the remaining customization options to change your TikTok feed widget’s layout, button design, video elements, and more.

Finally, you can click on the Save button once you’re happy with your TikTok feed widget.

Embedding Your TikTok Feed Widget

Now that you’ve customized how your TikTok feed widget looks, it’s time to go ahead and add it to your site. For that, you can get started directly from the visual customizer itself.

Just click on the Embed button at the top.

embed tiktok feed live feed editor

The plugin will now open a popup with the embed options for your TikTok feed widget.

Before you select the embed option, hit the Copy button on the popup.

copy shortcode tiktok feed pro

After copying the shortcode, you can choose between 2 ways of embedding your new TikTok feed widget:

  • Add to a Page: Show the TikTok video widget on your WordPress page.
  • Add to a Widget: Embed your widget on your sidebar or footer areas instead.

For this example, we’ll select the Add to a Page option.

tiktok feed pro add to a page

TikTok Feed Pro will show you a list of WordPress pages that are available on your website.

All you have to do is select the page you prefer and then click on the Add button.

From the list, select your page and then click on the Add button on the popup.

select your page tiktok feed pro

Clicking on that will open the page in the WordPress block editor.

Here, you can add a new block by clicking on the plus icon (+) at the top.

add block tiktok video feed

Using the search bar, look for the “shortcode” block.

Then, you can click on the Shortcode block in the search results below to continue.

Doing that will add a shortcode block to your WordPress page.

Finally, paste the shortcode from earlier into the new WordPress block.

shortcode for tiktok feed pro

Now, the plugin will automatically handle the rest and embed your TikTok feed widget on your website.

If you open your site now, you can also see how your new TikTok widget will look to your site visitors.

example of tiktok video feed

With TikTok Feed Pro, you can have a beautiful TikTok widget on your website in just minutes — it’s really that easy!

With that, let’s look at how you can add an Instagram feed widget to WordPress with ease.

How to Add Instagram Feed Widgets to Your Site

The process of adding an Instagram feed widget to WordPress is similar to Facebook and YouTube.

To get started, grab your copy of the Instagram Feed Pro plugin, then install and activate the plugin on your website.

Once the plugin is ready, navigate to the Instagram Feed » All Feeds menu from your WordPress dashboard area.

From that page, click on the Add New button.

create new feed instagram feed pro

Next, you can choose the type of Instagram content you want to embed using the feed widget. Instagram Feed Pro comes with 3 options by default:

  • User Timeline: Embed your own Instagram posts
  • Public Hashtag: Show Instagram posts with your chosen hashtag
  • Tagged Posts: Show the posts that have tagged your account

As a bonus, you can also select multiple options here to combine different feed types into a single feed.

After choosing your Instagram feed type, click on the Next button.

select user timeline import instagram feed

We’ll go with a user timeline feed for our tutorial.

As you can see, you can create a new Instagram feed in a few clicks using this plugin. Now you can connect this feed widget to Instagram in the next step.

Connecting Your Instagram Account

For your feed widget to display Instagram posts on your site, it needs a source.

To start adding this source, click on the blue Add Source button.

instagram add source for feed

For your source, you can choose between a personal Instagram account or a business account.

A personal account only allows you to embed content from your own Instagram profile. But with a business account, you can display hashtag feeds, shoppable feeds, video feeds, and much more.

To continue, select your account type and then click on Login with Instagram.

select instagram account type popup

Next, the plugin will ask for read-only access to your Instagram account.

Like the other plugins in this tutorial, Instagram Feed Pro can only use this access to view your content and can’t make any changes to your social media account.

Now click on Allow to finish connecting your Instagram account.

allow access to instagram account create feed

After this, you can simply select this source whenever you create a new feed — no need to connect your account again!

Finally, click on the Next button to confirm this Instagram account as the source for your new feed widget.

confirm account as source for instagram feed

Now that your feed widget has been connected to Instagram, you can use the live feed editor to change its design in the next step.

Customizing Your Instagram Feed Widget

For an easy way to create beautiful Instagram feeds, the plugin has different pre-designed themes that you can use.

Just select the theme that you want to import and then click on the Next button.

select your instagram theme

Like with the other options on this list, you can also import a template for your widget. Each template lets you copy a unique layout for your Instagram content.

Select your Instagram template and then click on Next to continue.

choose your instagram template

In the live feed editor, you can find the options to change your feed layout, color scheme, header design, post style, button design, and much more.

When you edit your feed widget, you can use the live preview on the right to check how it looks.

live feed editor for instagram feed pro

Like with Facebook and YouTube, you have the feed layout option that changes how your posts appear on the website.

Click on the Feed Layout option to get started with that.

select feed layout options live feed editor instagram

Once you do that, Instagram Feed Pro will give you 4 feed layout options that you can choose from: Grid, Carousel, Masonry, and Highlight.

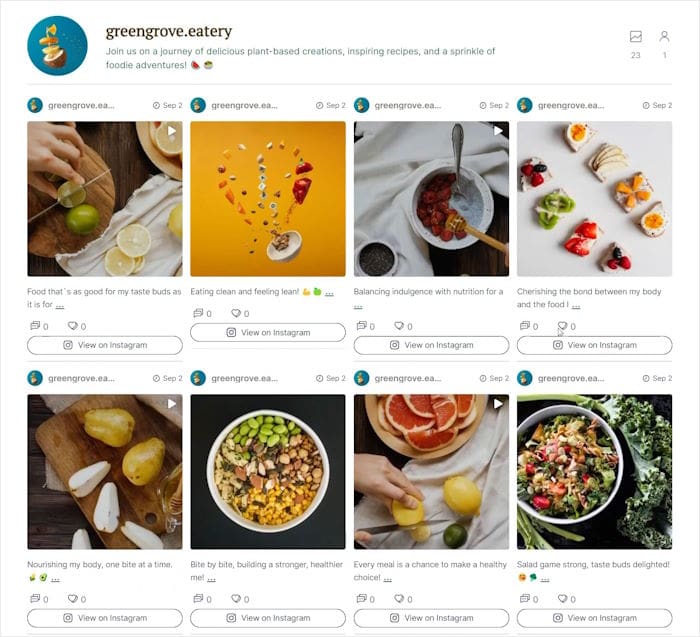
instagram grid layout on your website

Using the Grid layout, you can show square-cropped thumbnails of your Instagram posts in clean rows and columns.

That way, you can create an Instagram gallery with a neat design that shows tons of posts at once.

grid layout for instagram

Next, you have the Carousel layout that you can use to turn your Instagram feed into a sliding carousel.

You can then make your website more interactive and give visitors more ways to engage with your posts.

carousel layout instagram social media feed widget

Want to keep the original proportions of your Instagram photos and videos?

You can go for the Masonry layout in that case.

masonry layout for instagram

Finally, you have the Highlight layout that puts the focus on specific Instagram posts.

This can be a great way to make your e-commerce websites stand out from simple Shopify sites by highlighting your best products to increase user engagement and sales.

highlights layout for your instagram feed

Select the feed layout that you want for your Instagram widget, and then click on the Save button.

You can then click on Customize to continue setting up the design of this feed widget.

return to main customization options instagram

Doing that will bring you back to the main customization options for the live feed editor.

From here, you can set up the colors of your Instagram feed as well. Click on the Color Scheme option on the left to get started.

color scheme options for instagram feed pro

To quickly change all the colors of your feed widget, you can just choose the color scheme that you prefer:

  • Inherit from Theme: Use the same colors as your WordPress theme
  • Light: Show a plain white background along with a darker font color
  • Dark: Choose a dark background and light font
  • Custom: Manually choose all the colors of your feed
color scheme options live instagram feed

Select the color scheme that you prefer from this list and then click on Save to keep the changes.

Next, you can use the remaining customization options here to set your feed size, number of posts, button design, header style, and more.

After you’re happy with the design of your Instagram feed widget, click on Save once again.

Finally, you can go ahead and embed this Instagram feed widget on your website.

Embedding Your Instagram Feed Widget

Similar to your Facebook and YouTube, you can start embedding the Instagram feed widget directly from the editor.

Just click on the Embed button in the top right corner.

instagram click on the embed button

Next, the plugin will ask you to choose where to embed this Instagram feed widget. You can choose from 2 options here:

  • Add to a Page: Embed your widget on a web page
  • Add to a Widget: Display the widget on your footer or sidebar

For our example, we’ll embed the feed widget on a WordPress page.

To continue, click on the Add to a Page button here.

add live instagram feed to page

After you do that, you’ll see a list of all the WordPress pages that are available.

Select the page where you want to show the Instagram content, and then click on the Add button.

select page to embed live instagram feed

The plugin will then send you to that page so you can finish embedding your Instagram feed widget.

First, click on the plus (+) icon to add a new content block to this page.

add new content block on wordpress

After that, write “instagram” in the search bar at the top and then click on the Instagram Feed block below.

The plugin will then automatically embed the Instagram feed widget on this page.

embed instagram feed block on wordpress page

You can now click on Update to confirm your changes. Now open your website, and you can check how the Instagram feed widget looks to your visitors.

example of instagram feed wordpress

For more ways to display Instagram content, you can check out our in-depth guide on how to embed Instagram widgets on WordPress.

Ready to see how you can embed Twitter content on your website?

Let’s get started!

How to Add Twitter Feed Widgets to Your Site

To begin, go and get your copy of Twitter Feed Pro and then add it to your website.

If you’re not sure how, just check out our guide on installing WordPress plugins.

After you do that, you can open the Twitter Feed » All Feeds menu from the admin dashboard and click on the Add New button.

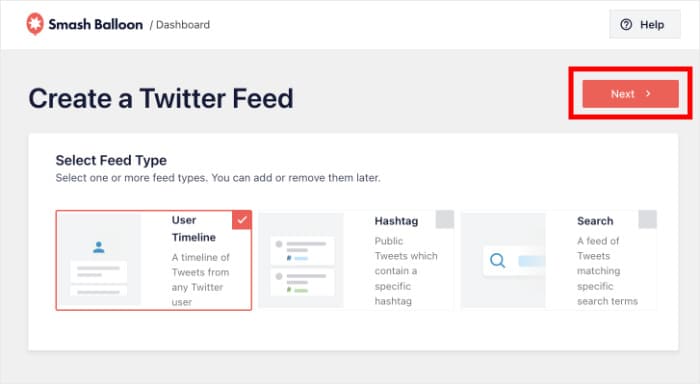
add new custom twitter feed

You can then pick the type of Twitter feed widget you want to display. There are 6 options for you to choose from:

  • User Timeline: Choose a Twitter profile and show all the timeline posts
  • Hashtags: Display tweets with your chosen hashtags
  • Home Timeline: Show all the tweets from your Twitter homepage
  • Search: Pick specific search terms and embed the search results
  • Mentions: Embed tweets that mention your account
  • Lists: Display content from a specific Twitter list

To continue, select your Twitter feed type and then click on Next.

feed type options twitter

In this tutorial, we’ll create a user timeline feed using Twitter Feed Pro.

Now that you’ve created your Twitter feed widget, you can go ahead and connect it to your Twitter account.

Simply click on the Connect button to get started.

connect twitter account to wordpress

Doing that will send you to Twitter, where you can finish connecting the plugin to your Twitter account.

Like the other plugins in this tutorial, Twitter Feed Pro is completely safe since it only views Twitter content and can’t make any changes.

To connect your account, click on the Authorize app button.

authorize twitter read only access.jpg

Now, you can choose the source for your Twitter feed widget. This source can be a Twitter profile, hashtag, search term, Twitter list, and more that you want to embed.

To continue, just enter the source in this popup and then click on Next.

In this tutorial, we’ve added the Twitter account “starbucks” as the source.

embed twitter feed user timeline

Now that you’ve created a Twitter feed widget and connected it to a source, you can start the customization in the next step.

Customizing Your Twitter Feed Widget

To quickly create a beautiful Twitter feed widget, you can just import a pre-built template. In fact, you can choose from 7 templates for your Twitter feed widget:

  • Default
  • Masonry cards
  • Simple carousel
  • Simple cards
  • Showcase carousel
  • Latest tweet
  • Widget

After selecting the template you prefer, click on Next to proceed.

choose a feed template

Twitter Feed Pro will send you to the live feed editor, where you can customize your feed layout, color scheme, header style, load more buttons, and much more.

Plus, you can use the live preview on the right to track all of your changes in real-time.

live feed editor twitter

To help you easily change how the tweets are displayed on your site, Twitter Feed Pro comes with simple feed layout options

Just select the Feed Layout option on the left to get started.

feed layout option twitter

Now, you can choose from 3 different feed layouts for your Twitter feed widget: List, Masonry, and Carousel.

pick a feed layout twitter

Using the list layout option, you can show a single column of tweets, just like the official Twitter website.

That way, your visitors can check out Twitter content in a familiar way.

list twitter feed layout

Want to use your feed widget to show tons of tweets at once?

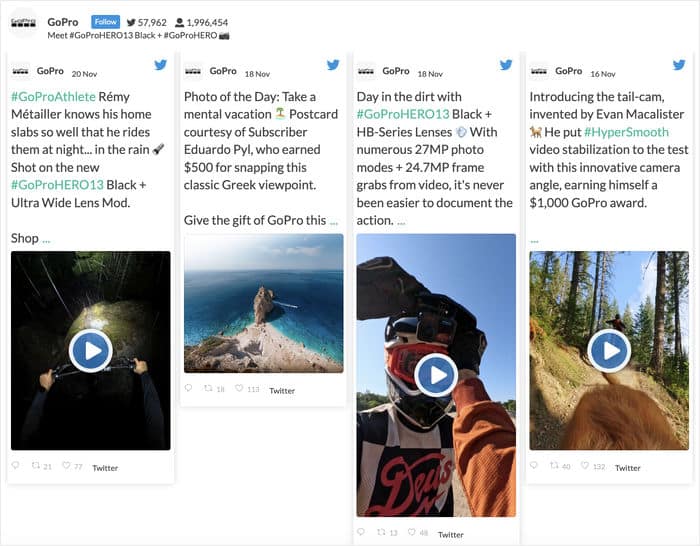
You can go for the Masonry layout, which shows Twitter content in multiple columns.

example masonry twitter feed wordpress

Next, you have the Carousel layout that you can use to embed a Twitter slideshow carousel and make your website more engaging.

Plus, you can also set the number of columns, loop type, navigation arrows, and more.

pick the carousel layout for twitter

After selecting your Twitter feed layout, click on Save to confirm your changes.

You can then continue customizing your Twitter feed using the remaining options in the live feed editor.

All you have to do is click on the Customize button at the top.

back to customization options twitter

From here, you can now continue the customization by setting up the colors of your Twitter feed widget.

Just click on the Color Scheme option to get started.

color scheme option twitter feed pro

With Twitter Feed Pro, you have 4 color schemes that you can pick from:

  • Inherit from Theme: Copy your website’s colors
  • Light: Display a dark font and light background
  • Dark: Show a light background and a dark font color
  • Custom: Choose all the colors yourself
choose color scheme twitter

After picking the color scheme that you prefer, click on the Save button once again.

As you can see, customizing your Twitter feed widget is super easy with this plugin. You can now change your header design, lightbox options, feed size, number of tweets, button designs, and much more.

After you’re done with the customization, remember to click on Save to confirm your changes.

Then, you can go to the final step and embed this Twitter feed widget on your website.

Embedding Your Twitter Feed Widget

Similar to the other plugins, Twitter Feed Pro allows you to embed your widget in a few simple clicks using the live feed editor.

Click on the Embed button at the top to get started.

embed yout twitter feed

On the popup, you can choose between 2 locations for your Twitter feed widget:

  • Add to a Page: Embed the Twitter feed on a page
  • Add to a Widget: Display the feed on your sidebar or footer

For our tutorial, we’ll go with the Add to a Widget option here.

add twitter feed to widget

Next, the plugin will send you to the widgets page of your website so you can embed your Twitter feed widget.

Before you do that, click on the Sidebar or Footer panel, depending on where you want to display Twitter content.

open sidebar panel

We’ll use the sidebar for our example.

Next, you can add a new widget by clicking on the plus (+) icon at the bottom. Then, click on the Twitter Feed widget from the options.

add a twitter feed widget to wordpress

Finally, click on Update to finish embedding your Twitter feed widget. If you open your website now, you can see the Twitter content right there.

embed twitter feed widget on website

Just like that, you now have a Twitter feed widget on your WordPress site. As a result, you can turn site traffic into likes, replies, and followers.

To learn more, you can follow our guide on how to embed Twitter feeds to WordPress.

Finally, let’s see how you can display a social wall widget on your website.

How to Add Social Wall Widget to Your Site

With the help of a social wall widget, you can show content from different social media platforms in a single feed.

To get started, go and get your copy of the Social Wall Pro plugin. Then, you can install and activate the plugin on your website.

Since you’ve already created social media feed widgets for Facebook, YouTube, Instagram, and Twitter, you can easily combine them into a single wall.

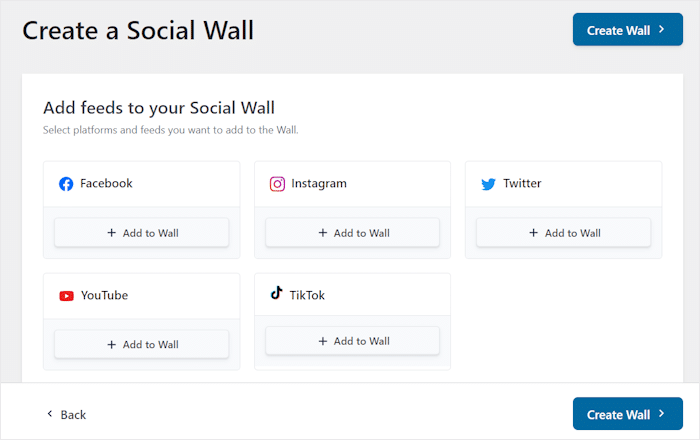
To do that, go to your WordPress dashboard area and then open the Social Wall menu, and click on Add New.

After that, you can set up your social wall by choosing the content you’d like to show.

First, click on the Add to Wall button below the social media platforms you want to include.

select sources for social wall

Once you do that, you can choose which of your feeds you want to add to your social wall widget.

Just select the feeds underneath each platform to add them to your social wall.

Finally, click on the Create Wall button to continue.

select feeds for your social wall

With that, you’ve created a social wall for your WordPress website. You can now customize how it looks in the next step.

Customize Your Social Wall Widget

To help you change the design of your new social wall widget, the plugin will open the visual customizer.

Here, you can use the left panel to change your layout, color palette, post elements, filters, and more.

live feed editor social wall

You also get a live preview on the right to keep track of your changes.

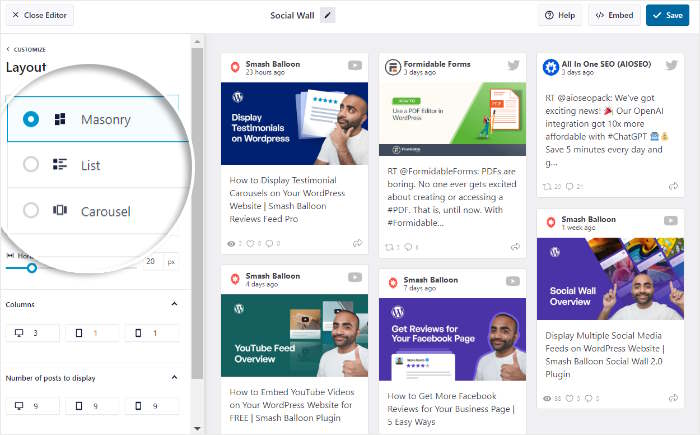
To start the customization, click on the Layout option on the left.

customize social wall layout

On the left, you can find 3 different layout options that you can use for your social wall: Masonry, List, and Carousel.

Using the Masonry layout, your social wall can show tons of different posts at once using multiple columns.

Want to make each social media post more clearly visible?

You can select the List layout in that case.

list layout social wall

Finally, you have the Carousel layout, which will enable a social media slideshow on your WordPress site.

carousel layout social wall

Just select the layout that you prefer and then click on Save.

To continue designing your social wall, just click on the Customize button on the top left.

customize your social wall again

Now, you can use the remaining customization options to change your social wall widget’s colors, post elements, and more

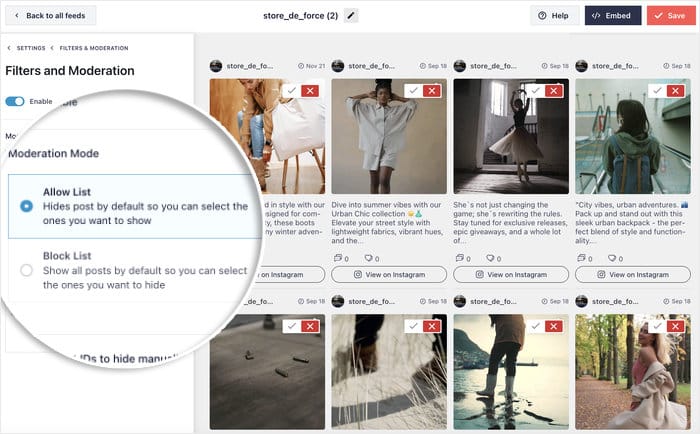
Plus, you even get moderation options to help you curate social media posts and filter the content you don’t want to show.

Finally, click on Save to confirm your new design.

You can then move on to the final step and embed this social media wall on your website.

Add Your Social Wall Widget to WordPress

To help you out, this social media aggregator tool lets you start embedding your social wall directly from the visual customizer.

First, click on the Embed button in the top right corner.

embed your social media wall

After that, Social Wall Pro opens a popup where you can choose the location of your social wall.

For this example, we’ll embed it on a WordPress sidebar.

Click on the Add to a Widget option on the popup to continue.

add social wall to a widget

Clicking on that will open the widgets page of your website.

Here, click on the Sidebar or Footer panel here, depending on where you want to show the social wall.

For our example, we’ll use the sidebar.

open sidebar panel

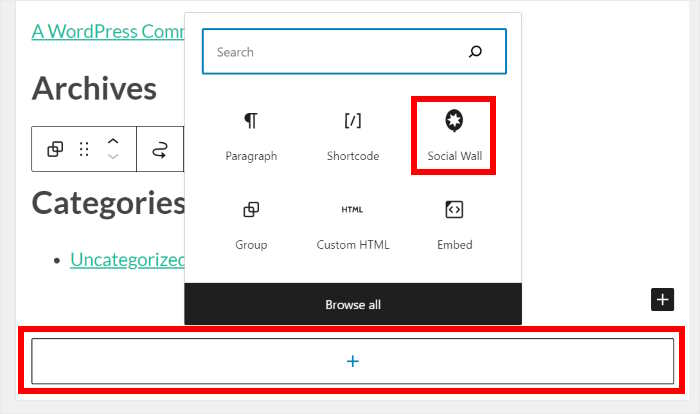
After that, add a new widget by clicking on the plus (+) icon at the bottom.

You can then choose the Social Wall widget from the options.

embed social wall widget sidebar

To save your changes, click on the Update button at the top.

If you open your website, you can now see how your social wall widget looks to your visitors.

embed social wall widget example

And that’s it!

You can now easily create, customize, and embed social media feed widgets with ease. That way, you can engage your visitors and boost your social media following.

With these social media feed aggregators, you can do all that in a few simple clicks and start growing your brand right away.

Ready to create an engaging social media feed widget? Get Smash Balloon’s All Access Bundle here.

Want an easy way to grow your brand? You can check out this tutorial and learn how to embed Google reviews widgets on your WordPress site.

Enjoyed this article? Feel free to follow us on Twitter and Facebook for more social media marketing tutorials.

author avatar
Sajjan Sharma Senior Writer
Sajjan has been writing about WordPress, social media marketing, and online businesses for over 10 years. His professional interests extend to include influencer marketing, content curation and digital marketing strategies.

Add a Comment

We're glad you have chosen to leave a comment. Please keep in mind that all comments are moderated according to our privacy policy, and all links are nofollow. Do NOT use keywords in the name field. Let's have a personal and meaningful conversation.