If WordPress videos are not playing on your site, you’ve come to the right place.
While showing videos is a great way to boost engagement, your visitors can end up with a worse impression of your site if these videos aren’t working properly.
To help you out, we’ll show you how you can fix video errors on your website – even if you’re a WordPress newbie.
Before we get started, let’s see how videos can help your brand, along with the best way to embed videos in WordPress.
Or you can click here and directly start fixing your WordPress videos.
Why Add Videos to Your WordPress Website?
Did you know that 72% of customers prefer learning about brands through videos?
Instead of telling people to buy your products, you can display WordPress videos to show positive reviews, testimonials, product demonstrations, and more.
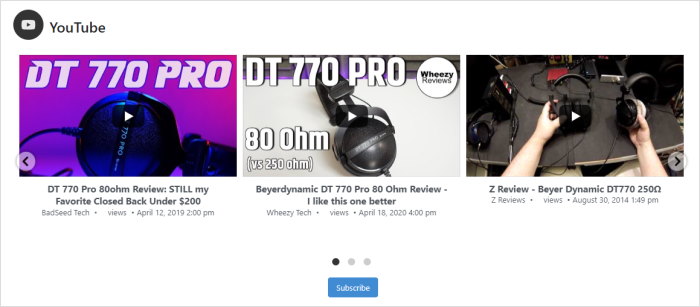
Videos like that can work as social proof and convince visitors to buy from you. As a result, you can get more sales and grow your business.
On top of that, you can use videos to keep people engaged on your site for much longer.
When it comes to showing video content, an easy solution is to upload videos on platforms like YouTube and Instagram. You can then embed these videos on your site so people can check them out.
But some choose to upload the videos directly to WordPress before embedding them.
Should You Embed Videos in WordPress from the Media Library?
While you can upload your videos directly to your WordPress site, this isn’t the recommended method for several reasons:
- Compared to large video hosting platforms like YouTube and Instagram, the videos from your media library will often load much slower.
- All the videos you upload take up valuable space on your website’s server. Plus, WordPress has limits on the file size of videos that you can upload.
- You’re missing out on potential views since your site doesn’t have millions of users like YouTube or Instagram does.
- Your media library can’t host live-streaming videos, so you won’t be able to interact with visitors in real time.

As you can see, uploading your content on video hosting platforms can help you avoid a lot of potential issues in the future.
Now, we’ll go ahead and see how you can fix the videos on your WordPress website.
How to Fix WordPress Videos Not Playing
Ready to start troubleshooting your WordPress videos? You can go through the simple steps below to get your videos working once more.
Let’s get started!
Step 1: Make Sure You’re Using Supported Video Formats
A common reason for your video errors can be the problem with your video file’s format. After all, WordPress only supports these 6 formats:
- .mp4
- .m4v
- .webm
- .ogv
- .wmv
- .flv
So, your videos won’t work properly if you aren’t using one of these formats for your videos.
To solve this problem, you can take the time to convert each of your videos into an accepted file format.
Or you can skip ahead and see how you can embed YouTube videos on your website.
Step 2: Check the Size of the WordPress Video Files
With WordPress, you have a limited server size to fit all of your website’s content, including images, audio, documents, and videos.
If your video has a large file size, your website might not have enough space left on your server.
What’s more, WordPress also limits the size of a file that you can upload to your media library. To check this limit, open the Media » Add New menu from your dashboard.
Once you’re there, look for the Maximum upload file size option to see your limit.
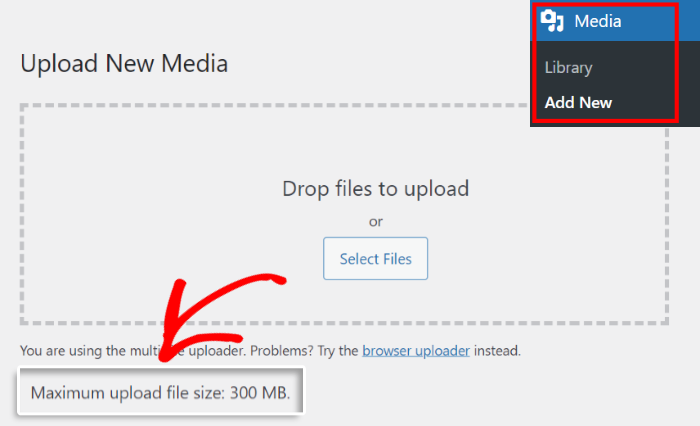
If your video file is bigger than this limit, you won’t be able to upload your video to WordPress at all.
You can solve this issue by switching to a better WordPress hosting service which gives you access to more server space.
Don’t want to move your site to another web hosting service yet? Then click here to see how you can embed YouTube videos on your site.
Step 3: Fix Plugin Conflicts
While WordPress plugins can be useful tools, badly made plugins can cause problems on your site and stop certain features from working.
The solution?
You can disable your plugins one by one to find which one is causing WordPress video errors on your website.
To deal with this, you can open the Plugins » Installed Plugins menu from your WordPress dashboard.
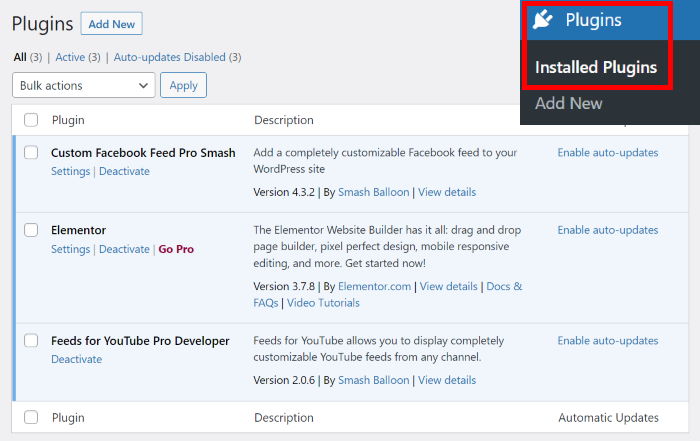
You can find all of your WordPress plugins listed in a single place here.
To temporarily disable all the plugins, first, click on the check box in the top-left corner.
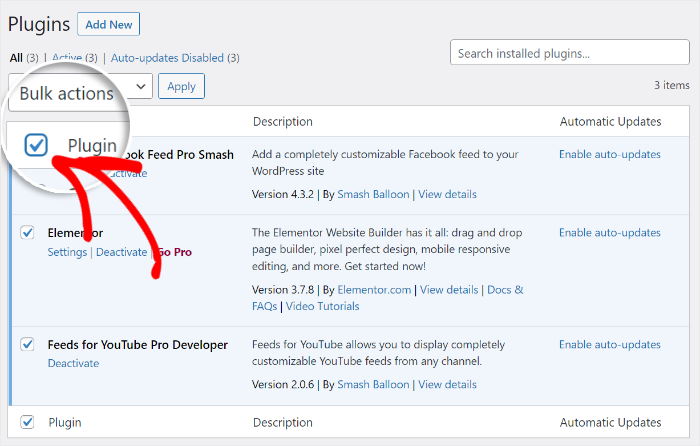
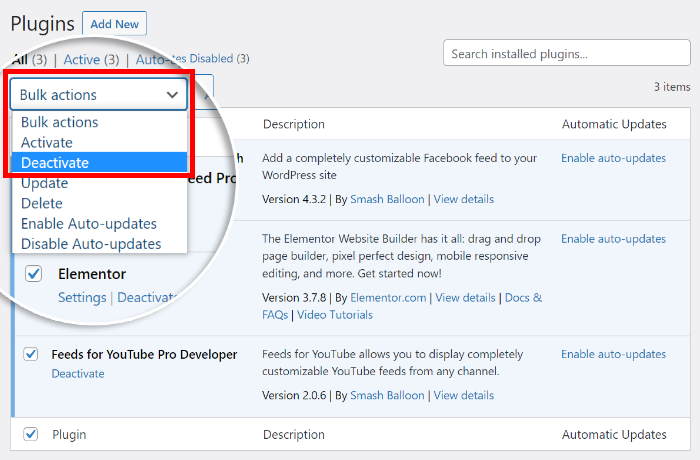
Next, use the drop-down menu right above the check box to see all the actions you can take.
To continue, click on the Deactivate option in the menu.
Finally, you can temporarily deactivate your plugins by clicking on the Apply button to the right.
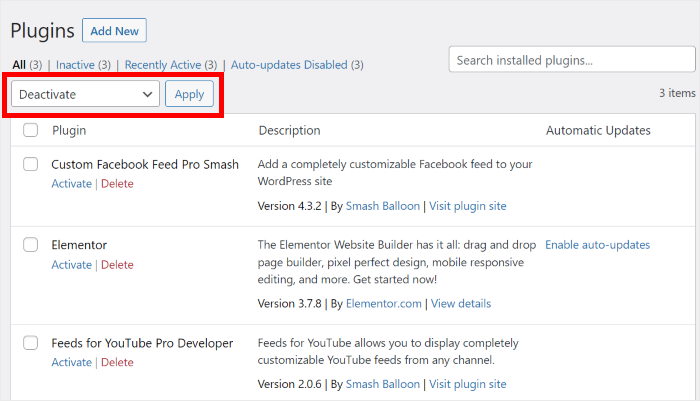
Once you deactivate them all, you can open your website and check if your WordPress videos are working.
If your video still doesn’t play, repeat the above process while selecting the Activate option in the drop-down menu.
After that, click here to move on to the next step.
But if your videos work now, then one of your plugins was causing the problem. You can now work on finding that plugin.
First, click on the Activate button below a single plugin.
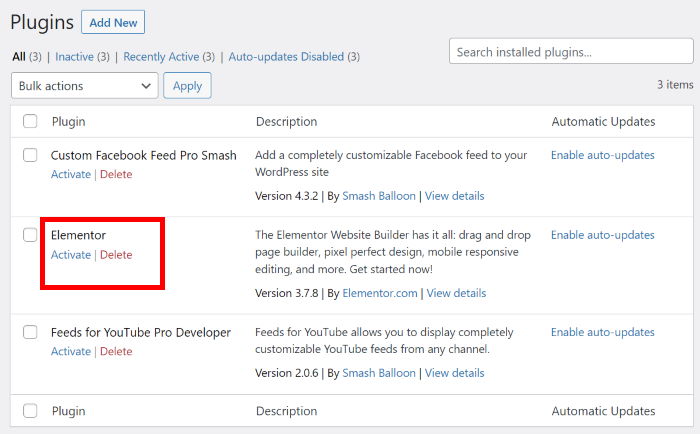
Once you do that, open your site and check if your WordPress videos are working properly.
You can then go through all the plugins like this to find the one that’s causing your video errors. After that, you can replace it with a trustworthy WordPress plugin.
Step 4: Reupload Video to the WordPress Media Library
Small errors in the upload process can also cause your self-hosted WordPress videos to not play.
In this case, you can try deleting the file from your media library and then uploading it again.
First, open the Media » Add New menu from your WordPress dashboard to see all the media files from your website.
From that page, click on your video file.
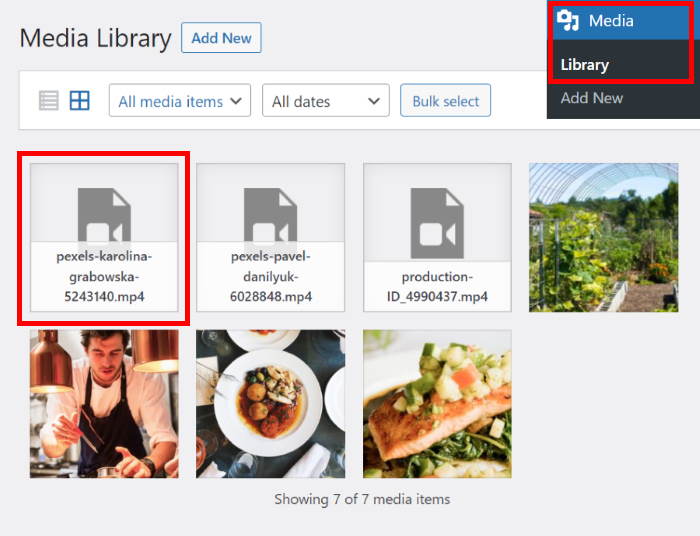
This will open the WordPress video in a popup where you can change all of its options.
You can now click on the Delete permanently button to remove the video from your site.
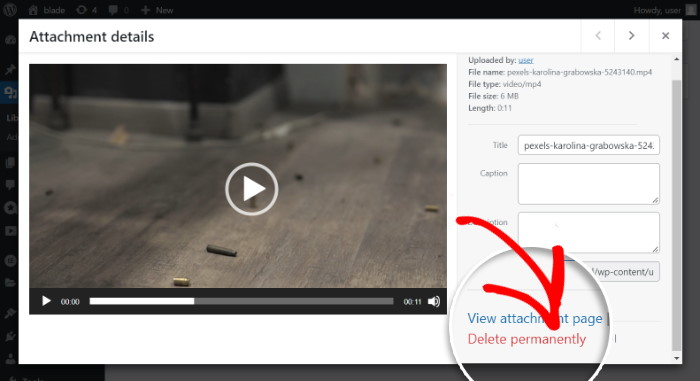
Once you do that, reupload the video again and then embed it on your site.
If your WordPress video is still not playing, or if this process is too time-consuming, there’s an easy solution that you can try.
All you have to do is upload the videos on social media platforms like YouTube.
You can then embed social media feeds and showcase the videos on your website – no need to worry about file sizes or upload errors.

Let’s go ahead and see how you can use this method to embed WordPress videos with ease.
How to Embed Videos in WordPress (Easy Way)
Since it’s the #1 video hosting site on the internet with over 2.5 billion users, YouTube is a fantastic place to upload your videos.
You can then display the videos on your website with the help of a WordPress plugin. As a result, you won’t have to deal with small upload size limits, server space, plugin conflict, or other problems.
And when it comes to YouTube feed plugins, the best option in the market is YouTube Feed Pro.
With the help of this plugin, you can display feeds of YouTube videos on your website in just minutes – no need for HTML, CSS, PHP, iFrames, or any kind of embed codes.
On top of displaying your own videos, you’ll be able to embed videos from any YouTube channel, playlist, search results, live streams, and more.
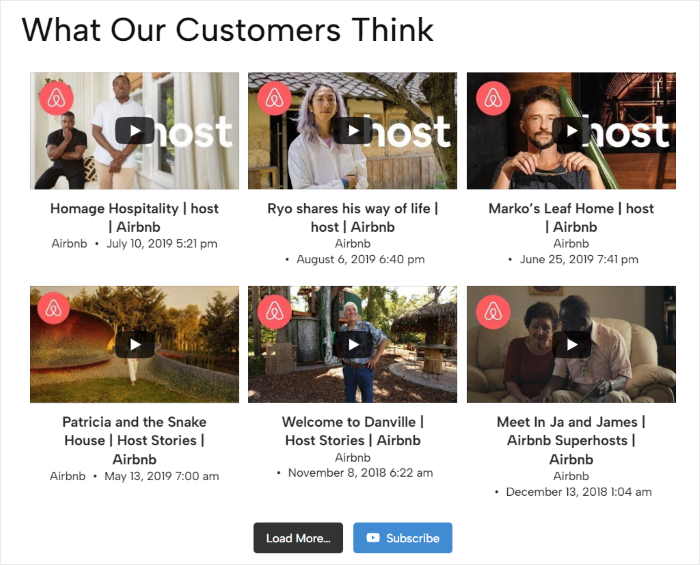
All you have to do is follow a simple 3-step guide, and the plugin will guide you through the process of creating, customizing, and embedding YouTube video feeds.
What’s more, all the videos you embed will automatically copy your website’s design and look fantastic right out of the box.
Plus, the plugin gives you total control over the design of your YouTube video feeds. With the live editor, you can customize your video layout, color scheme, header design, button style, and much more.
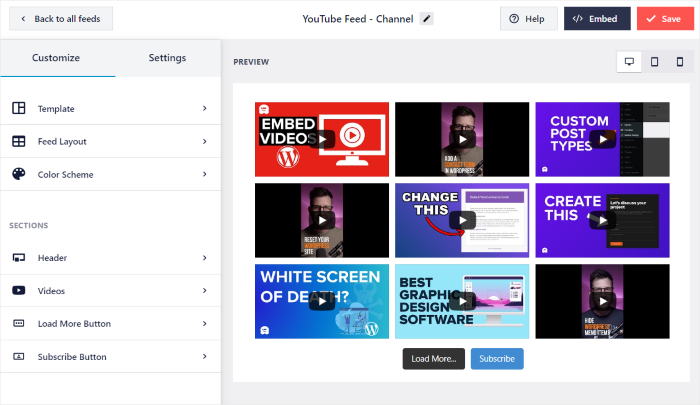
To help convert visitors, you can show call-to-action buttons or links to your other videos when visitors pause or finish watching a video.
Plus, the plugin won’t autoplay your videos and only start playing once a visitor clicks on it. As a result, you can add tons of video embeds while making sure your page loads as fast as ever.
And with a faster website, your site can get much better SEO and rank higher in Google search results.
The best part? Since the plugin has a dedicated support team of experts, you’ll always have people ready to lend you a hand.
With all these amazing features, YouTube Feed Pro is the best YouTube feed plugin out there and a fantastic option if you want to add videos to WordPress.
Ready to create your YouTube video feeds? Get YouTube Feed Pro here!
Let’s go ahead and see how you can use this plugin to fix WordPress videos not playing on your website.
Step 1: Install YouTube Feed Pro Plugin
To get started, grab your copy of YouTube Feed Pro and then download it to your computer. Next, install and activate the plugin on your WordPress site.
In case you need a quick refresher, you can check out our guide on how to install a WordPress plugin.
After that, you can use the plugin to create your feed in step 2.
Step 2: Create Your YouTube Feed
Since the plugin comes with a guided flow, you can create your YouTube feed in a few clicks.
First, open the YouTube Feed » All Feeds menu from your WordPress dashboard and then click on the Add New button.
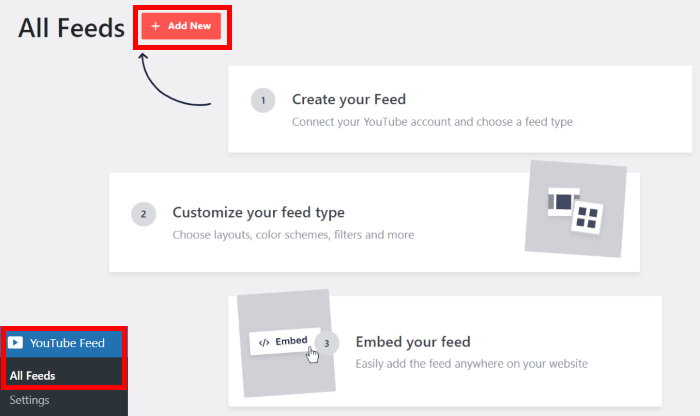
Once that’s done, you can choose the type of YouTube feed you want to show on your website. There are 6 options to choose from:
- Channel: Show videos from a selected YouTube channel
- Playlist: Embed a YouTube playlist on your website
- Favorites: Display the videos that you’ve marked as “favorites”
- Search: Choose a search term and embed matching YouTube videos
- Live Streams: Show live streaming videos from YouTube
- Single Videos: Select specific YouTube URLs for the videos that you want to embed
To continue, select a feed type and click on the Next button.
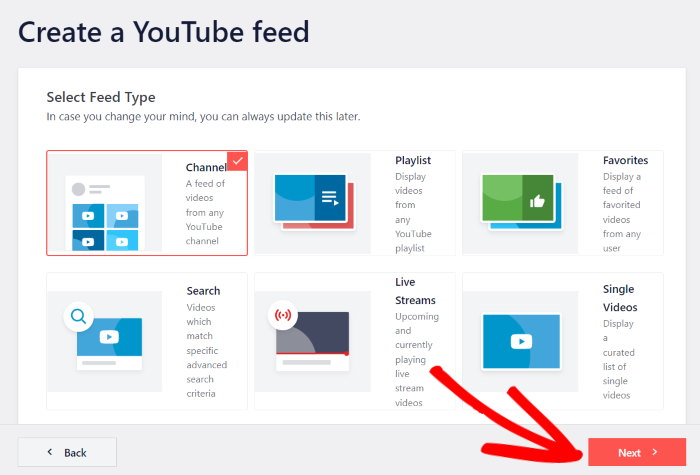
For our example, we’ll embed videos from a channel.
Just like that, you’ve created a new YouTube feed to display videos on your WordPress website.
In step 3, you can connect this feed to your YouTube account
Step 3: Connect Your Feed to YouTube
To display videos on your website, you can connect your feed to YouTube in 2 different ways:
- Add API Key: Enter your YouTube API key so your feed can display all kinds of videos on your site
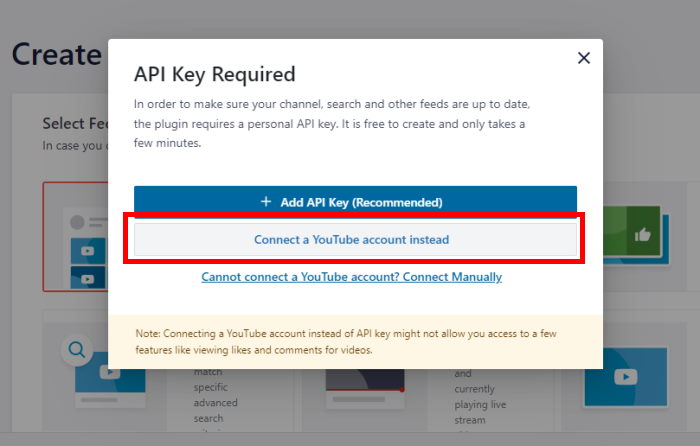
- Connect a YouTube account instead: Directly connect your YouTube account so your feed can embed the videos
Let’s take a look at both of these methods below.
To use your YouTube API key, click on the Add API Key button on the popup.
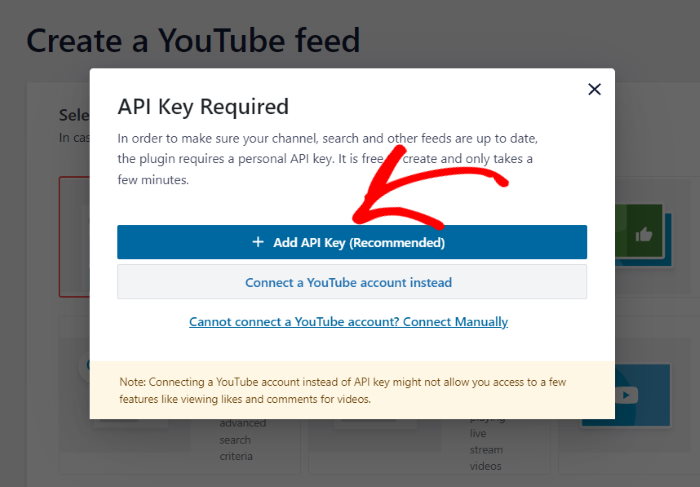
In case you don’t have your YouTube API key yet, we’ve got a step-by-step guide on how to create an API key that you can look at.
Once you have your API key, copy it and then return to your site.
After you do that, paste your API key on the popup and click on Add to continue.
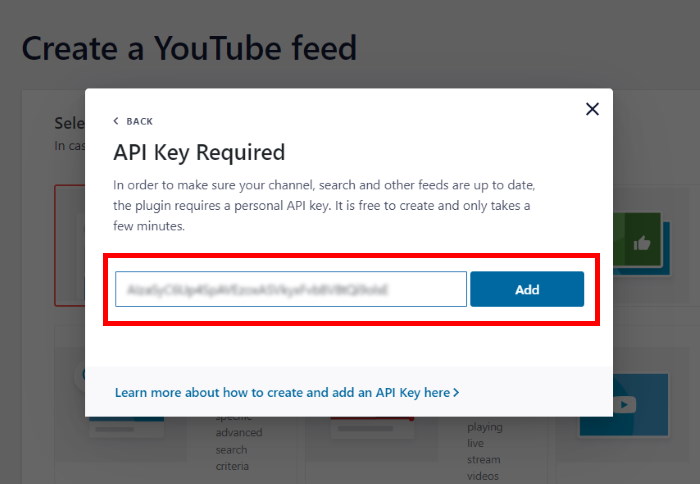
When you do that, your feed can now start displaying YouTube embeds on your website — it’s that easy.
For that, use the popup to choose the Connect a YouTube account instead option.
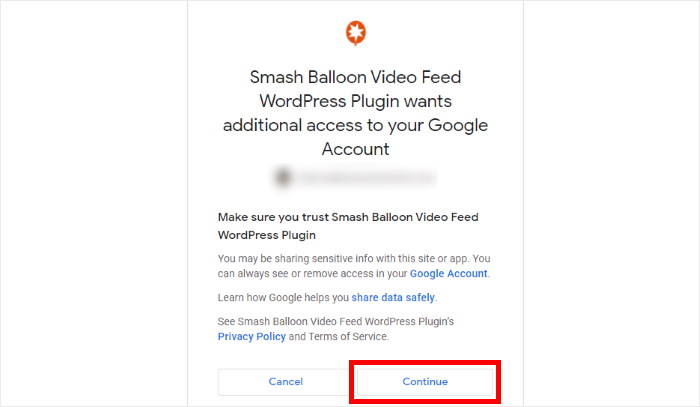
To connect your feed to YouTube, the plugin will now ask for read-only access to your YouTube account.
As you can see, the access only allows the plugin to view YouTube content, and it won’t be able to make any changes to your account.
So, using the plugin is completely safe.
From here, click on the Continue button to connect your YouTube account.
The plugin will then return you to your site and show that you’ve connected your new feed to YouTube.
You’re now ready to choose the source for your YouTube video feed. Depending on the feed type you selected, this can be a YouTube channel, playlist, search term, and more.
We’ll use a YouTube channel as our source in this tutorial.
To do that, open www.youtube.com on your web browser and then open the YouTube channel that you want to embed.
Now, look for the URL at the top and copy the code at the end.
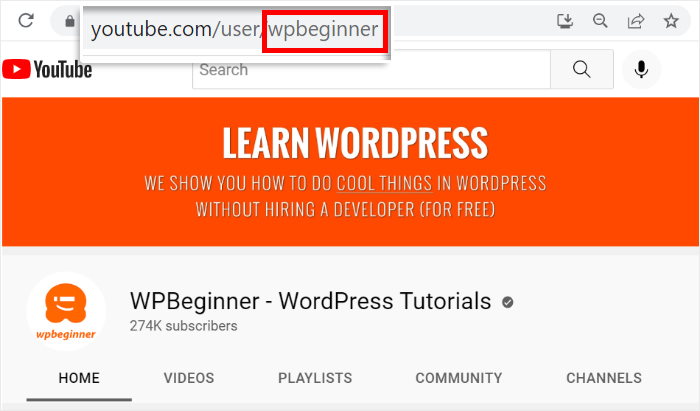
After you do that, head on over to your website and then paste it into the Channel ID or Username field.
Simply click on the Next button to finish adding your source.
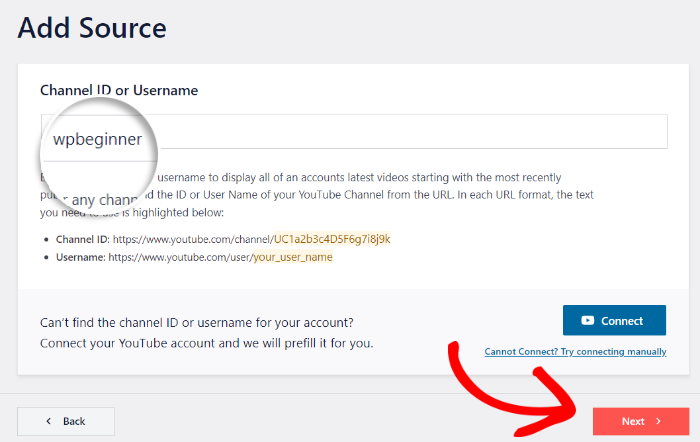
Your YouTube feed is now ready to display video content on your WordPress website. Since the plugin copies the design of your website, it’ll look beautiful right out of the box.
Plus, the video feed will be responsive and work perfectly on mobile devices as well.
Additionally, YouTube Feed Pro gives you tons of customization options to set how your YouTube feed looks. We can take a look at these options in step 4.
Step 4: Customize Your YouTube Feed
The plugin lets you easily create a unique YouTube feed by importing a pre-designed template that you prefer.
You’ve got 6 options to choose from:
- Default
- Carousel
- Cards
- List
- Gallery
- Latest video
- Showcase carousel
- Widget
After you select a template, click on Next to continue.
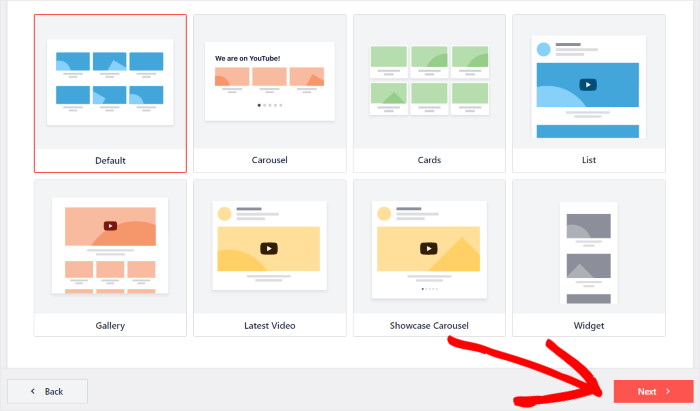
After doing that, you can use the plugin’s live feed editor to design your YouTube feed.
On the left side, you can find the customization panel to set your feed layout, color scheme, header style, button design, and much more.
When you use these options, the live preview of your YouTube feed on the right can show all the changes in real-time.
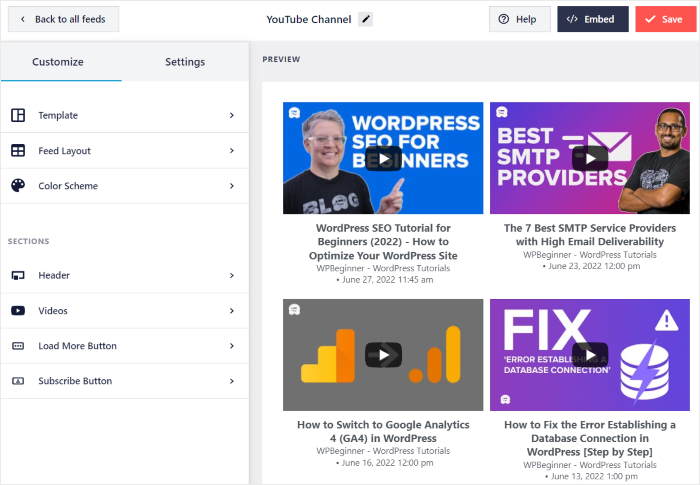
To start designing your feed, you can choose the layout of the videos on your site.
You can do that by clicking on the Feed Layout option on the left.
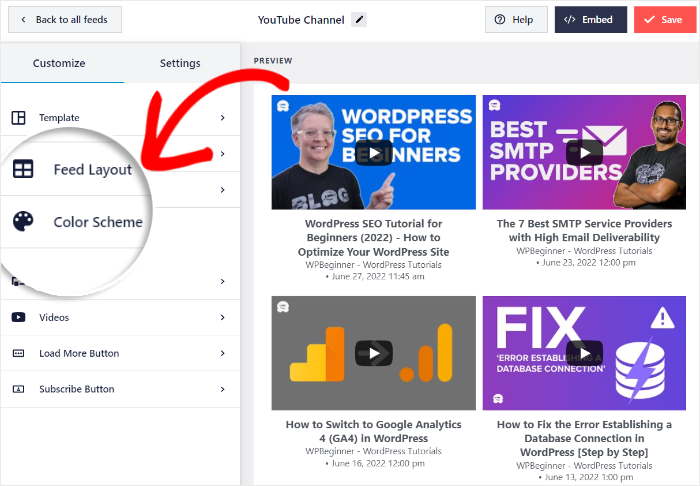
This plugin comes with 4 different feed layouts that you can use for your embedded YouTube videos:
- Grid
- Gallery
- List
- Carousel
Let’s look at all these layouts below:
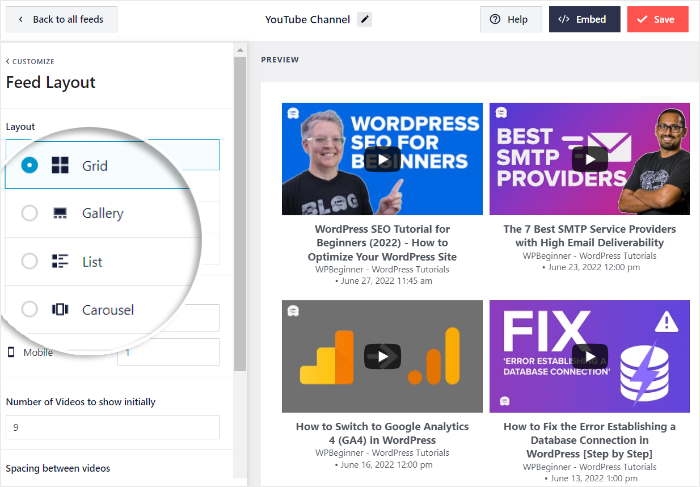
If you go for the grid layout, the plugin will show your videos in neat-looking rows and columns.
So, you can use this layout to show lots of videos at the same time.
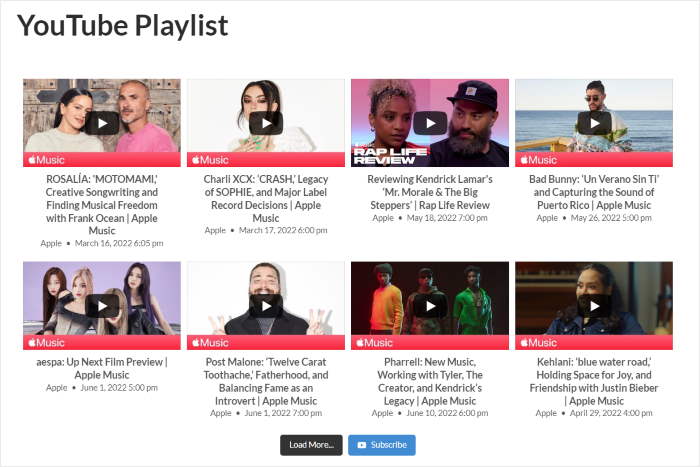
If you want one specific video to be highlighted, then you can select the gallery layout.
Doing this will show a large video on your site with several thumbnails underneath.

To show your video content in a single column instead, you have the list layout.
Since this layout makes your videos more clearly visible, you can grab your visitor’s attention.

Finally, there’s the carousel layout which shows your videos as an interactive slideshow.
As a result, you can embed tons of videos at once without taking much space on a webpage.

You can now click on Save to confirm your feed’s new layout.
Next, click on the Customize button to continue designing your video feed.
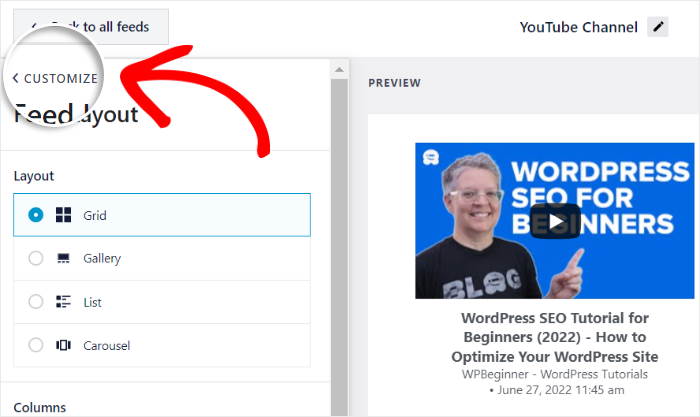
With the help of this plugin, you can also enable a header for your feed and then customize it.
First, click on the Header option on the left.
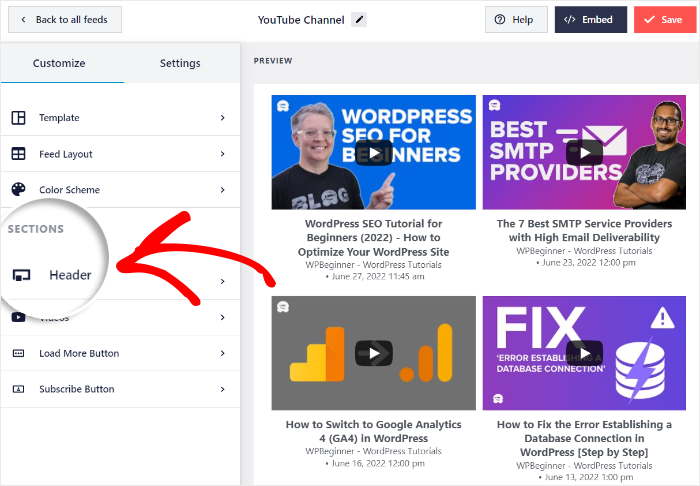
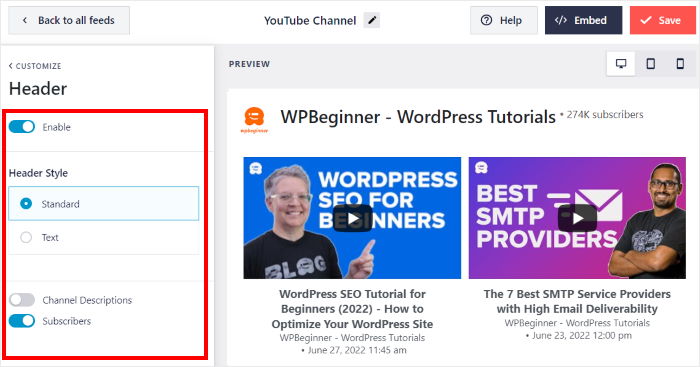
You can now Enable or Disable your video feed’s header by toggling the option at the top.
Below that, you’ve got 2 different Header Style options to choose from:
- Standard: Show a visual header with the channel icon, subscriber count, and more
- Text: Manually write a heading and then show it at the top of your YouTube feed
After you pick your header options, click on Save once again.
Since this plugin is so user-friendly, you can easily use the remaining options to change your color scheme, button designs, post style, and more.
Once you’re satisfied with how your video feed looks, click on the Save button.
You can now move on to the final step and display the videos on your WordPress website in step 5.
Step 5: Embed YouTube Video Feed in WordPress
To embed your videos in WordPress, the plugin gives you 2 options to choose from
- Embed videos on a WordPress page
- Embed videos on the WordPress sidebar or footer
We’ll go through both of these methods below:
Embed Videos on a WordPress Page
Using the live feed editor, you can immediately start embedding your YouTube video feed in WordPress.
Here, you can click on the Embed button to get started.

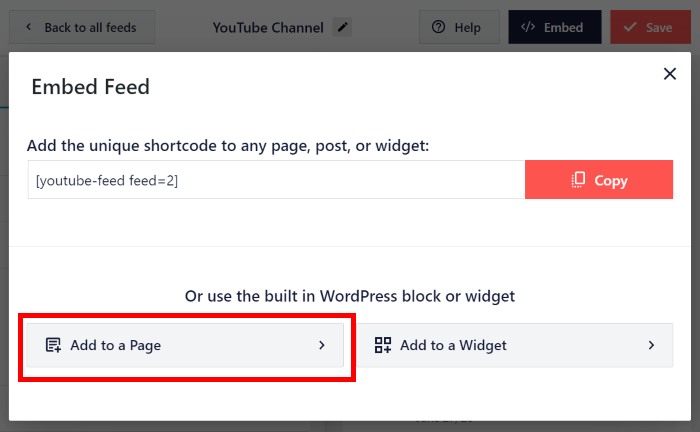
Clicking on that brings up the embed options for your video feed. From here, you can copy the shortcode or embed videos on a page, sidebar, or footer.
For this method, you can click on the Add to a Page button.
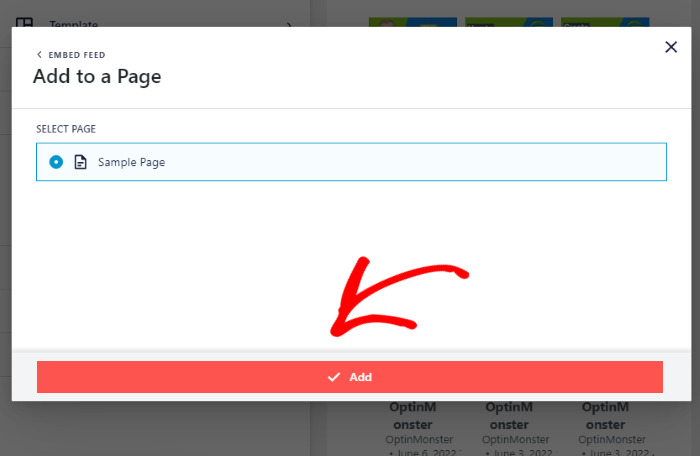
Next, you can choose the WordPress page where you want to embed your videos.
After selecting your page, click on the Add button below.
Clicking on it will open the page in the WordPress editor so you can embed your videos.
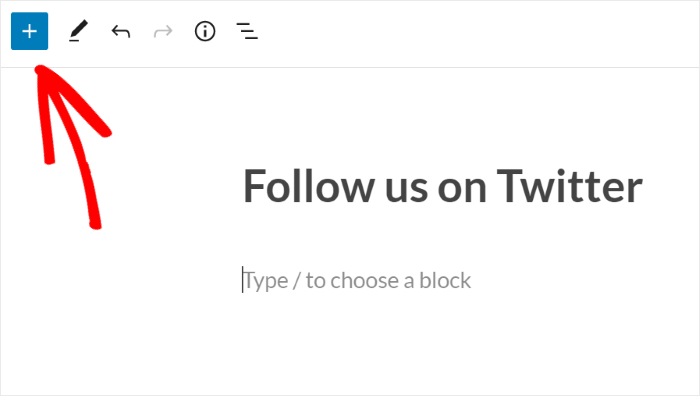
In the editor, add a new Gutenberg block by clicking on the plus (+) icon.
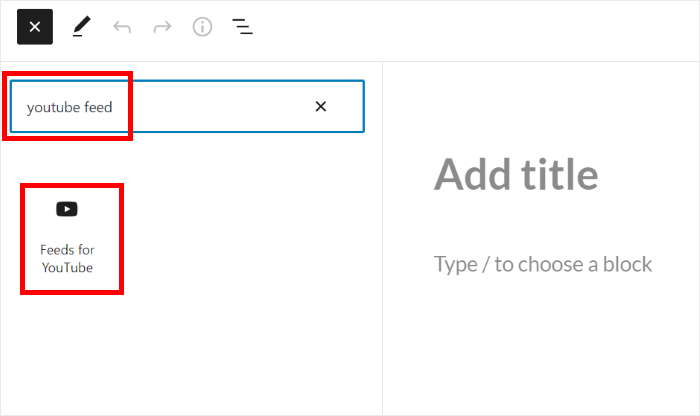
With the help of the search bar, now look for the “youtube feed” block.
Finally, click on the Feeds for YouTube block from the search results below to embed your videos.
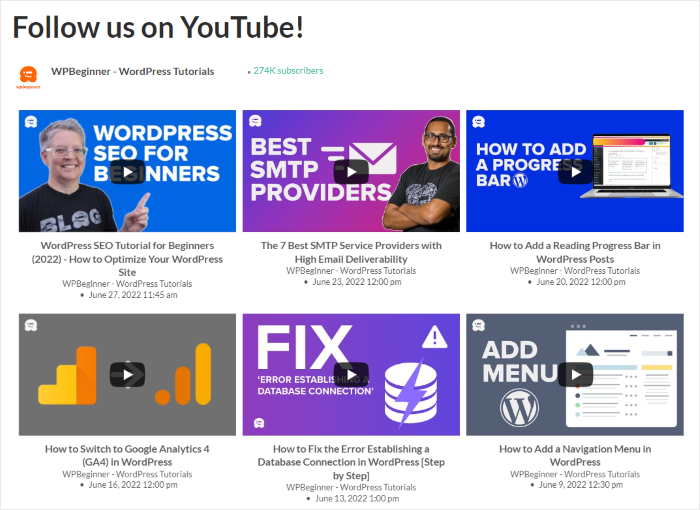
All you have to do is click on the Update button, and your visitors can check out these videos as well.
And if you open your WordPress site, you can check how your videos look to your visitors.
Next, let’s see how you can embed your videos on the sidebar or footer areas of your WordPress site.
Embed Videos on the WordPress Sidebar or Footer
The next option is to show YouTube videos on your site’s sidebar or footer areas with the help of a YouTube widget.
And like before, you can get started directly from your live feed editor.
First, open the YouTube Feed » All Feeds menu from your WordPress dashboard and click on your feed.
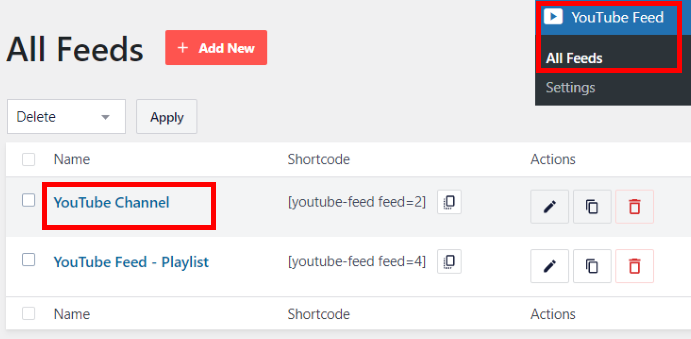
Like earlier, you can click on the Embed button at the top to continue.
This will bring up the embed options for your video feed once again.

This time, you can click on the Add to a Widget option on the popup.
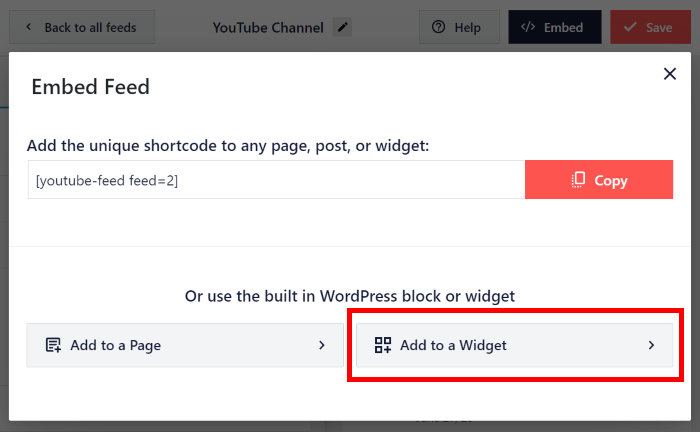
To help you embed your videos with ease, the plugin will now send you to your website’s Widgets page.
From this page, you can choose where to place the video widget.
To show video content on your site’s sidebar, click on the Sidebar panel.
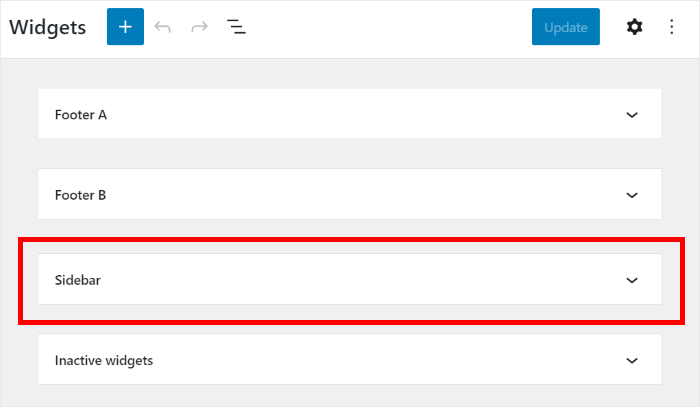
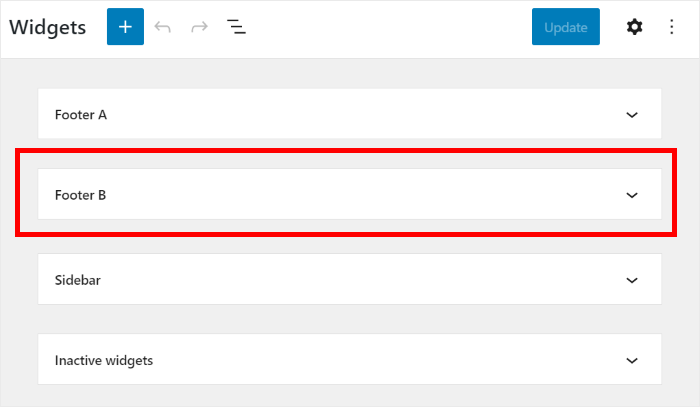
Want to show videos below your page on the footer? Click on the Footer panel instead.
To showcase our example, we’ll opt for the website sidebar.
Once you choose where to embed your videos, add a new widget by clicking on the plus (+) icon.
Then, you can select the Feeds for YouTube widgets to embed your videos.
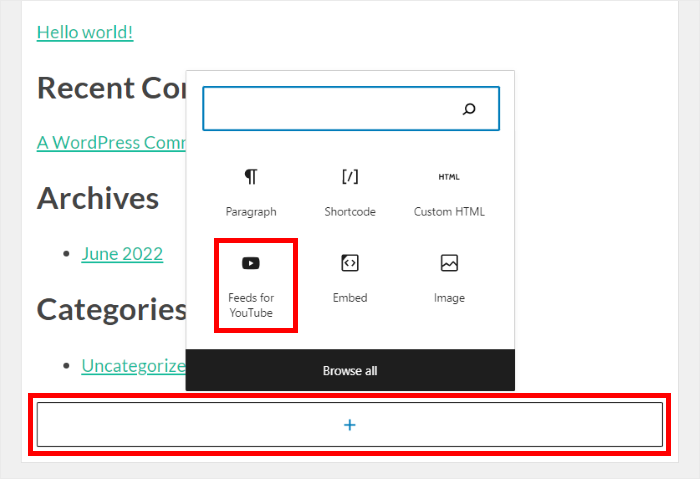
Finally, save your changes by clicking on the Update button, and your video widget will be live on your website.
To see how the videos look, you can open your site and check it out for yourself.
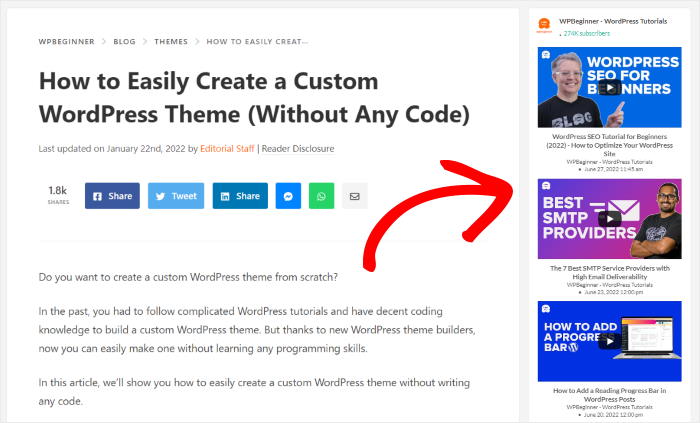
And that’s just the start! You can use Smash Balloon plugins to embed videos from other social media platforms like Facebook, Twitter, and Instagram.
To learn more, you can look at our guide on how to embed Facebook videos in WordPress.
So there you have it!
If WordPress videos are not playing on your site, all you have to do is follow this guide to solve the problem. As you can see, a simple way to avoid most of these issues is to use platforms like YouTube.
You can then grow your brand’s social media presence, boost your views, convert your visitors, and much more.
If you want to get more out of YouTube, we’ve got a guide on how to make money from your YouTube channel.
Also, if you found this guide helpful, go ahead and follow us on Twitter and Facebook for more useful tips and tutorials.
