Want to showcase your Facebook photo galleries right on your WordPress website?
When I first started helping others display galleries from Facebook, I quickly realized how confusing Facebook’s built-in embed tools and raw code snippets can be. Especially for beginners.
If you’re not comfortable with coding, the manual route can eat up hours and leave you feeling stuck.
That’s why, after years of working with business owners and trying every method myself, I now use an easy, beginner-friendly WordPress plugin for quickly showing Facebook galleries: Smash Balloon’s Facebook Feed Pro.
With it, I can display photo albums from my Facebook page, design how they look with instant previews, and keep them updated. All without touching a single line of code.
In this quick guide, I’ll show you step-by-step exactly how I embed a Facebook gallery on WordPress. You’ll be able to do it in just a few minutes, even if you’re new to WordPress or websites.
In This Article
- Embedding a Facebook Gallery: Manual vs Automatic
- The Easiest Way I Know to Embed a Facebook Gallery on Your Website
- 5 Steps to Add Facebook Gallery to WordPress Website
- Start Embedding Your Facebook Gallery Now
Embedding a Facebook Gallery: Manual vs Automatic
Should you manually embed Facebook gallery feeds on your website, or is it better to use a plugin to automatically do it?
Check out this table I made to help you compare:
| Feature | Using Smash Balloon’s Facebook Feed Pro | Manually (Without Plugin) |
| Setup Process | 👍 A straightforward process you complete in minutes, all inside your WordPress dashboard | 👎 Requires generating code on Facebook and manually placing it on your site |
| Technical Skill | 👍 Designed for all users, from beginners to experts. It’s 100% code-free | 👎 You need coding knowledge for any customization, or a developer |
| Risk | 👍 The plugin handles all code, protecting your site from errors. It’s trusted by the world’s biggest brands to add social media feeds to their websites! | 👎 Pasting code directly can introduce errors that may break your website |
| Customization | 👍 Use a live visual feed editor to easily customize layouts, colors, spacing, and more to perfectly match your brand | 👎 You are restricted to Facebook’s default styles, which may not match your brand |
| Features | 👍 Embed photo albums, Facebook timelines, videos, live streams, events calendars, and even reviews | 👎 Supports only basic embeds of single Facebook albums or posts |
| Support | ✅ You get access to a friendly team of WordPress experts ready to help you | ❌ If you encounter problems, you have to solve them on your own |
| Final Takeaway | Want to easily embed Facebook gallery feeds in minutes? Check out Smash Balloon’s Facebook Feed Pro today! | Tougher setup that risks site errors and offers minimal control over the design |
Let’s talk about the simplest way to display a Facebook gallery feed on your site below.
The Easiest Way I Know to Embed a Facebook Gallery on Your Website
[Disclaimer: As I work with Smash Balloon, I’m naturally going to highlight our plugin as a solution. Based on my professional experience with social media marketing, though, I genuinely believe it’s the easiest and most effective way for most WordPress users to do this.]
The easiest way to add a Facebook gallery to your website is by using Smash Balloon Facebook Feed Pro.
Facebook Feed Pro helps you embed, customize and display Facebook galleries without any hassle. It’s super easy to use, even if you’re just starting out with WordPress.
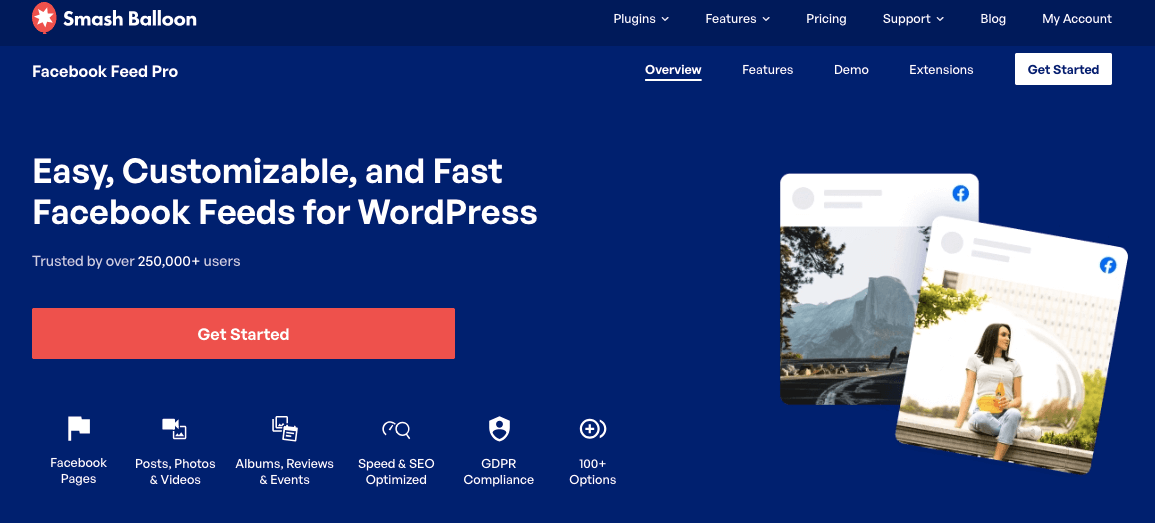
As the best Facebook feed plugin for WordPress, Facebook Feed Pro is designed to help you easily add Facebook galleries to your website.
This makes it simple to show off your photos and keep your site interesting for visitors. And you don’t need to know any coding! Here’s what I love about it:
- Shows any album you want. You can display all of your Facebook albums at once, or choose to feature just a single album
- No coding skills needed. You can create, customize, and add your photo gallery to your site without touching any code
- Looks great instantly. The Facebook gallery automatically copies your website’s colors and fonts, so it matches your brand perfectly
- Customize with a live preview. Use the easy visual feed editor to change layouts, colors, and more, and see your changes happen in real-time
If you’re not that tech-savvy, there’s absolutely nothing to worry about. What I especially appreciate about this top-rated plugin for Facebook feeds is its visual feed customizer.
It lets you control exactly how your galleries look and what photos they show with just a few simple clicks.
Customizing your Facebook galleries is simple with its live feed customizer. I like that in just a few clicks, I can change the size, spacing, colors, Facebook feed themes, layout, and more.
Another thing I find useful about Facebook Feed Pro is the lightbox feature.
I love that when a visitor clicks on an album, the photos open up right there on the website instead of sending them away to Facebook. It’s like having a professional photo gallery that keeps people engaged on your site.
Plus, Facebook Feed Pro helps you embed the following Facebook feeds on your site:
- Facebook post timeline
- Facebook photos
- Facebook photo galleries
- Status updates and link posts
- Facebook videos
- Facebook live streams
- Facebook events calendar
- Customer reviews
Finally, if ever you run into some issues while embedding your Facebook gallery, you’re in luck.
Facebook Feed Pro’s customer support team is made up of WordPress experts who will happily guide you along the way. They’re just a message away.
Smash Balloon plugins are trusted by the world’s biggest brands to help them display their social media feeds on their sites.
After all, with over a million users and thousands of 5-star ratings, they must be doing something good, right?

Ready to display Facebook galleries on your site in just a few clicks? Get started with Facebook Feed Pro now!
5 Steps to Add Facebook Gallery to WordPress Website
Now, let’s walk through the steps to display a Facebook gallery feed on your website. For this method, I’ll use Facebook Feed Pro to embed a feed of Facebook photo galleries on my website.
Facebook Feed Pro will make sure that my feed automatically matches my website’s design, and it’ll keep my Facebook gallery feed updated whenever I upload a new photo on my albums.
Here’s a quick step-by-step guide on how you can showcase Facebook photos from your gallery on your website:
Step 1: Install Smash Balloon Facebook Feed Pro
The first step is to get your own copy of the Facebook Feed Pro plugin here. After downloading the plugin, make sure to upload and install it to your WordPress site.
Don’t worry if you’re not sure how to do this. You can always follow the step-by-step instructions on this helpful guide on installing WordPress plugins for more details.
After installing and activating the plugin, move on to the next step below.
Step 2: Create a New Facebook Gallery Feed
After installing and activating Facebook Feed Pro, you can go ahead and create a new feed for your Facebook gallery.
First, go to the Facebook Feed » All Feeds menu from your WordPress dashboard and click on the Add New button.
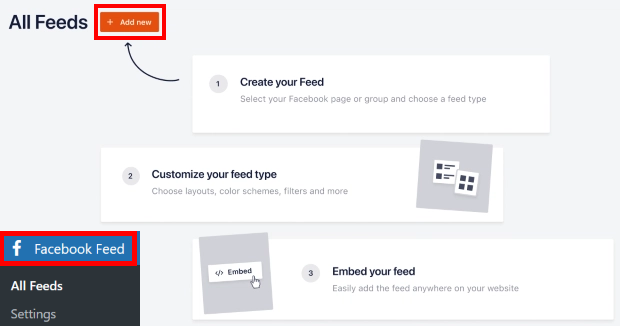
After that, you can choose the type of feed that you want. You have 9 different options here, such as photos feed, videos feed, events feed, reviews feed, and much more.
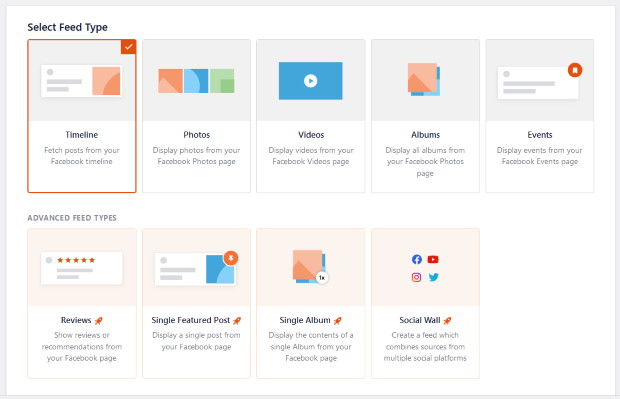
For your Facebook gallery, you can pick from 2 different types of feeds:
- Albums Feed: Post all the photo albums on your Facebook page
- Single Album Feed: Show all the images from a single Facebook album
After you’ve decided the feed type for your Facebook gallery, you can move to step 3 and connect it to Facebook.
Step 3: Connect Your Gallery to Facebook
The next step is to connect your new Facebook gallery to a source, which is your Facebook page.
Depending on the feed type you picked in the previous step, you can do this in 2 ways:
- Connect an albums feed to Facebook
- Connect a single album feed to Facebook
Let’s take a look at how you can do both of these.
Connect an Albums Feed to Facebook
First, select the Albums feed type from the options and then click on Next.
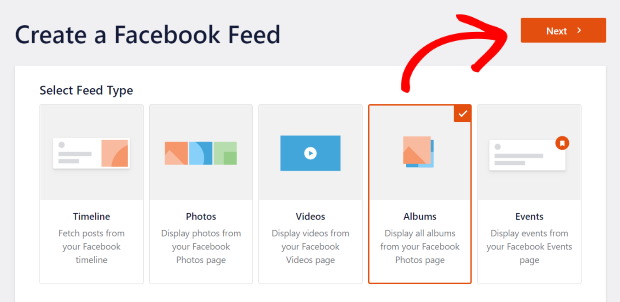
Once you do that, click on the Add New button to add a source for the Facebook gallery.
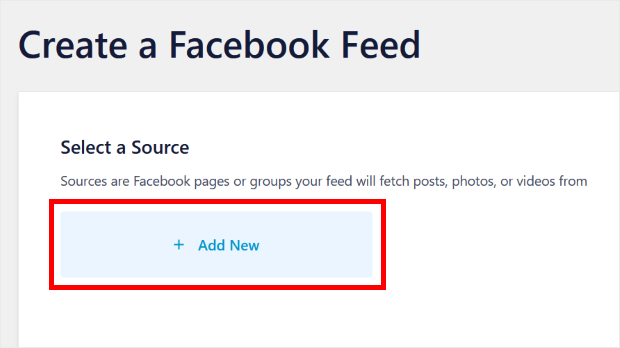
On the next page, let’s go ahead and click on the Connect to Facebook button.
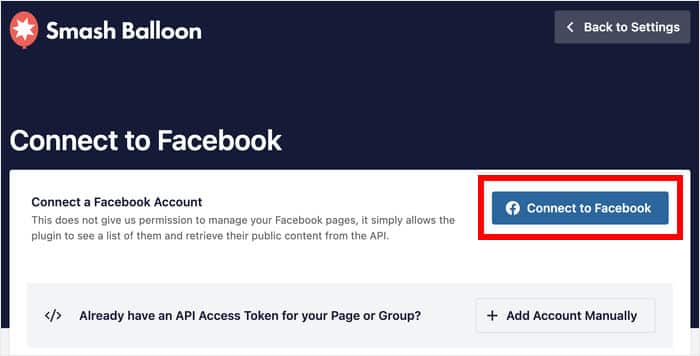
Now, Facebook Feed Pro will send you to Facebook, where you can give read-only access to the plugin.
Using this access, it can only read your Facebook posts, but it can’t change anything — the plugin is completely safe to use.
To proceed, select the Facebook page you want and then click on Next.
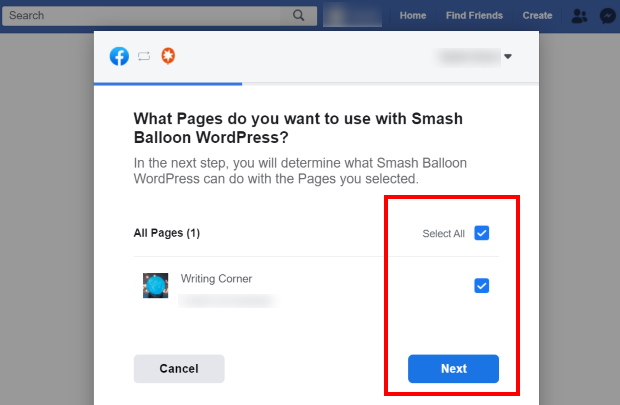
Next, you can finish giving the read-only access by clicking on the Continue button.
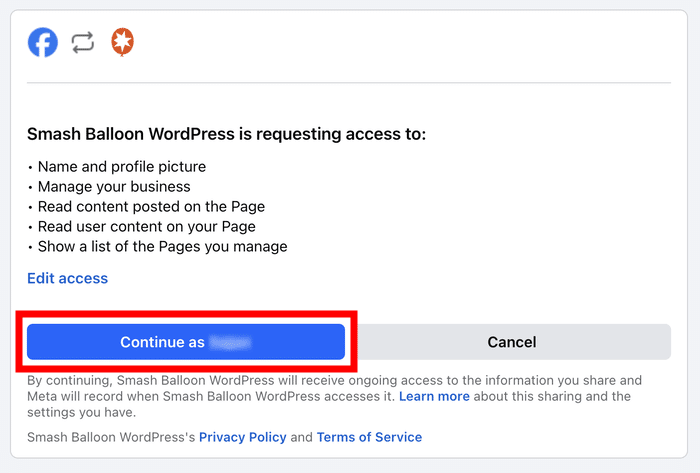
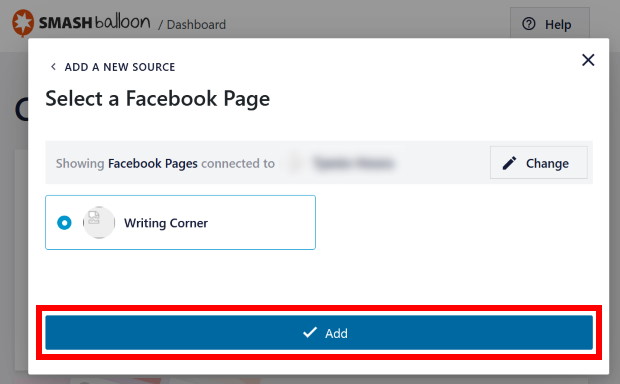
Doing that will bring you back to your WordPress site. Then, you can confirm the Facebook page as the source for your new gallery.
To continue, click on the Add button.
Now click on Next to finish connecting your Facebook gallery to a source.
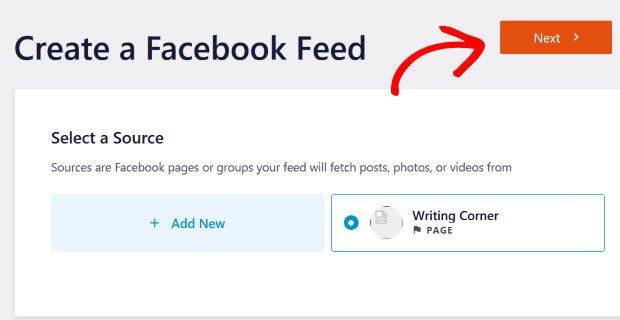
And just like that, your Facebook gallery is now ready for the next step.
Connect a Single Album Feed to Facebook
The other option is to use a Single Album feed for your Facebook gallery.
For that, navigate to the Facebook Feed » All Feeds menu from your WordPress dashboard.
Then, click on the Add New button on the new page.

After that, select the Single Album feed type from the options and then click on Next.
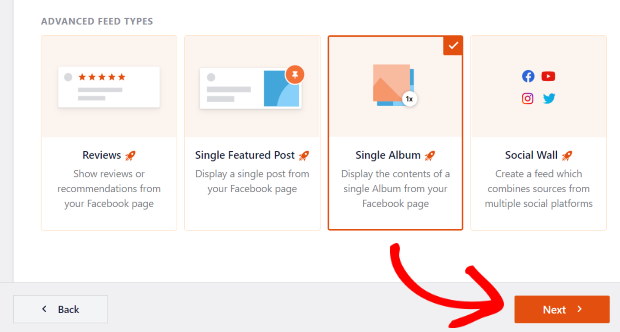
Now you can add a new source by clicking on the Add New button.

On the next page, let’s go ahead and click on the Connect to Facebook button.

The plugin will send you to Facebook after that. To continue, just select your Facebook page here and then click on Next.

Now you can finalize your account connection by clicking on the Continue button.

After that, you’ll be back on your site. To proceed, click on the Add button on the new popup.

Now click on Next to finish adding the source for your Facebook gallery.

Once you do that, open the Facebook album that you want to embed. And then, copy the URL at the top.
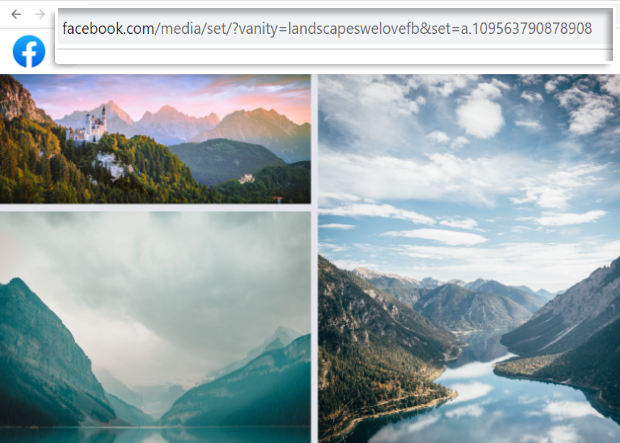
After that, you can return to your site. Now look for the Album URL or ID field on the popup and paste the URL there.
Finally, click on the Next button.
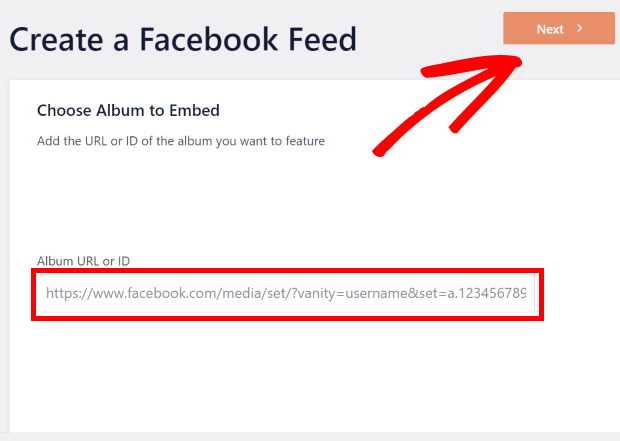
You’ve now connected your new Facebook gallery to a source. The next step is to start customizing it.
Step 4: Customize Your Facebook Gallery
After connecting your gallery to Facebook, you’ll see it open in the visual feed customizer with live preview.
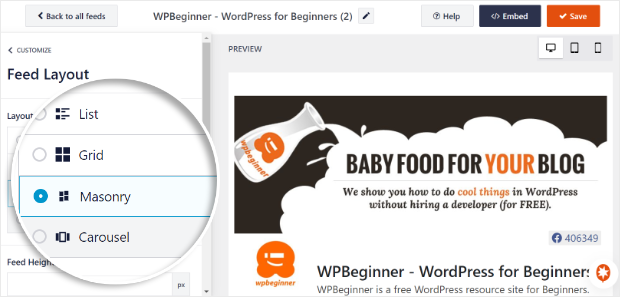
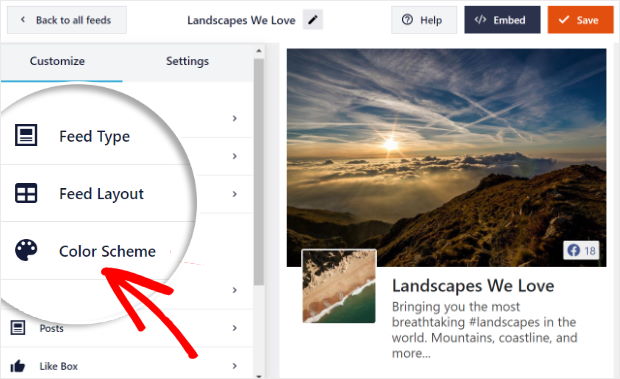
On the left, you can see your customization options. Using these, you can change your feed type, layout, like box, header design, post style, color scheme, and much more.
You can also find a live preview on the right. So, you’ll have a clear idea of how your Facebook gallery will look on your site.
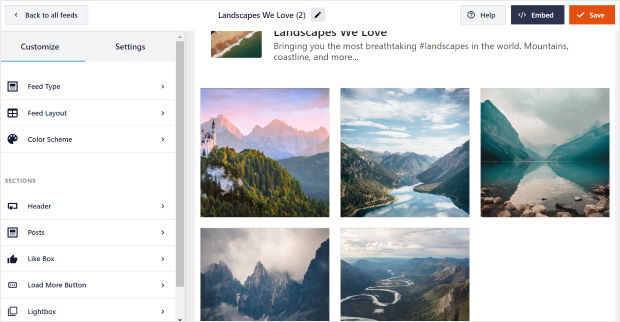
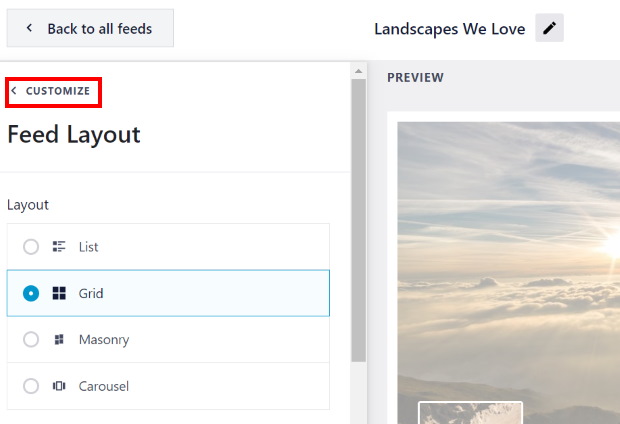
To start customizing your Facebook gallery, what I usually do first is select the Feed Layout option on the left.
I like designing my feed layout first, but you can also skip this step and tweak other customization options if you want!
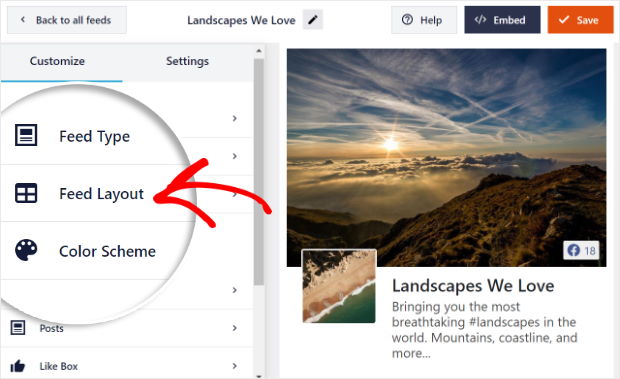
Then, you’ll get 4 different layout options to choose from: List, Grid, Masonry, and Carousel.
First, you have the list layout to show your Facebook content in a single column, one after the other. So, each item will be more visible.

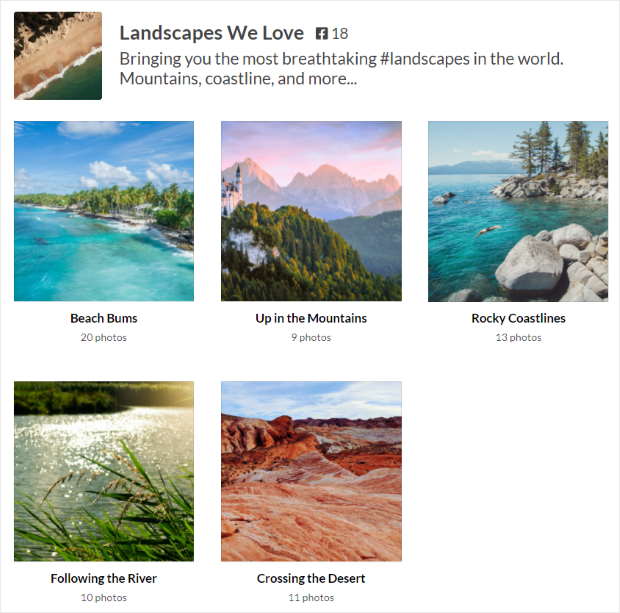
Next, you can try using a grid layout. This way, you can show lots of items at once in different rows and columns. This is what I use on my personal website so my site visitors can view my Facebook albums at once.
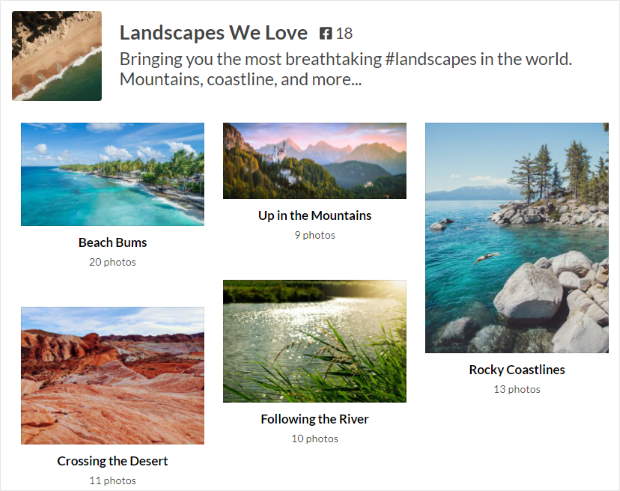
Want your Facebook posts to keep their original proportions? In that case, you can try using the masonry layout.
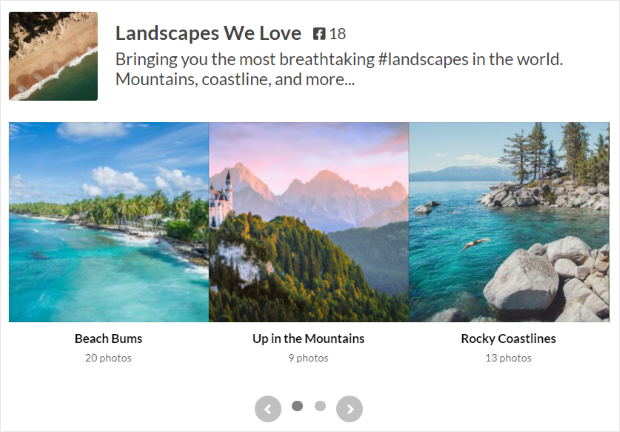
And there’s also the carousel layout which allows you to show your content in a beautiful Facebook carousel slider.
Just pick the layout that you prefer and then click on the Save button.
Next, click on the Customize button to go back to the main customization options.
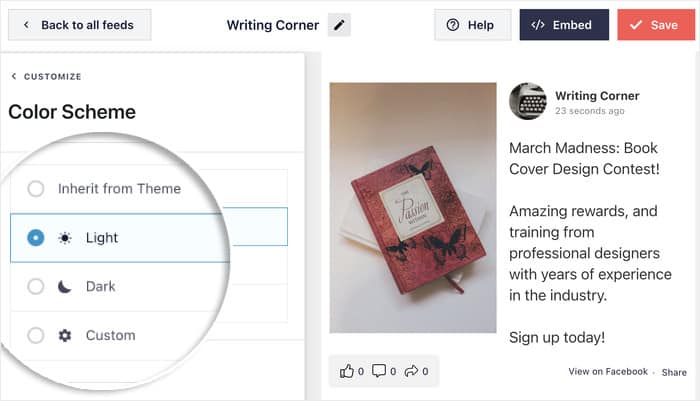
You can now edit the colors of your Facebook gallery. To do that, select the Color Scheme option.
With Facebook Feed Pro, you have 4 different color schemes to pick from:
- Inherit from Theme: Copy the colors of your website
- Light: Use a brighter look with a dark font color
- Dark: Pick a darker look along with a lighter font color
- Custom: Choose all the colors yourself
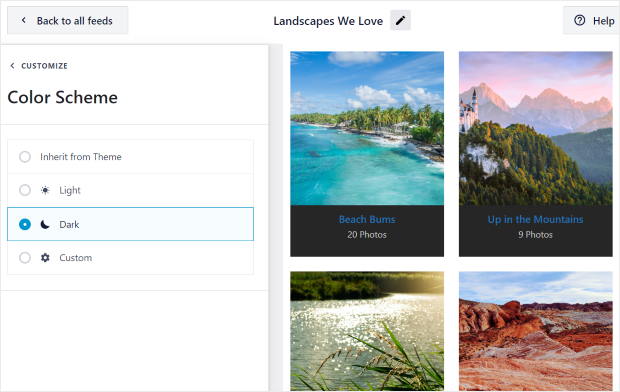
I usually use the Inherit from Theme option so my Facebook gallery feed matches my site’s branding. Feel free to select the color scheme that you prefer and then click on the Save button.
As you can see, it’s super easy to customize your Facebook gallery using the visual feed customizer. In just a few clicks, you can change your header style, post layout, feed size, margins, and much more.
Finally, click on Save once you’re done customizing the feed. After that, you can start embedding your Facebook gallery.
Step 5: Embed Your Facebook Gallery on Your Website
Now that you’ve customized your Facebook gallery, it’s time to embed it on your website.
You can do that in 2 different ways:
- Embed your Facebook gallery on a page
- Embed your Facebook gallery on a sidebar or footer
We’ll take a look at both of these methods below:
Embed Your Facebook Gallery on a Page
You can start embedding your Facebook gallery right from the live feed editor.
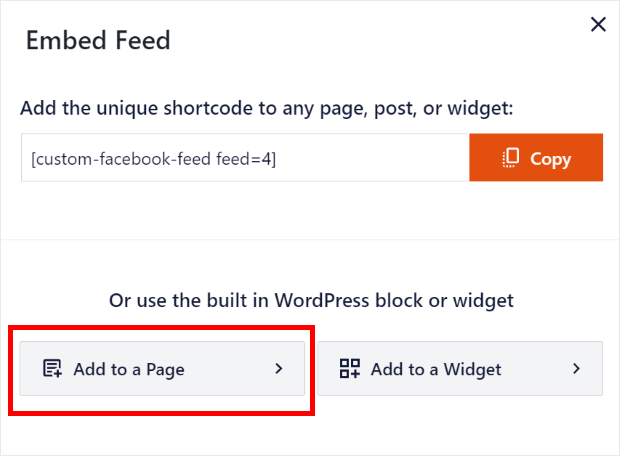
First, click on the Embed button at the top.
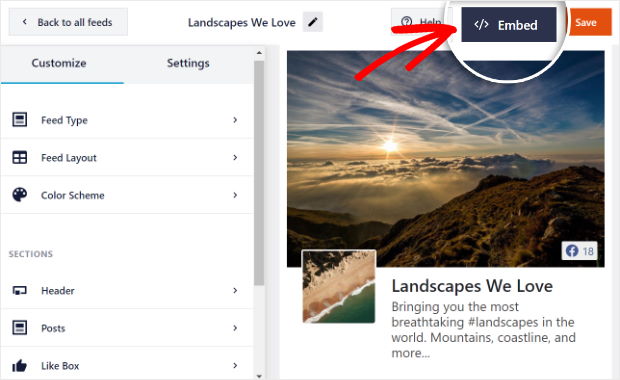
After that, you’ll see a new popup that asks where you want to embed your feed. To continue, select the Add to a Page option there.
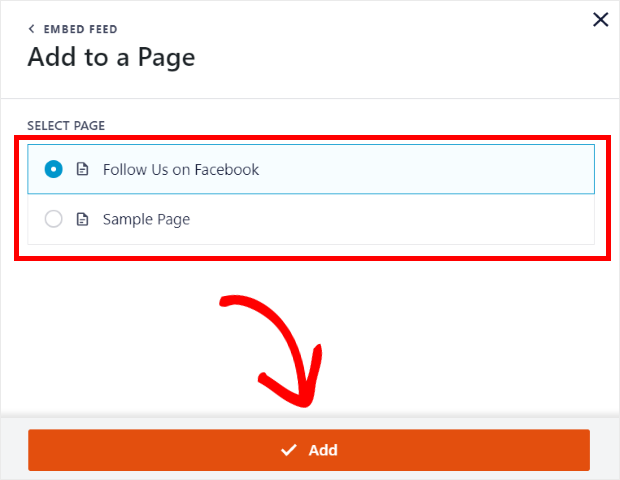
Next, you’ll see a list of all the WordPress pages on your site. Just select the page where you want to embed your Facebook gallery and click on the Add button.
Then, the plugin will send you to that page. To embed your Facebook gallery here, first click on the Plus (+) icon to add a new block.
After that, just find the Custom Facebook Feed block and click on it.
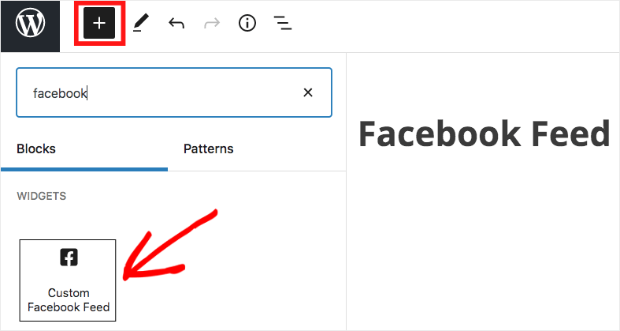
Clicking on it automatically embeds your Facebook gallery to your page. Feel free to edit the page title.
Then, click on Publish to make it live on your website.
You can now open your site and check it out!
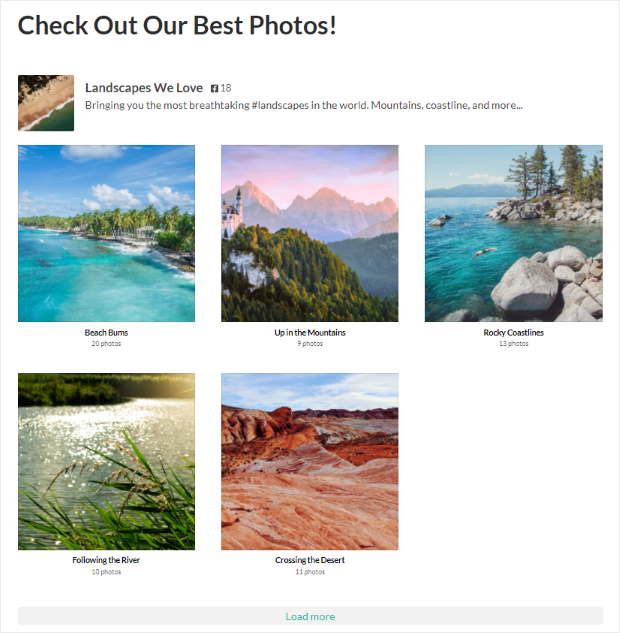
When your visitors click on an album, they’ll see a lightbox popup that shows all of the photos right there on your site.
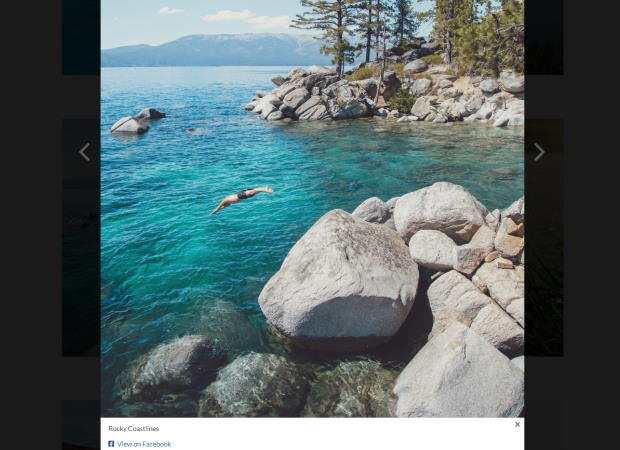
As you can see, embedding your Facebook gallery can be quick and easy.
Embed Your Facebook Gallery on a Sidebar or Footer
Using this method, you can embed your gallery on your sidebar or footer as a Facebook widget. And you can do that from the live feed editor too.
To open the live feed editor, go to the Facebook Feed » All Feeds menu from your dashboard.
Here, you can see all of your Facebook feeds listed out. To continue, you can just select the feed that you created earlier.
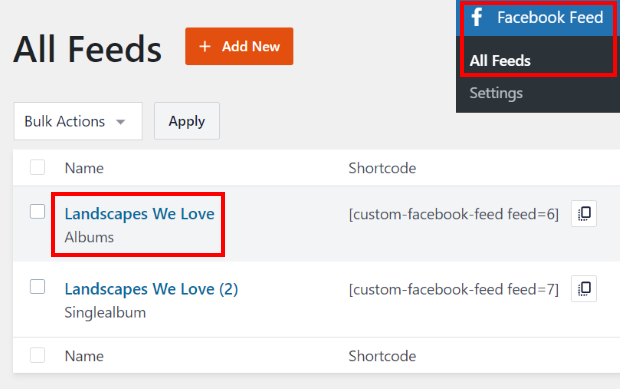
You’ll see your Facebook gallery open in the live feed editor after that. Now click on the Embed button in the top right corner.

This will bring up a popup where you can choose the location to embed your Facebook gallery.
On the popup, just select the Add to a Widget option.
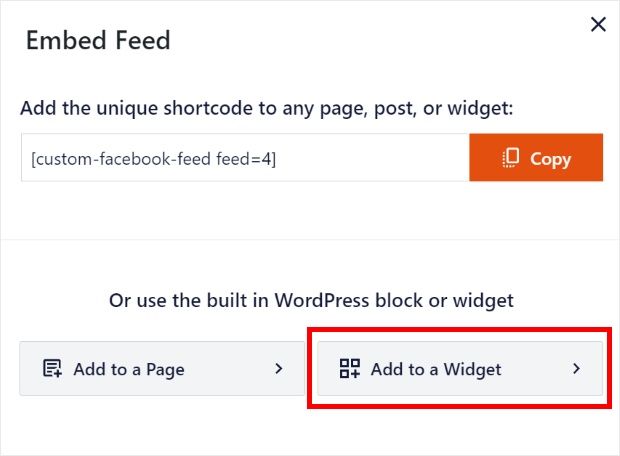
Doing that will send you to the Widgets page of your website. Here, you can embed your Facebook gallery on the sidebar or footer as a Facebook widget.
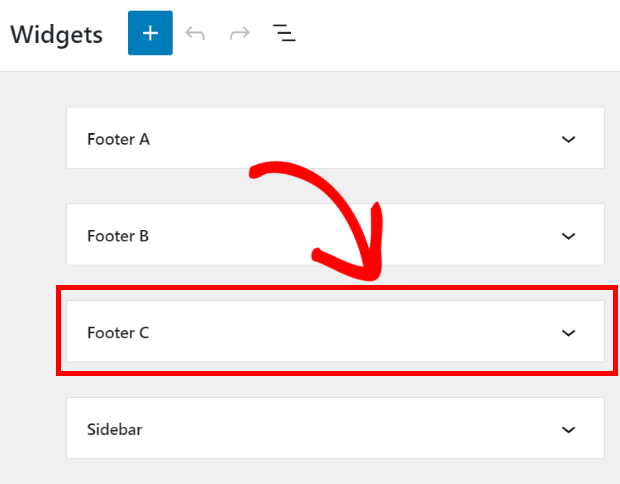
To continue, click on the Sidebar panel on this page.
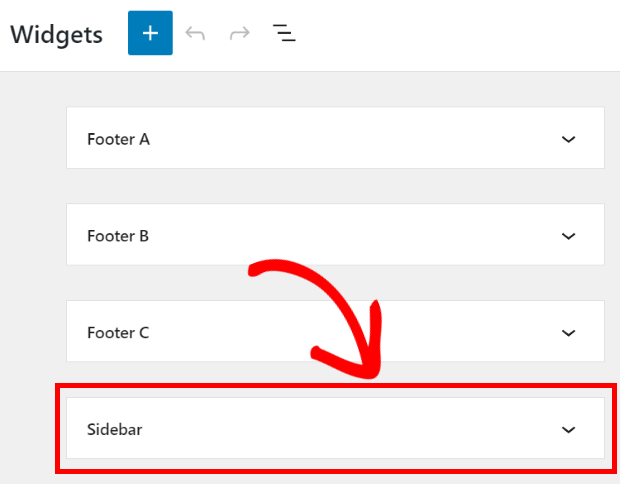
If you want to embed your Facebook gallery on the footer, click on a Footer panel instead.
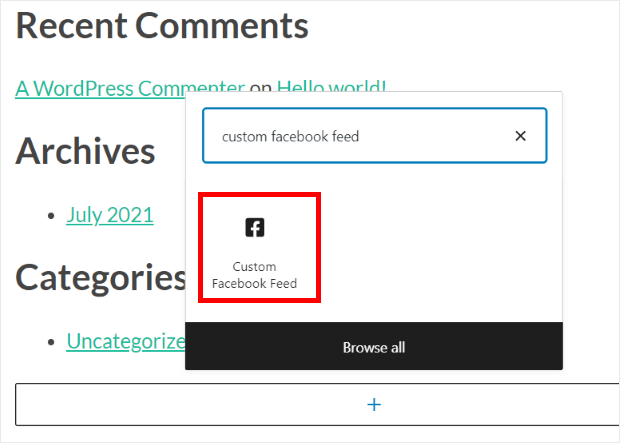
Finally, click on the plus icon (+) to add a new widget and then select the Custom Facebook Feed widget.
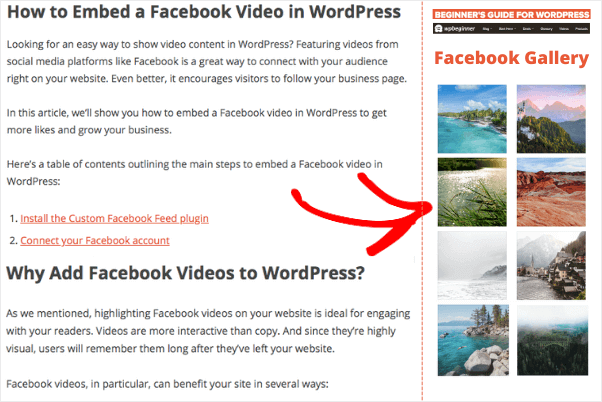
Now, when your visitors check out your website, they can see your Facebook gallery embedded on your sidebar area, like this:
And that’s it!
Now, you’ve learned how to embed a Facebook gallery on your website — easily, quickly, and hassle-free.
Using the Facebook Feed Pro plugin, you can post your Facebook galleries in just a few clicks. Then, you’ll have an easy way to engage your website visitors, boost your sales, and get more Facebook followers.
Ready to display Facebook galleries easily? Get started with Facebook Feed Pro today.
Start Embedding Your Facebook Gallery Now
As these steps demonstrate, adding a beautiful Facebook gallery to your website is a simple and effective way to share your brand’s story.
From my own experience, using Smash Balloon Facebook Feed Pro is the most reliable way to create a professional-looking gallery without wrestling with code. You can have your photo albums live on your site in just a few minutes.
Here is what I recommend you do next:
- Get your copy of Facebook Feed Pro. (It includes our 14-day money-back guarantee!)
- Follow the easy steps we’ve just walked through to create your Facebook gallery feed
- Preview your new Facebook gallery to ensure it perfectly matches your website’s design
Do you have any questions about using Facebook Feed Pro to add a Facebook gallery to your site? Please let me know in the comments below.
Want to know how to display specific Facebook albums on your site? Take a look at this next post on how to embed a Facebook album on your website today.
Interested in boosting your Facebook reviews to build trust for your brand? Here’s how you can get more Facebook reviews for your page.
