If you want to make your brand’s Divi website even more engaging, showing Facebook content can be a great solution.
Out of the options, the best way to add your Facebook feed is by using a plugin like Facebook Feed Pro. It automatically fetches Facebook content, embeds it on your site, and keeps your feed updated.
In comparison, manually displaying Facebook content can be complicated as well as time-consuming.
Instead of spending your valuable time dealing with complex embed codes, you can let the plugin handle it for you — just like how Divi makes it easier to design your site.
To help you supercharge your Divi website with social media content, we’re going to guide you through the easiest way of adding a Facebook feed to Divi.
In this Article
- Why Use a Facebook Feed with Divi?
- Easiest Way You Can Add a Facebook Feed to Divi
- How to Add a Facebook Feed to Divi WordPress Websites
Why Use a Facebook Feed with Divi?
Developed by Elegant Themes, Divi is a popular website builder and WordPress theme that makes web design super easy.
But if you want to promote your Divi website, one of the best ways is to use the biggest social platform out there — Facebook!
“With more than 3 billion active monthly users, Facebook is the world’s most popular social media platform. From a marketing perspective, there are many opportunities to engage with new audiences and expand your company’s reach.”
– Neil Patel, Award-Winning Digital Marketer
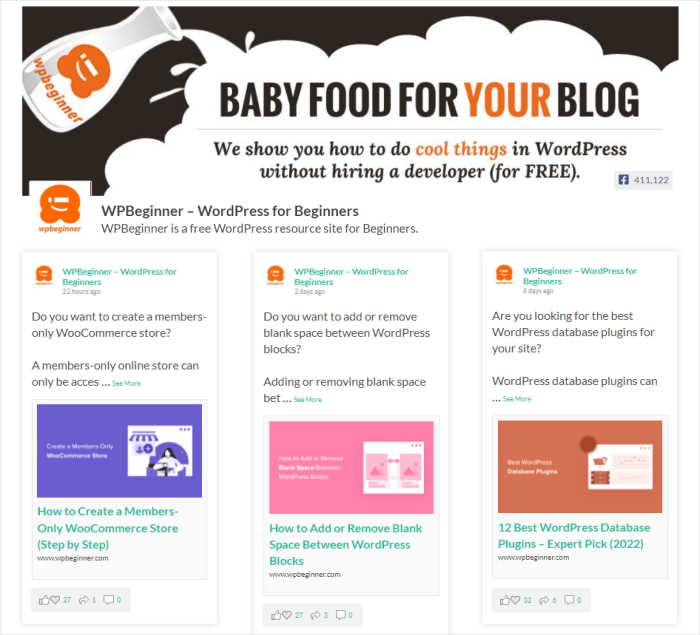
And a great way to supercharge your Facebook marketing is to add a Facebook feed widget to your Divi WordPress site.
Here’s what you can get by embedding Facebook content on your site:
- Displaying your brand’s Facebook content can get you more likes, shares, and followers from all the people visiting your website.
- Adding a Facebook page feed is a great way to get website visitors to join your community.
- You can show reviews and testimonials from Facebook on your website as social proof. So, visitors can see that actual people are using products, which can boost your conversions.
- It’s also easy to show Facebook photos and videos and make your site more interesting for your visitors.
Easiest Way You Can Add a Facebook Feed to Divi
In the past, you could use the official Facebook page plugin to generate embed codes, edit the code yourself, and then add them to your WordPress site.
As you can guess, all this took a lot of time and effort since you had to deal with a lot of code.
The solution?
You can use an easy-to-use plugin like Facebook Feed Pro to embed your content.
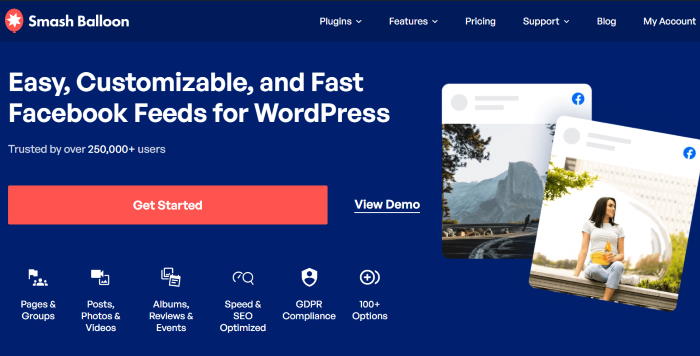
With this user-friendly plugin, you can create, customize, and embed Facebook feeds in just a few clicks — no coding needed. Right out of the box, it works perfectly with page builders like Divi and Elementor.
Plus, you also get a ton of features to help you build engaging social media feeds:
- Fast and Easy Setup: Setting up the plugin is simple and quick, so you’ll be able to post your Facebook content feeds in just a few minutes.
- Live Feed Editor: You can easily customize your feeds with a visual customizer to help you out — no need for custom CSS, HTML, or any code.
- Lots of Feed Types: You can choose from Facebook page feeds, group feeds, review feeds, album feeds, video feeds, and a lot more.
- Optimized for Speed: The plugin allows you to add as many feeds as you want while keeping your site as fast as ever. On top of that, a faster site will also be great for your SEO.
- Customer Support: It also comes with a team of WordPress experts who will make sure you have a smooth experience.
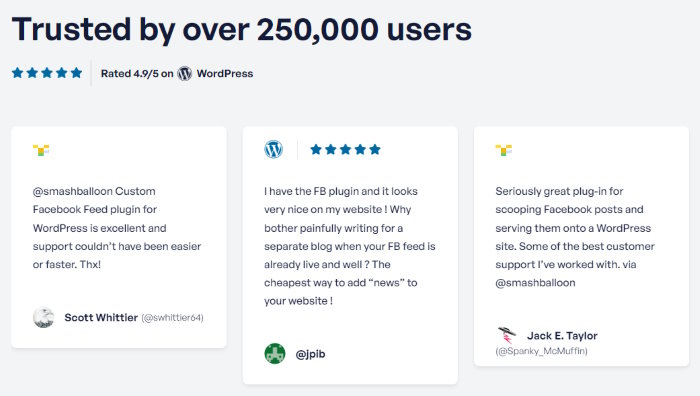
With all these amazing features, Facebook Feed Pro has 250,000+ active users and a rating of 4.9/5 stars, which speaks for itself.
In fact, the team behind this plugin has also released other popular tools like Instagram Feed Pro, YouTube Feed Pro, Reviews Feed Pro, and more.
All of the Smash Balloon plugins work perfectly with the Divi theme and page builder. So you can get more engagement and conversions on your Divi website with ease.
To embed Facebook in Divi easily, get your copy of Facebook Feed Pro today.
How to Add a Facebook Feed to Divi WordPress Websites
Just follow the step-by-step Divi tutorial below, and you can learn how easy it can be to create, customize, and embed Facebook content on your site.
Step 1: Install and Activate Facebook Feed Pro
First, grab your copy of Facebook Feed Pro from here.
Now, you can install and activate the plugin on your WordPress site.
You can just follow our step-by-step guide on how to install a WordPress plugin if you want a quick refresher.
Step 2: Create Your Facebook Page Feed
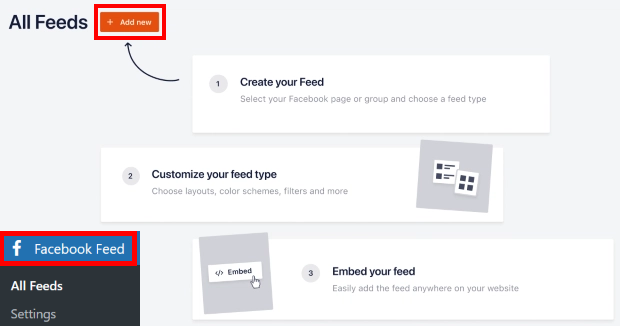
Go to the Facebook Feed » All Feeds menu from your dashboard and click on Add New.
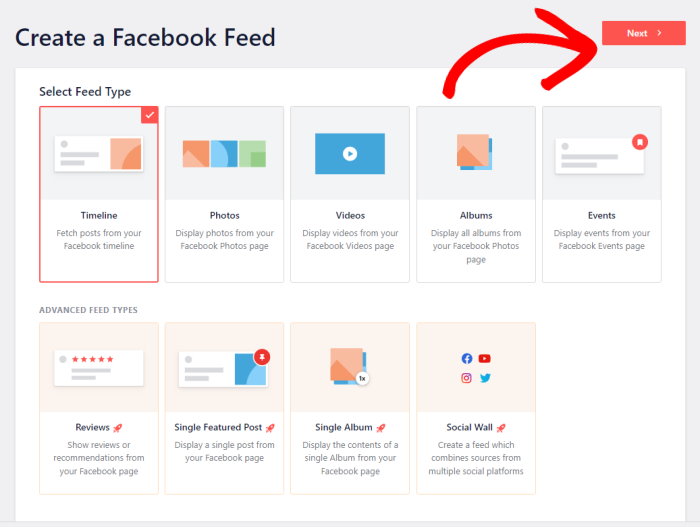
After that, pick the type of feed you want for your Divi WordPress site.
Here, you have 9 types of feeds, including a timeline feed, reviews feed, video feed, photos feed, and much more.
Pick the feed type you prefer, and then click on the Next button.
For this tutorial, we’ll go for a timeline feed.
Step 3: Connect to Your Facebook Profile
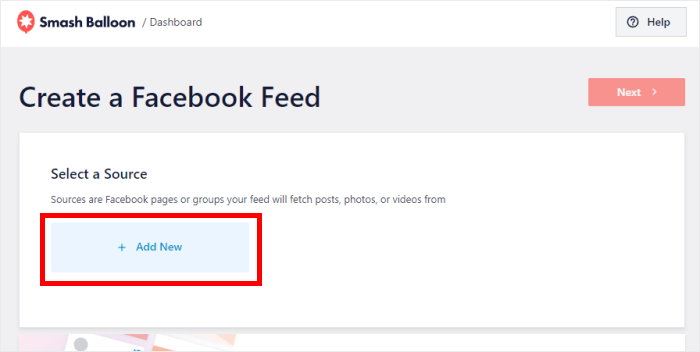
To show Facebook content on your feed, you need to connect a Facebook page or group as a source.
Click on the Add New button to get started.
You can now see a popup that asks you to pick between a page or a group for the source.
Once you select the type of source you want, click on Connect.
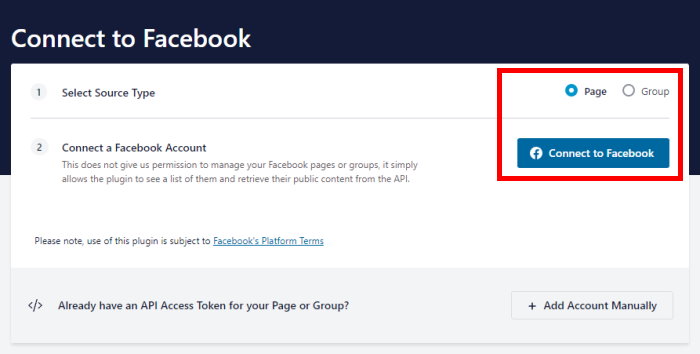
Clicking on that will open Facebook, where you can choose which pages or groups you want to connect.
To continue, select your page or group on the popup and click on Next.
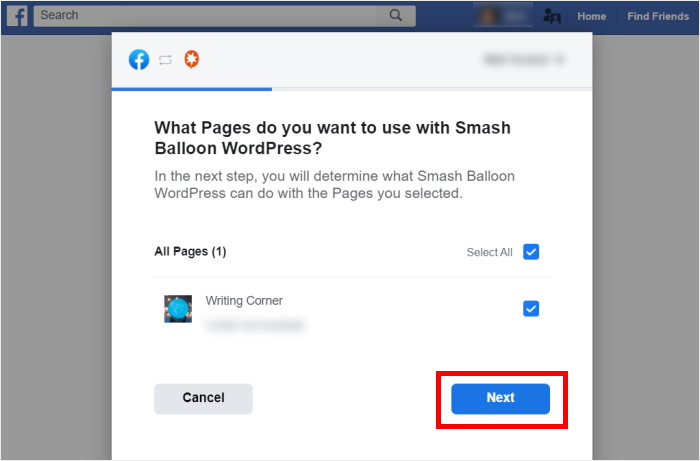
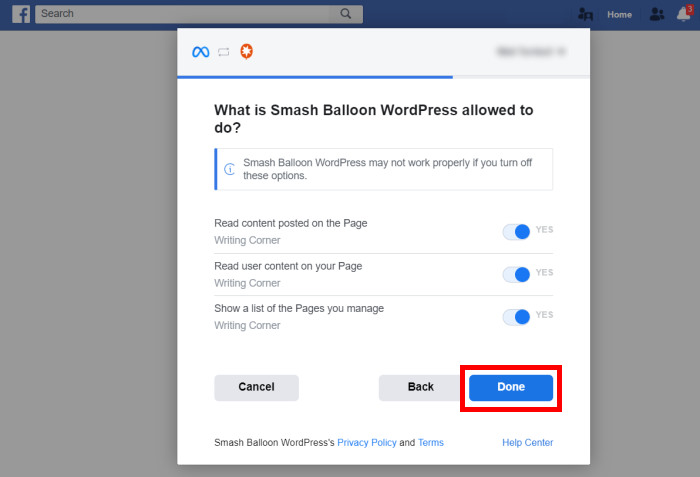
Now, you can give the plugin a read-only access so that it can show Facebook content.
Of course, the plugin is completely safe since it can only read your Facebook content and can’t make any changes.
Just click on Done on the popup to confirm the read-only access.
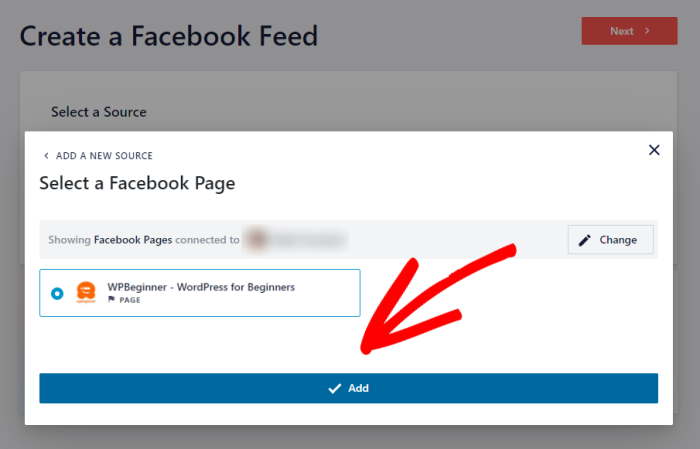
This will bring you back to your WordPress site, where a new popup asks you to confirm this source.
Select the Facebook page you want to use and click on Add.
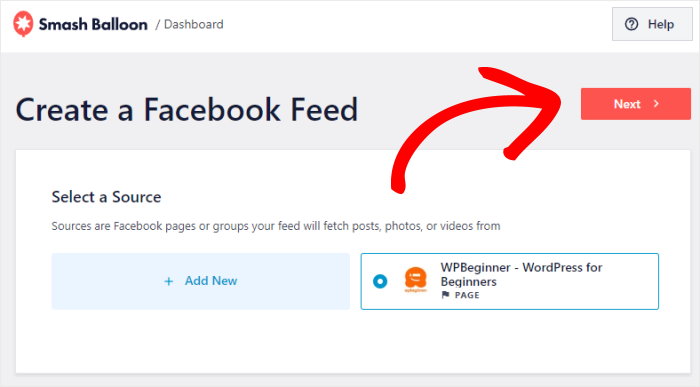
To finish connecting your new feed to Facebook, click on the Next button.
Step 4: Customize Your Facebook Feed
Facebook Feed Pro will automatically copy your WordPress theme’s design so your feed looks beautiful right away.
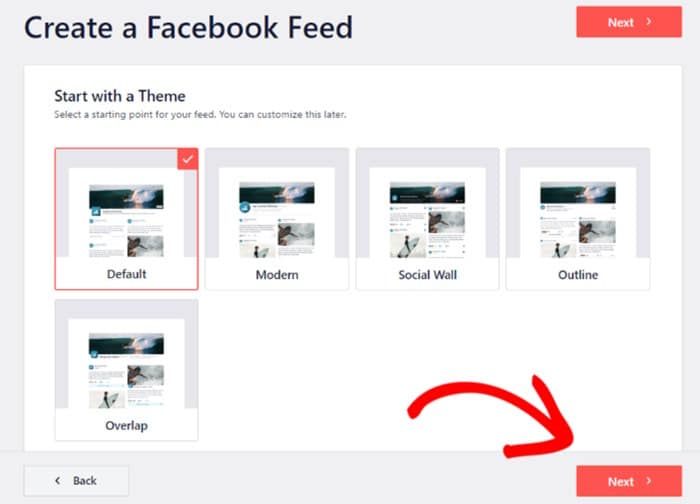
On top of that, the plugin lets you import a professionally designed theme for your newly created feed. There are 5 options that you can choose from:
- Default
- Modern
- Social Wall
- Outline
- Overlap
Just select the option that you prefer and then click on Next.
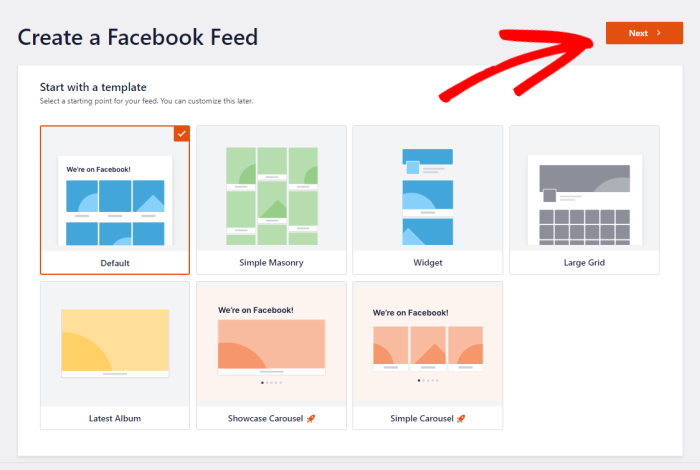
On top of that, you can also import a feed template to instantly set the layout of the posts and header on your website.
To continue, select a template and then click on Next.
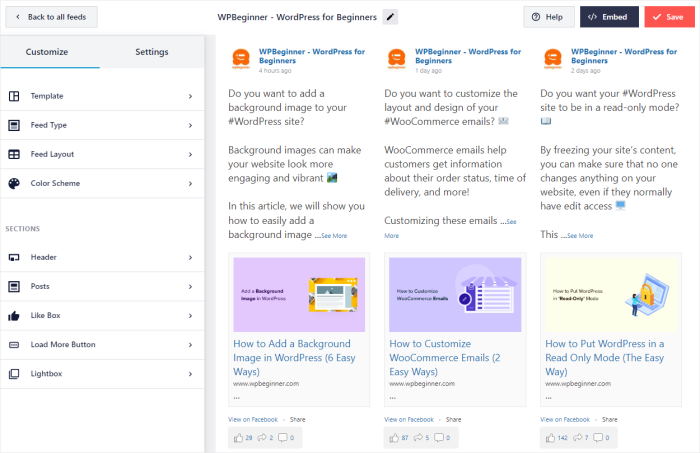
You can now see your new feed open in the live feed editor, where you can customize it.
The live feed editor has all the customization options on the left and a live preview of your feed on the right.
So, you can easily set your feed type, feed layout, color scheme, header style, post layout, and much more.
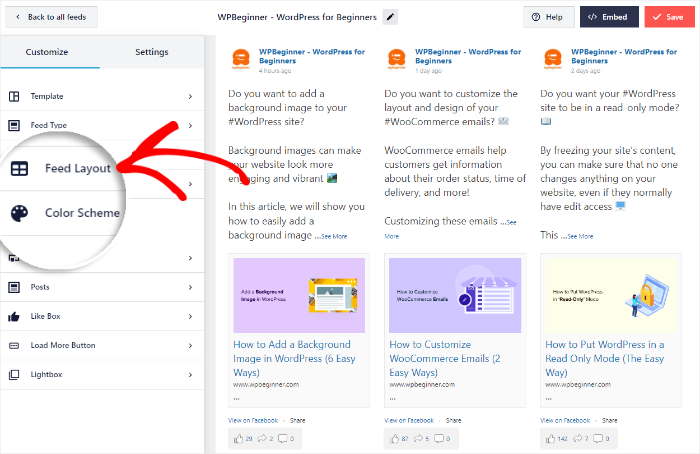
To get started, you can select the Feed Layout option on the left.
That way, you can change the layout of the Facebook content on your Divi website.
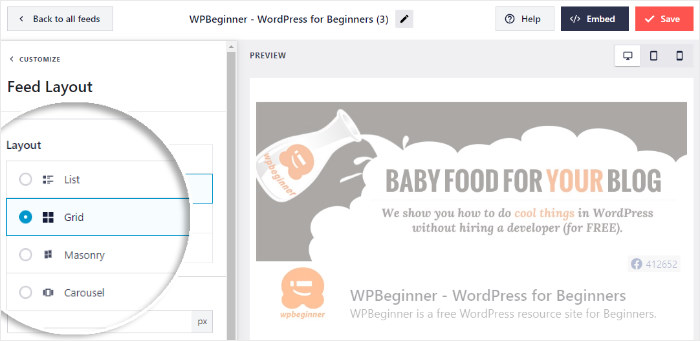
This will show you the different layouts for your new Facebook content feed: List, Grid, Masonry, and Carousel.
Let’s look at each of these layouts below:
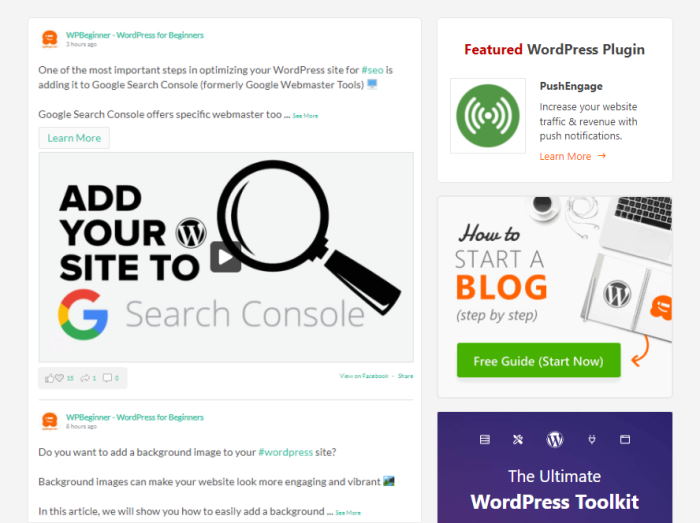
You can show all of your Facebook posts one after the other in a single line with a list layout.
This is a great choice if you want visitors to focus on one post at a time.
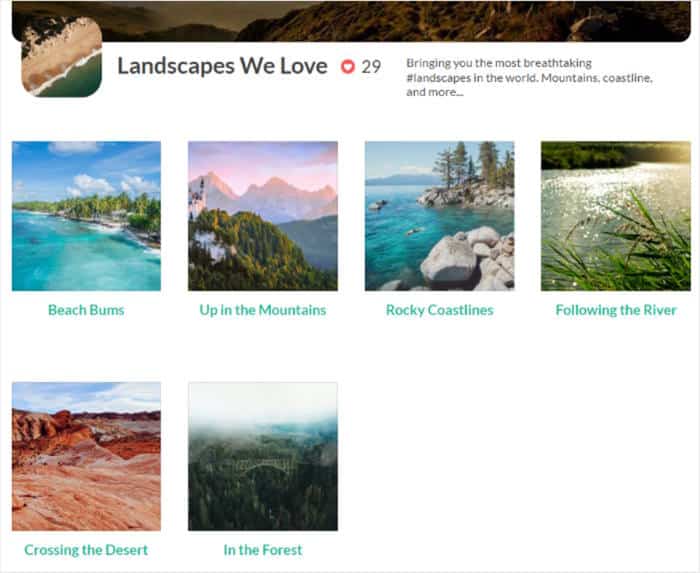
The next option is the grid layout, where your Facebook posts will appear in rows and columns.
If you want to show lots of Facebook photos and videos at once, this can be the option for you.
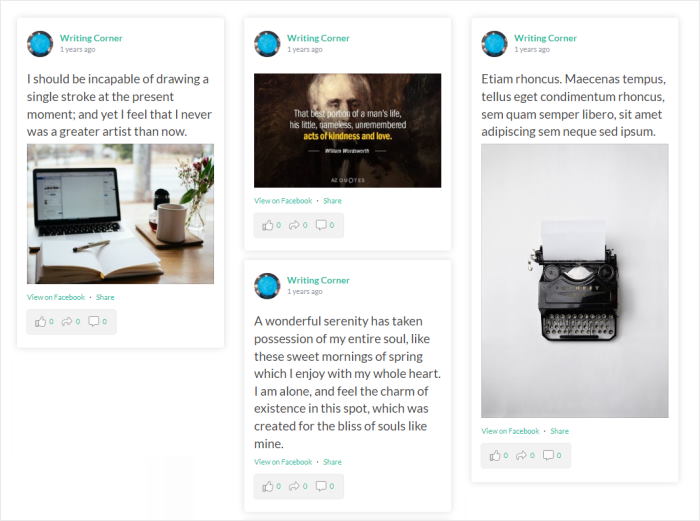
If you want to show your Facebook content in different columns, you can go for the masonry layout.
Want to get visitors to interact with your website? You’ve got the carousel layout that will put your posts in a Facebook carousel slider.
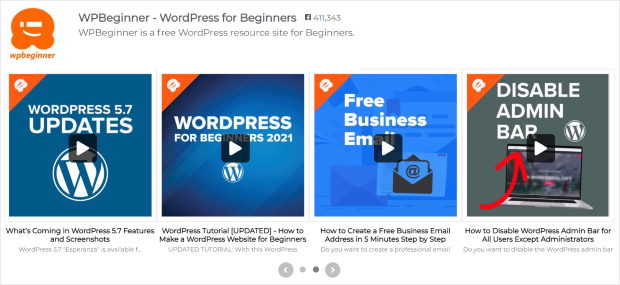
Finally, click on the Save button to save your new layout.
After that, you can just use the Customize button to go back and see the rest of the customization options.
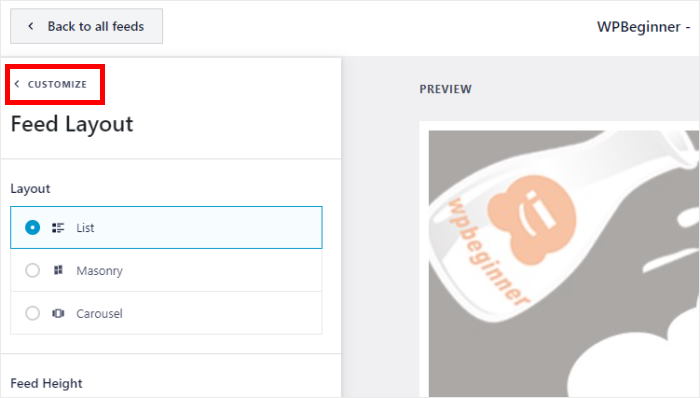
Next, you can set the header for your Facebook Divi feed using the live feed editor.
Click on the Header option on the left to get started.
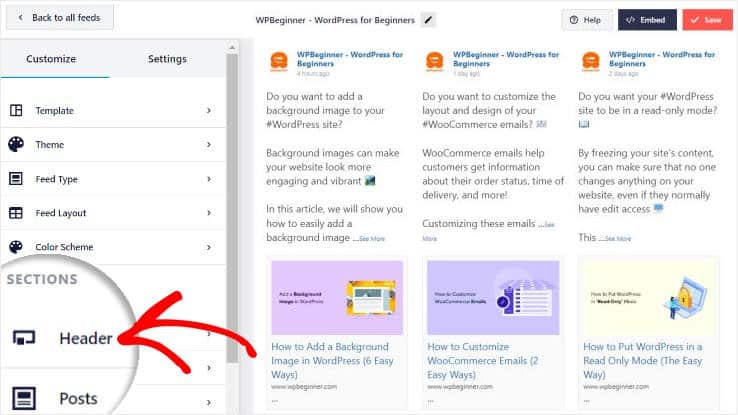
Once you do that, you can see the option to Enable or Disable your header.
Below that, Facebook Feed Pro gives you 2 header options to choose from:
- Visual: Show your cover photo, profile picture, and some more information about your group or page
- Text: Write a custom heading to show at the top of your social media feed instead
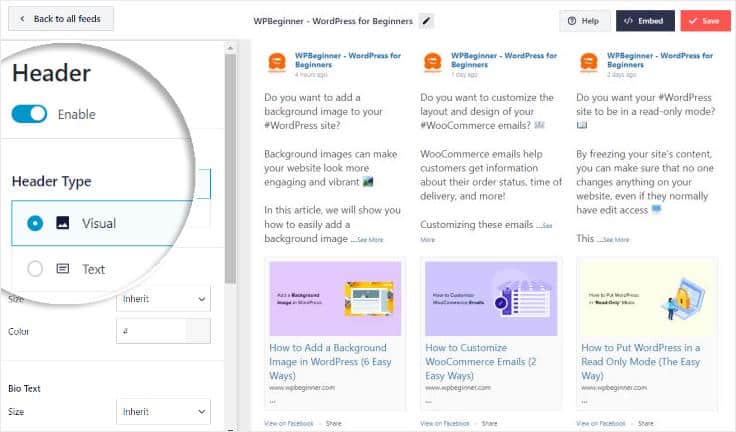
Like before, you can click on Save once you choose the design of your header.
You can now go ahead and customize the rest of your feed, including the header style, post elements, post layout, feed margins, background, like box, and much more here.
Step 5: Embed Facebook Feed on Your Divi WordPress Site
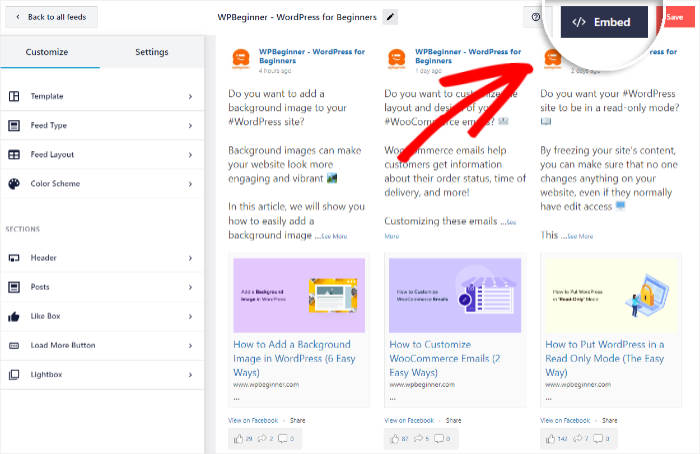
It’s pretty easy to embed Facebook posts on your site using your live feed editor. First, click on the Embed button in the top right corner.
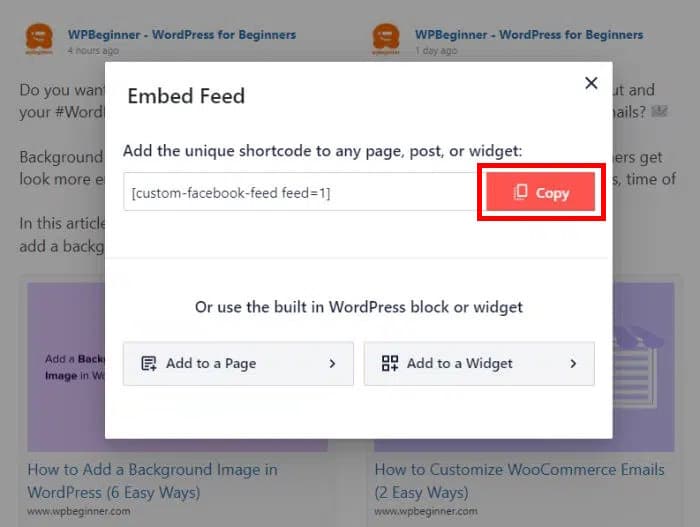
Now, you can see a popup that contains the unique shortcode of your feed. To continue, just click on the Copy button.
You can use this code to embed this feed in your WordPress Divi site, so remember to copy it properly.
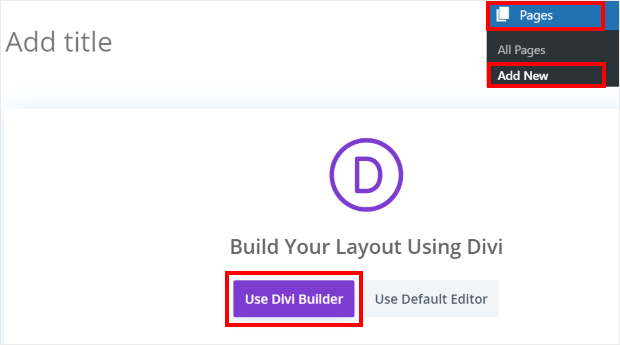
After that, you can go to Pages » Add New from your dashboard to create a new WordPress page.
On the new page, click on the Use Divi Builder button.
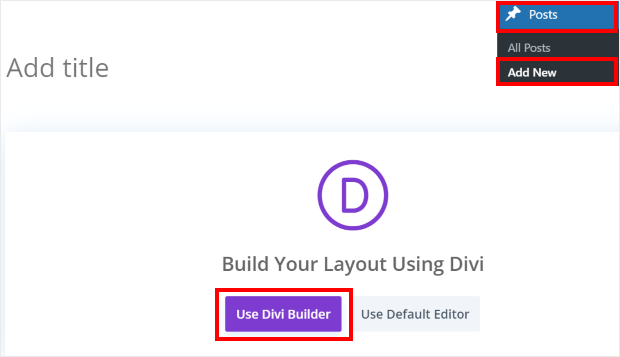
You can also use a WordPress post for this. From your dashboard, go to Posts » Add New and then select Use Divi Builder.
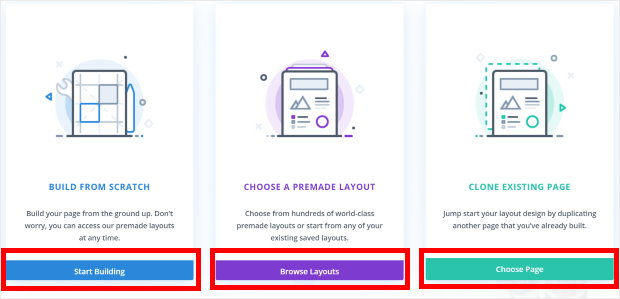
Now that you have the Divi builder open, you have 3 options:
- Start Building: Start creating your page from scratch
- Browse Layouts: Import the design of a pre-built layout
- Choose Page: Copy the design of an existing page
Just click on either of the three options to proceed here.
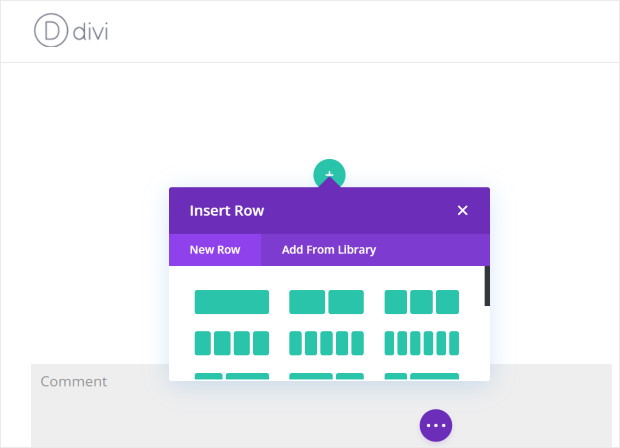
The Start Building option will show you a blank page.
From here, you can start editing your Divi post or page right away.
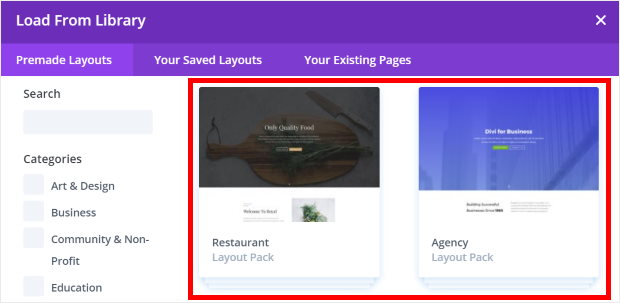
With the Browse Layouts option, you will see a new popup where you can browse all of your available page layouts.
If you see a layout you like, you can just click on it.
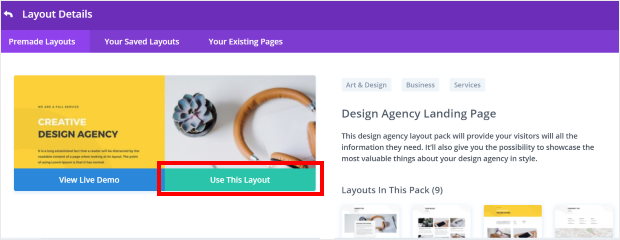
Once you do that, you can see the Layout Details popup. If you see a layout that you want to use, click on Use This Layout.
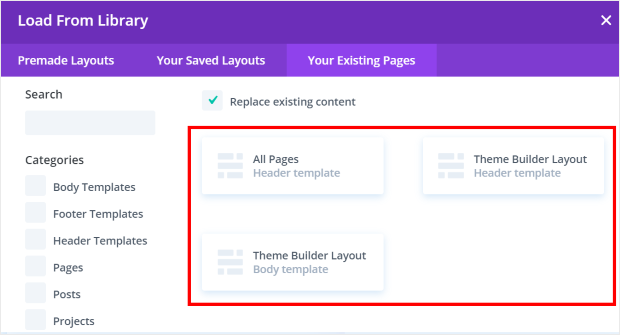
If you go with the Choose Page option, you can see a popup with all the existing page layouts listed.
So. you can click on any of these page layouts to continue.
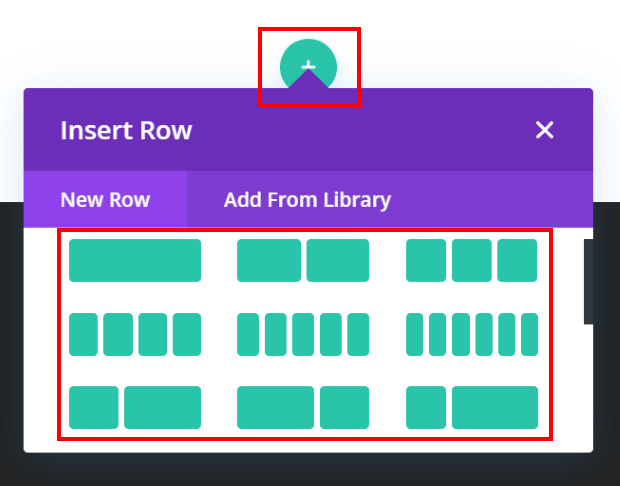
Now, you can add your Smash Balloon Facebook feed to the Divi builder. For that, you need to click on the small green plus icon (+) to open the Insert Row popup.
Next, click on the type of row you prefer from the options on the popup.
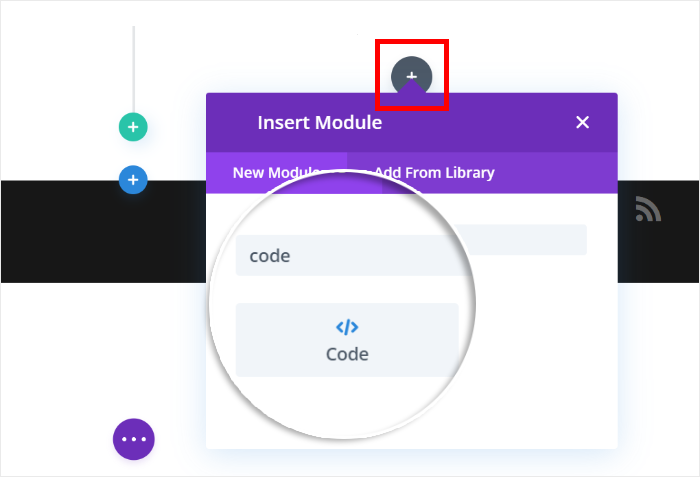
After you’ve selected the row, click on the plus icon (+) to add a new Divi module.
On the new popup, type in “code” in the search bar to find the code module and then click on it.
After that, just go to the code field and paste the code from earlier, which allows you to embed Facebook feeds on this WordPress Divi site.
Finally, click on the check icon at the bottom.
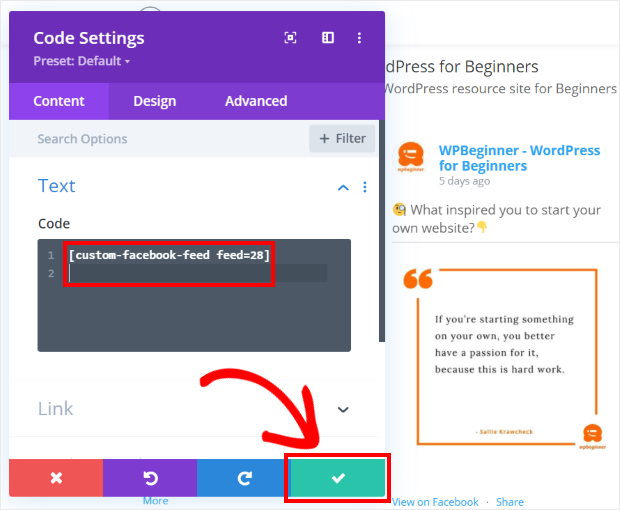
You’ve now successfully added a Facebook feed to your Divi WordPress site. As one of the best Facebook plugins for WordPress, Facebook Feed Pro lets you do this in just a few clicks.
If you open your website, you can see how the Facebook content looks to your website visitors.
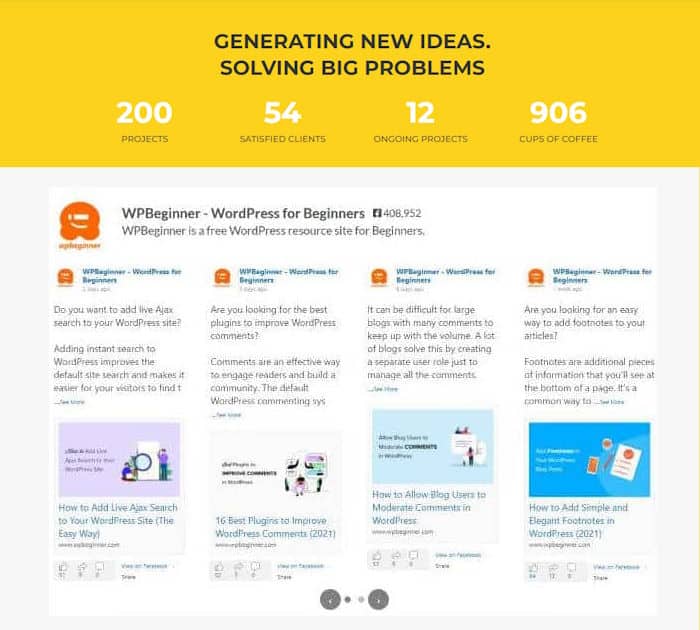
And there you go!
Now you know how to add a Facebook feed to a Divi WordPress site. Just follow the steps and you can engage your visitors with relevant Facebook content in no time.
Using Facebook Feed Pro, you can create, customize, and add custom social feeds that can help you boost your engagement, get more conversions, and market your brand.
And you can do all that in 5 simple steps:
- Add Facebook Feed Pro to your website
- Create a new Facebook feed
- Connect the feed to your Facebook page
- Pick your theme, template, and design
- Add the feed to any Divi page you like
Ready to give it a shot? Get your copy of Facebook Feed Pro today!
Want to use Twitter with Divi as well? Then check out our guide on how to add Twitter Divi feeds to your website.
More Social Media Marketing Tutorials and Guides
- How to Schedule a Facebook Post Easily (Step-by-Step Guide)
- Best Link in Bio Tools for Instagram to Grow Your Followers
- Best Page Builder Plugins For Your WordPress Site (Handpicked)
- Reasons Why Your YouTube Shorts Are Not Getting Views [+ What You Should Do]
- Best Social Media Plugins for WordPress (Expert Picks)
