We can all agree that creating Instagram Reels is a lot of hard work.
So, you can imagine how much it stung when I posted a video only to get a handful of views.
After some investigation, I figured out the problem: none of my followers were online when I posted the video.
There’s just so much content out there that it’s easy to get lost if you can’t immediately grab people’s attention. So, I just had to schedule the reels and my problem was fixed.
Today, I’ll show you the super easy method I used to schedule my Instagram Reels in just minutes.
How to Schedule Your Instagram Reels (Easy Way)
I’ve created a step-by-step guide that’ll take you through the whole process of scheduling your reels.
Let’s get started:
Step 1: Create a ClickSocial Account
The first step is to get a social scheduling tool that supports Instagram.
While there are many options out there, the one I prefer is ClickSocial.
The biggest plus point of this tool is that you can schedule posts directly from your website. The whole process is also pretty quick since it comes with one-click scheduling.
So, just open ClickSocial on your browser and click on the Sign Up button.
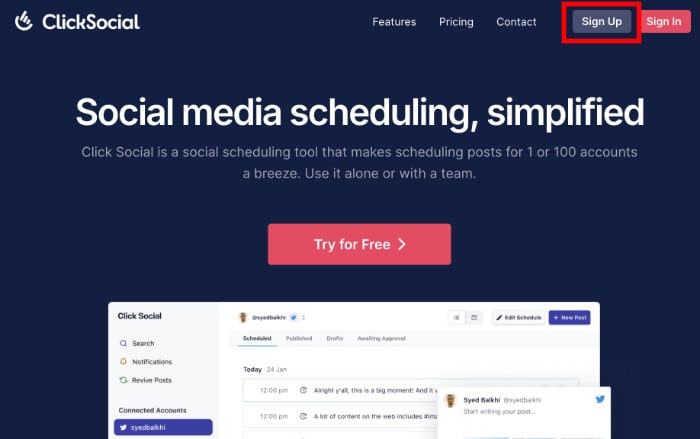
The signup process is pretty quick, which is another plus point of the plugin.
After you’ve done that, return to your website and open the Plugins » Add New Plugin menu.
Now, look for the “ClickSocial” plugin using the search bar at the top.
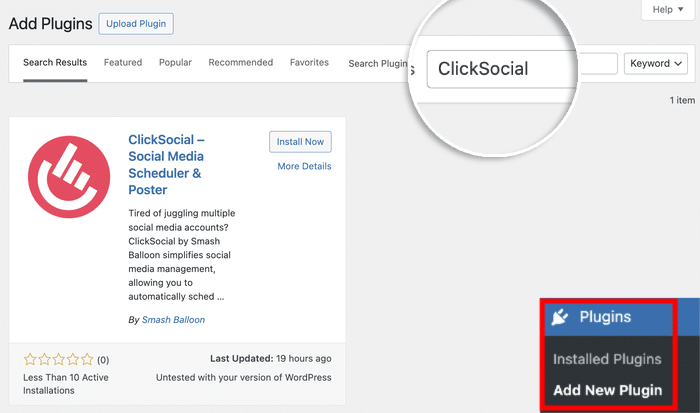
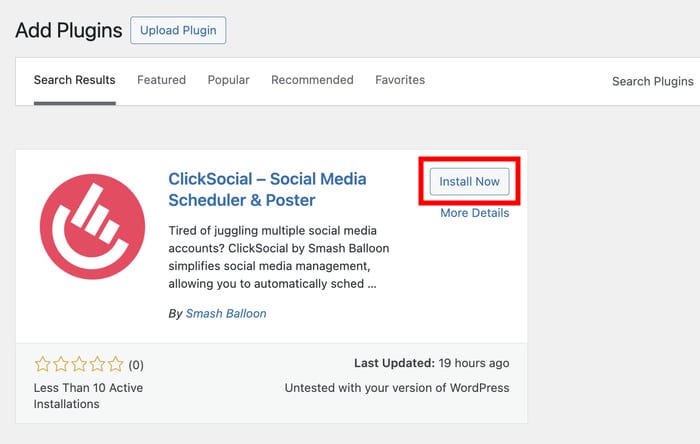
Once you see the plugin in the search results, click on the Install Now button.
Then wait a few seconds for the plugin to finish installing. Finally, you can Activate it.
Step 2: Connect Your Website to ClickSocial
Before you can start scheduling Instagram Reels from your site, you’ll need to connect it to ClickSocial.
I was a bit intimidated at first, but it turned out to be pretty simple. I just had to generate a unique key (known as API key) and add it to my website.
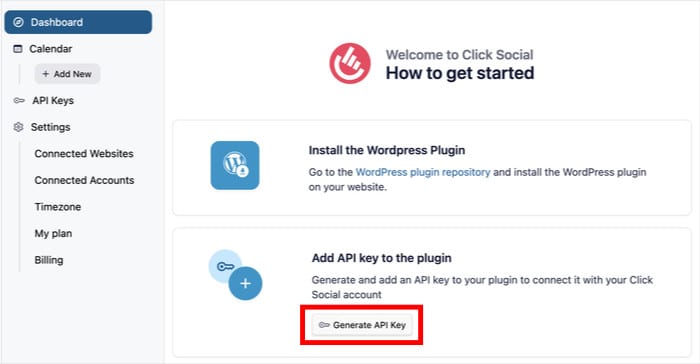
First, go back to your ClickSocial dashboard and select the Generate API Key option.
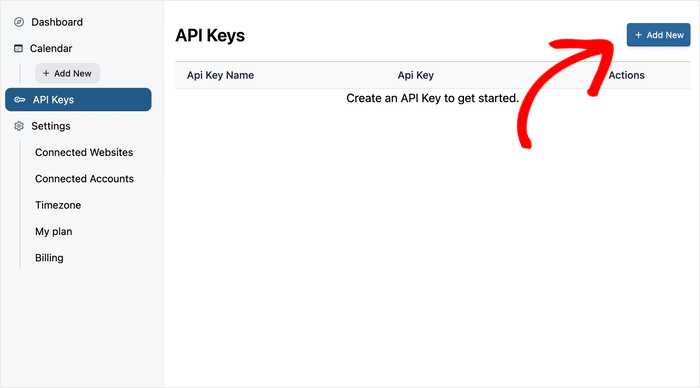
Once you start connecting your sites to ClickSocial, they’ll be listed here.
But for now, you can just click on the Add Now button at the top.
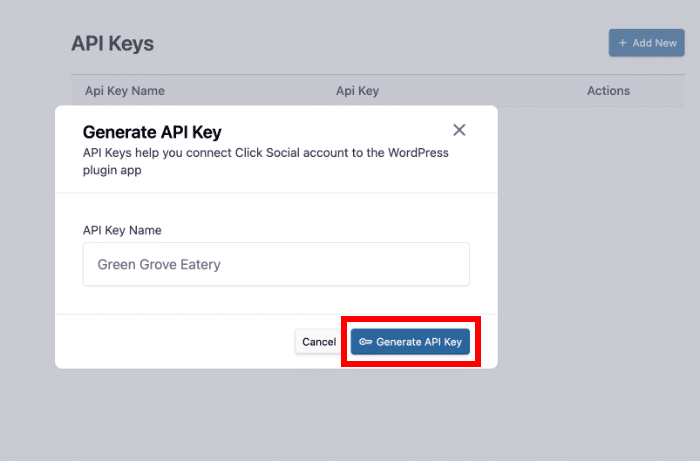
Now, you can choose a label for your API key.
I was tempted to add a funny label here, but to avoid confusion, I just used the name of my website.
Finally, hit the Generate API Key button below.
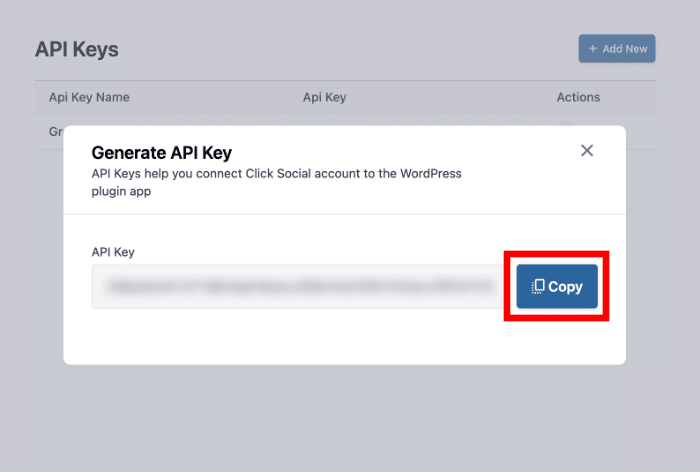
Just like that, ClickSocial will create a unique API key for your website. This key is super important, so remember to keep it safe.
To continue, click on the Copy button.
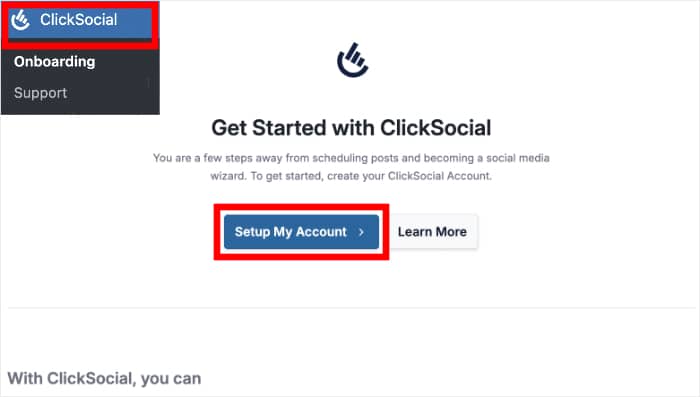
After that, return to your website and click on the ClickSocial.
Next, click on the Setup My Account button on the dashboard.
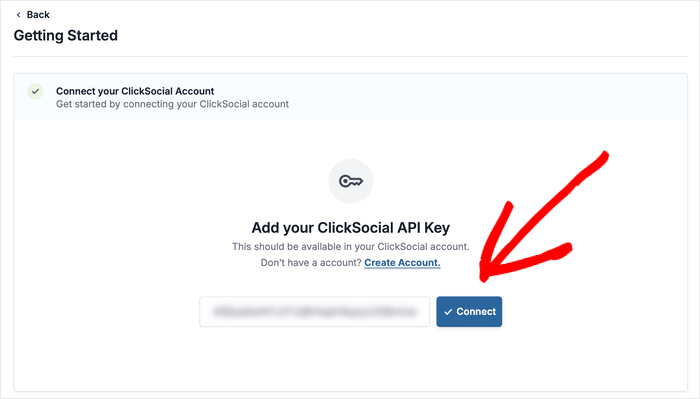
You can then paste your API key into the field here.
Finally, click on Connect and your website will be connected to ClickSocial.
Step 3: Connect Your Instagram Account
In this step, you can connect your Instagram account, so your website is ready to start scheduling posts.
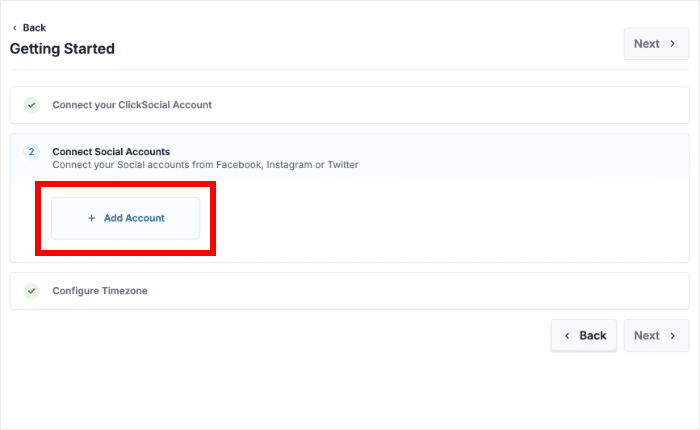
It’s a click and easy process, in my opinion. Just click on the Add Account button to get started.
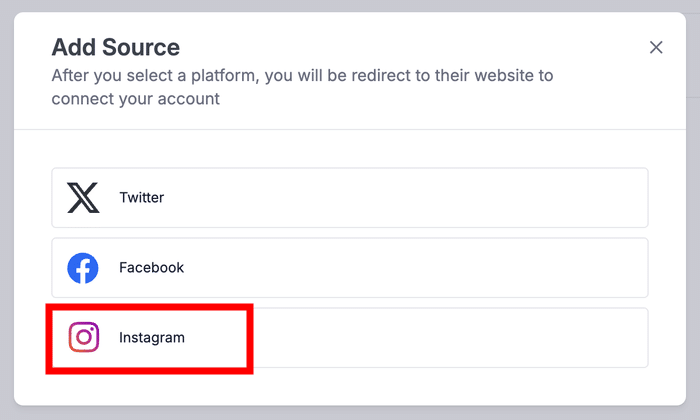
After that, ClickSocial asked me to pick the social platform that I wanted to use:
- Twitter/X
The process is the same for any of these platforms, but let’s select Instagram for now.
Now, ClickSocial will open Facebook on your browser so you can connect this plugin to your Instagram account.
Important: To schedule Instagram Reels, you’ll need to connect your Instagram account to Facebook. It’s pretty easy, so you can check out this quick guide to learn how.
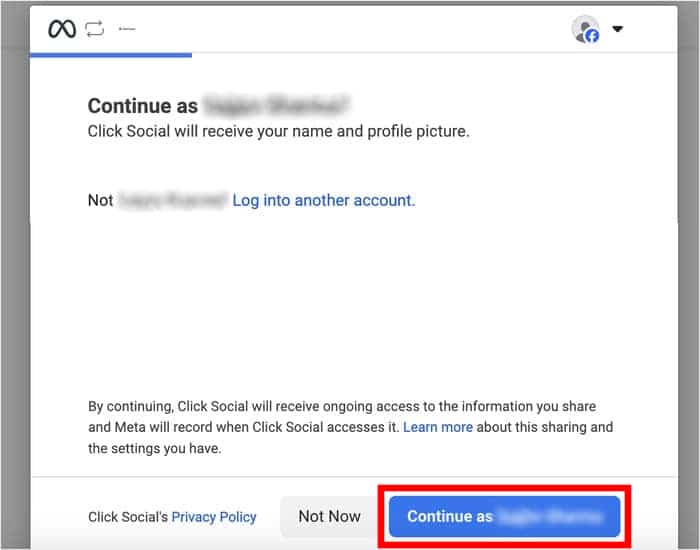
Once you’re on Facebook, select the profile that you’ve connected to Instagram and click on Continue.
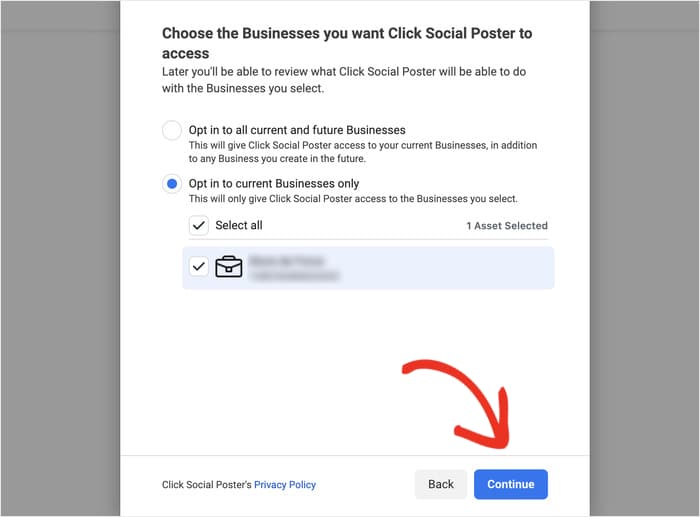
Now, you can see all the business that you’ve connected to this Facebook account.
Select the one which is linked to your Instagram and click on Continue.
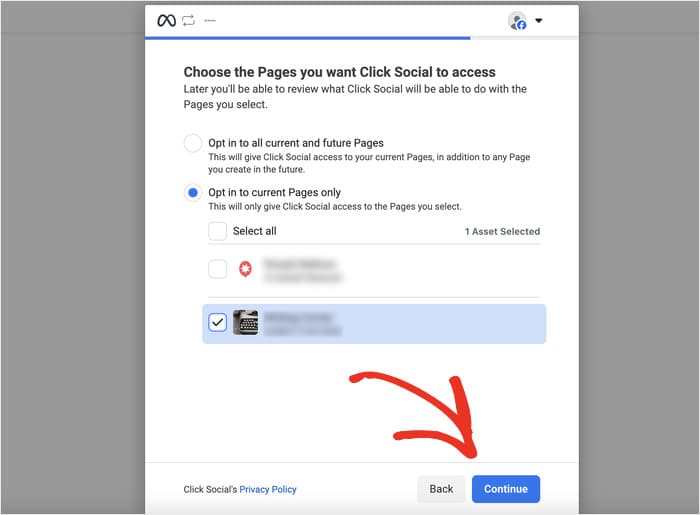
After that, the popup will show a list of Facebook pages associated with your account.
Select the page that you’ve linked to Instagram and click on Continue.
You can just select the page you’ve linked to Instagram and hit the Continue button.
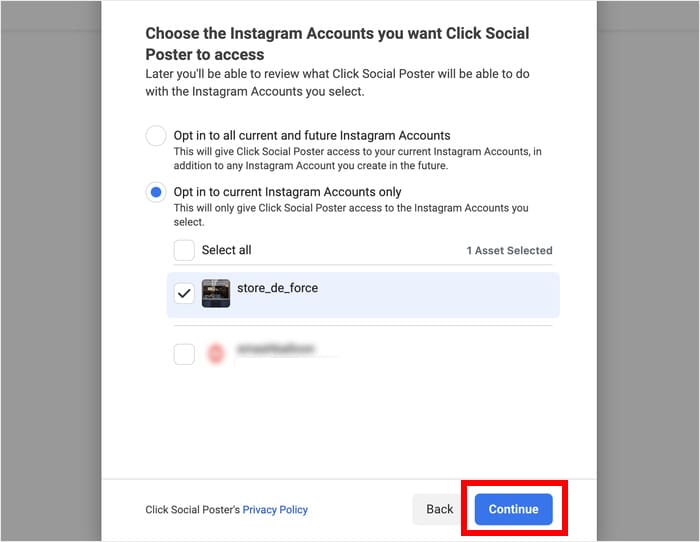
Then you’ll see a list of Instagram accounts that you’ve connected to Facebook.
So, you can pick your account here and (you guessed it!) click on Continue.
With that, your website is connected to Instagram.
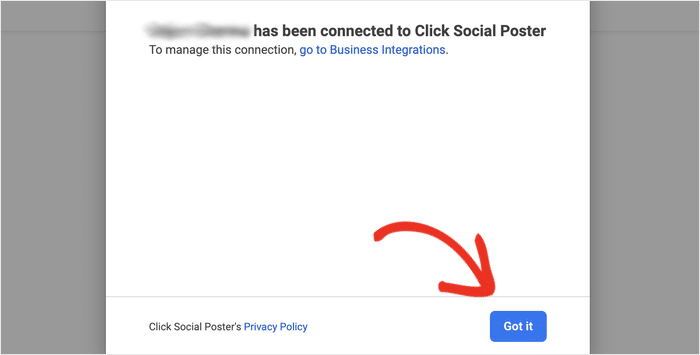
You can click on Got it and the plugin will redirect you back to your page.
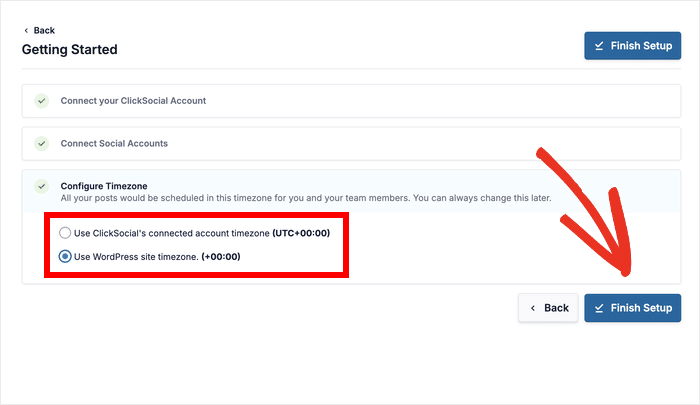
As a sidenote, the plugin also asked me to select a timezone option for ClickSocial:
- Use ClickSocial’s connected account timezone
- Use WordPress site timezone
Since I use the same time zone for both, it’s not really a big deal for me.
But if you’re using separate time zones on WordPress and Instagram, select an option here and click on Finish Setup.
Step 4: Set Up Your Post Calendar
Just like that, you’re ready to start using ClickSocial.
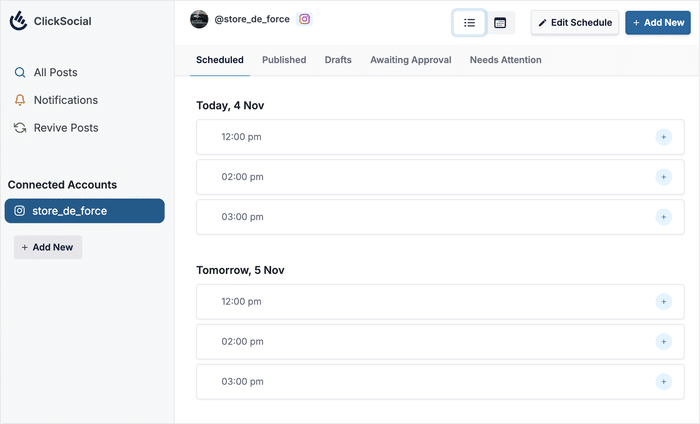
First, the plugin will send you to the post calendar. This is where you can check your scheduled and published Instagram content.
You can also check on your drafts or posts that need approval using the tabs at the top.
While you can schedule posts to go online at any time you like, you can create a posting schedule to make things easier.
For example, let’s say my followers are online at 10 AM on weekdays. So, I can create a schedule for Monday-Friday with a time slot at 10 AM.
That way, I can simply select the slot with a single click instead of manually setting the time each time.
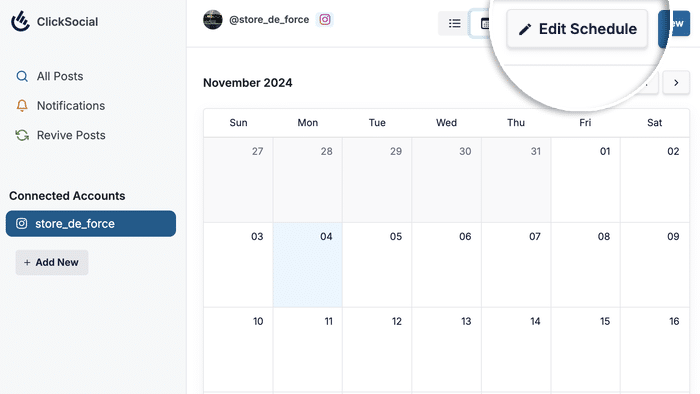
To create your schedule, click on the Edit Schedule button at the top.
Like I mentioned earlier, you can choose the days and time slots where you can schedule your posts.
First, use the checkboxes and pick the days where you regularly post new Instagram Reels.
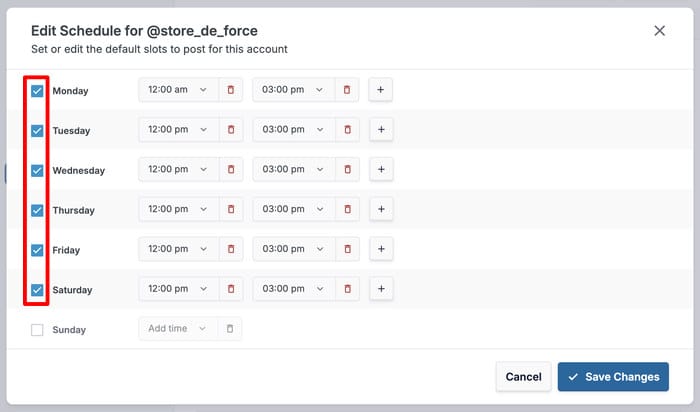
After that, you can edit the time slots for each of these days by using the dropdown menu on the right.
Once you select a new time, click on the check icon.
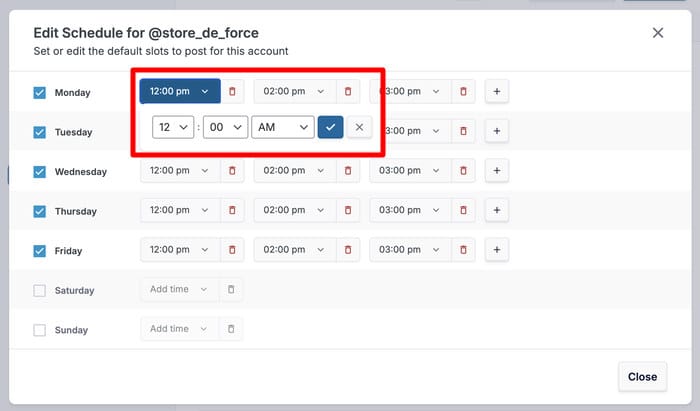
You can also remove a slot by clicking on the red trash icon, and add slots by clicking on the plus (+) icon.
Just like that, create a posting schedule that fits your audience’s habits.
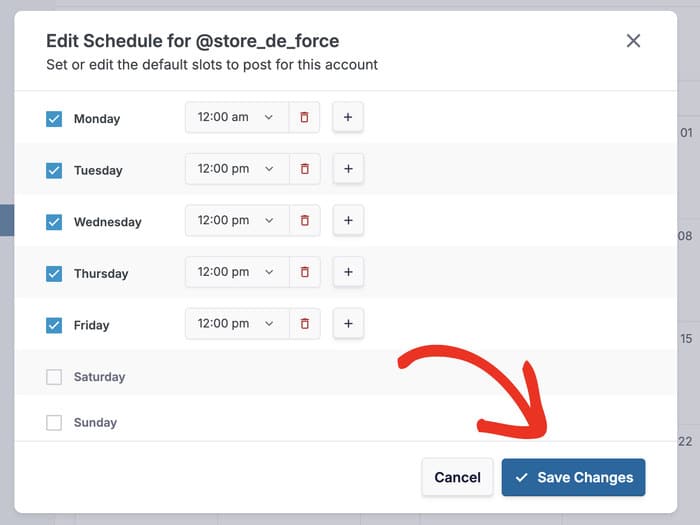
Then click on the Save Changes button once you’re done.
Step 5: Schedule Your Instagram Reel
Finally, it’s time to schedule your Instagram Reel directly from your WordPress dashboard.
You can start by clicking on the Add New button at the top.
Or you can scroll down to find a time slot and click on the plus (+) icon on the right.
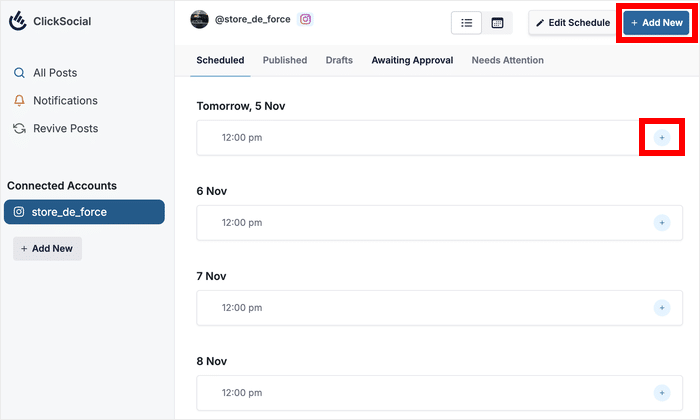
Doing that opens the post composer where you can draft your Instagram content. This is also the same composer where you can create your tweets or Facebook posts.
Using the text box here, you can enter the caption for your Instagram reel.
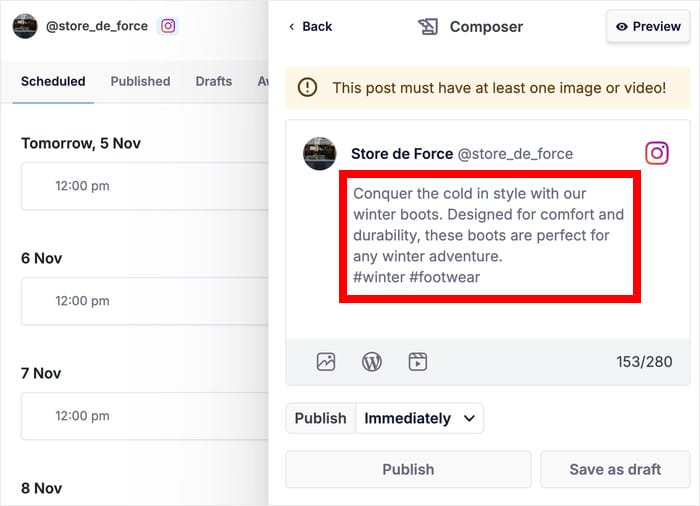
After you’ve added the caption, you can choose from 3 types of content to add to your post:
- Photo
- WordPress Post
- Video
To add media to this post, you can click on the Photo or Video icon and select the item from the media library.
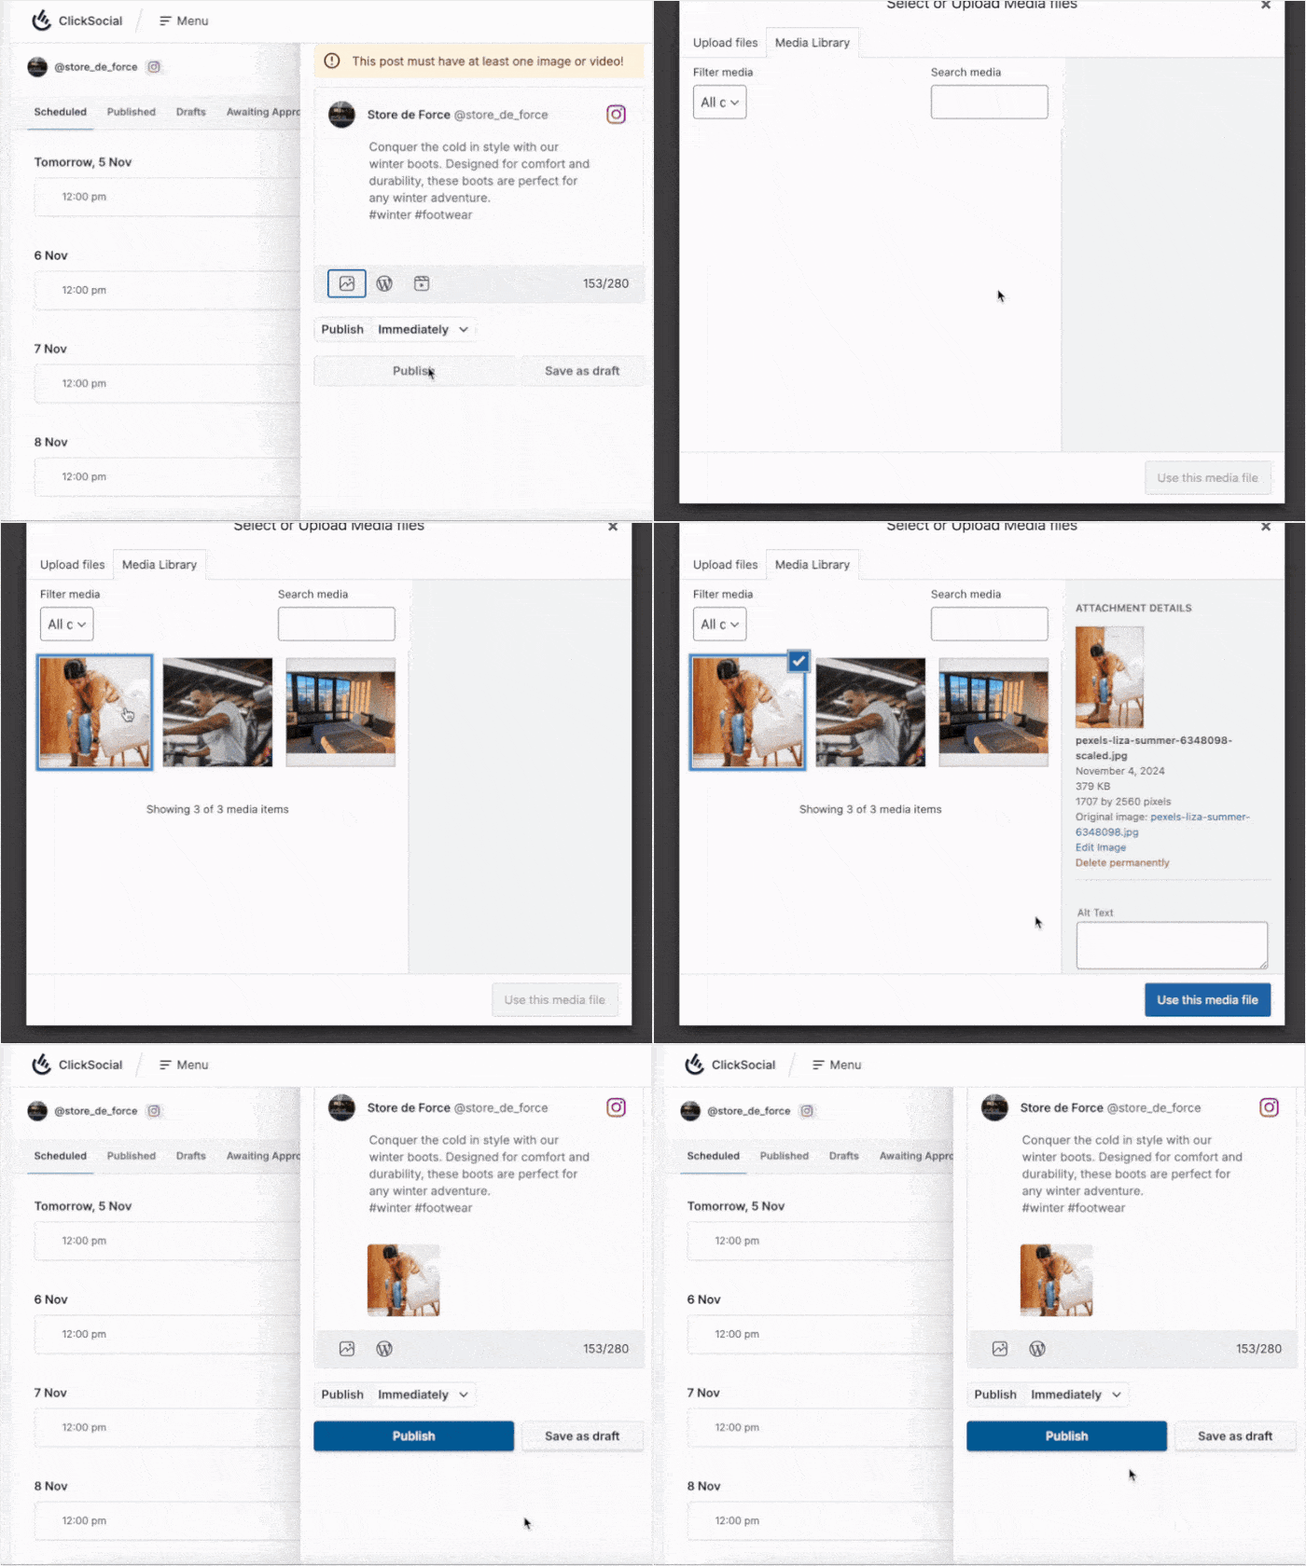
You can also link WordPress posts with ease from here, and it’s a great way to drive more traffic to your website.
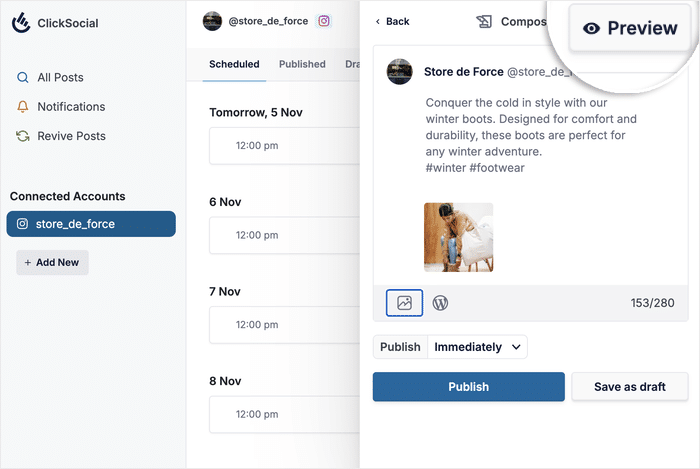
Once you’re done drafting your post, you can check how it looks by clicking on Preview.
After you do that, let’s get to the main event and schedule this Instagram post.
First, look below the post composer and click on the dropdown menu.
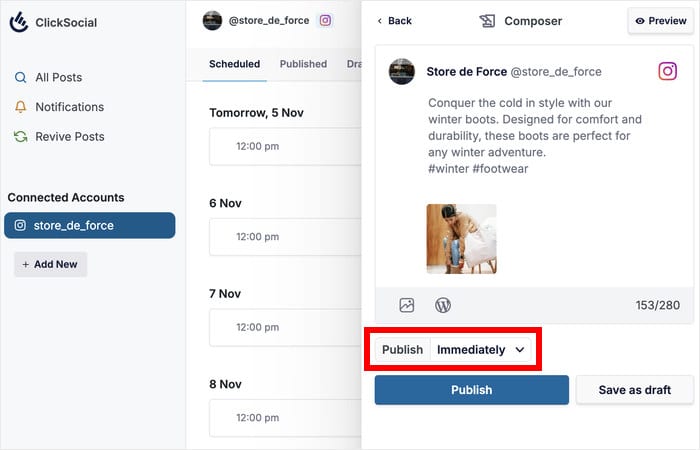
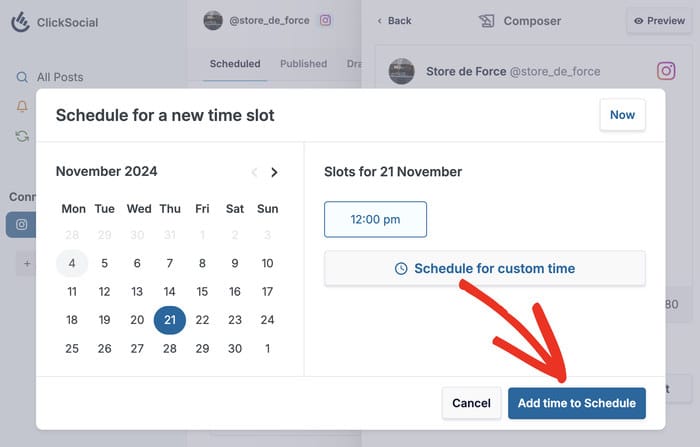
Now, you’ll see the post schedule that we created earlier. You can click on Schedule for custom time and manually pick any time and day you like.
To save some time, you can simply pick a day on the left and select the time slot on the right.
After you do that, click on the Add time to Schedule button on the popup.
Finally, you can click on the Schedule Post button and ClickSocial handle the rest.
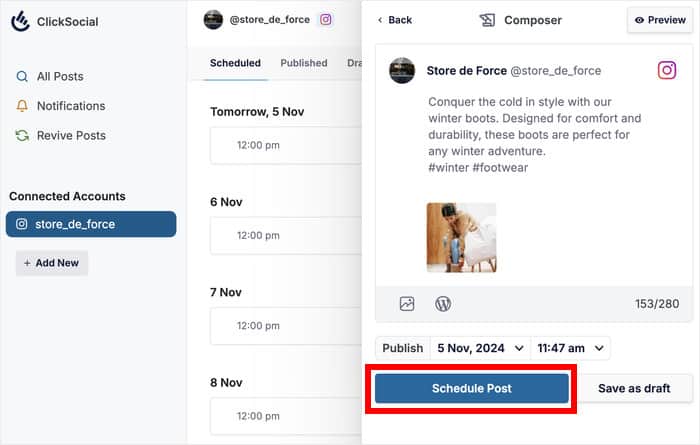
You can use the post calendar from earlier to keep track of this post if you like. Once your selected time arrives, the plugin will automatically schedule the post.
And that’s it!
It’s pretty easy to schedule Instagram content, right? Plus, this method works for Instagram photos, reels, tweets, Facebook posts, and more.
Just remember to keep focusing on content quality, and people will keep coming back to your Instagram profile for more videos.
If you want to schedule Instagram Reels with ease, get your copy of ClickSocial here!
To get even more views for your reels, check how this guide on how to embed Instagram Reels on your WordPress website.
More Social Media Hacks & Tutorials
- How to Schedule Instagram Posts on WordPress (Easy Guide)
- Best WordPress Social Media Plugins that Pro Marketers Swear By
- How to Schedule a Facebook Post Easily (Step-by-Step Guide)
- Reasons Why You Should NEVER Buy Instagram Reel Views (+ What to Do Instead)
- How to Get More Views on Reels: Proven Instagram Tips
