Do you want to learn how to create a contact form in WordPress?
If you want to communicate with your visitors, a contact form is a must-have for your website. With it, you can receive feedback, provide customer support, answer questions, and more.
In this post, I’ll show you the easiest way to make a contact form for your WordPress site.
In This Article
- Why Add a Contact Form to WordPress?
- Easiest Way to Add a Contact Form in WordPress
- How to Create a Contact Form in WordPress
- Bonus Tip: Add a "Contact Us" Form Widget 🌟
Why Add a Contact Form to WordPress?
If you were wondering why contact forms are important, the answer is simple.
Using a contact form, your visitors can easily reach out to you directly from your website. That way, your customers can easily ask questions, get customer support, provide feedback, and a whole lot more.
Since they can easily reach you this way, this stops your potential customers from leaving your site and going to your competitors.
That’s just the start. Here are a few more amazing ways contact forms can help your site.
- Fast Communication: When people fill up a contact form, the information is instantly sent to you. Then, you can quickly reach out to them as soon as you’re available.
- Important Data: In a phone call or email, people might not give you the information you need. But with a contact form, you can let people know exactly what information you want.
- Spam Protection: You can also block spam bots from using the contact forms. So, you don’t need to wade through spam messages to discover the necessary information.
- Lead Generation: Based on our social media marketing statistics, over 70% of your visitors will leave your site and never return. But with a contact form, you can collect their information and add them to your email marketing list.
- Organized Data: As soon as people submit the contact form, the data will automatically be divided into different categories. This saves you the time of manually organizing the data.
And there’s a lot more you can do with contact forms on your website.
Easy communication means you can keep your visitors engaged, provide better customer support, reach potential customers for marketing, and so much more.
Now, let’s go ahead and take a look at the easiest way to create a contact form in WordPress.
Easiest Way to Add a Contact Form in WordPress
Forget about creating contact forms from scratch. With WordPress, all you need is a contact form plugin, and you can build your forms with ease.
When it comes to plugins for contact forms, there are a ton of options available online. However, the best one of the bunch has to be WPForms.

As the best WordPress form plugin in the market, WPForms helps you build engaging contact forms for your WordPress site in just a few minutes — no coding needed.
On top of being user-friendly, WPForms is packed with a ton of great features to help you build high-converting contact forms. In fact, here are a few highlights:
- Drag and Drop Builder: Using the simple drag and drop builder, you can quickly create your contact forms even if you’re a WordPress newbie.
- Pre-Built Templates: You can just grab a ready-made template, edit it with the drag-and-drop builder, and have a contact form ready to go in minutes.
- Multi-Page Forms: To make longer forms more engaging, WPForms allows you to divide them into different pages.
- Smart Conditional Logic: With WPForms, you can create smart forms that show or hide fields depending on the person’s choices. So, you can make shorter forms that only have the necessary fields.
- File Upload Feature: No need to download a separate file upload plugin — WPForms lets your visitors upload files directly from your site.
- Payment Support: Your visitors can even use Paypal or Stripe to make payments using your forms. As a result, you can have convenient order forms on your website.
And that’s just the start. WPForms is an all-in-one solution for building forms on your WordPress site. With over 6 million satisfied users, it’s easily the best contact form plugin in the market.
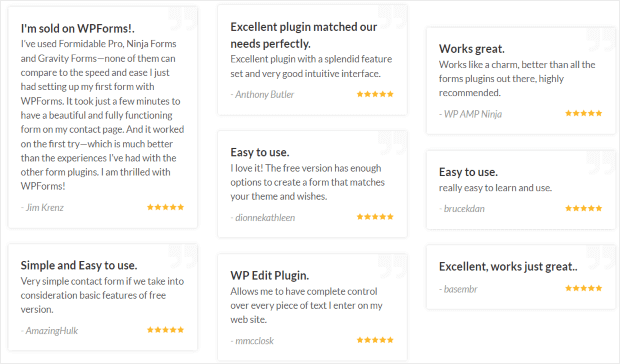
Want to find out more? You can just take a look at our in-depth review of WPForms here.
With that, let’s move on and see how you can create your contact form in WordPress.
How to Create a Contact Form in WordPress
Using WPForms, you can easily build your contact form in just 5 steps. Let’s get started and go through the steps below:
Step 1: Download and Install the WPForms WordPress Plugin
First of all, you can get your copy of WPForms here. Once you have the plugin, you can just install and activate it on your website.
Not sure how that’s done? Just check out this simple guide on how to install WordPress plugins.
After that, you can move on to step 2, where you create your new contact form.
Step 2: Create a New Contact Form
Now, you can create a new contact form for your site. To do that, first, go to WPForms » Add New from your WordPress dashboard.
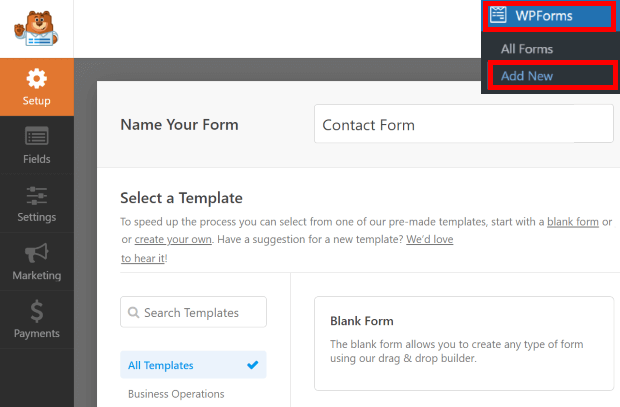
In the next screen, you can select the template for your new form. To continue, just scroll down and go to the Simple Contact Form option.
When your mouse is hovering over the option, just click on Use Template.
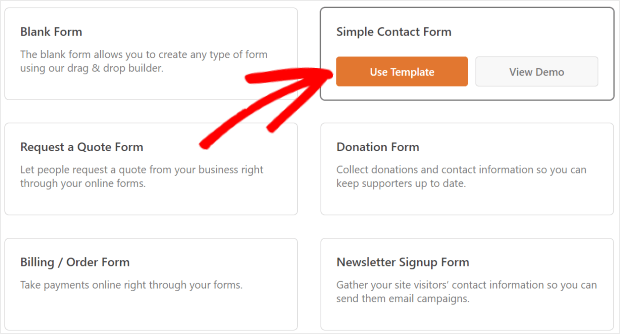
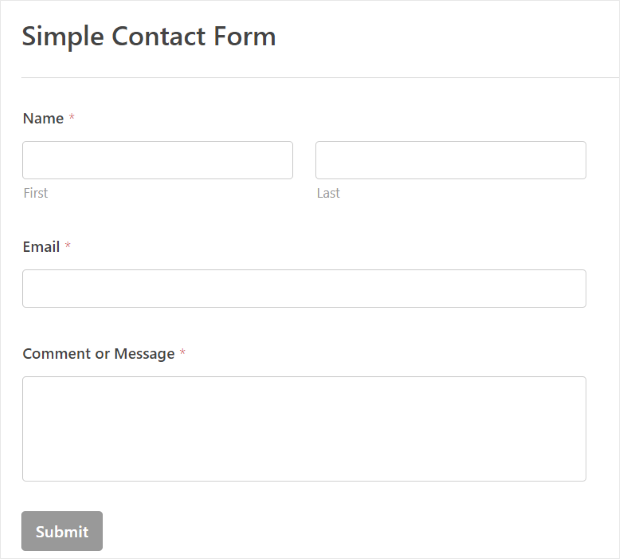
Once you do that, WPForms automatically creates a simple contact form for you.
Now you now have a new contact form on your site. On it, you get 3 custom fields where people can enter their information:
- Name field: First and last names of your visitor
- Email field: The email address of the person
- Comment or Message field: A place to enter a message
Below that, you have the Submit Button that your visitors can press to submit their contact form.
After that, it’s time to go to step 3 where you can add all the custom fields you need on the contact form.
Step 3: Add Your Custom Fields
Now that you’ve created your contact form, you need to add new custom fields where visitors can enter their information.
When using WPForms, I love the fact that I can easily do this using WPForm’s simple drag-and-drop editor.
On the left panel, you can find the different custom fields. And on the right, you can see your new contact form.
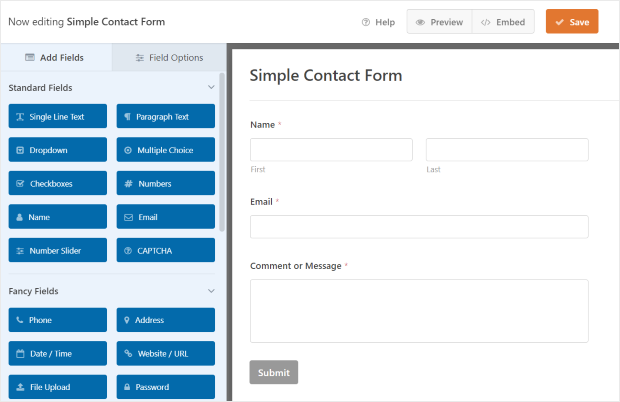
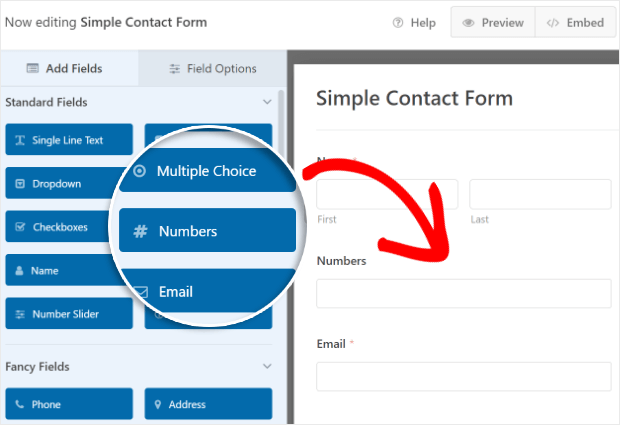
Just pick a field that you want from the left and then drag and drop it on your contact form on the right.
For this tutorial, we’ll add the Numbers field to collect the phone numbers of your users.
After that, you can change the options for your new custom field.
To do that, just click on the new field. You’ll then see the options on the left panel.
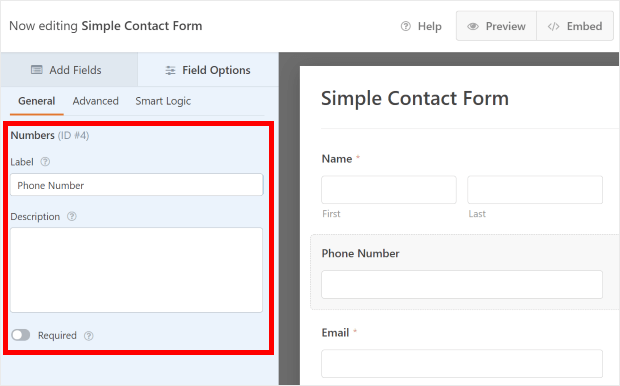
Using the Label field, you can change the text that appears on the field.
Below that, you have the Description field that you can use to show more information about the field.
Finally, you can toggle the Required option below to change whether the user has to complete the field or not.
You’ll get different options here for other types of custom fields. Once you’ve changed these options, click on the Advanced tab at the top of the left panel.
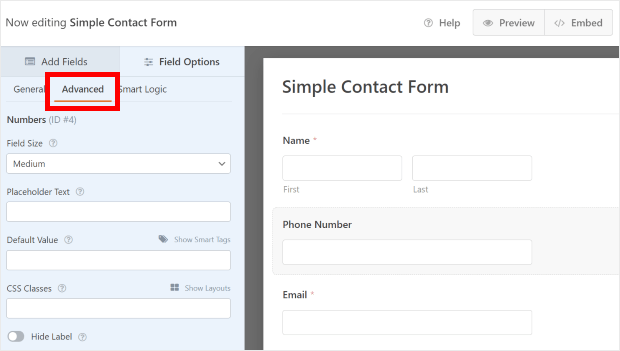
Here, you can change the advanced options for your field. The options here are:
- Field Size: Choose the size of the field on the screen
- Placeholder Text: Add a bit of text that appears before the user fills the custom field
- Default Value: Select what value the field would have if the user doesn’t fill it
- CSS Classes: Customize the field even further using CSS codes
- Hide Label: Choose to show or hide the label of the field
After you’ve changed the advanced settings, you can click on the Smart Logic tab.
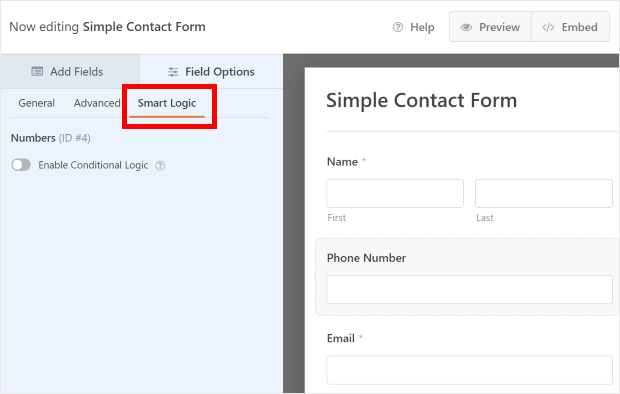
Here, you can enable Conditional Logic for your field. You can then hide or show your field depending on the answer of another field on the contact form.
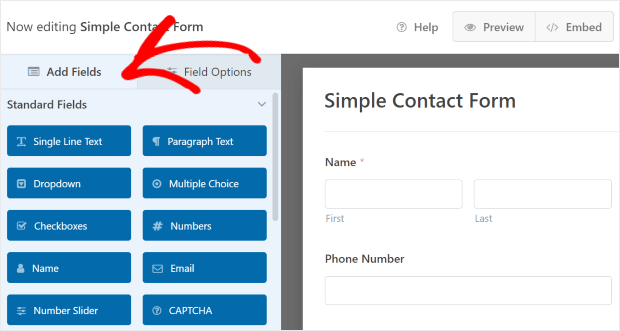
Then, you can just click on the Add Fields button to continue adding more custom fields to your new contact form.
Finally, you can click on the Save button on the top right once you’re done adding custom fields.
After that, it’s time to go to step 4, where you change the settings for the contact form.
Step 4: Change the Settings for Your Form
The next step after adding your custom fields is to change the settings of your new contact form.
First, click on the Settings button on the left to open your settings page.
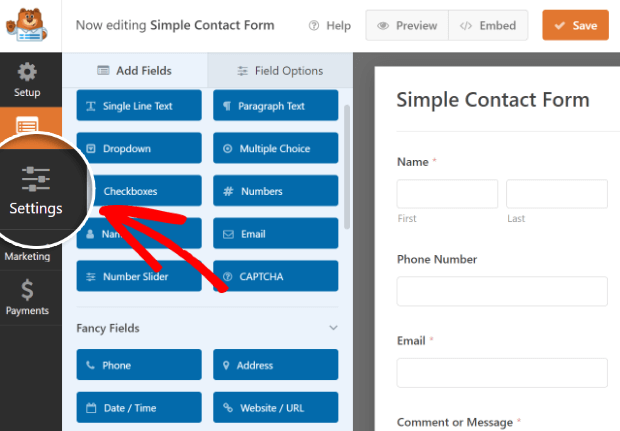
On this page, you’ll see the General Settings for your new contact form. With it, you can set up these:
- Form Name: The name of your new contact form
- Form Description: A basic description of what the contact form does
- Submit Button Text: The label that appears on the submit button of the contact form
- Submit Button Processing Text: The label that appears on the submit button when the form is processing
- Enable anti-spam protection: Enable or disable protection from spam bots for your form

After you enter your settings here, click on the Save button.
Then, go to the Notifications options on the left to check out the other settings.
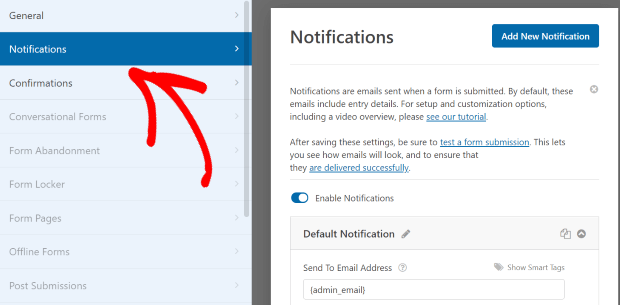
Here, you can change the email notifications that you get when someone submits the form.
First, you can use the Enable Notifications toggle to set whether or not you receive these notifications.
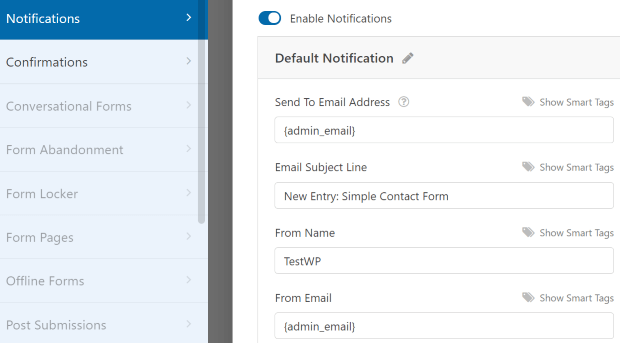
Under that, you can change the details for your notifications:
- Sent to Email Address: The email address that receives these notifications
- Email Subject Line: The subject line for your contact form notification emails
- From Name: The sender’s name for your notification emails
- From Email: The email address that sends your notification emails
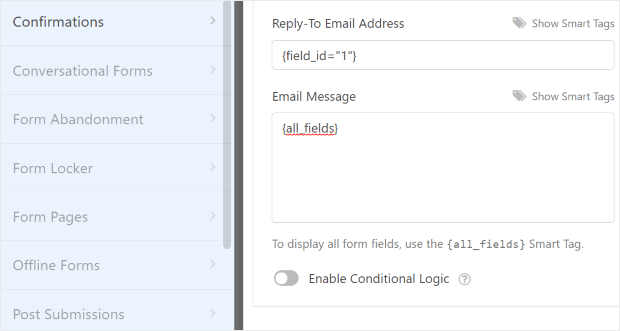
If you scroll down, you can find the Reply-To Email Address field. Using this, you can choose the email address that’ll receive the replies to your notification emails.
After that, you can change the contents of the notification emails using the Email Message field. If you leave it as it is, the email notifications will show you the information from the contact form.
Finally, you have the option to Enable Conditional Logic for the emails.
Using that option, you can set your contact form to only send the notification emails if certain custom fields are filled in a specific way.
Once you’ve set these options, click on the Save button.
You can then go to the Confirmations option on the left to change the next settings.
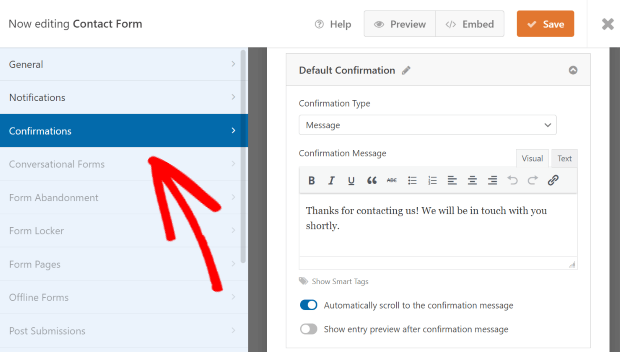
Using these settings, you can change the message your viewers get when they complete the contact form.
Just add in the message you like in the Confirmation Message field and then click on Save.
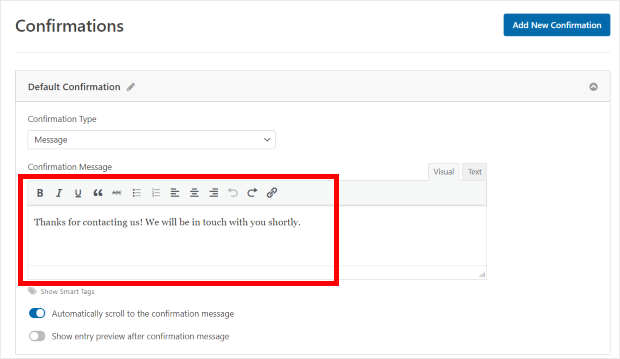
And just like that, you’ve created a new contact form and then properly set it up.
Your next step is to go ahead and finally add the contact form on your WordPress site.
Step 5: Add the Contact Form to Your Website
Finally, you can embed the contact form on your WordPress website.
There are 2 ways you can do that:
- Add the contact form to your WordPress page
- Add the contact form to your WordPress sidebar or footer
Let’s take a look at both methods below.
Add the Contact Form to Your WordPress Page
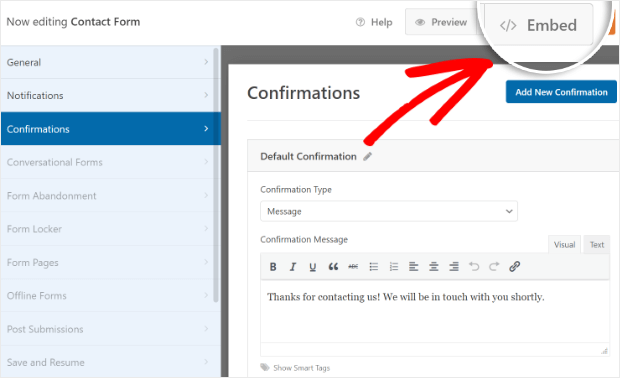
To embed your contact form on a page, click on the Embed button in the top right corner.
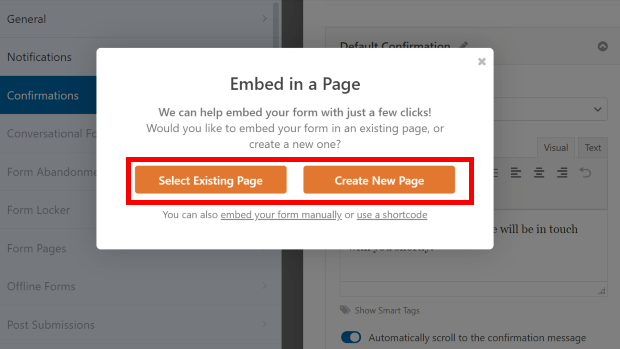
You’ll then see a popup that asks you where you want to embed your contact form. You can either Select Existing Page or Create New Page for your contact form.
Once you select the option you want, the plugin will either send you to a new page or an existing page.
There, just click on the small plus (+) icon and then select the WPForms block.
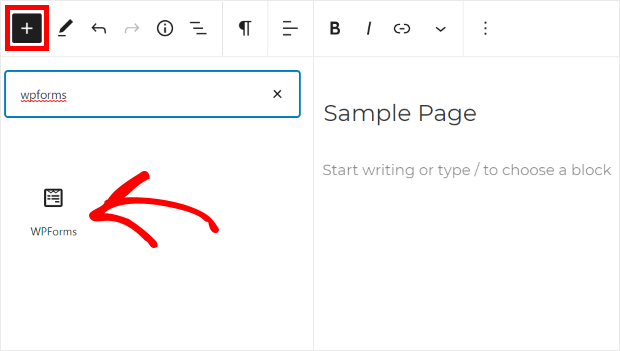
After that, you’ll see a new block on your page that asks you to choose which contact form you want to embed.
Just use the dropdown menu and select your contact form from earlier.
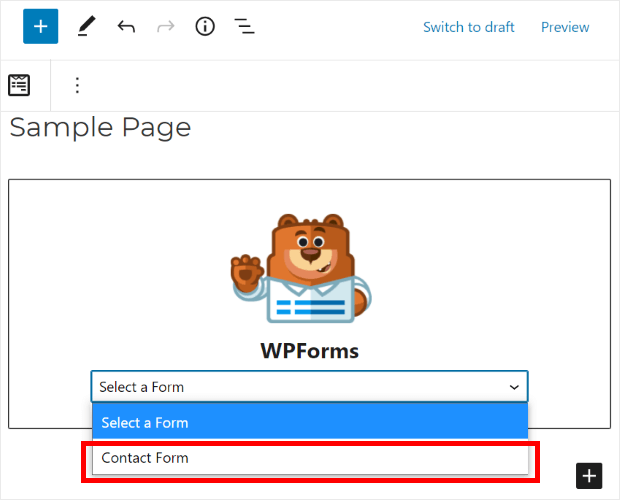
Finally, click on the Publish or Update button, and you’re done! You can now open your site and check out how your contact form looks.
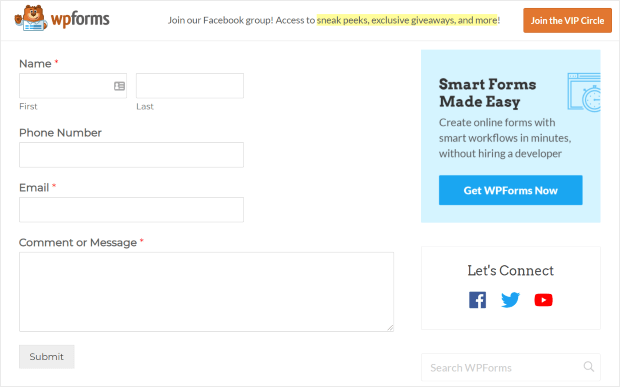
Now let’s go ahead and look at the second way to embed your contact form.
Add the Contact Form to Your WordPress Sidebar or Footer
The next way to add your contact form is to embed it on your sidebar or footer as a WordPress widget.
First, go to Appearance » Widgets from your WordPress dashboard.
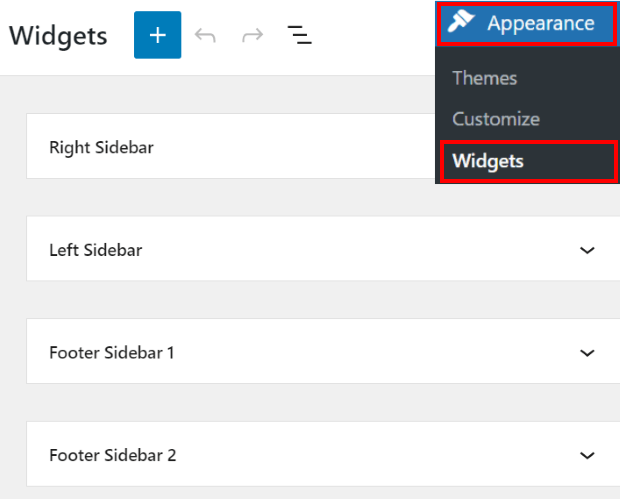
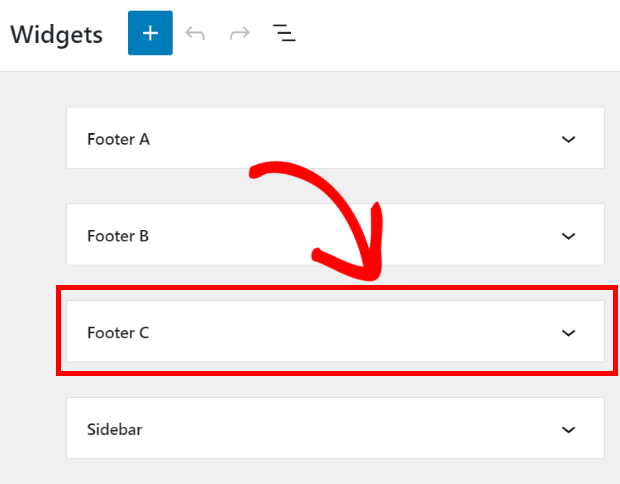
There, you can see all the different widget-ready areas of your WordPress site. To continue, just click on a Sidebar panel from the available options.
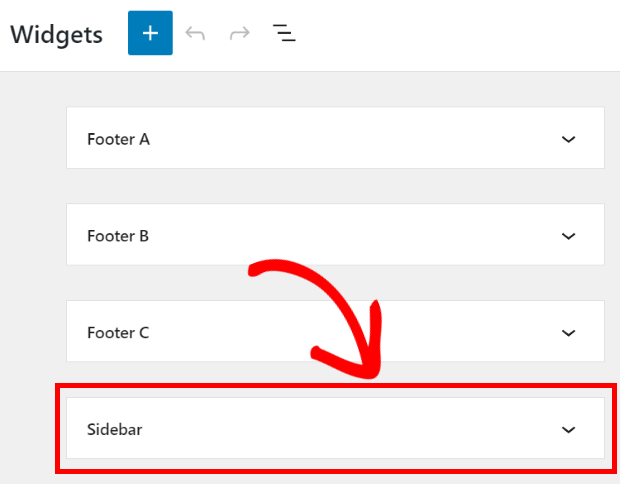
You can also click on a Footer panel here to embed your contact form on the footer area.
For this tutorial, we’ll use a sidebar.
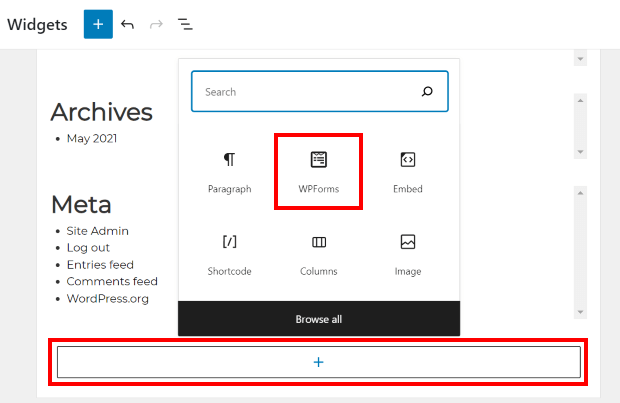
Now, click on the plus (+) icon and select the WPForms widget from the options.
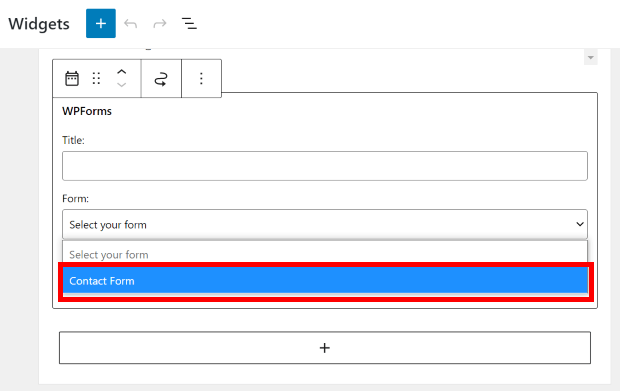
You’ll now see a widget that allows you to embed your forms. Just use the dropdown menu under the Form field to select your contact form.
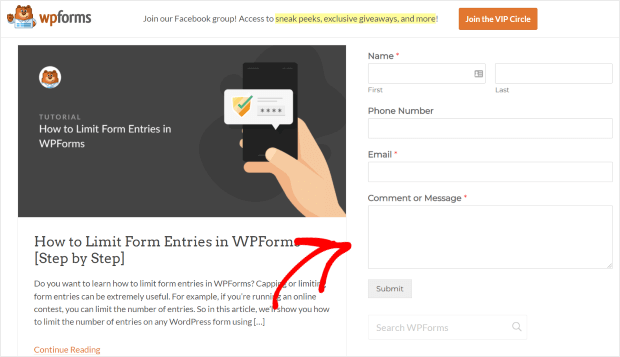
Then click on the Update button, and you’ve officially added your new contact form to your WordPress sidebar.
You can now open your website and check how the contact form looks.
And that’s it!
This was our guide on how to create a contact form in WordPress. As you can see, you can build contact forms easily on your website using the WPForms plugin.
As the best WordPress contact form plugin, WPForms lets you build powerful contact forms in just a few easy steps. Then, you can engage your visitors, generate leads, and get more sales with your forms.
Grab your copy of WPForms today, and you can have high-converting contact forms on your website.
Bonus Tip: Add a “Contact Us” Form Widget 🌟
After setting up your WordPress contact form, you might want to make it even easier for your visitors to reach you by embedding it as a widget.
Adding a “Contact Us” form widget is a fantastic way to enhance user interaction right from the sidebars or footers of your website. Here’s a quick summary on how you can do it:
- Simple Contact Collection: Use widgets to collect essential visitor information like email addresses quickly, allowing easy follow-up
- Improved Organization: Automatically sort the incoming information, saving you from manually organizing the data
- Fast Customer Support: Quickly respond to and manage customer queries directly from your sidebar or footer form submission
- Spam Protection: Safeguard your site by blocking spammy form submissions effectively
- Engagement Boost: Convert casual visitors into loyal customers by encouraging them to interact more with your site
To follow along step-by-step, read this next article on how to add a contact form widget on your website.
Want to use social media marketing to boost your business? Take a look at our easy guide on how to get more Facebook followers for your business.
Interested to get more leads for your brand? Here’s how you can create a landing page in WordPress.
