Looking for an easy way to show Twitter slideshows on your WordPress website?
Displaying Twitter feeds on your website helps you show relevant social media content to your visitors. Plus, it’s also a refreshing way to boost your brand exposure and customer engagement.
But Twitter doesn’t allow you to customize your feed’s layout. And it’s a bit tricky to customize Twitter code without hiring a developer.
That’s why we’ll show you how to add a Twitter slideshow to your site with ease — even if you’re not tech-savvy.
First, let’s look at the simplest way to embed a Twitter slideshow.
Or you can click here to directly skip to the tutorial.
Easiest Way to Display an X (Twitter) Slideshow
If you want, you can manually embed your Twitter feeds on your site, but this method comes with some difficulties and risks:
- Difficult to set up: If you’re not comfortable with coding, it’s not easy to set up since you have to manually embed lots of code and switch between different web pages.
- Takes a lot of time: Missed a line of code? Or did something wrong? You’d need lots of time to figure out what went wrong.
- Confusing and prone to error: Since you’re embedding manually, you carry the risk of accidentally breaking your site just because of tiny mistakes.
- No customization choices: Want to show a Twitter slideshow? You can’t. When you manually add your feed to WordPress, you can’t freely customize your feed’s layout and style.
- No filters: You can’t also filter your feed’s content. So if you want to moderate the tweets you’ll show in your feed, it’s not possible.
If this is the case, what’s the best way to embed a Twitter slideshow in your WordPress? By using the highest-rated Twitter feed plugin for WordPress: Twitter Feed Pro.

This non-techie plugin makes creating Twitter slideshows in WordPress so easy — even complete newbies can freely use it.
If you use Twitter Feed Pro to add Twitter slideshows to your website, you get to enjoy its features, like:
- Super easy to set up: Once installed, you can set everything up and display your Twitter feed easily. Even if you’re not an IT guru.
- Tons of feed types: You can hashtag Twitter feeds, user timelines, Twitter lists, search results, and much more.
- Time-saving and efficient: Show your Twitter slideshow feed in just under 5 minutes with our simple guided flow!
- User-friendly: No need to tweak codes or risk accidentally breaking your site. It just takes several clicks to customize your Twitter feed and control the tweets you show.
- Lots of customization choices: Want to show a horizontal Twitter feed in a slideshow layout? With the plugin’s live feed editor, you can do this in a single click — no confusing code needed.
- Control your content: The plugin allows you to filter tweets so you can only show the feeds you want to. This is especially helpful when you want to show social media testimonials to use social proof for increased conversions.
And did we mention the best part? When you get your own copy of Twitter Feed Pro, you have access to a friendly and fast support team of WordPress experts who can guide you.
So if you find yourself needing help, just send them a message, and they’ll do their best to give you a hand.
As a result, the plugin has a solid star rating of 4.9/5 stars and is happily recommended by over 150,000 users.

How to Add an X/Twitter Slideshow to Your WordPress Site
Ready to increase your Twitter followers by showing your engaging Twitter feed? Check out the step-by-step tutorial to embed your Twitter feed in a slideshow below:
Step 1: Install and Activate Twitter Feed Pro Plugin
First, get your own copy of the Twitter Feed Pro plugin here. After that, install and activate the plugin on your WordPress website.
Confused about how to do this? Just check out this user-friendly tutorial on how to install a WordPress plugin on your website.
Step 2: Create a New Twitter Feed
In this step, you can use Twitter Feed Pro’s guided flow and create a new feed on your website.
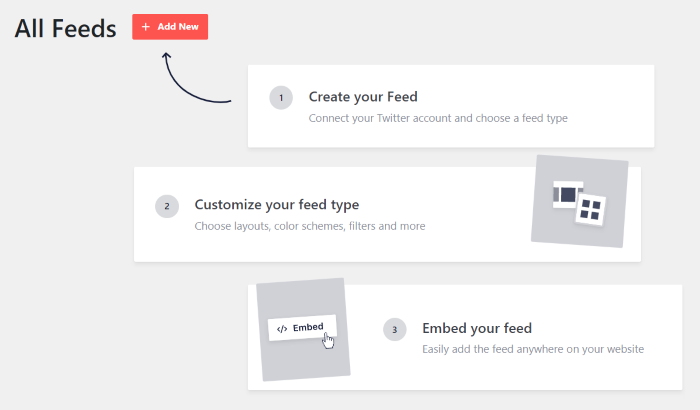
From your WordPress dashboard area, go to the Twitter Feed » All Feeds menu to get started.
After that, click on the Add New button at the top.
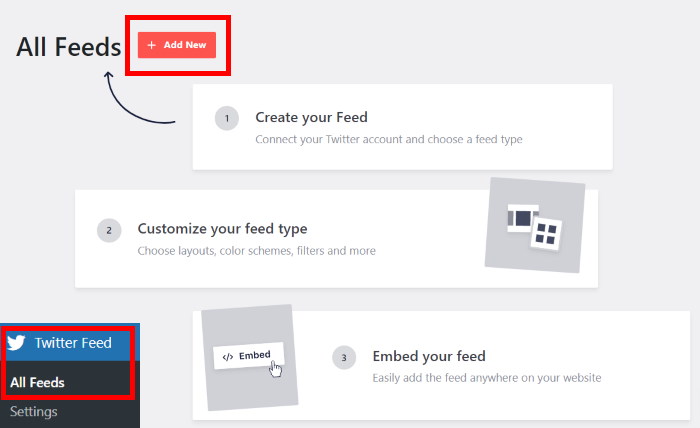
After you do that, you can specify which type of Twitter feed you want to create.
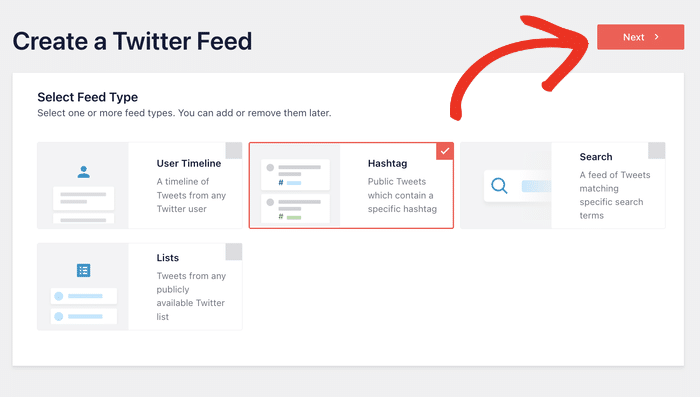
With Twitter Feed Pro, you can choose from the following feed types:
- User Timeline: Shows tweets from your own Twitter timeline
- Hashtag: Embed tweets that have specific hashtags
- Search: Shows tweets based on the results of an advanced Twitter search
- Lists: Shows tweets from your specific Twitter lists
For our example, we’re using the hashtag feed type here.
After you pick your Twitter feed type, click on Next to continue.
Step 3: Connect Your Twitter Account
By connecting your Twitter account, your feed can show content from Twitter on your website.
First, click on the Connect button on the popup to get started.
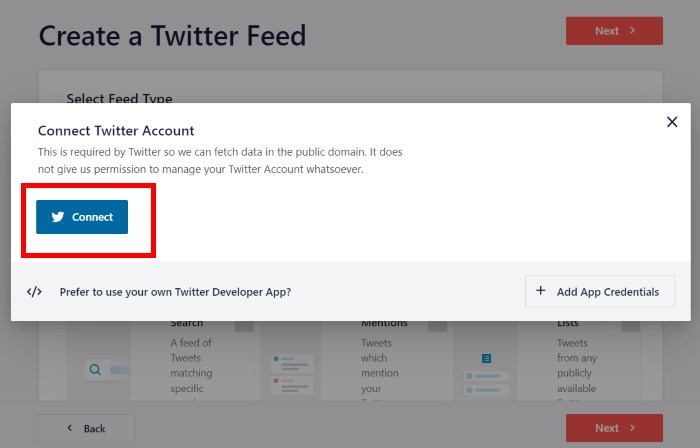
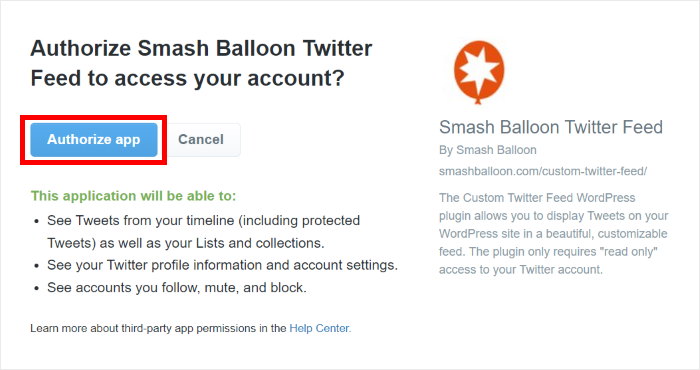
After you do that, the plugin will ask you to give read-only access to your Twitter account.
It’s completely safe since Twitter Feed Pro won’t be able to use that access to make any changes.
To give read-only access to the plugin, click on the Authorize app button.
Doing that will bring you back to your website, where you can choose the source for your Twitter feed.
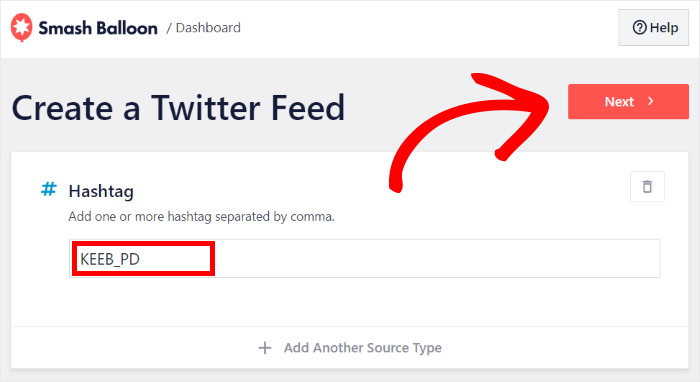
To do that, you can just enter the user accounts, hashtags, search terms, or any other source type that you want to display on your site.
Just write in the Twitter source on the popup and then click on Next.
As an example, we’re using the hashtag “#KEEB_PD” for our Twitter feed.
Step 4: Choose Your Twitter Slideshow Feed Template
Done connecting your Twitter account to the plugin? Great!
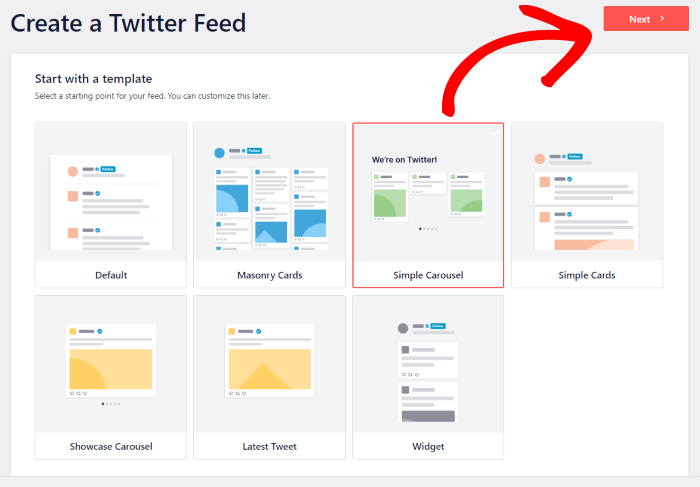
Now, Twitter Feed Pro will ask you to choose the feed template that you want to use.
If you want to show lots of tweets at once on your slideshow, pick the Simple Carousel template and click on Next.
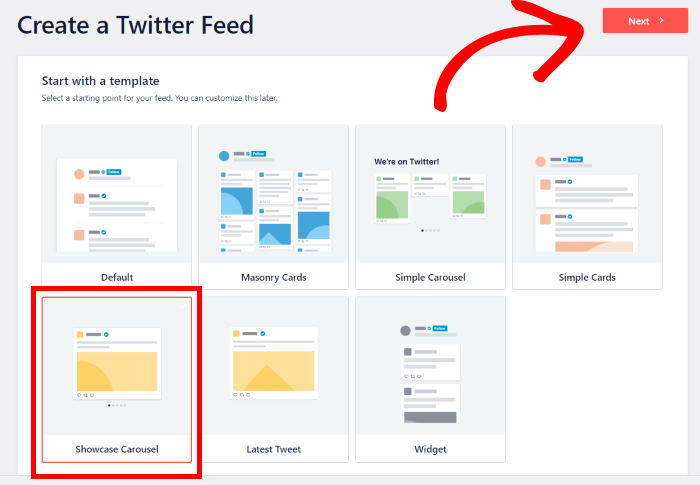
If you want the Twitter slideshow to have just one tweet at a time, click on the Showcase carousel instead.
Then, click on the Next button to proceed.
Just like that, you now have a Twitter slideshow feed on your website.
Plus, your new feed looks great right out of the box since it automatically copies your website’s design.

Step 5: Customize Your Twitter Slideshow Feed
With the Twitter Feed Pro plugin, you get a user-friendly live feed editor to help you design your Twitter feeds easily.
Here, you can find all the customization options on the left panel. Using these, you can change your feed template, layout, colors, size, header style, number of posts, feed size, and much more.
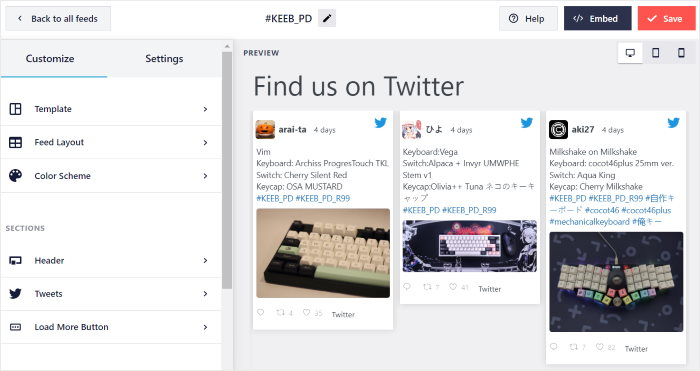
On the right, you can find a real-time preview of your Twitter feed so you can easily track your changes.
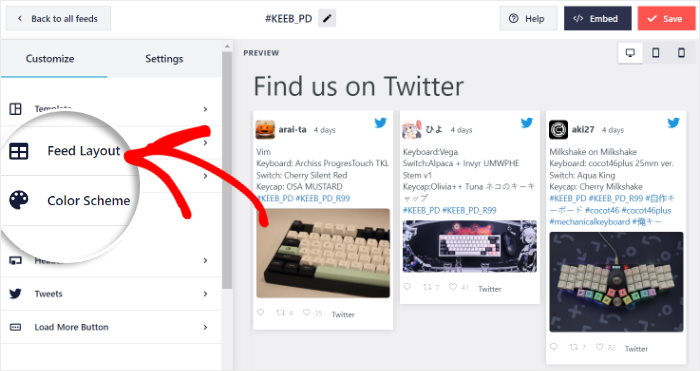
To get started with the customization, click on the Feed Layout option.
From here, you can change how the tweets appear on your Twitter feed. You can even show the tweets as a list or in a masonry gallery.
To change the options for your Twitter slideshow, simply scroll down on the left and look for the Carousel Settings section.
You can then choose to enable or disable the navigation arrows, pagination dots, and autoplay for your Twitter slideshow.
Plus, you get to change the number of rows, type of loop, height of the slideshow, interval time, and more.
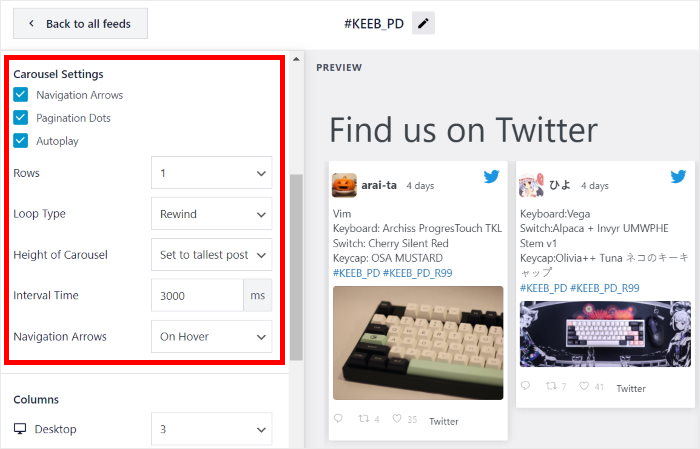
Once you’re done setting up your Twitter slideshow, click on Save to keep the changes.
Now, click on the Customize button at the top to continue designing your Twitter feed.
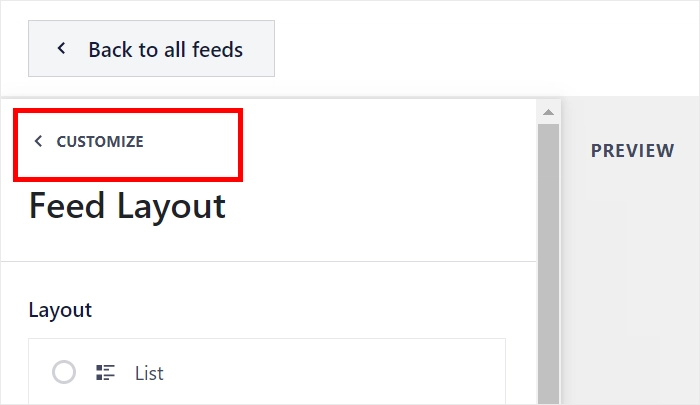
Next, click on the Color Scheme option so you can set the colors of your Twitter slideshow.
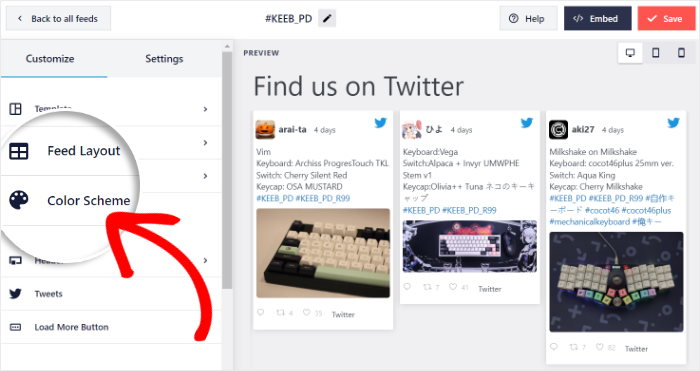
With Twitter Feed Pro, you can simply pick a color scheme to instantly change all the colors of your Twitter feed at once.
You have 4 color schemes to choose from:
- Inherit from Theme: Use the same colors as your website
- Light: Show a light background along with a darker font color
- Dark: Display a dark background with a light color for the font
- Custom: Select the colors of your Twitter feed manually
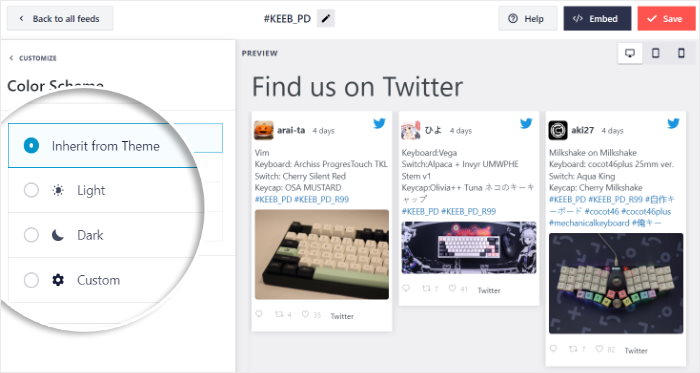
After picking the color scheme for your Twitter slideshow, click on Save to confirm your changes.
As you can see, it’s super easy to customize the rest of your Twitter feed using the live feed editor.
All you have to do is click a few buttons, and your feed will look just how you want it to. This means you don’t need to deal with confusing code snippets or hire a developer to help you.
Once you’re happy with the look of your Twitter feed, click the Save button.
Step 6: Display Your Twitter Slideshow Feed to Your WordPress
You’ve now learned how to create and customize your Twitter slideshow feed. Great! The final step is learning how to display it on your website.
With Twitter Feed Pro, there are 2 ways you can do this:
- Add your Twitter slideshow feed to your WordPress page
- Add your Twitter slideshow feed as a widget to your sidebar or footer.
Not sure which way is better for you? Don’t worry. You can check out both methods below:
Add Your Twitter Slideshow Feed to Your WordPress Page
To make things easy, you can use the live feed editor to embed your Twitter slideshow in a few simple clicks.
First, click on the Embed button at the top to get started.
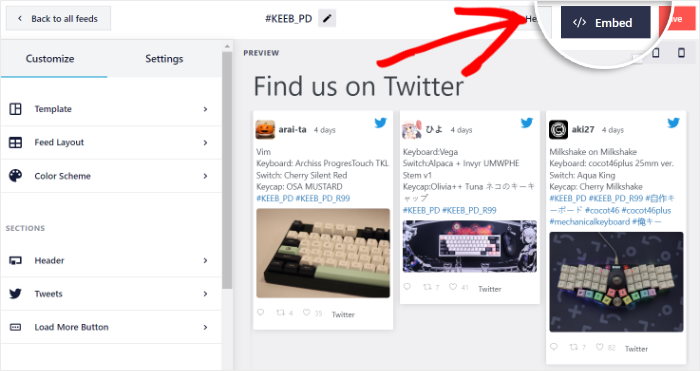
Then, a popup will ask where you want to embed the Twitter feed.
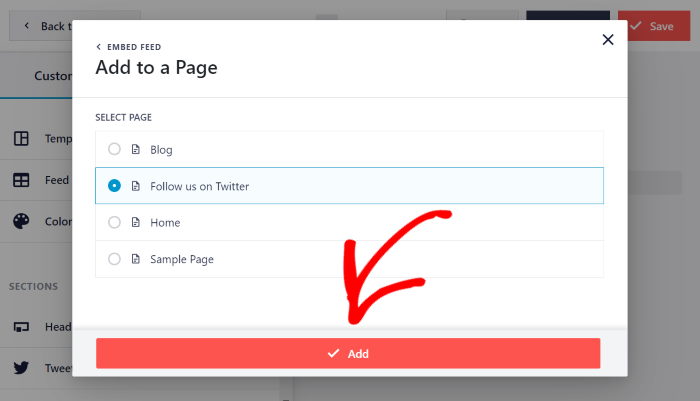
Since you’re showing your Twitter slideshow on a WordPress page, click on the Add to a Page button.
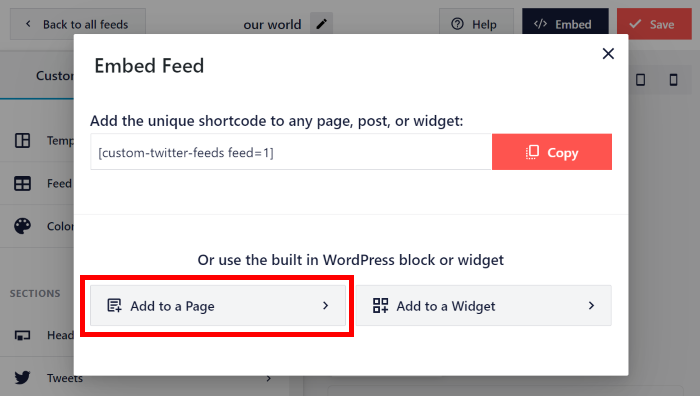
After that, the popup will show you a list of WordPress pages on your site. Select a page from this list and click on Add to start embedding your feed.
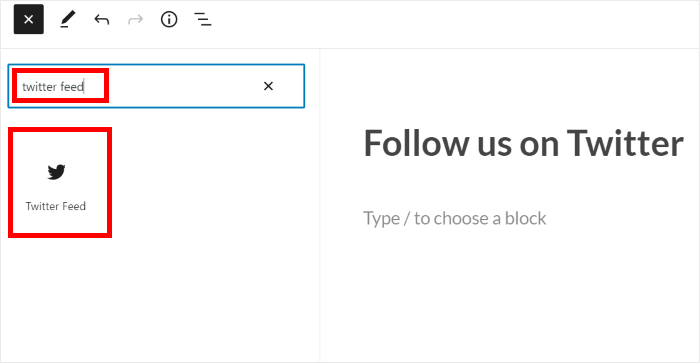
Twitter Feed Pro will now open that page in the WordPress editor. You can now add a new WordPress block by clicking on the plus (+) icon.

Next, write “twitter feed” in the search box, and from the search results, click on the Twitter Feed block.
Finally, click Publish or Update to save your changes, and your Twitter slideshow will finally be online.
You can now open your website and see how it looks.

As you can see, Twitter Feed Pro makes it easy to embed Twitter content.
Now, let’s take a look at the second way to display Twitter slideshow feeds on your site.
Add Your Twitter Slideshow Feed to Your Site’s Sidebar or Footer
To embed your Twitter slideshow feed in your website’s sidebar or footer areas, you can simply use the live feed editor.
First, go to the Twitter Feed » All Feeds menu from your admin dashboard and click on your Twitter slideshow feed.
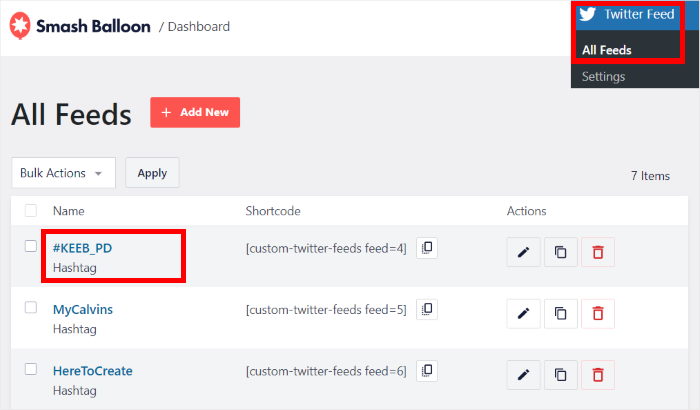
Now, you can see the live feed editor once again.
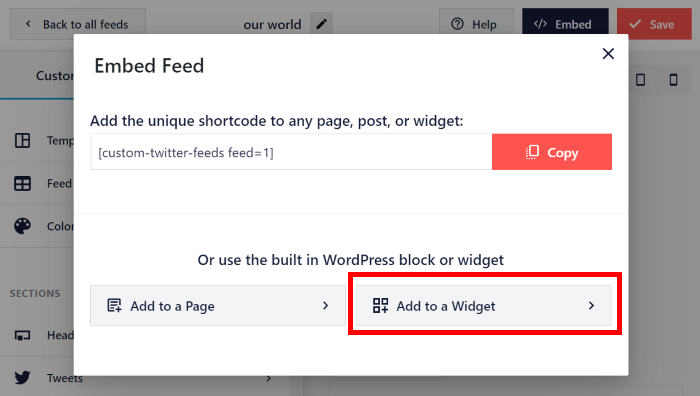
To start embedding this Twitter feed, click on the Embed button in the top right corner.

Using the popup, you can now pick the location of your new Twitter slideshow feed.
Since you’re embedding it in your widget areas, click on the Add to a Widget button.
Twitter Feed Pro will now send you to your website’s Widgets page so you can embed the Twitter feed as a widget.
If you want to show your Twitter slideshow on the sidebar, click on the Sidebar panel.
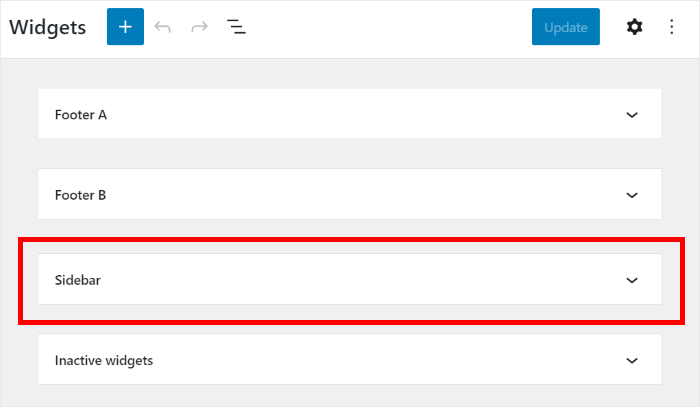
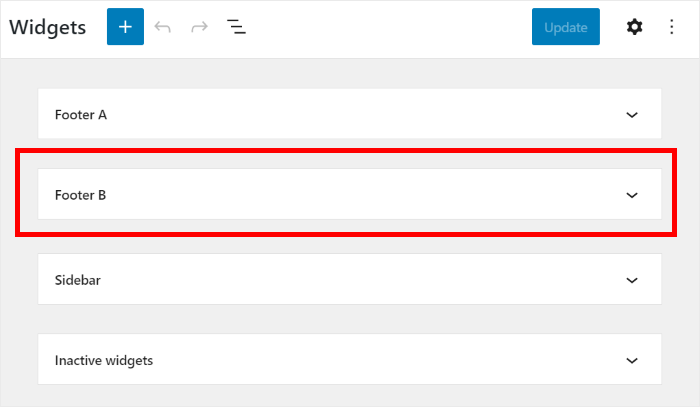
To embed your Twitter slideshow widget on the footer, click on the Footer panel instead.
For this guide, we’ll embed the feed on the WordPress footer.
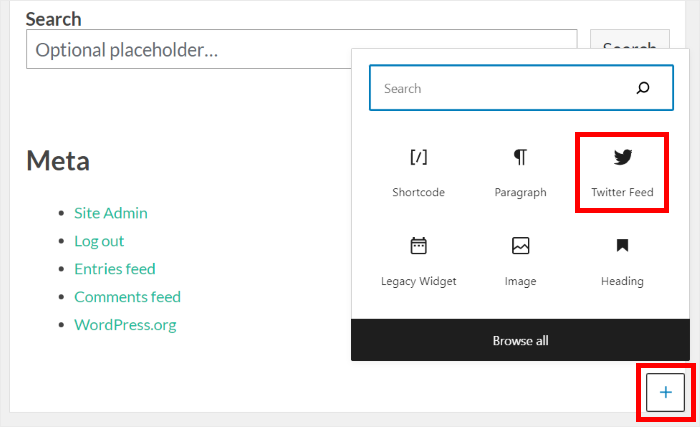
To create a new widget, click on the plus icon (+) at the bottom.
Now, click on the Twitter Feed widget from the options to embed your Twitter slideshow feed.
Finally, click the Update button to save your new Twitter widget, and you’re good to go!
If you open your website, you can now see a Twitter slideshow feed on your sidebar or footer area, just like this:

And there you have it.
By reading through this step-by-step guide, you’ve now learned how to add a Twitter slideshow feed to your WordPress site.
Now, you can easily increase your Twitter followers, build an engaging community, and grow your business over time.
Ready to embed Twitter slideshows? Get started with Twitter Feed Pro today!
For related reading, you may also want to check out this post on the best types of tweets proven to grow your business right now.
And if you enjoyed this article, connect with us on Twitter and Facebook for more helpful tutorials.
