Want to make your WordPress site more lively by featuring a sliding Facebook feed your visitors can scroll through?
Adding a Facebook slider lets you display your latest posts in an eye-catching, interactive way, helping you keep your site fresh and encourage more followers to connect with your Facebook page.
But did you know that setting up a Facebook slider using default tools can often be confusing or lack the customization you need?
I remember working with a business owner who struggled for hours trying to make their Facebook content stand out, only to end up with a basic, unappealing feed.
With our experience at Smash Balloon helping millions of WordPress users showcase social media feeds seamlessly, I’ve created a simple solution that anyone can use.
In this article, I’ll walk you through how to add a Facebook slider to your WordPress website with the updated steps for 2025.
Even better, you’ll be able to set it up quickly and easily. No coding or design expertise required.
In This Article
Easiest Way to Create a Facebook Slider
Ever tried using Facebook’s platform to embed your posts on your website? It only lets you do limited things:
- No option to customize your Facebook feed’s design. Want to change your background color? Or your feed’s header? You can’t.
- Want to display your feed in a carousel or slideshow? Facebook doesn’t allow you to do this.
- It comes with a lot of risks. You need to change pieces of code and manually add them to your WordPress. This means if you’re not tech-savvy, you can accidentally break your website.
- No customer support to help you. Got confused or lost along the way? You’re on your own.
The easiest way to display a Facebook feed slider on WordPress? Use a trusted WordPress plugin like Facebook Feed Pro.

Facebook Feed Pro is a non-techie plugin that’s perfect for WordPress beginners.
Using this, you can easily display your Facebook feed on your website — no technical knowledge required! The plugin does all the hard work for you.
As the best Facebook feed plugin for WordPress, it’s designed to be light and ultra-fast. Even though the plugin has lots of powerful features, it won’t slow down your website.
Here are some of the plugin’s features that you may find helpful:
- Set it up in a few minutes: Are you a WordPress newbie? Even if you’re not tech-savvy, you can easily install the plugin, add the Carousel extension and display your Facebook feed carousel with just a few clicks.
- One plugin, lots of Facebook content choices: One thing I appreciate about this plugin is I can use it to add content from Facebook pages, events calendar feed, albums, videos, and even customer reviews to my WordPress website!
- Super easy to customize: Want to change your Facebook feed’s design and layout to match your brand’s visual identity? No need to touch confusing code — just use the live feed customizer.
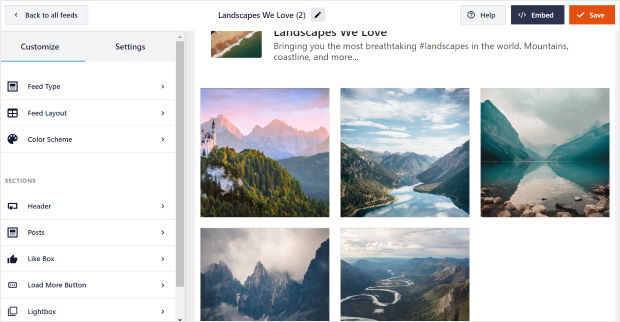
- Responsive: It’s mobile-friendly. Plus, it looks fantastic on any screen size or device.
- Lightning-fast loading: The plugin efficiently requests data, so your Facebook feed loads faster on your site.
- Smart backup system: Your website visitors will still see your Facebook slider feed, even if Facebook’s temporarily down.
In addition to the plugin’s useful features, the best thing about Facebook Feed Pro is the awesome customer support team behind it.
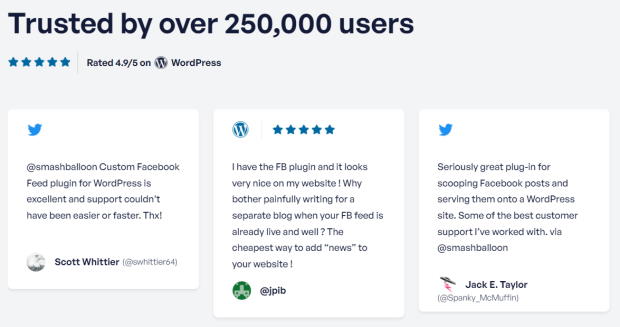
In fact, the plugin has a solid 4.9/5 star rating from over 250,000 users. Just send a message, and this efficient and friendly team will do their best to give you a hand.
Ready to add a Facebook slider to your WordPress to increase your Facebook page engagement? Get started with Facebook Feed Pro now.
Let’s now dive in by following the step-by-step tutorial below.
Step 1: Install Facebook Feed Pro Plugin and Carousel Extension
To start, get your own copy of the Facebook Feed Pro plugin here. Then you can also download the Carousel extension from here.
Want to get full access to all of Smash Balloon’s plugins and extensions instead? You can just get the All-Access Bundle here.
Once you’re done downloading all the plugins to your computer, the next step is installing them on your WordPress site.
Not sure how to do this? Check out this step-by-step tutorial on how to install a WordPress plugin here.
After you’ve done that, go to Facebook Feed » Extensions menu from your WordPress dashboard and look for the Carousel section.
On that section, simply click on the Activate button.
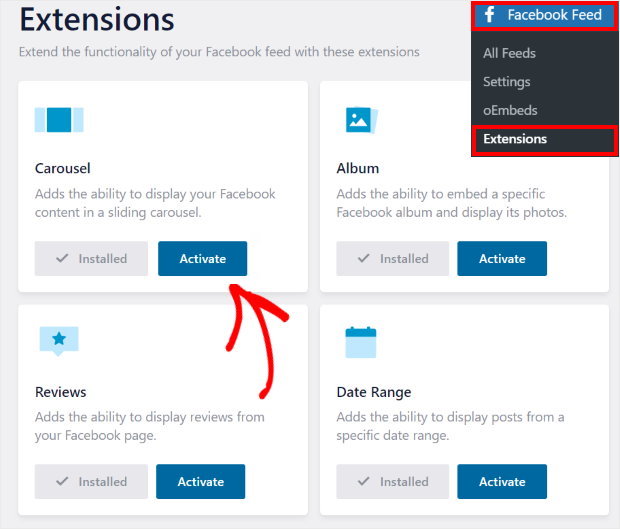
Now, you can move on and start creating your Facebook carousel slider.
Step 2: Create Your Facebook Slider
The next step is to create your Facebook slider feed. To do that, you can open your WordPress dashboard and then go to Facebook Feed » All Feeds.
And on that page, click on the Add New button.
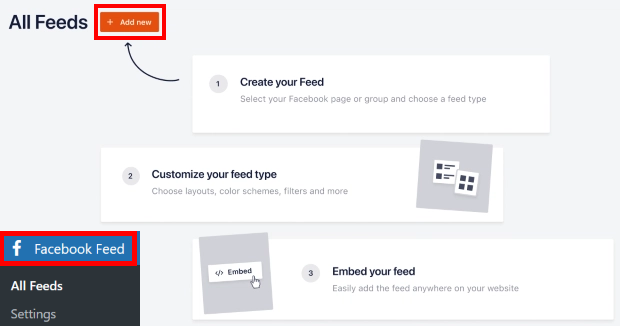
You can then see all the different feed types that you can pick for your Facebook slider.
With this plugin, you get 9 different options, such as timeline feeds, photos feeds, albums feeds, reviews feeds, Facebook galleries, and more.
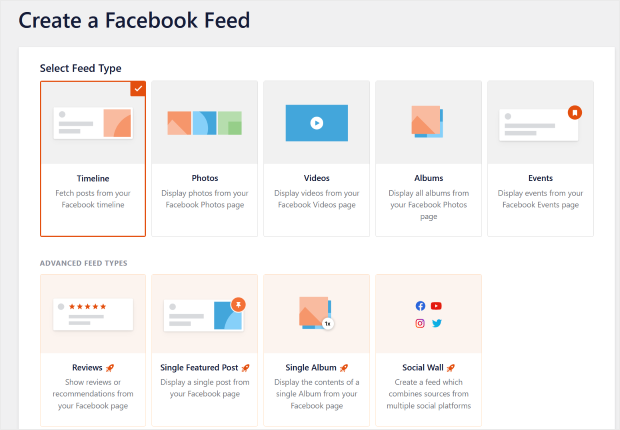
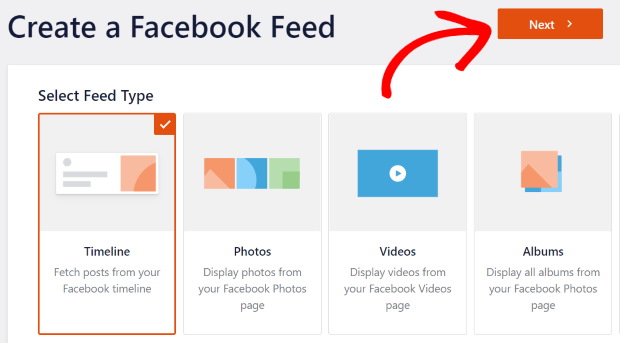
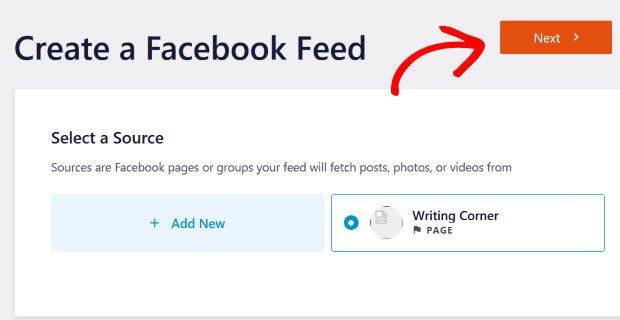
To proceed, you can just select the type of feed you prefer and then click on the Next button at the top right.
We’ll go ahead and use a timeline feed for this tutorial.
Step 3: Connect to Your Facebook Page
After creating your Facebook slider, it’s time to connect it to Facebook. To do that, you’ll need to add a source, which is your Facebook business page.
To get started with that, click on the Add New button here.
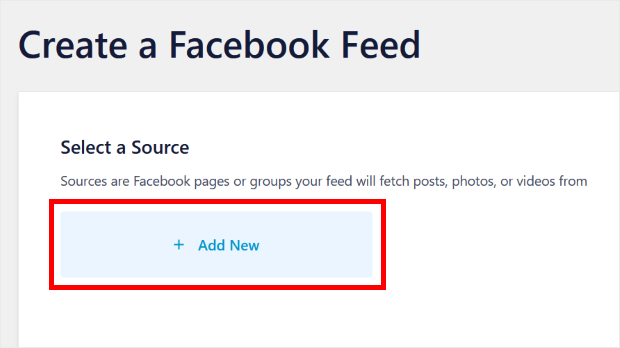
This will bring up a new popup where you get to choose the source for your slider. Choose to use your Facebook business page as a source, and then click on Connect.
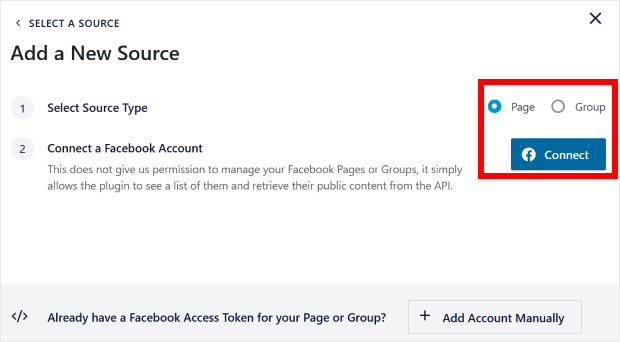
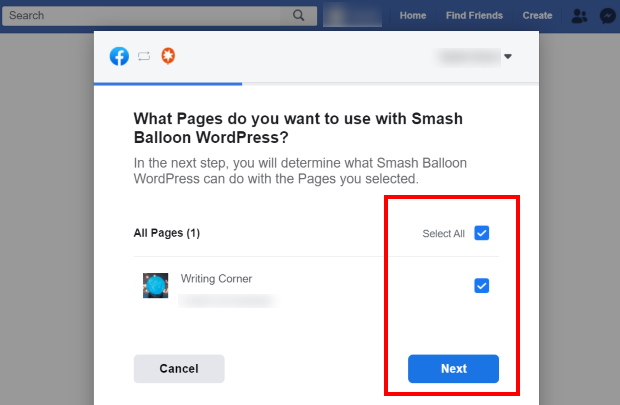
The plugin will now take you to Facebook and ask you to pick the page that you want to show on your Facebook slider.
After you select your page here, just click on Next.
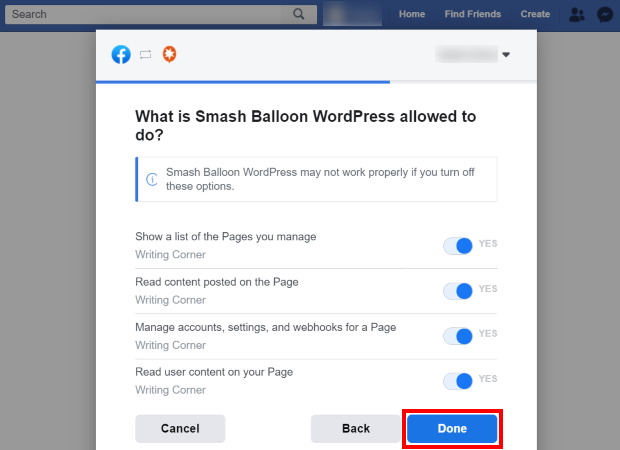
After that, the plugin will ask for read-only access to your Facebook account so that it can display your Facebook slider.
This means that the plugin can’t change anything on your account.
So, just click Done to allow the read-only access and continue.
After that, you can click on the Add button to finalize the whole thing and add a new source for your feed.
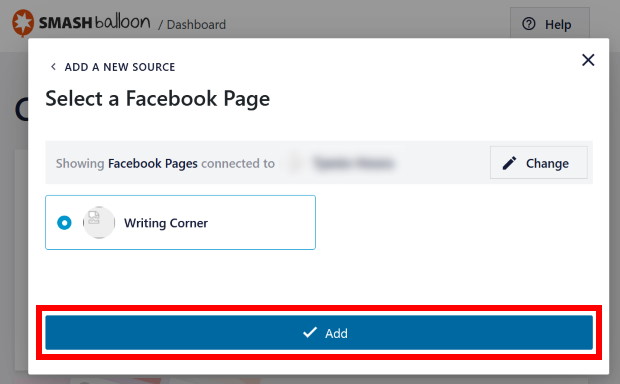
Once you’ve done that, you can just click on Next and proceed to the next step.
Step 4: Customize Your Facebook Slider
Once you’ve finished connecting your new slider to Facebook, you’ll see it open in the live feed editor.
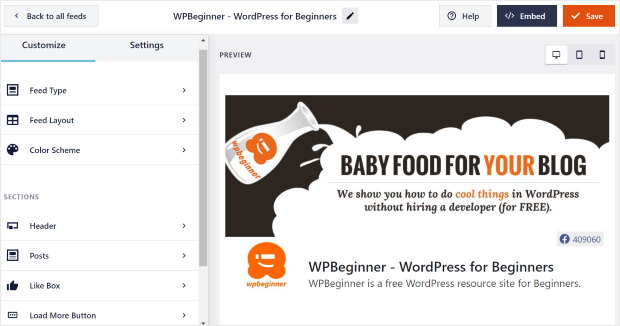
On the left, you can see all of your customization options. When you use these options to customize your feed, you can see a preview of how your feed will look on the right.
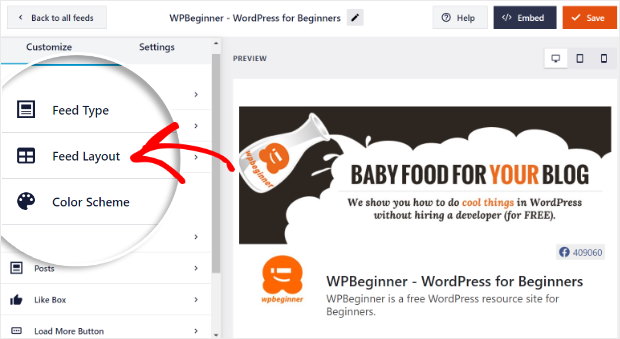
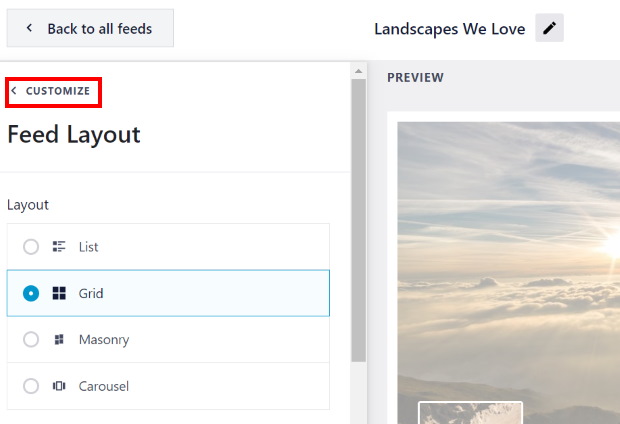
So let’s get started with the customization here. First, click on the Feed Layout option.
Here, you can pick the layout to turn your feed into a Facebook slider.
Just select the Carousel option from the left to do that.
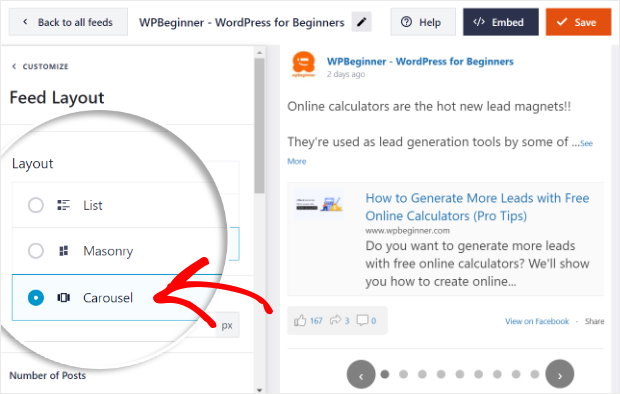
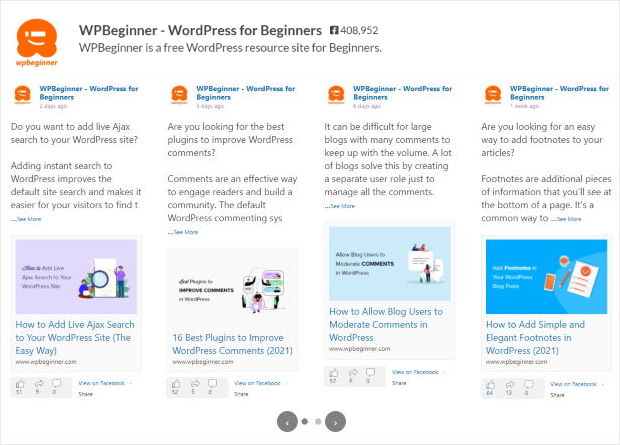
On the right, you can now see your Facebook feed with its carousel slider layout.
Now click on the Save button to save your new layout.
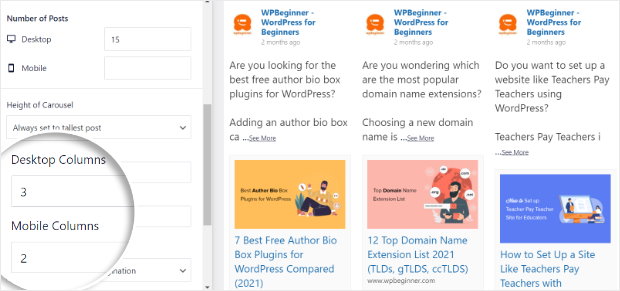
Next, scroll down the options on the left and look for the Desktop Columns field. Here, you can choose the number of posts that your slider will show to visitors on a computer.
Below that, you have the Mobile Columns option. With it, you can set the number of posts visitors on mobile devices can see at once.
Just add the number of columns you want in these fields and click on the Save button.
And that’s just the start. You can also change the other settings of your slider here, including the autoplay settings, interval, pagination style, and more.
After you’re done, click on the Save button.
With your carousel slider settings set, click on Customize to go back to the main customization options.
To continue, go ahead and select the Color Scheme option.
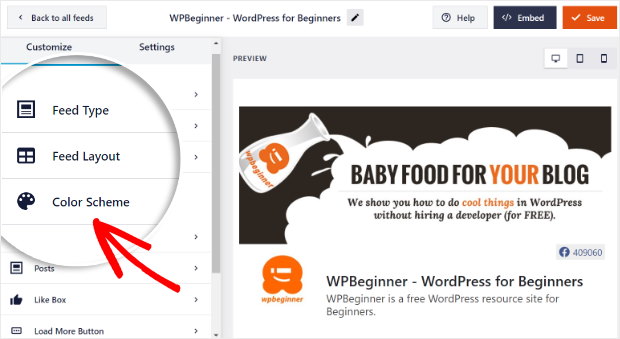
You can see 4 different color schemes that you can pick from for your Facebook slider.
- Inherit from Theme: Your Facebook slider copies the colors of your website.
- Light: Select a bright look with lighter backgrounds.
- Dark: Have dark backgrounds on your Facebook slider.
- Custom: Manually select all the colors for your Facebook slider.
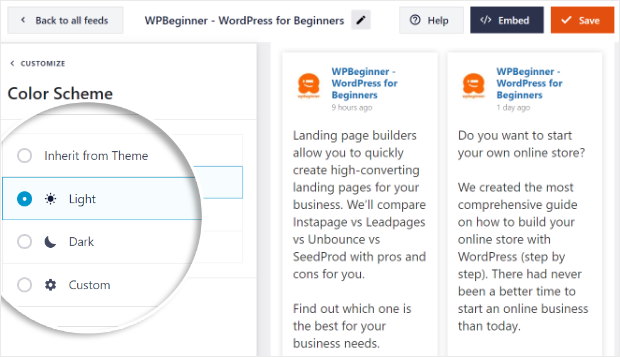
Just pick the color scheme you like here and click on Save.
After that, you can customize the different parts of your Facebook slider using the live feed editor. You can change the feed type, header style, post elements, and much more here.
Finally, click on Save and move on to step 5 to embed your Facebook slider.
Step 5: Add Facebook Slider to Your Website
After you’re finished with customization, you can now finally get started and embed it on your website. For that, there are two ways you can do it:
- Add Facebook slider to your pages
- Add Facebook slider to your sidebar
Both are pretty easy, so let’s get started and see how you can do it:
Add Facebook Slider to Your Pages
If you want to add a Facebook slider on your WordPress pages, it’s pretty easy from the live feed editor.
Just click on the Embed button in the top right corner of the screen.
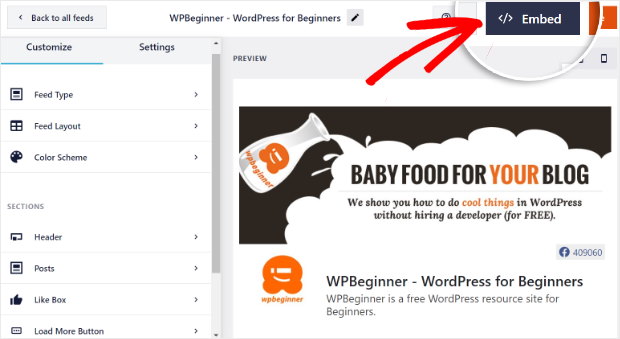
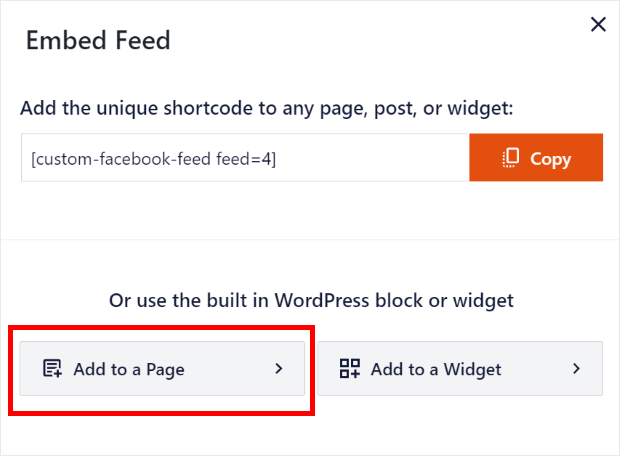
The plugin will then show you a new popup to pick the location for your Facebook slider.
So, select the Add to a Page option here.
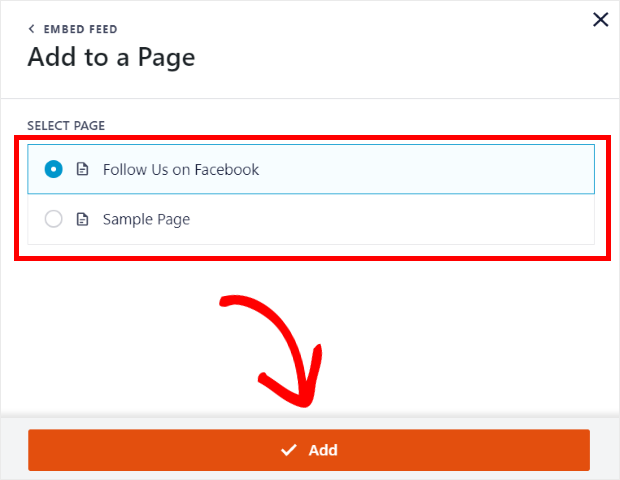
Next, you can pick which page you want to show your Facebook slider on. Just pick the one you prefer from the list and click on Add.
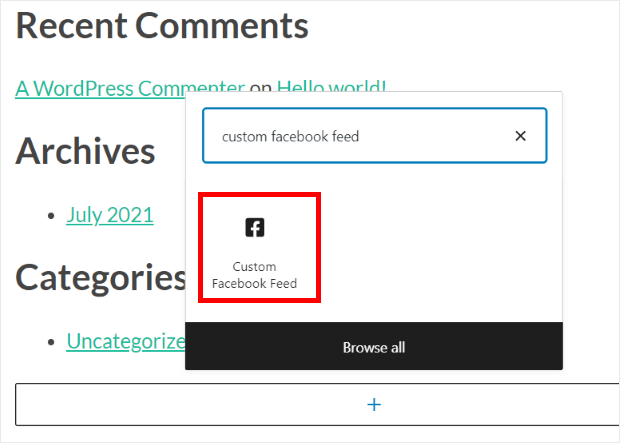
Once you do that, add a new block by clicking on the small plus icon (+).
Then just pick the Custom Facebook Feed widget from the options.
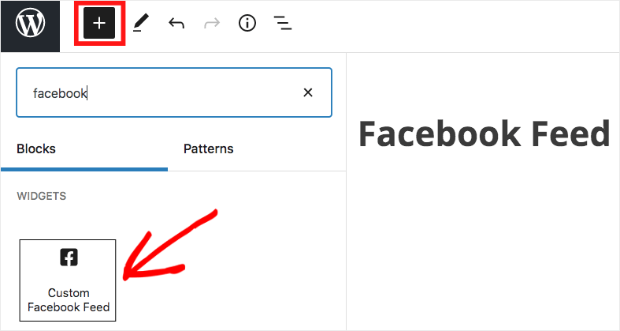
Finish things up by clicking on Publish, and you’re good to go!
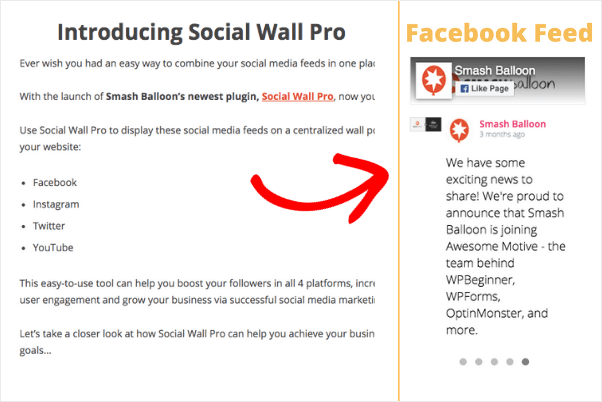
Just open your website to see how your new Facebook slider looks.

Add Facebook Slider to Your Sidebar
Want to show your Facebook slider on your website’s sidebar area?
You can also do that from the live feed editor.
First of all, go to Facebook Feed » All Feeds from your WordPress dashboard. On that page, you can find a list of all of the Facebook feeds you’ve created so far.
To continue, click on the Facebook slider feed that you just created.
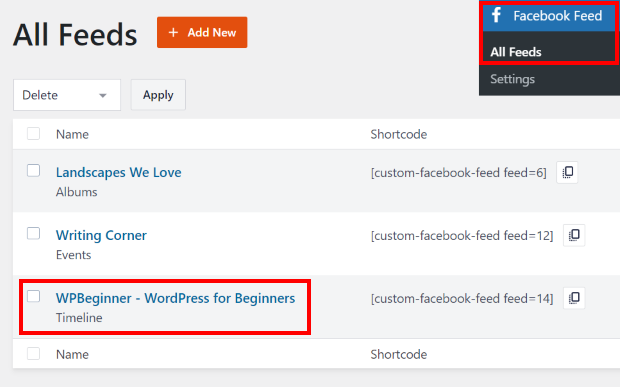
This will open the live feed editor once again. To add your Facebook slider on your sidebar, click on the Embed button.

In the new popup, click on the Add to a Widget button.
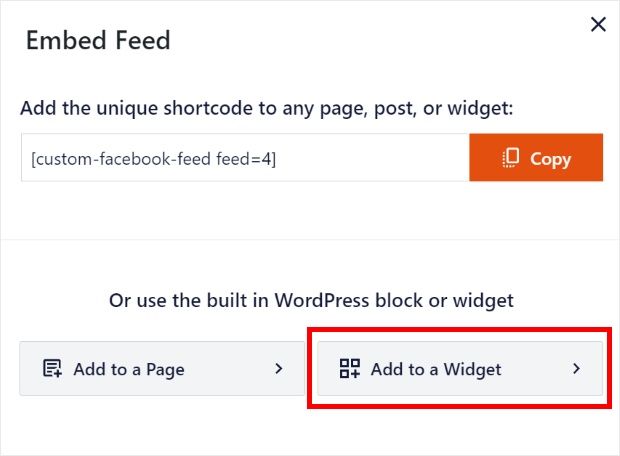
With that, the plugin will now open your Widgets page so that you can add your new slider as a Facebook widget.
To proceed, you can open the Sidebar panel by clicking on it.
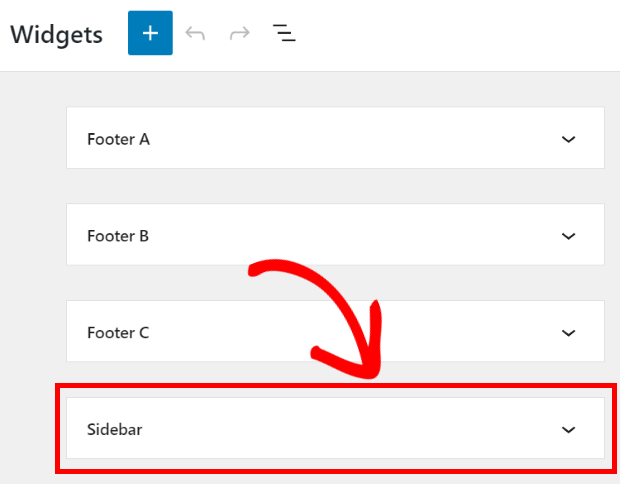
Now, you can add a new widget to the sidebar by clicking on the plus icon (+).
Finally, select the Custom Facebook Feed widget to add your Facebook slider to your WordPress sidebar.
And you’re done! Now you can open your website and see how your Facebook slider looks.
So there you have it.
By reading through this step-by-step guide, you now know how to easily add a Facebook slider to your website. Now, you can boost your brand awareness and your Facebook page fans at the same time.
As you can see, this plugin makes it super easy to boost your social media following and grow your business.
Ready to create Facebook feeds? Click here to get started with Facebook Feeds.
Want more Facebook tips? You may want to check out this next post on how to embed a Facebook page on your website.
Finally, if this article helped you, go ahead and follow us on Twitter and Facebook for more helpful tips to take your brand’s social media marketing to the next level.


