Are you looking for the easiest way to display a horizontal Facebook feed on your WordPress?
Embedding your Facebook feeds on your website is a great way to boost user engagement and cross-promote your brand so you can grow your business over time.
And in this post, we’ll share the easiest way to add a horizontal Facebook feed to your WordPress website.
By following this tutorial, you can easily display your Facebook posts in a horizontal layout with just a few clicks!
- Which is Better: Facebook Page Plugin vs. Facebook Feed Plugin?
- How to Easily Add a Horizontal Facebook Feed
Which is Better: Facebook Page Plugin vs. Facebook Feed Plugin?
When it comes to embedding your Facebook feed to your website, you can choose between using a Facebook plugin or a WordPress plugin to help you.
Using the Meta Page Plugin
Using Facebook’s official Page plugin means you have to manually embed your Facebook feed on your website.
When you do this, you can only display your Facebook page’s feed. Plus, if you’re not comfortable with coding, it’ll be tricky to customize your feed’s layout.
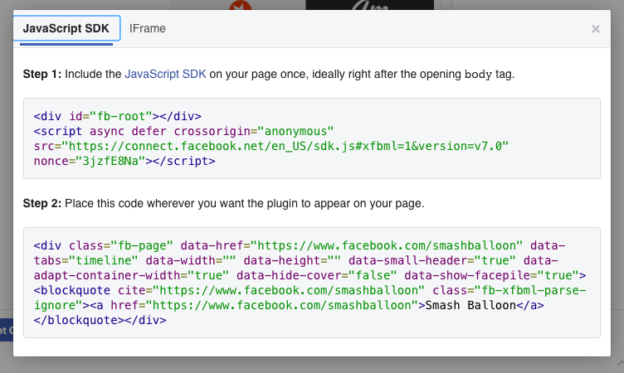
Why? Well, that’s because you need to tweak lots of code snippets just to change your feed’s design in the Facebook plugin.
Finally, you run the risk of accidentally breaking your website if you don’t have any technical knowledge while using it.
And the worst part? There’s no dedicated support team to help you in case you encounter any issues while embedding your Facebook feeds. You’re on your own. Yikes.
Using the #1 Facebook Feed Plugin in WordPress
On the other hand, using a trusted plugin like Facebook Feed Pro means you can automatically embed your Facebook feeds on your site — even if you’re not tech-savvy!

Facebook Feed Pro lets you create, customize, and display your horizontal Facebook feed on your website in just a few minutes.
And add the Carousel extension to show your Facebook content in a scrolling horizontal layout.
Here’s what you can get with Facebook Feed Pro:
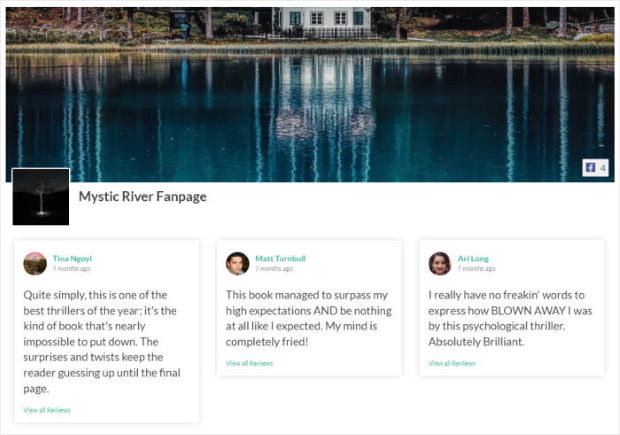
- You can also use it to add Facebook feeds of events, albums, videos, and even customer reviews to your WordPress website!
- Since the plugin is built with both newbies and advanced users in mind, it’s packed with lots of features along with a user-friendly interface.
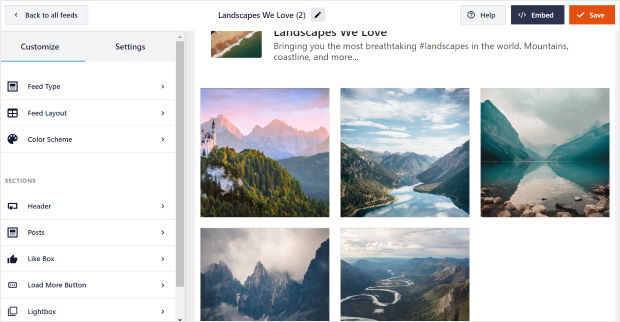
- You can customize your feed’s layout and design on the live feed editor — no need to mess around with confusing code snippets.
- Since it has a lightning-fast performance, the plugin can load your Facebook feed super fast even when you’re displaying tons of posts.
- Facebook Feed Pro comes with an amazing team of customer support behind it. You can just send them a message if you need any help, and they’ll do their best to give you a hand.
Don’t just take our word for it — check out lots of testimonials from our happy customers here. The plugin’s solid rating of 4.9/5 stars is also proof of how awesome its customer support and features are.
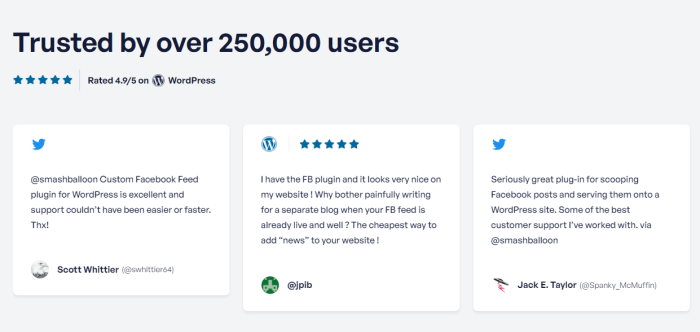
As you can see, Facebook Feed Pro really is the best Facebook feed plugin for WordPress. Using this plugin, you’ll have an easy time adding a horizontal Facebook feed to your website.
Ready to add Facebook content to your site? Sign up for Facebook Feed Pro today!
How to Easily Add a Horizontal Facebook Feed
With these in mind, let’s talk about how you can embed a horizontal Facebook feed in just a few easy steps.
Step 1: Install Facebook Feed Pro
First, get your copy of the Facebook Feed Pro plugin here. Then you can also download the Carousel extension from here.
After downloading all the plugins to your computer, it’s time to install them on your WordPress website.
If you need some help doing this, you can take a look at this newbie-friendly tutorial on how to install a WordPress plugin.
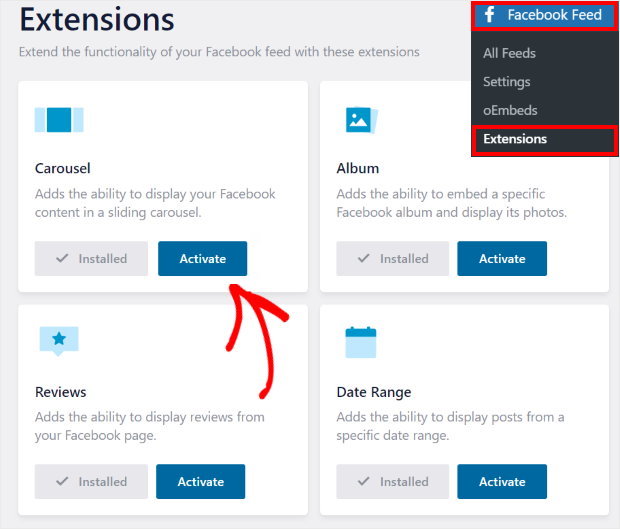
Step 2: Activate the Carousel Extension
Next, you need to activate the Carousel extension so you can embed your Facebook feed in a horizontal layout.
To get started, go to your WordPress admin panel and then navigate to the Facebook Feed » Extensions menu.
On this page, look for the Carousel extension and click on the Activate button there.
Step 3: Create Your Facebook Feed
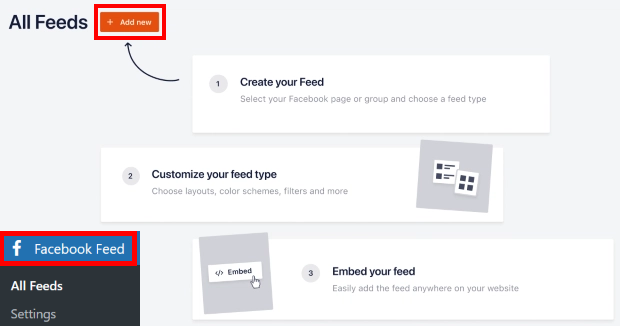
To create a Facebook feed, first navigate to Facebook Feed » All Feeds from your WordPress dashboard.
You can now click on the Add New button here to get started.
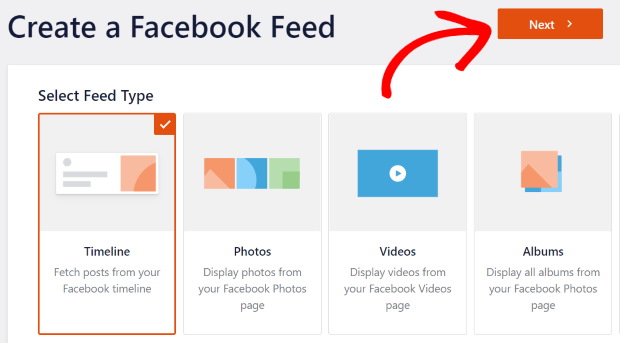
After that, the plugin will show you the 9 different options for your feed type, including timeline feed, photos feed, videos feed, albums feed, reviews feed, and more.
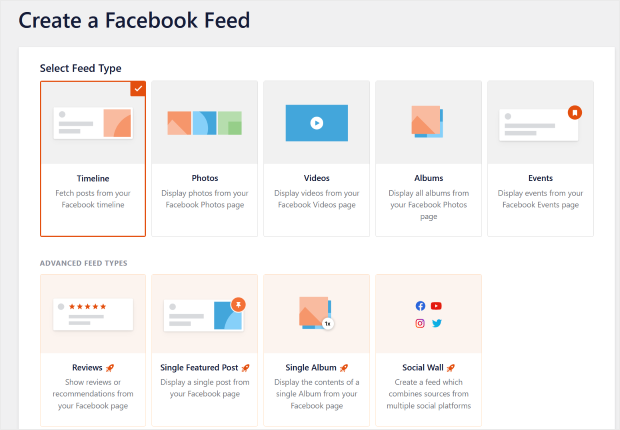
You pick whichever feed type you prefer here. Once you do that, click on the Next button.
Today, we’ll use a timeline feed for our tutorial.
Step 4: Connect Your Feed to Facebook
For the next step, you need to connect your new feed to Facebook. That means you have to add a Facebook page as a source.
First, click on the Add New button on the popup to get started.
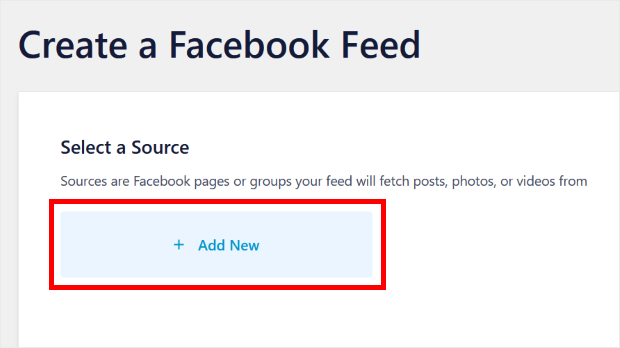
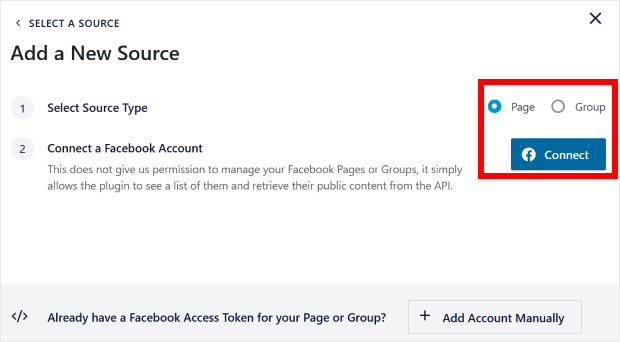
Once you do that, the plugin asks you to start connecting your brand’s Facebook page.
For that, simply click on Connect.
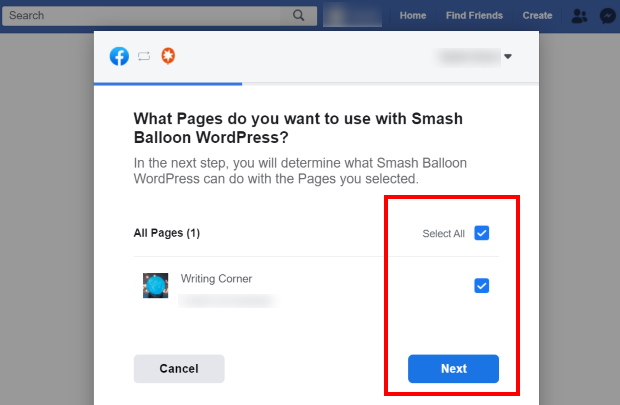
After that, the plugin will send you to Facebook. Here, you can use the popup to select the page that you want to connect to your horizontal Facebook feed.
Once you do that, just click on Next.
On the next popup, you can give the plugin read-only access to your Facebook page.
With that access, it can only read the posts on Facebook and can’t change anything. So you can be sure that Smash Balloon is perfectly safe.
To continue, just click on the Done button.
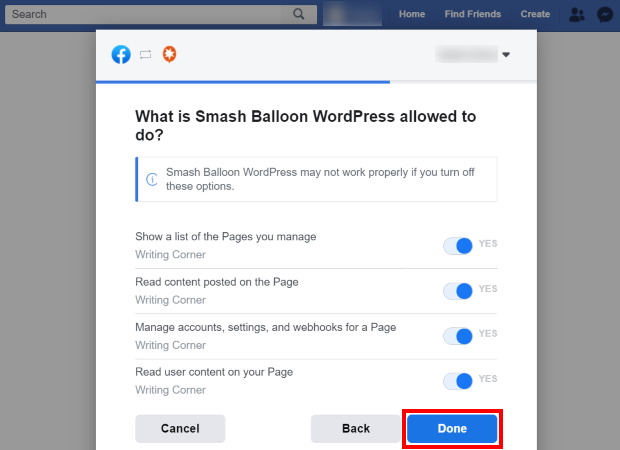
You’ll now be back on your website to finish connecting your new feed to Facebook.
So click on the Add button and confirm your Facebook page as a source for your feed.
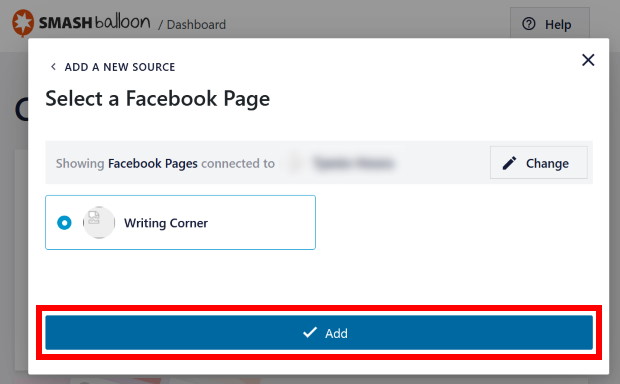
Finally, click on Next to finish connecting your feed to Facebook.
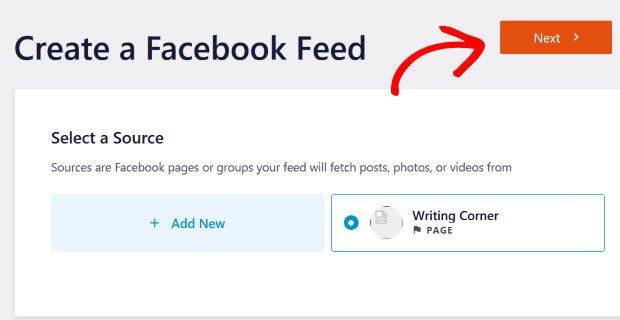
Step 5: Customize Your Facebook Feed
After connecting your feed to Facebook, the plugin will show you different themes that you can import. Each theme comes with a unique look with different buttons, header design, colors, and more.
To continue, select a theme that you like and then click on the Next button.
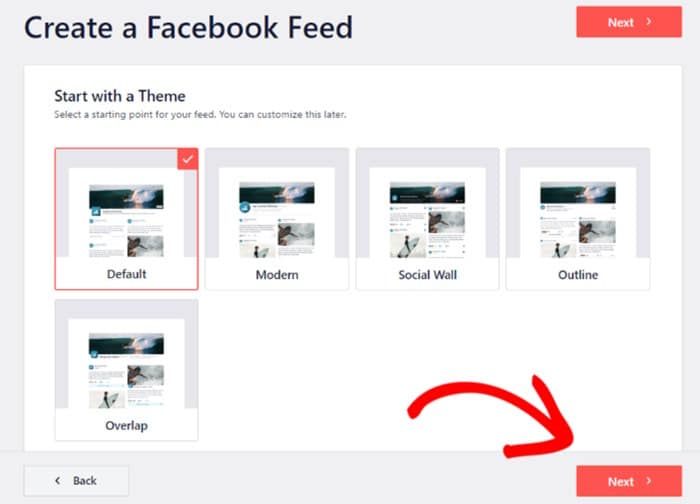
Next, you can quickly change the layout of your Facebook content by selecting a template.
Just select a template that you’d like to use and then click on Next here.
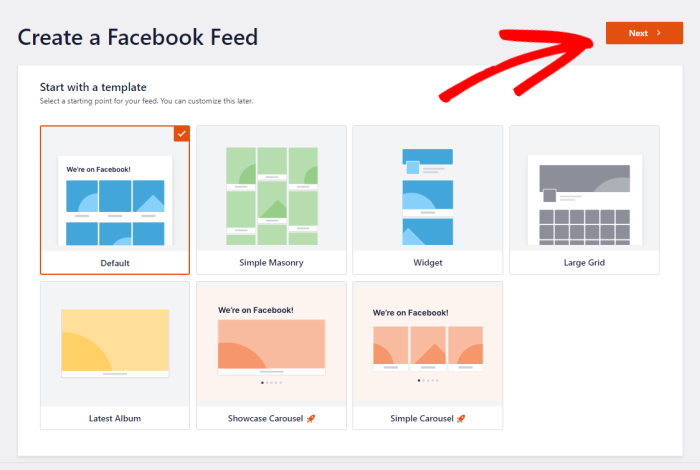
Now, Facebook Feed Pro will open your new feed in the live feed editor.
The left panel of the live feed editor has all the customization options. You can use these to change the layout, color scheme, header style, background, and other parts of your Facebook feed.
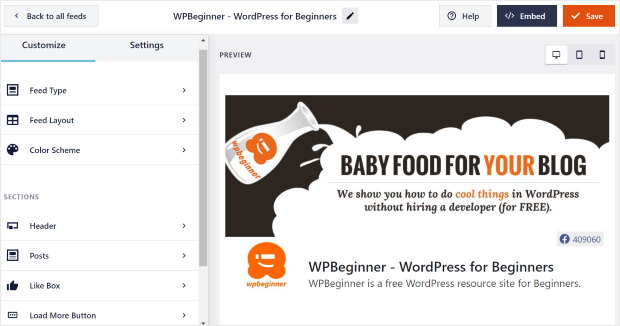
On the right, you can see a live preview of your Facebook feed that shows all your changes.
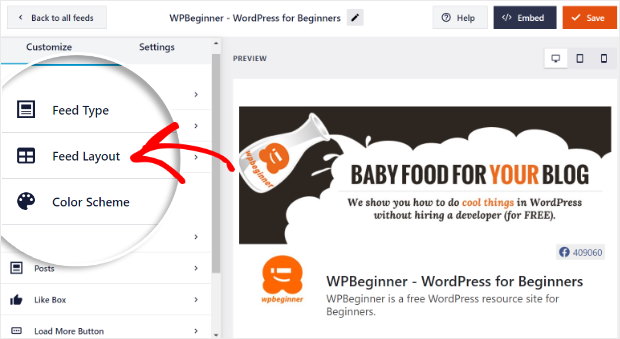
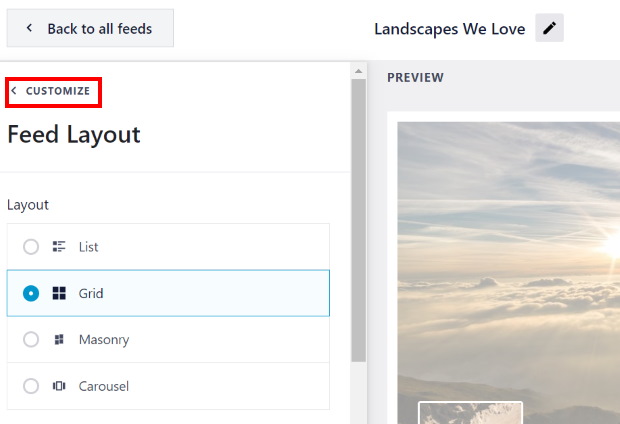
First, we need to enable the horizontal layout for your new Facebook feed. To do that, click on the Feed Layout option.
You can see all the layout options for your Facebook feeds here.
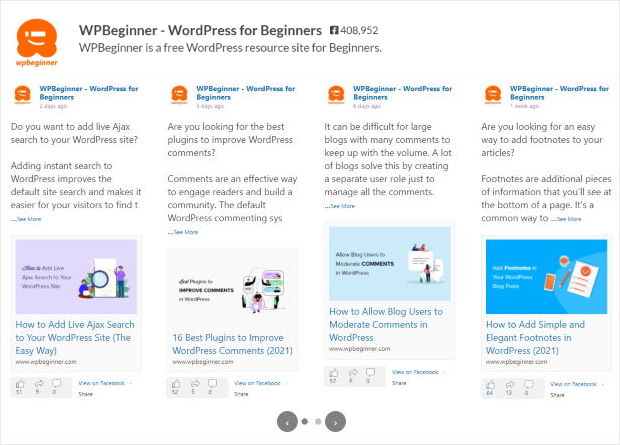
To turn your new feed into a horizontal Facebook feed, select the Carousel option.
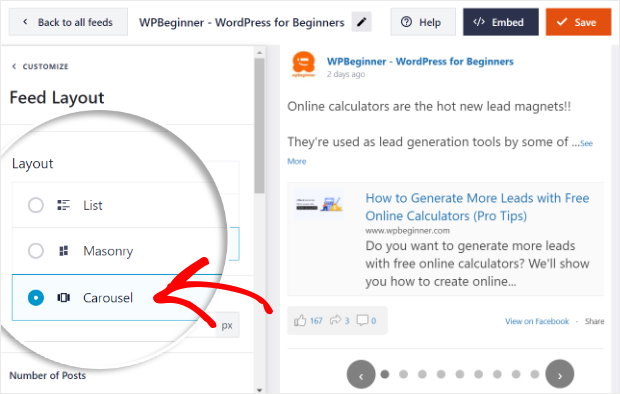
As you can see on the live preview, you now have a horizontal Facebook feed for your website.
Remember to click on the Save button to keep this layout.
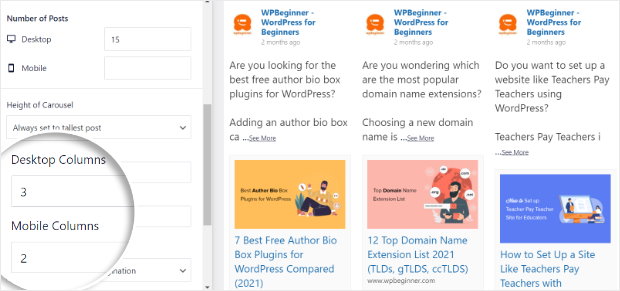
After that, scroll down to check the Desktop Columns field. You can pick the number of Facebook posts that are visible on desktop devices here.
Next, there’s the Mobile Columns option, where you can set the number of posts visible for mobile users.
Enter the number of columns in these 2 fields and then click on Save.
Once you do that, you can now change the other settings for your horizontal Facebook feed, including the autoplay settings, interval, pagination style, and more.
After you’re done changing these options, click on the Save button.
Next, you can click on the small Customize button to check out the rest of the customization options.
You can then select the Color Scheme option from the left to edit the colors of your new horizontal Facebook feed.
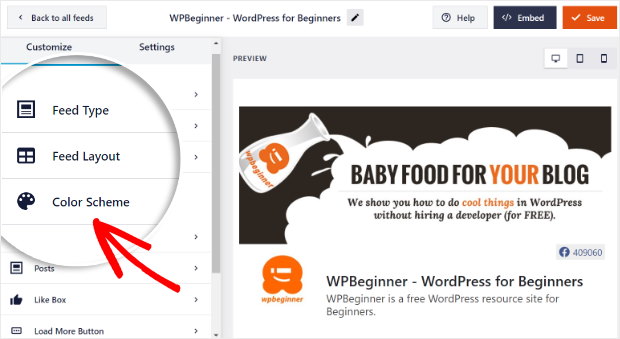
There are 4 options when it comes to the color schemes here:
- Inherit from Theme: Use the same colors as your website
- Light: Pick a lighter background with darker font
- Dark: Use a dark background and lighter text
- Custom: Manually pick all the colors yourself
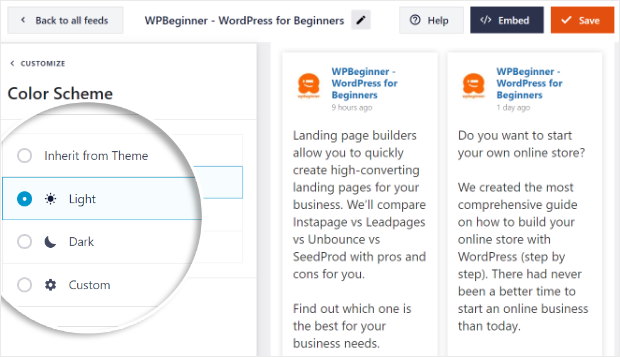
After you pick the color scheme you prefer, click on Save.
You can now go on and customize the rest of your horizontal Facebook feed using the live feed editor.
The Facebook Feed Pro plugin gives you a lot of options, so you can pick your background, feed type, header style, post elements, margins, and much more.
Once you’re done customizing your Facebook feed, you can click on the Save button.
Step 6: Embed Your Horizontal Facebook Feed
Finally, it’s time to post your new horizontal Facebook feed on your website. You have 2 ways to do that:
- Add a horizontal Facebook feed to your page
- Add a horizontal Facebook feed to your footer
Add a Horizontal Facebook Feed to Your Page
You can start embedding your horizontal Facebook feed right from your live feed editor.
All you have to do is click on the Embed button at the top.
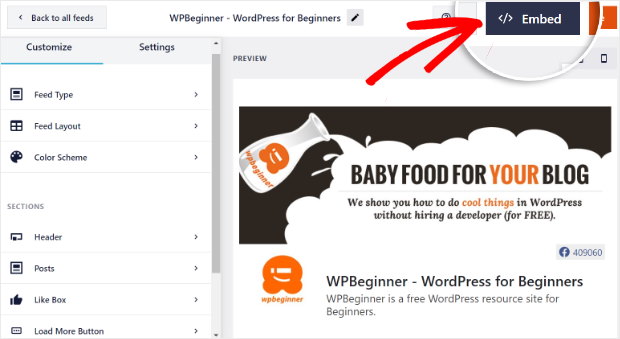
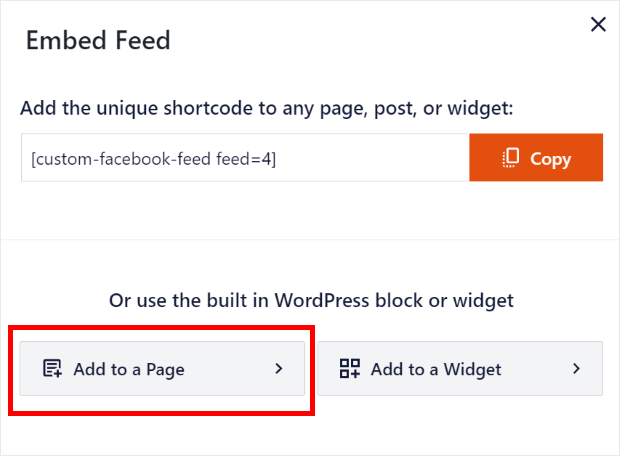
Then, the plugin will ask you to choose where to embed your new horizontal Facebook feed.
For now, just click on the Add to a Page option.
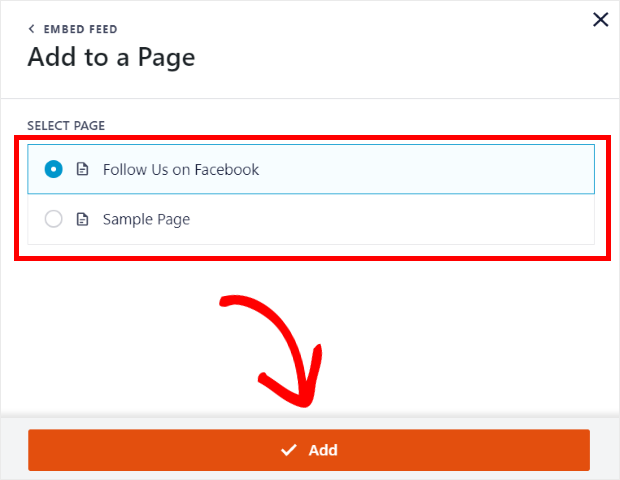
After that, just select your page from the list and then click on the Add button.
This will open that WordPress page so you can embed your feed there. To do that, click on the small plus icon (+) to add a new block.
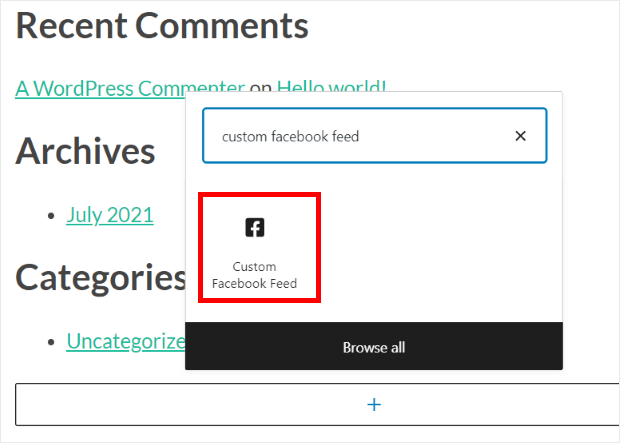
Finally, select the Custom Facebook Feed widget from the options to embed your feed.
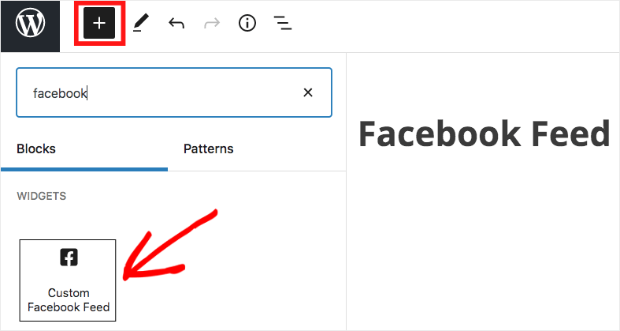
Just click on Publish now and you’ve successfully embedded your horizontal Facebook feed to your website!
Feel free to open your site and check if you want to see how it looks.
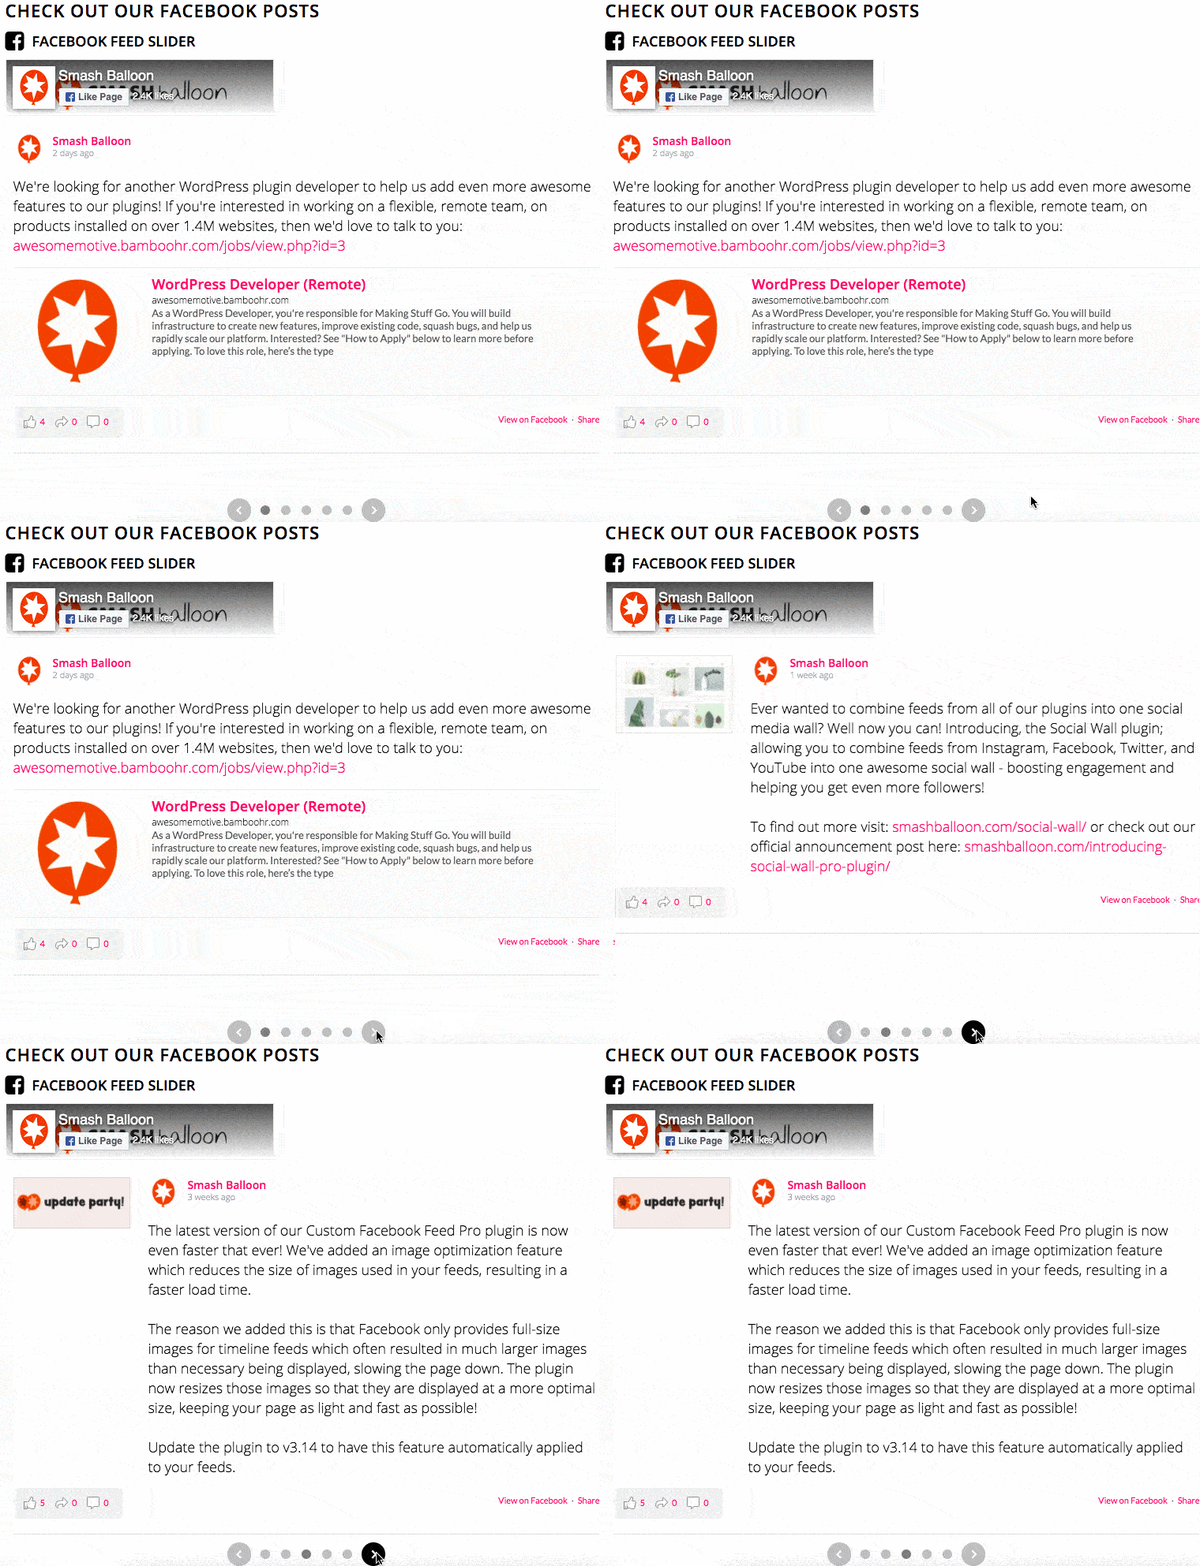
Add a Horizontal Facebook Feed to Your Footer
You can also embed your horizontal Facebook feed on your footer area as a Facebook widget.
To do that, you’ll first need to have the live feed editor open.
So go to the Facebook Feed » All Feeds menu from your WordPress dashboard.
On that page, you can see all of your Facebook feeds listed. Now click on your horizontal Facebook feed to continue.
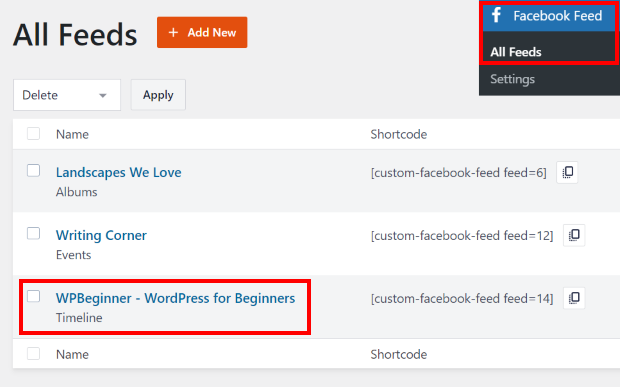
Clicking on it will open the live feed editor once again. On the editor, click on the Embed button in the top right corner.

Next, select the Add to a Widget button on the popup.
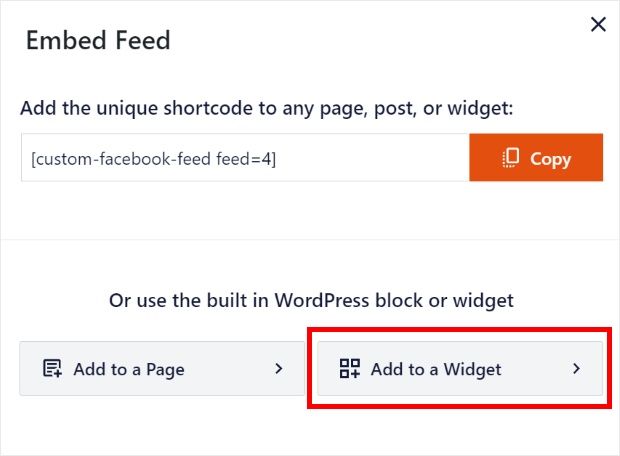
Now the plugin will open your Widgets page. You can manage all the widgets on your WordPress website here.
On this page, click on any of the Footer panels to proceed.
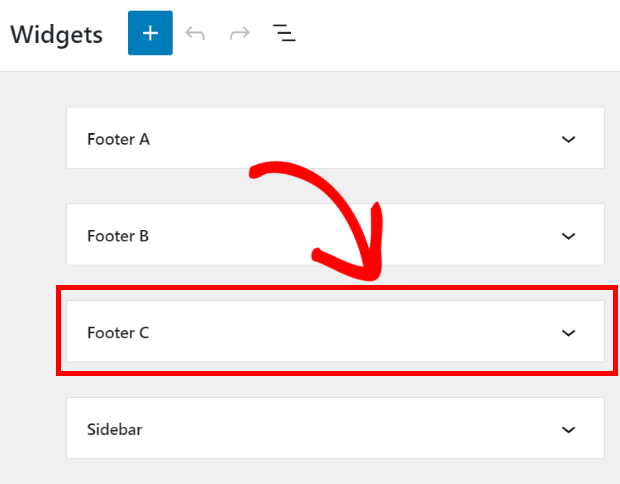
After that, click on the plus icon (+) there to add a widget and then select the Custom Facebook Feed widget.
So now, when you check out your website, you can see your horizontal Facebook feed embedded as a widget, like this:

And that’s it!
With the help of this tutorial, you can now easily add a horizontal Facebook feed to your website — with just a few clicks!
The cool thing about this tutorial is that it’s super beginner-friendly, so you can create and customize your Facebook feeds, even if you feel like coding’s not your thing.
What are you waiting for? Go and get your copy of Facebook Feed Pro by Smash Balloon today.
You can add a horizontal Instagram feed to your website as well. Just check out our article on how to embed a horizontal Instagram feed to see how.
