For many businesses, bloggers, and online stores, Facebook is a key platform for sharing photos and connecting with their audience.
In my work with digital marketing, I’ve seen how important visual content is for capturing attention online.
Facebook albums are a useful way to group related photos together. They can showcase your products, highlight events, or share behind-the-scenes glimpses of your brand.
Embedding these Facebook albums on your website can make it more visually engaging and informative. You can show visitors what you have to offer and keep them interested – all without using words.
If you’re looking for a simple way to embed Facebook albums on your website with ease, you’re in the right place.
In this guide, I’ll show you an easy method to embed a Facebook album on your website in a few easy steps.
In This Article
- 3 Ways to Add Facebook Albums to Your Website
- Easiest Way to Add Facebook Albums to Your WordPress Site
- Why Embed Facebook Photo Albums on Your Website?
- How to Embed a Facebook Album Feed on Your Website
- Top Posts on Embedding Facebook on Your Website
3 Ways to Add Facebook Albums to Your Website
The 3 main ways of displaying Facebook photo albums on your website are:
- Direct Embedding via Facebook Share Code: Share an album as a new post on Facebook, then paste the embed code into your website.
- Third-Party Embed Code Generators: Generate a Facebook album embed code from a 3rd-party website to paste on your website.
- WordPress Plugin (Easy Way): Use a WordPress plugin to connect your Facebook account and embed your albums with a few clicks.
Honestly, based on my personal experience, the first 2 methods for embedding Facebook albums are pretty difficult:
- They involve using multiple web pages and require you to paste code snippets directly into your website.
- Most tools use Facebook iFrames, so search engines won’t recognize the embedded content and you lose out on SEO points.
- If I don’t use a WordPress plugin, I also need to manually edit the code if I want to customize how my Facebook photo albums look.
- If you’re not familiar with coding like me, editing code snippets can literally break your website and waste your precious time. Yikes.
The good news?
Unlike Wix, Shopify, or Squarespace, WordPress comes with tons of plugins that can add features to your site.
The best and easiest way to embed Facebook album widgets on your website is to use a WordPress plugin.
With the help of a WordPress Facebook plugin, you can easily:
- Display your albums in stunning Facebook galleries — no coding required
- Sync your Facebook albums to WordPress so your Facebook album feed is automatically updated every time you add content
- Control how your albums look and feel on your website
- Customize the information displayed in your photo albums
- Display multiple Facebook albums in different areas of your site
- Get access to help and support from WordPress experts
Using a WordPress plugin to embed a photo album on your website gives you much more control over how you display your photos.
Easiest Way to Add Facebook Albums to Your WordPress Site
Embedding Facebook albums can be really simple when you use the right tool, like Facebook Feed Pro.
With the help of Facebook Feed Pro, you can create, customize, and embed feeds of Facebook albums on your website in just a few simple clicks.
Why I Liked Facebook Feed Pro:
- All you have to do is follow the 3-step guided flow, and the plugin will automatically take you through the whole process.
- You can embed different types of Facebook content on your site, including Facebook reviews, event calendars, Facebook galleries, videos, Facebook live streams, and more.
- Since the plugin was built with speed in mind, my site was loading as fast as ever even after displaying tons of photo albums.
- Another thing I really appreciate is its built-in visual feed customizer. You can control how your albums look and what photos they show — all without any coding!
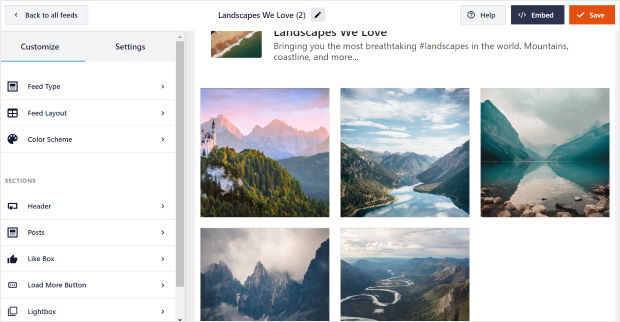
With the help of Facebook Feed Pro, displaying photos, albums, or any kind of Facebook content was so much easier than I expected.
Ready to showcase your Facebook albums on your site? Get started with Facebook Feed Pro now!
Why Embed Facebook Photo Albums on Your Website?
If you’re using Facebook to promote your brand, here’s why embedding a Facebook album is a great idea:
- Enhances Website Aesthetics: Adds eye-catching visual content, making your site more appealing.
- Boosts Facebook Engagement: Cross-promotes your Facebook presence to your website visitors, driving traffic and interaction.
- Improves On-Site Time & SEO: Engaging visual content encourages visitors to stay longer on your website, which means better SEO ranking.
- Increases Business Interest: Effectively showcases products, services, and brand activities, fostering greater interest in your offerings.
- Builds Social Proof: Displays user-generated content, enhancing credibility and fostering customer loyalty through authentic visuals.
How to Embed a Facebook Album Feed on Your Website
Now, let’s dive into setting up your Facebook albums in WordPress using the Facebook Feed Pro plugin.
Step 1: Download and Install Facebook Feed Pro
To embed a Facebook album on a website, first, go and grab your copy of Facebook Feed Pro. Once you have the plugin, install and activate it on your site.
(For more info, you can take a look at this step-by-step guide on how to install a WordPress plugin)
After that, you can get the Album Extension for the plugin. Like before, install and activate it on your website.
Step 2: Create Your Facebook Album Feed
Now that you’ve installed and activated the plugin, you can go to the Facebook Feed » All Feeds menu on your dashboard.
On this new page, click on the Add New button at the top.
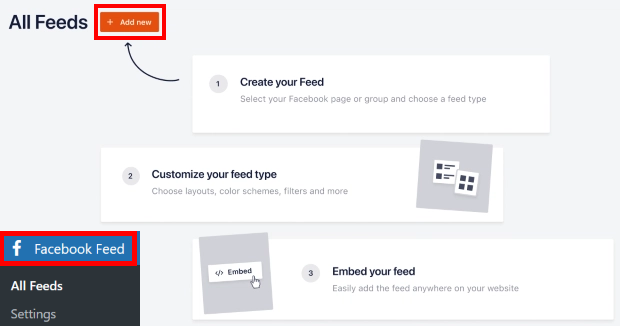
Once you do that, it’s time to pick the feed type from all the available options.
There are 8 different feed types here, with support for Facebook photos, videos, events, reviews, single albums, and much more.
When it comes to Facebook album feeds, there are 2 options to choose from:
Now that you’ve created a Facebook album feed, you can choose between 2 types of album feeds:
- Albums: Show all the albums from your Facebook page
- Single Album: Display a feed containing all the images from a single Facebook album
Create an Albums Feed
To get started, you can just select Album from all the feed types and click on Next.
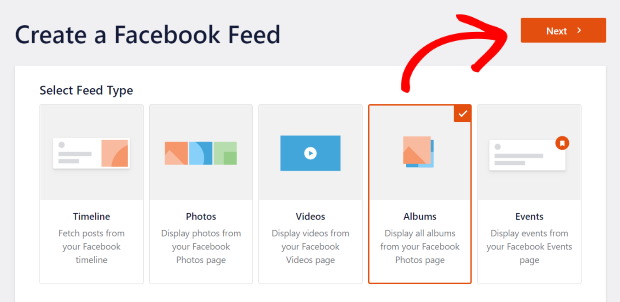
After that, you’ll have to pick the source for your Facebook album. This is the Facebook page where the album is stored.
To add the source, first click on Add New.
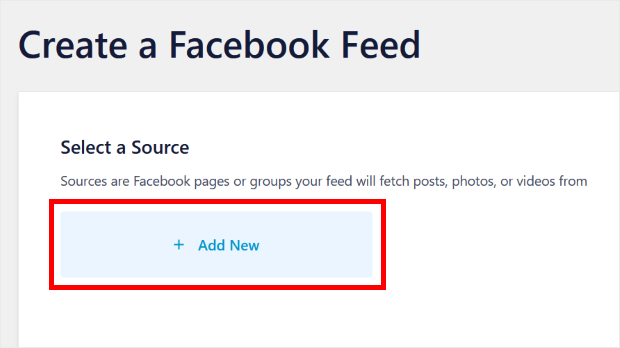
You’ll now see a popup where you can choose a Facebook Page for your source, then click on Connect.
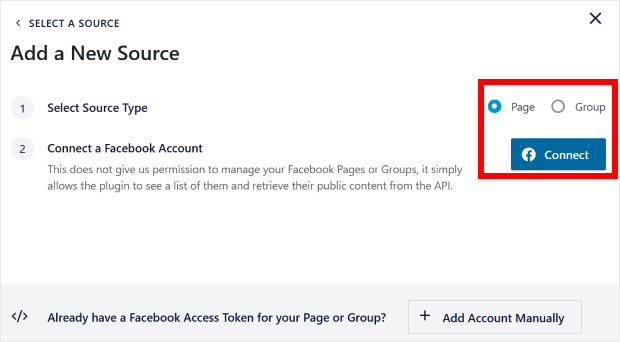
After you do that, it’s time to give read-only access to the plugin so that it can show your Facebook album.
And since it only asks for read-only access, Facebook Feed Pro can’t actually change anything on your site so it’s 100% safe.
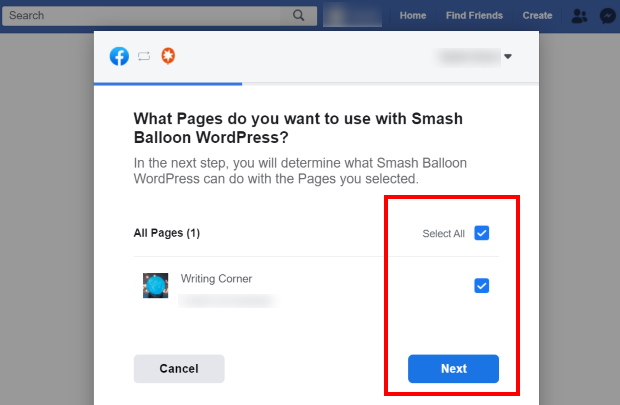
Here, select the page you want for your source and then click on Next.
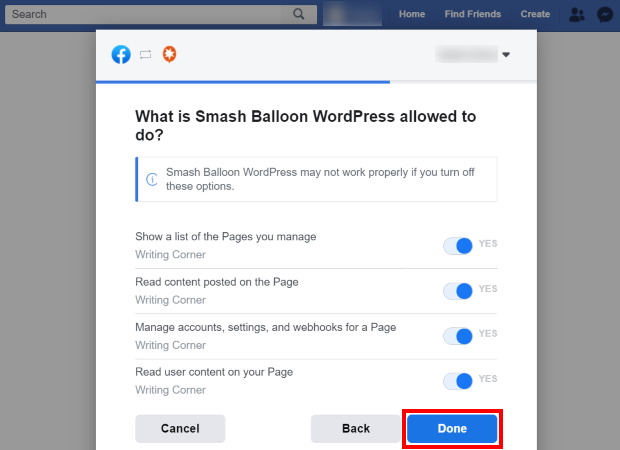
After that, click on Done to finish giving the access.
Now, you’ll be back on your website. Here, you can finally add your new source by clicking on Add.
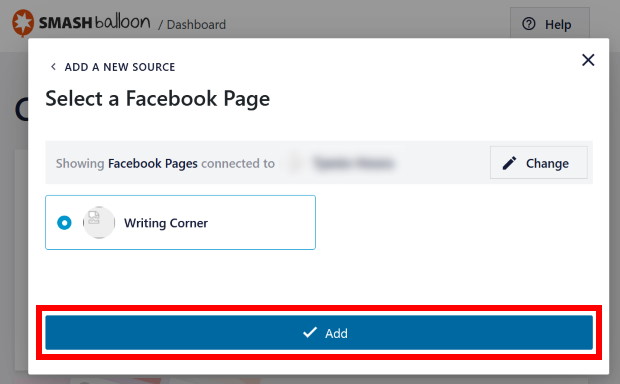
With that, you can just click on Next and move on to customizing your Facebook album feed by going to step 3 below.
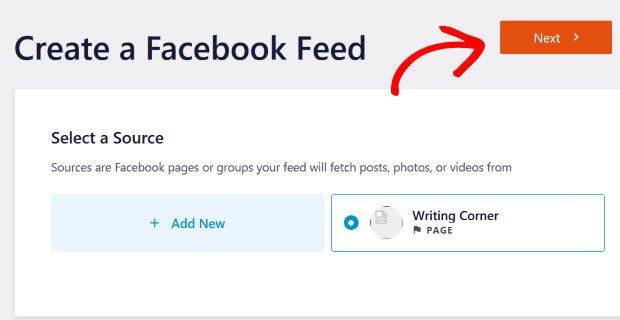
Create a Single Album Feed
Want to embed a single Facebook album instead? Facebook Feed Pro can help you do this, too.
First, go to the Facebook Feed » All Feeds menu on your dashboard and click on the Add New button to create a new feed.

On the next page, you can select Single Album and then click on Next.
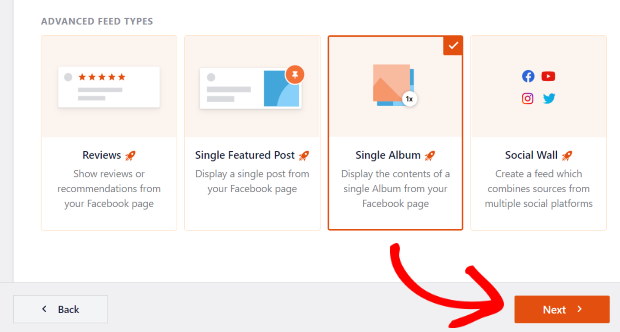
Now, you can click on Add New to add a new source for your Facebook album.

In this new popup, select Facebook Page and click on Connect.

After you’re done, you’ll see a new popup where you can select the Facebook pages to connect. Just select the ones you prefer and click on Next.
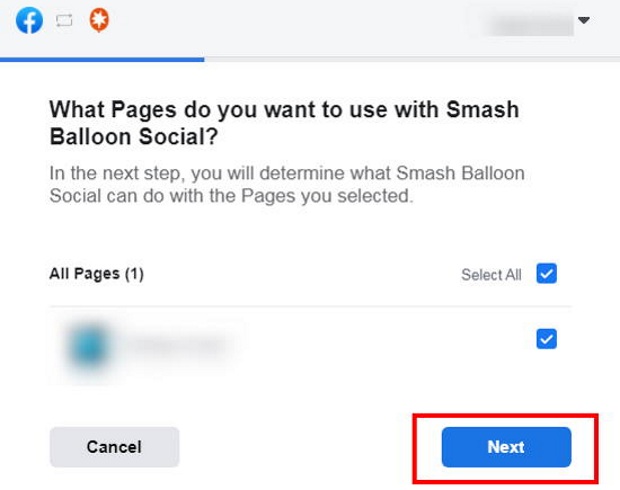
Now click on Done to finish up here and return to your website.
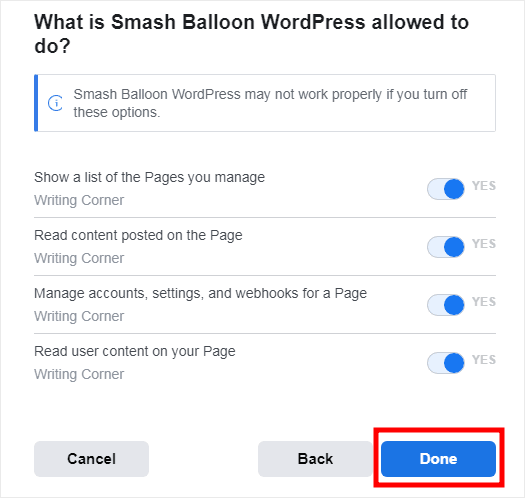
On your site, you can then click on Add to use this source for your Facebook album feed.

Finally, you can select your source and then click on Next.

With that, you can now get the link for your Facebook photo album to connect it to your feed. For that, open up the Facebook album on your web browser.
Then, you can copy the URL from the address bar.
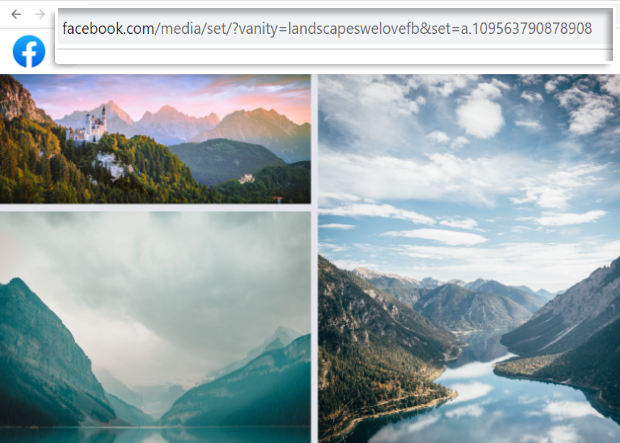
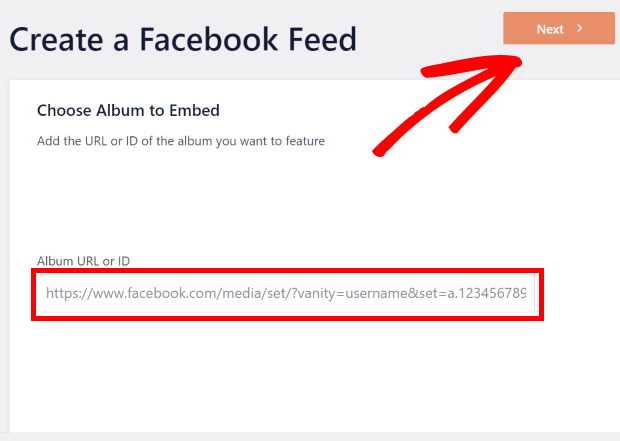
Now go back to your website and then paste the URL in the Album URL or ID field. Finally, click on Next.
Step 3: Customize Your Facebook Album Feed
Here’s my favorite part: this next step is about personalizing your Facebook album feed’s design and content.
To help you select your feed’s design with ease, Facebook Feed Pro comes with different feed themes that you can use.
These professionally-designed themes can change your colors, icons, button design, and more:
- Default
- Modern
- Social Wall
- Outline
- Overlap
After you choose your Facebook feed theme, click on the Next button.
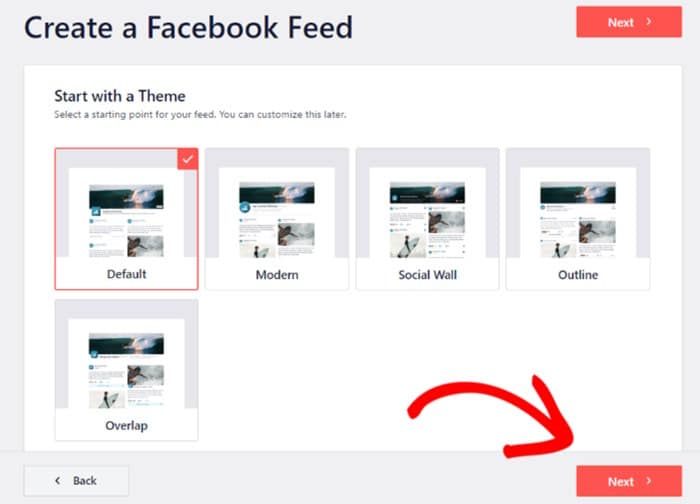
Once you’ve selected your theme, you can also choose a feed template for your feed. That way, you can change the layout and header design for posts.
All you have to do is pick from these ready-made layouts and then click on Next.
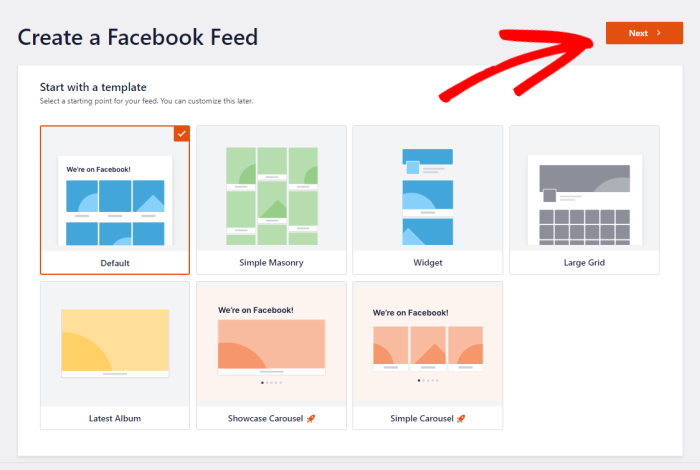
Now, you can see the live visual feed editor, where you can get creative with customizing your Facebook album widget.
You can see all the customization options on the left and the live preview of your Facebook album feed on the right.

With these, you can freely set your feed type, layout, color scheme, header design, post design, and a lot more with ease — no complex options, coding, or dropdown lists.
I’ll just guide you through some of my favorite customization options here.
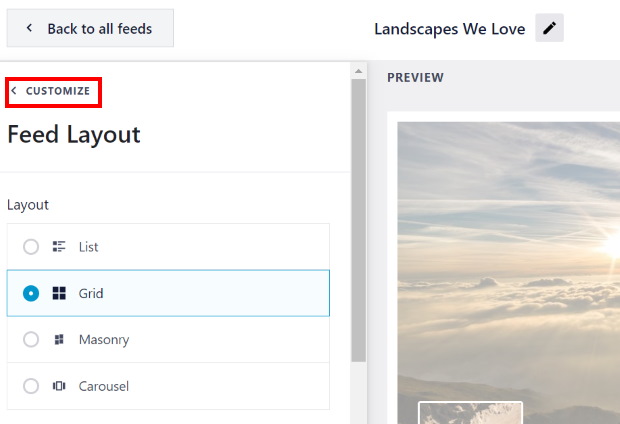
To begin, first, select the Feed Layout option.
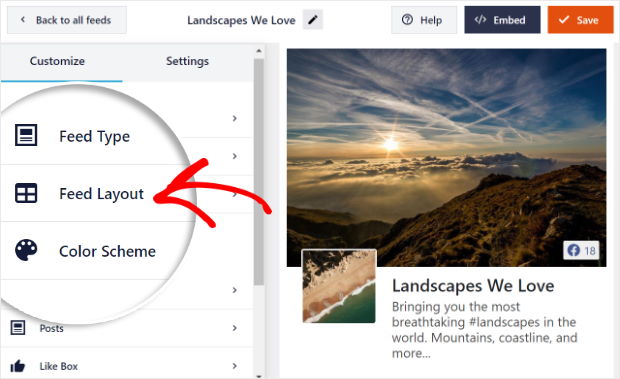
Here, you can choose from 4 different layouts for your Facebook album feed: List, Grid, Masonry, and Carousel.
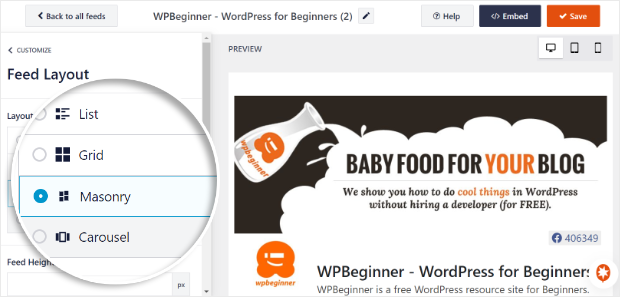
The list layout will show your Facebook albums one after the other in a simple way. It’s a great way to make each album clearly visible on your site.
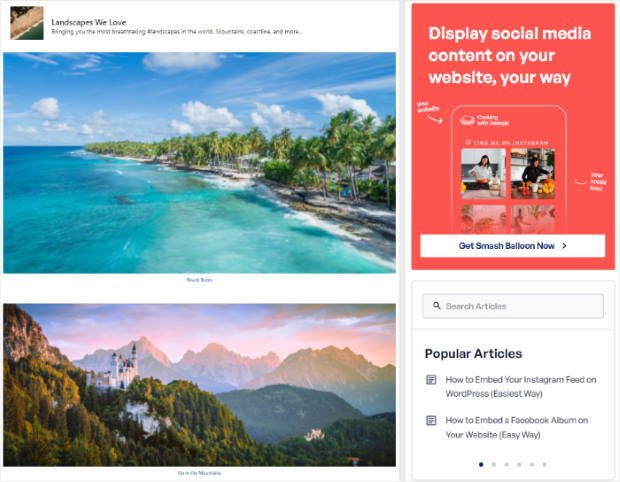
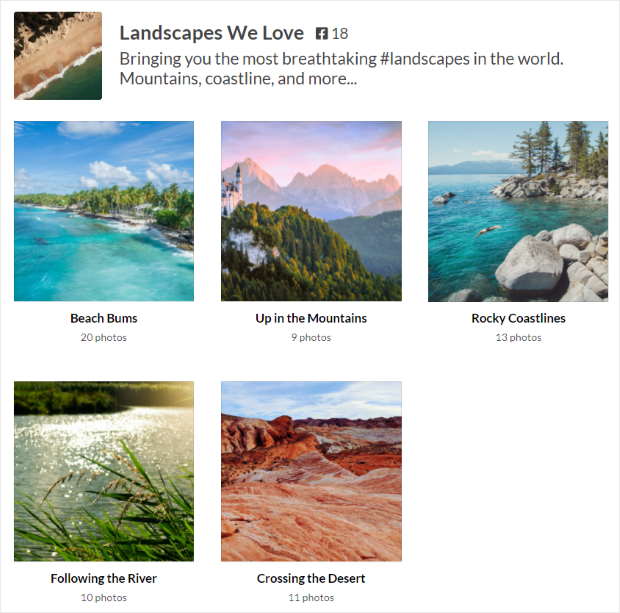
Want to show lots of albums at once? Well, the grid option can help you show all of your Facebook posts in neat rows and columns.
Personally, I usually use the grid layout just because it reminds me of Facebook’s design as well.
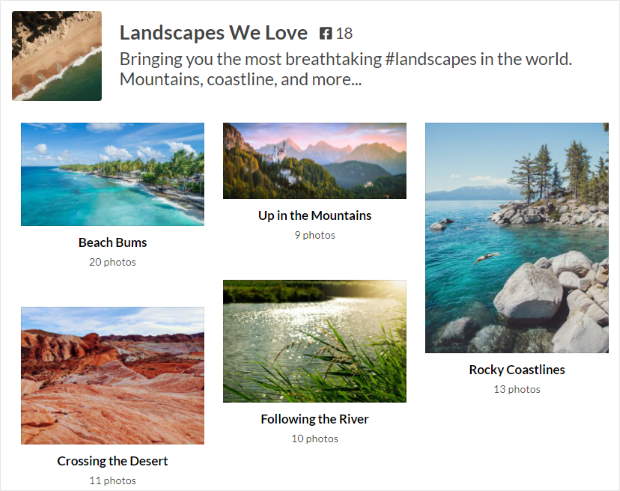
If you go for the masonry layout, your Facebook albums will keep their original proportions.
It’s a great way to showcase a variety of Facebook photos on your website.
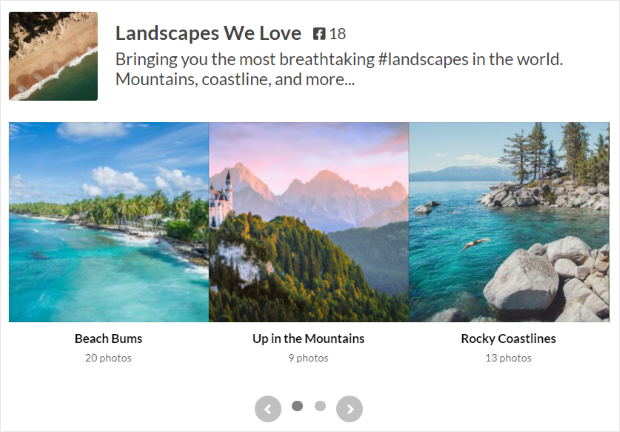
You can also pick the Facebook carousel layout here.
With it, your content will appear in a beautiful carousel slideshow instead.
Once you pick the layout you want, click on the Save button.
Now, to go back to the main customization options, click on the Customize button at the top.
Did you see how easy it was to customize your Facebook album feed? We didn’t even have to deal with any complicated coding snippets — such a lifesaver, right?
Now, from the options on the left, select Color Scheme.
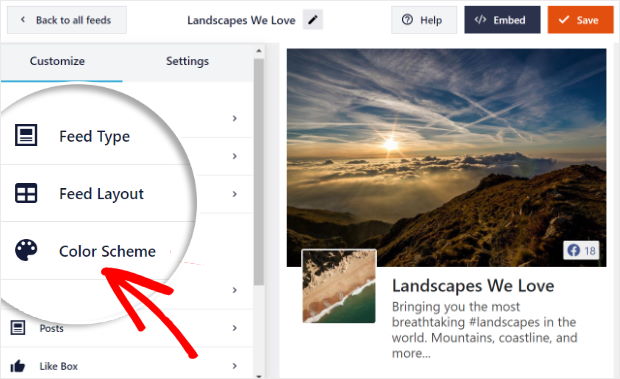
There, you can change the colors of your Facebook album feed by picking from 4 different options.
- Inherit from Theme: Copy the color scheme of your theme
- Light: Put on a brighter look with light colors
- Dark: Pick a darker look for your feed
- Custom: Manually add in all the colors for your feed
You can select your preferred option from these 4 to finalize the color scheme of your Facebook album feed.
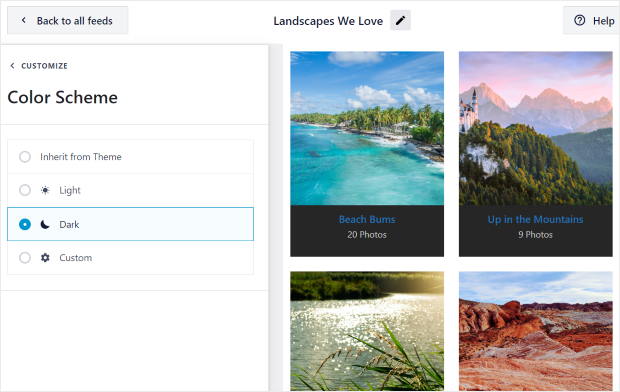
After you select the color scheme you prefer, click on the Save button.
You can then start customizing the rest of the feed. With these options, set the header style, post layout, feed size, margins, and a lot more.
And after you’re done with customizing your Facebook photo album feed, you can click on Save.
Step 4: Embed Your Facebook Album Feed
Finally, you can now add your new Facebook album feed to sync it to your website. There are actually 2 ways you can embed Facebook photo album feeds.
Embed Facebook Photo Album Feed on a Page
To get started, click on the Embed button at the top right corner.
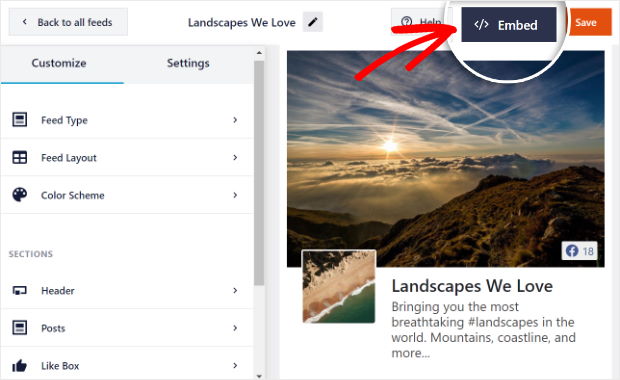
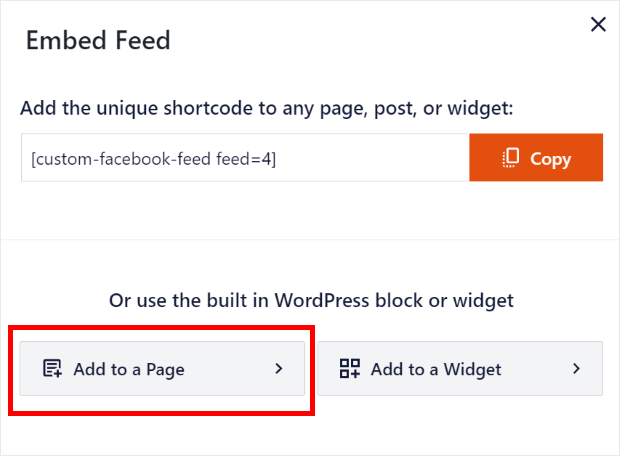
Doing that will open a new popup where you can pick the location for your Facebook album feed. You’ll be able to add it to your homepage, sidebar, footer, landing pages, or even copy the shortcode from here.
Just select Add to a Page here and continue.
The plugin will now show you all of your available pages. To proceed, select the one where you want the Facebook album feed and then click on Add.
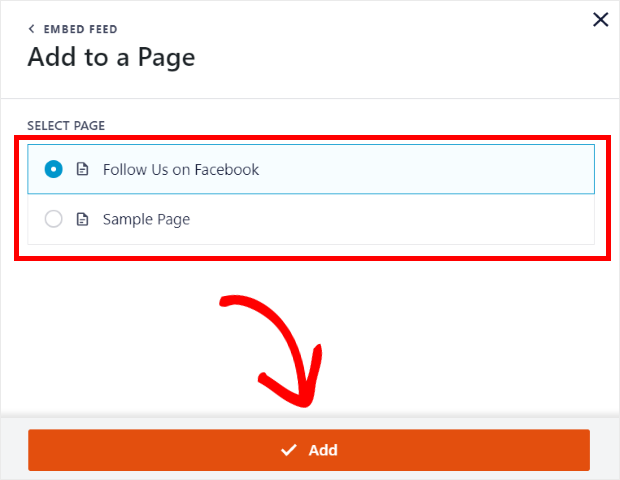
After that, the plugin will send you to that page so you can embed your Facebook album feed.
On that page, you can click on the small plus icon (+) at the top and select the Custom Facebook Feed widget.
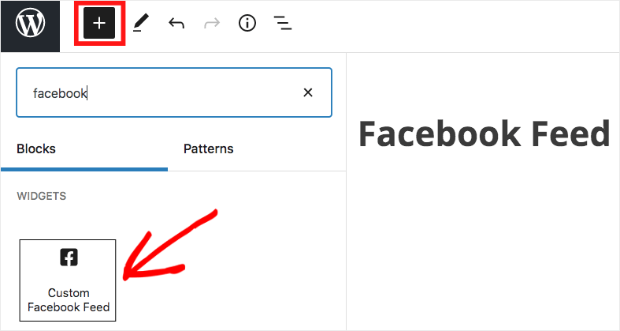
Just click on the Publish button on the top right, and you’ve successfully added your Facebook album feed to your site.
You can now open your site and check it out!
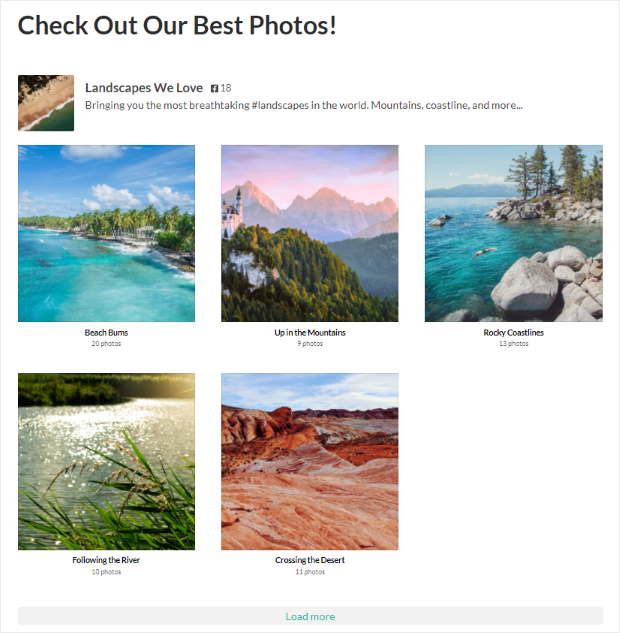
Now, your visitors can click on any of the Facebook photo albums to see your images in a beautiful lightbox.
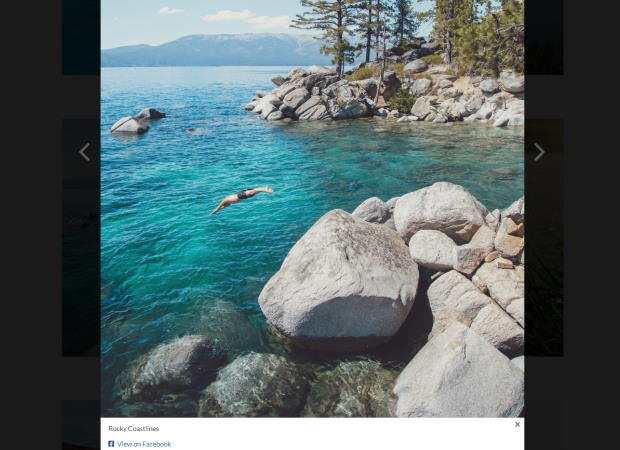
As you can see, Facebook Feed Pro lets you embed Facebook albums on your website free of hassle.
Next, you can also embed the feed as a Facebook photo gallery widget on your website with the help of this plugin.
Embed Facebook Photo Album Feed on Your Sidebar or Footer
You can also embed photo galleries on your website’s sidebar or footer as a Facebook widget.
First, you’ll have to open up the live feed editor.
To do that, you can go to the Facebook Feed menu from your WordPress dashboard.
Now, you should be able to see a list of all your Facebook feeds. Just click on the Facebook album feed you want to embed.
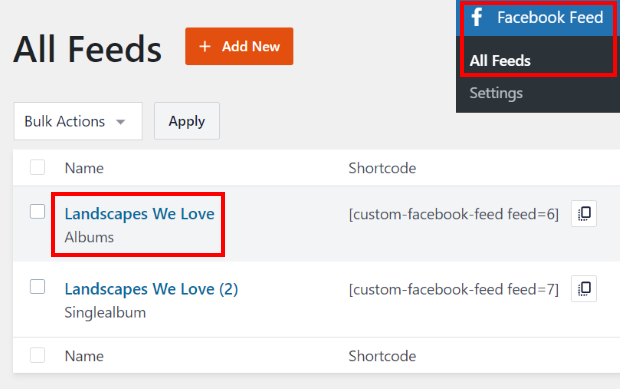
From here, you can customize your feed some more or add the Facebook photo album to your website.
In the live feed editor, click on the Embed button at the top.

You’ll then see all the ways to embed a Facebook album feed on your WordPress site.
From the options here, select Add to a Widget.
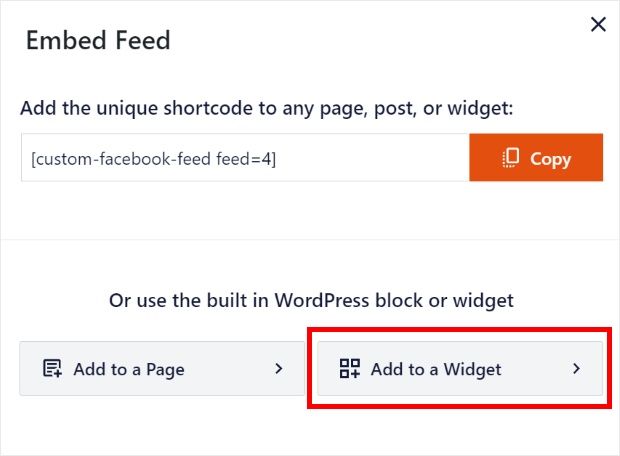
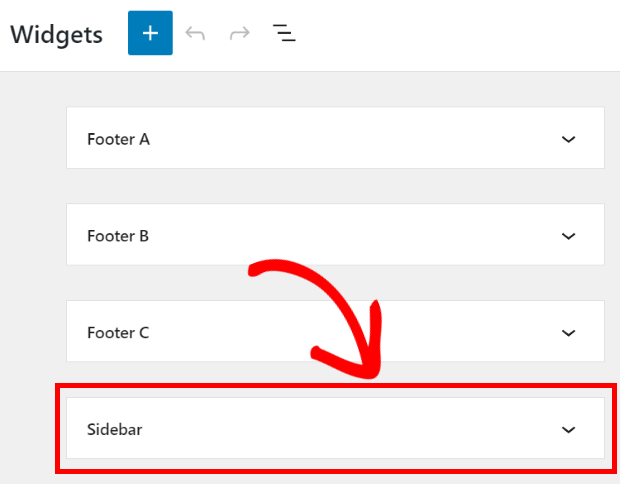
To embed a photo gallery on a website’s sidebar or footer, Facebook Feed Pro will now send you to the Widgets page.
Here, click on Sidebar to go ahead and add your Facebook photo album widget.
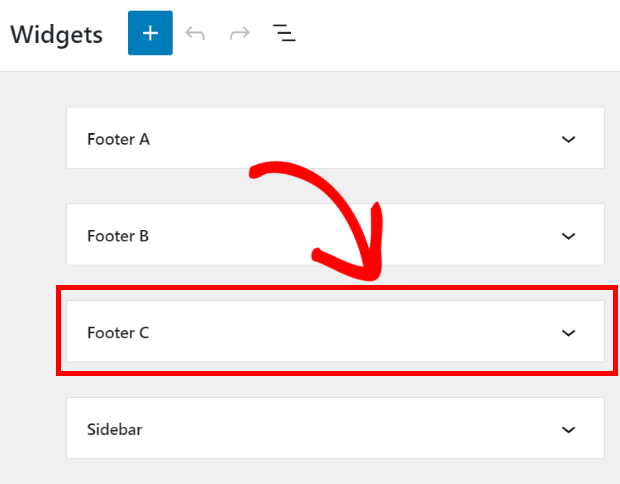
To use a WordPress footer instead, click on a Footer panel here.
For this tutorial, we’ll go with the sidebar.
Then, click on the plus icon (+) and select the Custom Facebook Feed widget.
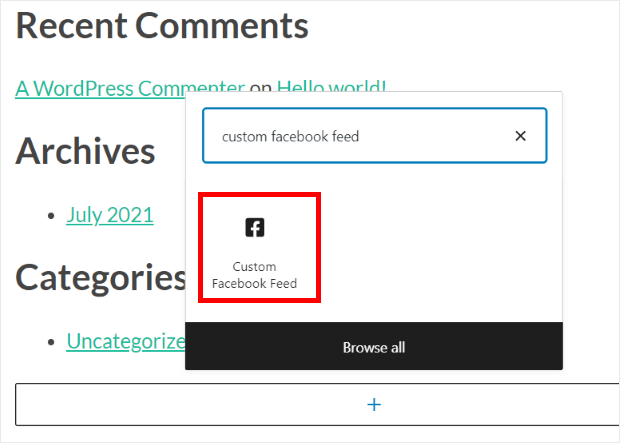
Finally, you’ve added your Facebook photo album to your website sidebar.
With the help of Facebook Feed Pro, you can get Facebook posts and albums to show up on your website’s widget-ready areas in no time.
You can open your site to check and see how your Facebook photo album widget looks now.
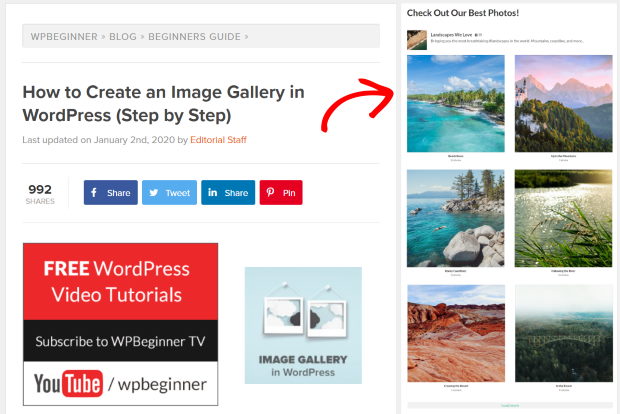
There you have it!
You now know how to embed a Facebook album on your website. With the Facebook Feed Pro plugin, all it takes is a few simple clicks.
All you have to do is pick the right photo albums to show on your site, and you can boost your engagement and grow your online presence.
Ready to add your photo albums to Facebook? Get started with Facebook Feed Pro today.
Frequently Asked Questions
What causes Facebook oEmbed issues in WordPress and how are they solved?
Unfortunately, WordPress has completely dropped support for oEmbeds so the feature isn’t available anymore. But the good news is that you can use third-party tools like Facebook Feed Pro to enable oEmbeds for Facebook as well as Instagram once more.
What is the easiest way to add Facebook albums to my WordPress website?
If you’re looking for something quick and easy, you can use Facebook Feed Pro to embed your albums. The plugin will automatically fetch content from Facebook, embed the albums your site, and keep your feed updated whenever you upload new photos or albums.
Can I embed my Facebook photo albums on an Elementor-built website?
Yes, you can embed your Facebook album feeds in Elementor sites as long as the plugin you’re using is compatible with Elementor. For example, Facebook Feed Pro is 100% compatible with Elementor and other popular page builders.
How can I embed Facebook events on my website?
Manually embedding events from Facebook can be a lot more complicated compared to other types of Facebook content. So, you can just use Facebook Feed Pro to create a Facebook events calendar that will be automatically updated with your latest events.
Top Posts on Embedding Facebook on Your Website
- How to Fix Facebook Video Embeds Not Working
- How to Solve the Facebook oEmbed Issue in WordPress
- Easy Way to Add Facebook Widgets to Your WordPress Website
- How to Embed Your Facebook Feed on Your Elementor
