Looking for an easy way to display a WordPress YouTube gallery on your site? You’ve come to the right place.
Getting views and subscribers on YouTube can be tough since over 500 hours of videos are uploaded to YouTube every minute.
In that case, you can simply cross-promote your YouTube videos to your website to easily reach interested viewers.
The best part? There’s an easy way for you to add a gallery of your videos to your site. Just read ahead to learn all about it.
- Easiest Way to Display a YouTube Gallery
Easiest Way to Display a YouTube Gallery
By default, YouTube makes it a bit confusing for people to display video galleries on their websites. In fact, you can only add a single YouTube video to WordPress at a time.
So, creating a WordPress YouTube gallery means going back and forth between YouTube and your website to manually embed all the videos.

As a result, it can get time-consuming. What’s more, you can’t customize anything without coding so your WordPress YouTube gallery might not match your branding.
No problem. By using a YouTube plugin for WordPress, you can still easily embed a YouTube gallery on your site.
With the help of a newbie-friendly plugin like Smash Balloon’s YouTube Feed Pro, you can easily display your gallery of videos — even if you’re not an IT expert!

Worried that plugins slow down your site? YouTube Feed Pro is designed to be lightweight, so your pages and feeds will still be ultra-fast. And with a faster site, you get much better SEO.
Plus, the plugin is newbie-friendly. This means no confusing code or accidentally messing up your site. Just install YouTube Feed Pro, and it’ll handle all the hard work for you.
Still on the fence? Here are other useful features of the plugin:
- Super easy to set up: After installing and activating the plugin, you can simply follow a guided flow to display your WordPress YouTube gallery in under 5 minutes!
- Livestream promotion: Automatically display a feed of upcoming livestreams from your channel. Have a livestream that’s currently playing? You can show this on your website, too.
- Completely customizable: You can control how your YouTube gallery looks in just a few easy clicks with the help of a live editor.

- Responsive: Your YouTube feeds are responsive, so they look great on any device and on any screen size. It’s also optimized for mobile.
- Multiple YouTube feeds: Want to display more than 1 YouTube gallery? You can create unlimited YouTube feeds with this plugin.
Using a WordPress plugin to create your YouTube gallery in WordPress gives you more control over how to display your videos.
Ready to increase your video engagement and subscribers?
Get started with YouTube Feed Pro today!
Step 1: Install and Activate YouTube Feed Pro
To start creating your YouTube gallery, get your own copy of the YouTube Feed Pro plugin here. Once you’ve downloaded the plugin, add it to your WordPress site by installing it.
Need a refresher on how you can do this?
Check out this step-by-step tutorial to install a WordPress plugin and follow the instructions.
Step 2: Create Your WordPress YouTube Gallery
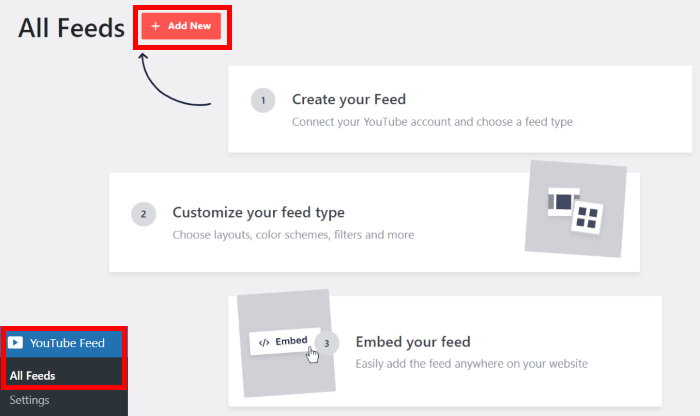
After you install and activate the plugin, simply navigate to the YouTube Feed » All Feeds menu from your WordPress dashboard area.
On this page, click on the Add New button to create your YouTube gallery.
With the YouTube Feed Pro plugin, you can select the type of YouTube videos you want your gallery to display. To continue, choose among these 6 options:
- Channel: Show a feed of your selected YouTube channel’s videos.
- Playlist: Show a feed of specific playlists by entering the YouTube playlist ID
- Search: Show a feed of videos based on specific search words or phrases
- Live Streams: Show a feed of upcoming or currently playing live streams of your chosen YouTube channel
- Single Videos: Show a feed of individual videos
After you choose your feed type, you can click on the Next button to continue.
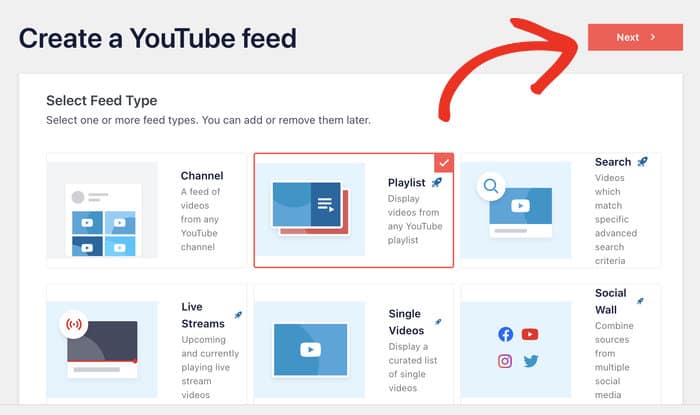
In this tutorial, we selected the Playlist feed type. So, your YouTube gallery will show a feed of your specified YouTube playlist.
Step 3: Connect Your Gallery to YouTube
Successfully created your YouTube gallery? Great.
Next, you can connect your gallery to YouTube so that it can show videos on your website.
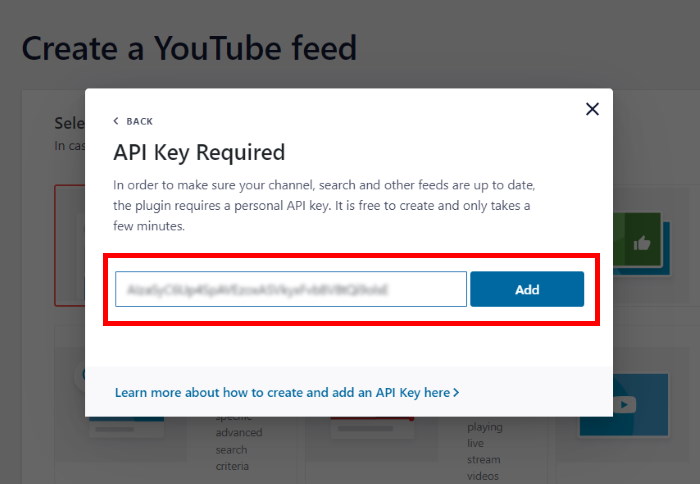
To do that, you can simply use your API Key. Just follow our step-by-step guide on how to create an API Key to get one.
Then you can return to your website and paste the API Key on the popup.
Finally, click on Add to submit your key.
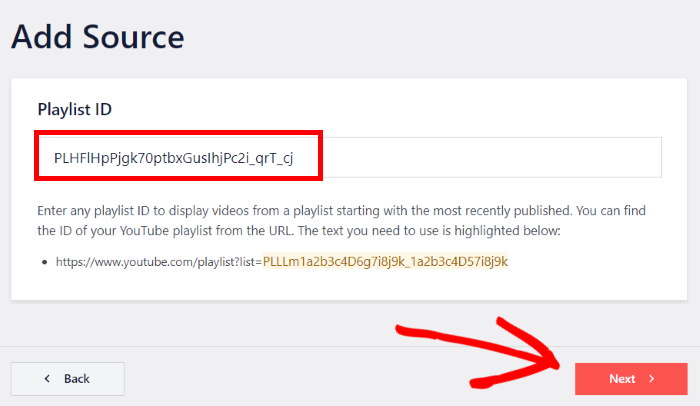
Next, you can pick the source for your YouTube gallery feed. Depending on your feed type, this can be a YouTube channel, playlist, live stream, and more.
For our example, we’ll add a YouTube playlist as the source.
First, open the playlist on the web browser and look at the URL on the top.
Next, look for “list=” on the URL and then copy everything after it.
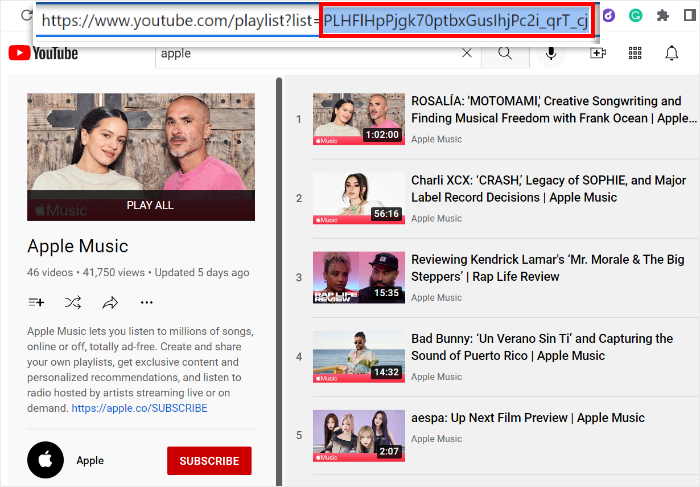
Next, return to your website and then paste it into the Playlist ID field before clicking on Next.
Similarly, you can simply paste an ID to connect YouTube channels, live streams, and much more.
Step 4: Customize Your YouTube Gallery
The good news is that your YouTube gallery looks great on your site right out of the box. After all, YouTube Feed Pro copies the same fonts, colors, and other styles that your WordPress theme uses.
And if you want more control over the way your YouTube gallery looks, the plugin offers you customization options as well!
To start, you can pick from a collection of feed templates. That way, you can instantly copy a beautiful design for your YouTube gallery.
Select the feed template that you prefer from the list and then click on Next.
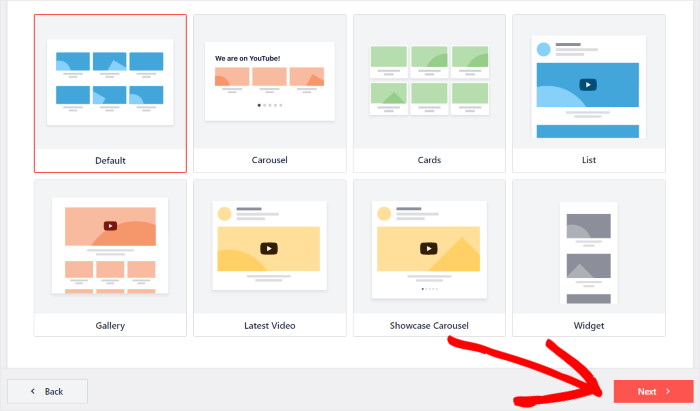
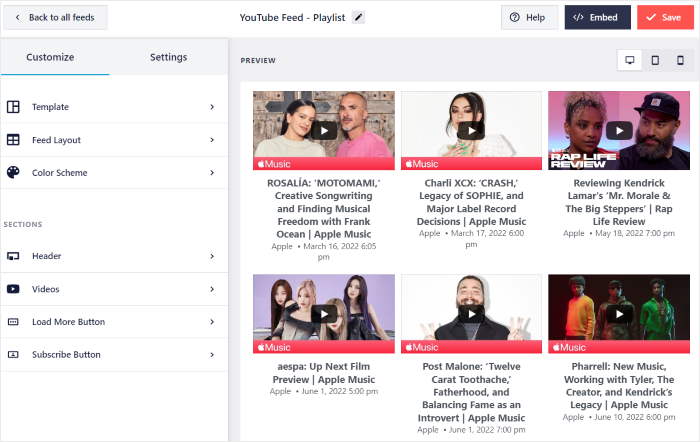
After that, YouTube Feed Pro will take you to the live customizer, where you can easily change the design of your YouTube gallery.
Towards the left, you can find the customization panel where you can set your layout, color scheme, header, button design, and much more.
Plus, you can see a live preview of your YouTube gallery on the right to keep track of all the changes.
Ready to start customizing your YouTube feed gallery?
First, click on the Feed Layout option on the left.
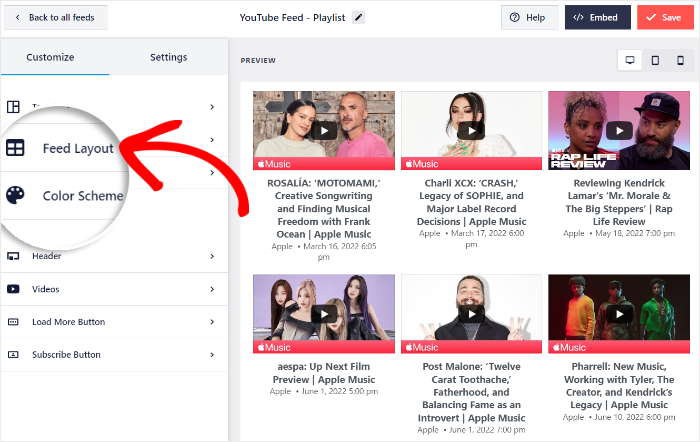
Under this section, you can freely change your YouTube gallery’s layout by picking from 4 options: Grid, Gallery, List, and Carousel.
Here’s an example of how your YouTube gallery would look on your WordPress site, depending on different layout types.
Grid Layout
Using this layout, your YouTube gallery shows your videos in a uniform grid of square-shaped thumbnails.
As you can see, this is a great way to show tons of videos at once in a clean way.

Gallery Layout
If you want your YouTube gallery to have a more traditional layout, choose the gallery layout. It’ll display 1 large video that plays when clicked.
It also has video thumbnails underneath so your visitors can keep watching your video content.

List Layout
This layout displays your YouTube gallery in a single column. As a result, your videos will be more clearly visible on your website.

Carousel Layout
Finally, if you want to show your YouTube videos in a horizontal slideshow carousel, this layout can help you. That way, your website can be even more interactive.

Once you pick the feed layout that you prefer, click on the Save button in the top right corner.
Next, click on the small Customize button to continue designing your YouTube gallery.
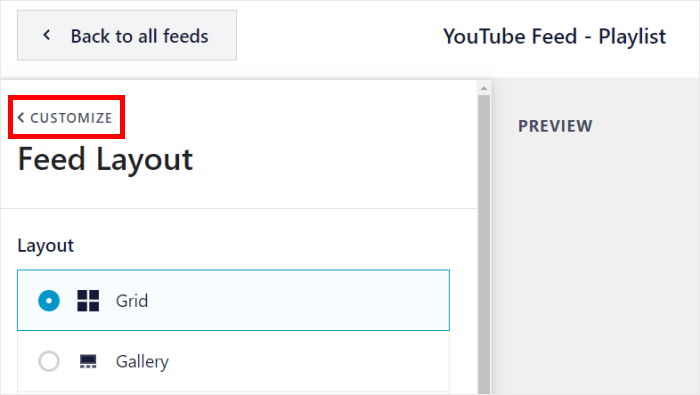
Want an easy way to change the colors of your YouTube feed gallery? Click on the Color Scheme option on the left.
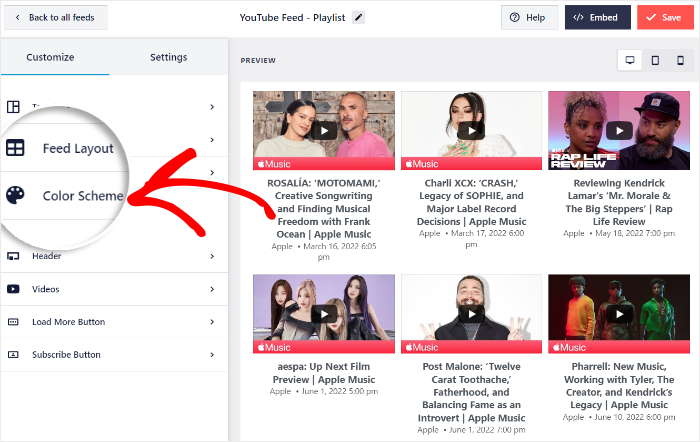
Here, you can find the color schemes that you can use to instantly change all the colors of your YouTube gallery.
All you have to do is pick from these 4 options:
- Inherit from Theme: Automatically copy the colors of your website
- Light: Pick a bright look with a light background and dark font
- Dark: Use a dark background with a light font instead
- Custom: Manually pick all the colors of your YouTube gallery
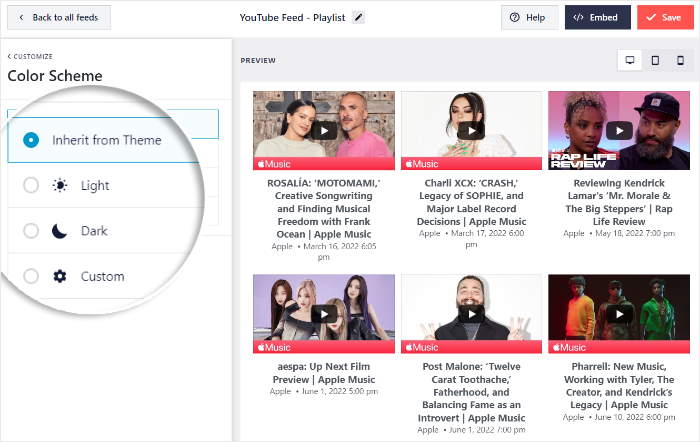
Remember to click on Save to confirm this color scheme for your YouTube feed.
As you can see, YouTube Feed Pro makes it super easy to set the design for your YouTube gallery. You can even change your header design, button style, video options, and much more.
Happy with your YouTube gallery’s visuals?
Great! Now click on the Save button to confirm your changes once again.
Step 5: Embed Your YouTube Gallery on WordPress
You can display your YouTube channel gallery on WordPress in 2 ways, including:
- Add your YouTube gallery to WordPress pages
- Add your YouTube gallery to the WordPress sidebar or footer
Let’s get started and see how you can do that:
Add Your YouTube Gallery to WordPress Pages
To make it easy for you to embed your YouTube gallery, you can do it directly from the live customer.
Start by clicking on the Embed button in the top right corner.
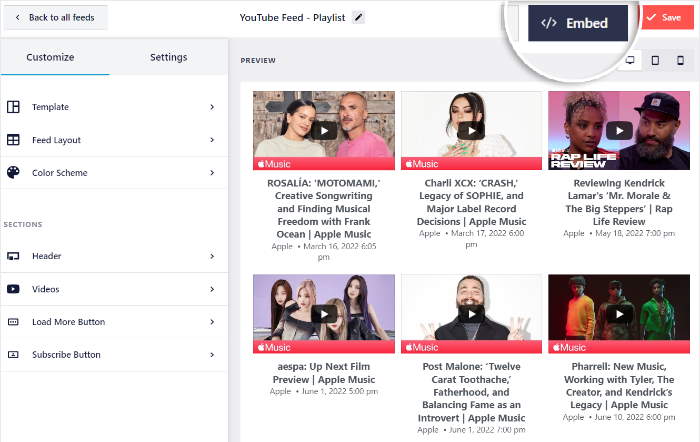
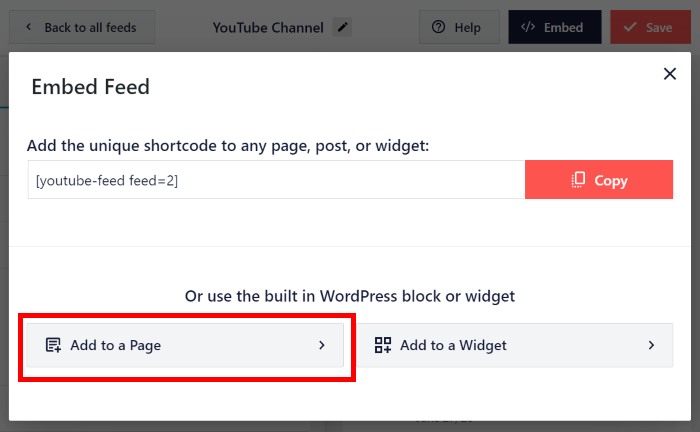
Once you do that, the plugin will ask where you want to embed your YouTube gallery. You can choose between a WordPress page or your widget area here.
To continue, click on Add to a Page.
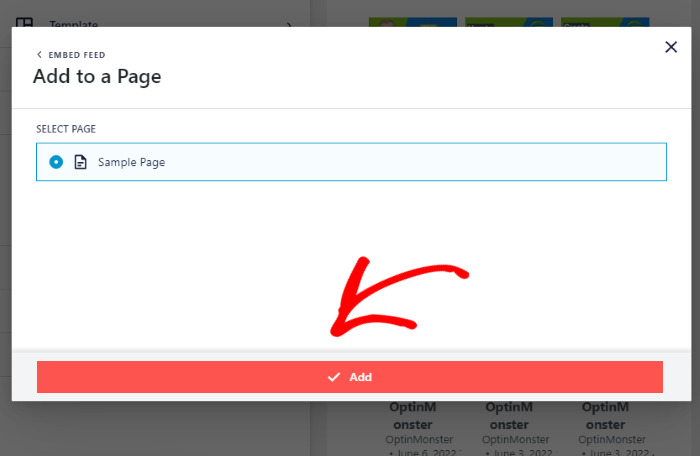
After that, you’ll see a list of all of your pages. Just select the page where you want the YouTube feed and click on Add.
YouTube Feed Pro will now open that feed in the WordPress block editor so you can embed your gallery.
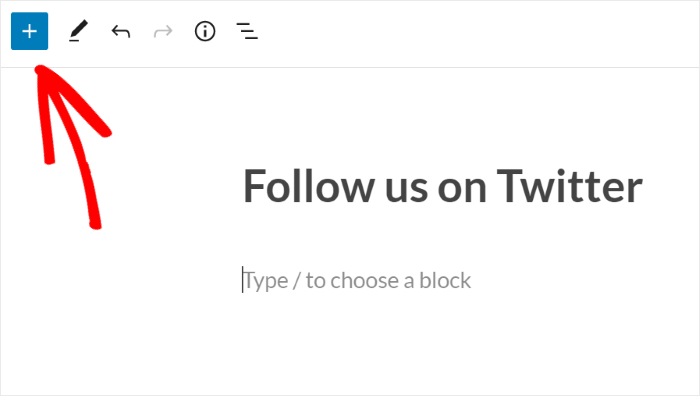
Next, within the block editor, click the Plus (+) icon to choose a new WordPress block.
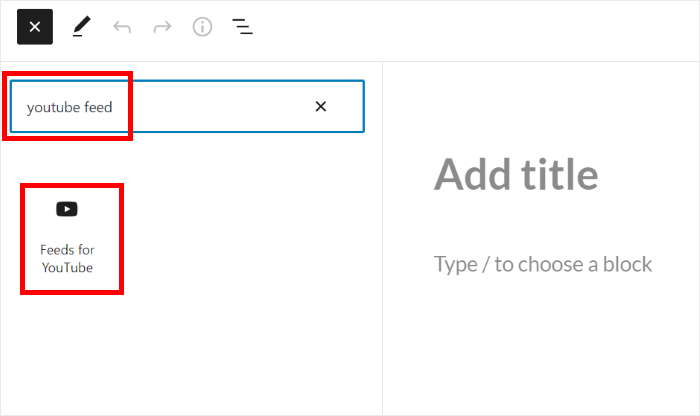
Type “youtube” into the search field and look for the Feeds for YouTube block. Click on it to add to your post.
Once you’ve added the block, it’ll be automatically displayed in the editor. Finally, click on Publish to make it live on your website.
If you open your website now, you can check how your WordPress YouTube gallery looks.
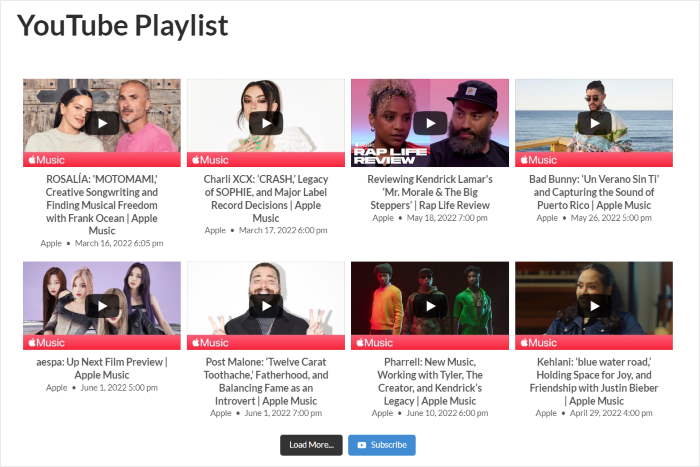
Next, let’s see how you can add your YouTube gallery as a WordPress widget.
Add YouTube Gallery to Your Website Using Widget
You’ll be glad to know that the plugin also comes with a ready-made WordPress widget. By using it, you can easily add your YouTube gallery to your website’s sidebar areas, like your sidebar or footer.
Start by going to the YouTube Feed » All Feed menu to view your available YouTube galleries.
Then, look for the YouTube gallery that you just created and click on it.
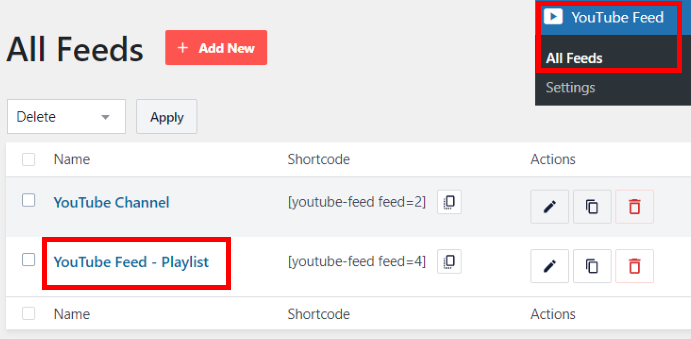
After you do that, click on the Embed button in the top right corner to start adding this gallery to your website.

On the popup, pick the location for your YouTube gallery by clicking on the Add to a Widget button.
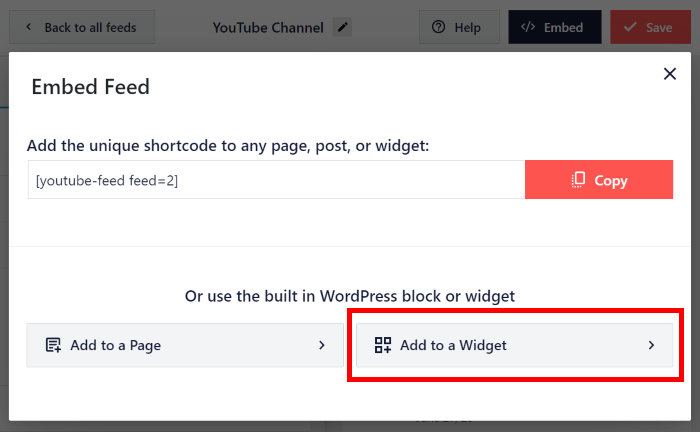
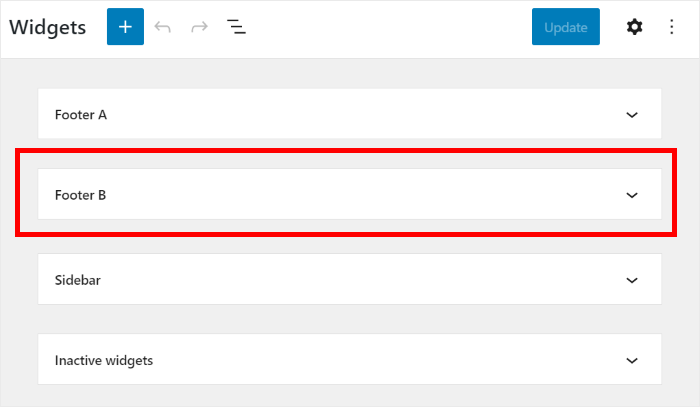
This will open your WordPress widgets page. Here, you can choose to manage the widgets on your sidebar or footer.
To add the YouTube gallery to the footer, click on the Sidebar panel here.
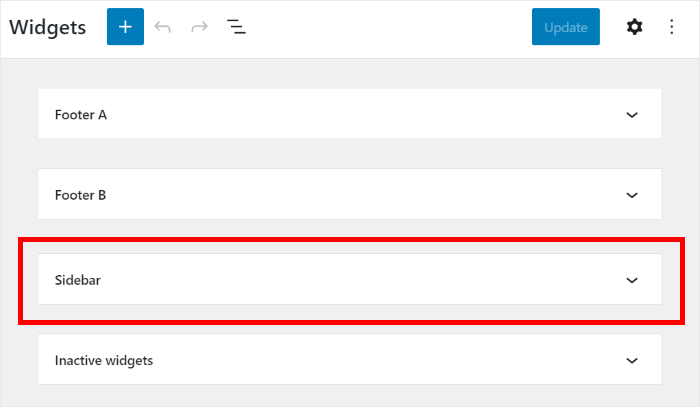
Or you can click on Footer instead and show your YouTube gallery there.
For our example, we’ll use a WordPress sidebar.
Finally, click on the plus (+) icon to add a new widget, and then click on Feeds for YouTube.
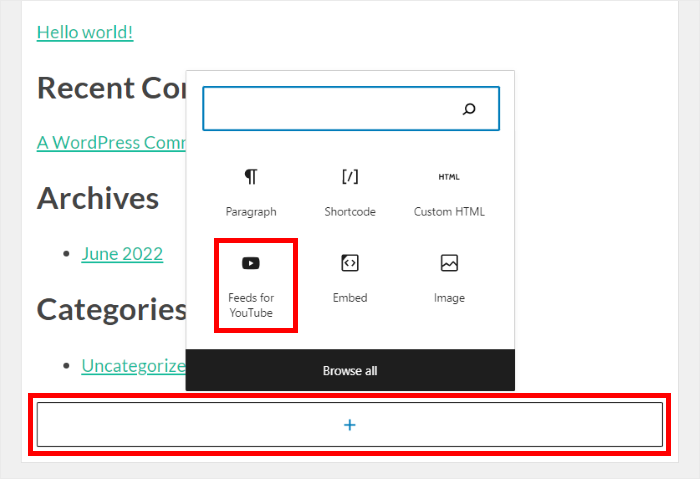
Remember to click Update to preserve your settings.
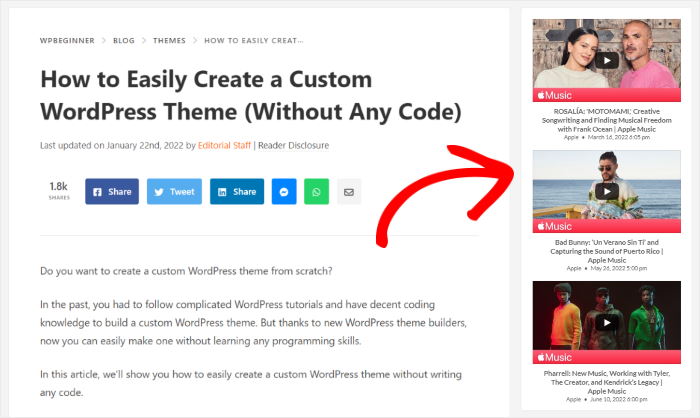
After this, your website visitors can readily see your YouTube gallery displayed on your website’s sidebar.
And that’s it!
Congratulations, you’ve learned the easiest way to add a YouTube gallery to your WordPress using a plugin. Now, you can start increasing your subscribers and skyrocketing your channel’s growth.
With YouTube Feed Pro, you can get started with YouTube galleries in a few simple clicks — even if you’re a WordPress newbie.
Ready to kickstart your YouTube marketing? Get YouTube Feed Pro here.
For further reading about YouTube marketing, you may also want to read this next post on the best types of YouTube videos to skyrocket your subscribers.
Finally, if you found this guide helpful, go ahead and follow us on Twitter and Facebook for more useful YouTube tutorials.



thanks