Social Wall
  Feed Analytics

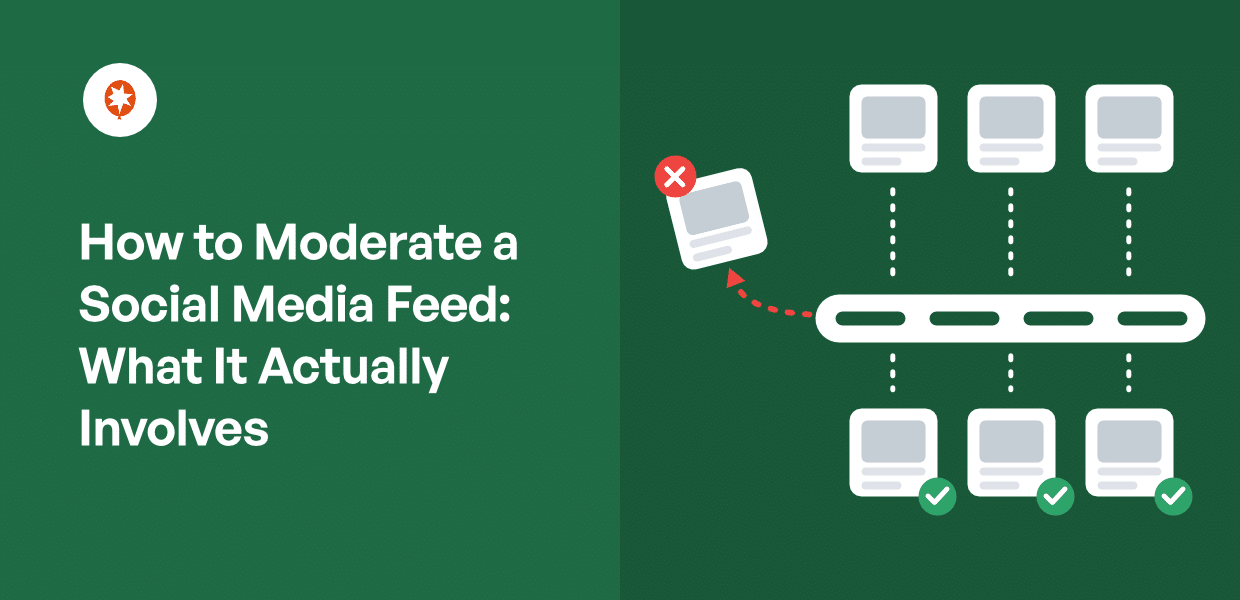
Want to know how to moderate a social media feed on your WordPress site?
If you’ve ever put a public feed on a landing page, yours or a client’s, you know the feeling. You check the page the next morning, and there’s a link-in-bio spam account, a competitor’s giveaway riding your campaign tag, and someone’s unrelated selfie sitting right next to the logo.
I’ve helped site owners at Smash Balloon run public feeds, and I’ve watched this play out before. Usually there’s nothing wrong with the feed. It’s pulling exactly what you asked it to pull.
What’s missing is the step where you decide which of those posts actually earns a spot on your page.
Here’s the part most moderation guides miss. Instagram decides whether a post breaks its rules. You decide whether a post belongs on your page. Those are two different tests, and the second one is yours to run.
It happens in your feed plugin, before anything reaches your visitors.
I’ll show you how to moderate your social media feed so nothing displays until you approve it, and how to cut down what you have to review before you ever open it.
- How Do You Moderate a Social Media Feed? (Short Answer)
- Why a Feed on Your Site Is a Different Problem
- Filters and Moderation: Two Controls, Two Jobs
- How to Set Up Filters for Your Social Feed (Step by Step)
- Which Reviews Should You Actually Hide?
- Someone Asked You to Remove Their Post. Now What?
- Start Moderating Your Feed Before It Goes Public
How Do You Moderate a Social Media Feed? (Short Answer)
You moderate an embedded feed in your feed plugin, on your own site, before anything publishes. The platform decides what breaks its rules. You decide what belongs on your page, and that’s a stricter test.
Two controls do the work. Filters show or hide posts by rule, so you’re looking at less. Moderation decides what actually publishes: set it to Allow List, and nothing displays until you approve it.
Set both up before you embed the feed, then check new posts on a schedule that matches how fast the source moves.
Why a Feed on Your Site Is a Different Problem
Most moderation advice answers a different question than the one you’re asking. Here’s the split:
| Moderating your social accounts | Moderating a feed embedded on your site |
|---|---|
| Comments and replies on posts you published | Posts other people published, pulled in by hashtag or mention |
| Happens inside Instagram, X, Facebook, etc | Happens in the feed plugin on your WordPress site |
| Tools: platform settings, community guidelines, a community manager | Tools: filters and moderation settings, applied before display |
| Bad content sits on a platform page | Bad content sits on your own page, next to your logo |
Three feed types carry the most risk: campaign hashtag feeds, event hashtag feeds, and public mention feeds.
Which is why the usual advice doesn’t help. Community guidelines and a moderation policy work on people who are posting to you. These people aren’t. They’re posting to Instagram, and your page happens to be listening.
The Platform is Answering a Different Question
Instagram is good at this. It catches what it sets out to catch, and it catches most of it before anyone reports it.
- Instagram decides whether a post breaks its rules.
- You decide whether a post belongs on your page.
Yours is the stricter test. A competitor’s giveaway post on your campaign tag breaks no rules at all. Neither does an unrelated selfie that happened to use your hashtag, or a genuinely good photo that’s just wrong for the client.
And while it sits there, it sits on your page, next to your logo. If you’re running the site for a client, they might spot it before you do.
Filters and Moderation: Two Controls, Two Jobs
Filters and moderation sound like the same thing. They’re not, and mixing them up is why most feeds go public with junk in them.
Filters show or hide posts by rule. You set them once and tune them now and then. Their job is to cut down what you have to look at, not to make the final call.
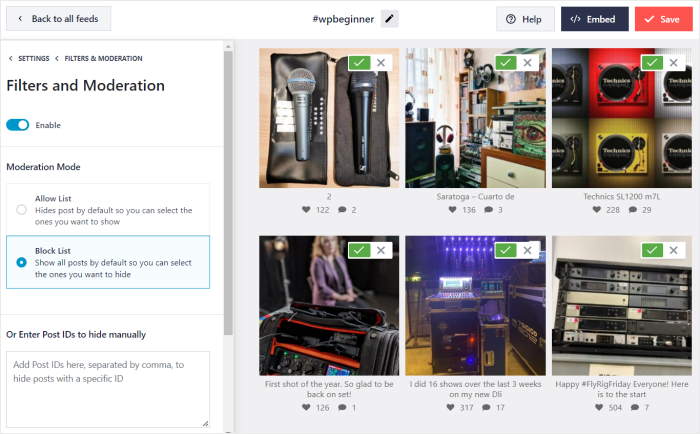
Moderation decides what is displayed, post by post. For example, if you switch it on for Smash Balloon Instagram Feed Pro, you can pick one of two modes:
- Block list: Everything displays except what you’ve selected to hide. You’re cleaning up after publication.
- Allow list: Nothing displays until you select it. Nothing reaches your page unreviewed.
Here’s the recommendation, plainly: a public hashtag feed belongs on an allow list. A feed of your own posts does not. Match the mode to who created the content, not to how much you trust the tag.
Your feed doesn’t update the instant someone posts. It pulls new content on a schedule, several times a day. On a block list, every one of those pulls publishes to your page with nobody approving anything, and each post stays until you happen to look.
On an allow list, the same pulls just bring in new candidates, and nothing displays until you say so.
What Filters Catch, and What Needs You
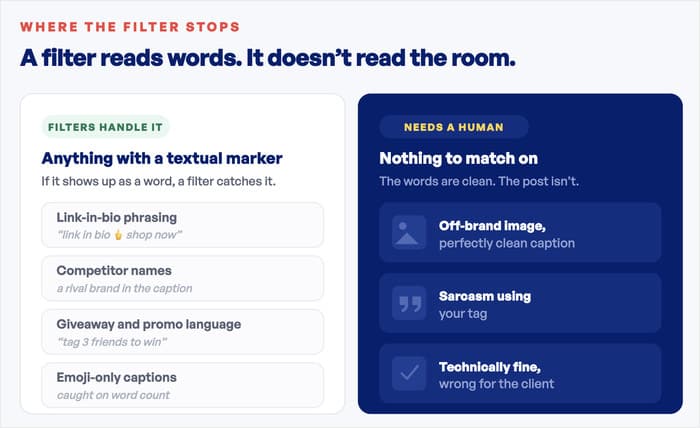
Filters are good at text. Anything with a textual marker, a filter can handle:
- Link-in-bio phrasing
- Competitor names
- Giveaway and promo language
- Emoji-only captions
Everything else needs a human looking at it:
- An off-brand image with a perfectly clean caption
- Sarcasm using your tag
- A post that’s technically fine but wrong for the client
One thing I’ve noticed running these feeds: filters do far more work on branded and campaign tags, where the junk carries textual markers, than on broad tags, where posts are simply irrelevant and no keyword catches them.
How Backup Caching Affects Your Feeds
Backup caching stores your feed data locally. If the social media platform has an outage or the API hiccups, your feed keeps displaying instead of showing an empty box.
That’s real resilience and also makes your feeds load faster, so it’s worth leaving on.
Once you add the filters and moderate your feed, clearing the cache tells your feed to rebuild from scratch. So, it makes sure your new filter and moderation options are applied instantly.
How to Set Up Filters for Your Social Feed (Step by Step)
Smash Balloon builds your feed inside a visual customizer, which is a live preview of your feed with all its settings alongside it. You change something on the left, you see it happen on the right. Filters and moderation both live in there, under the Settings tab.
Here’s the order to set them up in:
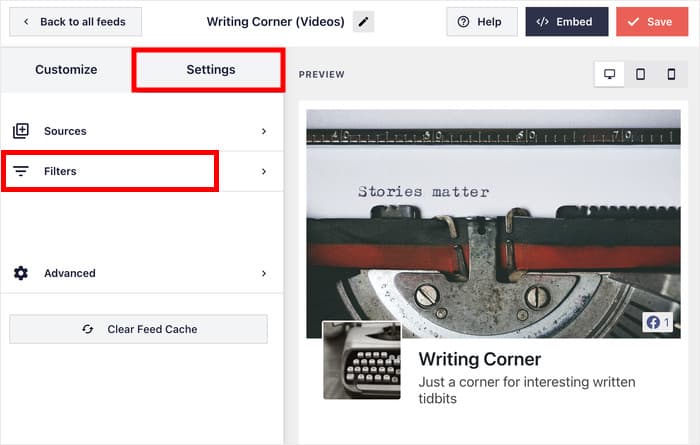
- Go to your feed settings in the customizer. Just open your feed in the live customizer and click on the Settings tab at the top.
- Select the Filters option from the settings. This is where you can find all the ways to filter your social feeds. Plus, different platforms can offer extra filtering options.
- Use keyword filters to add the words you want gone. Look at what’s actually turning up on your tag: “link in bio,” “DM me,” “giveaway,” competitor names. Any post containing those words drops out of the feed straight away.
- Add the words you want kept. On a busy tag, you can require your brand name or campaign word alongside the tag, and you’re left with posts that are actually about you.
- Use the remaining filters. Depending on the social platform, you have more ways to control the posts that are filtered. Skip Reels, keep replies out, limit an event feed to the dates the event ran.
With that, you can save your changes, and your social media feed will automatically start filtering the posts. As you can see, filters do the heavy lifting, clearing out the bulk of what you don’t want before you ever look at the feed.
How to Use Visual Moderation for Your Instagram Feeds
Moderation is where you take direct control over individual posts, rather than letting a rule decide for you.
For example, on an X (Twitter) or YouTube feed, you can paste in the ID of the tweet or video you want gone, and it stops appearing. It’s useful when one particular post is the problem and you don’t want to write a filter rule around it.
If you’re running an Instagram feed and want to directly moderate your feed, here’s what you can do:
- Open the Settings tab and select Filters and Moderation. The “Moderate your feed” button sits at the top of the panel, above your filter options.
- Click “Moderate your feed” to open the moderation screen where you can visually choose posts to show or hide.
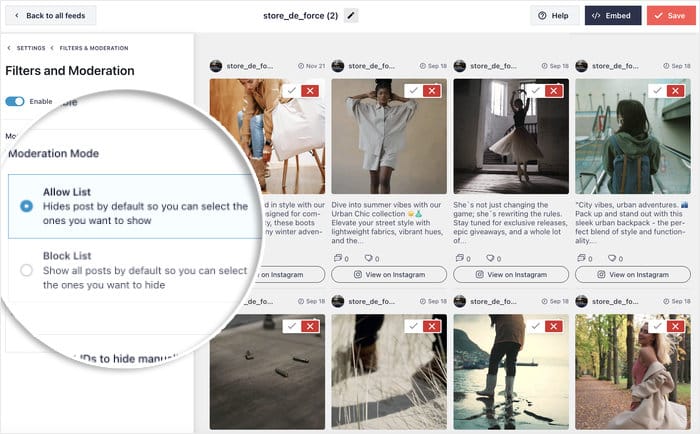
- Switch moderation on and pick your mode.
- The block list shows everything by default, so you select the posts you want hidden.
- The allow list hides everything by default, so you select the posts you want shown.
- Go through your posts and make your picks. You’re looking at the real image and caption for each one, so it’s obvious what belongs and what doesn’t.
- Click on Save to confirm your changes.
Don’t have an Instagram feed on your site yet? Check out our step-by-step tutorial where we show you how to embed an Instagram feed on your website.
How to Moderate Your Social Review Feeds
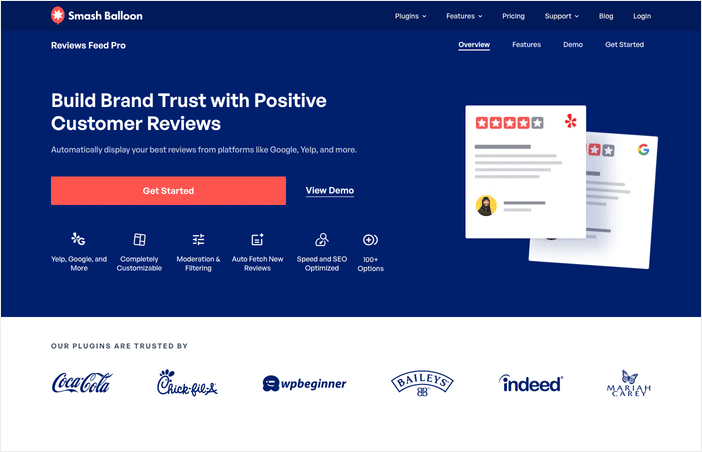
Smash Balloon Reviews Feed Pro gives you the same visual moderation, with a few extras built for reviews.
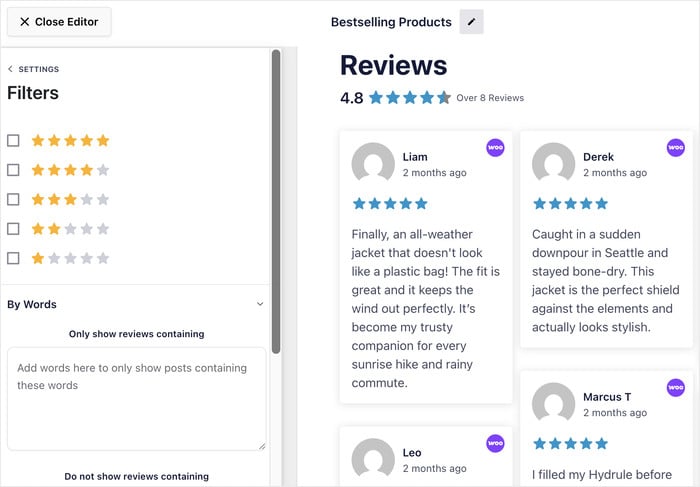
Open your feed settings and click “Moderate your feed.” You’ll see your reviews laid out with the star rating on each one, so you can pick what shows and what doesn’t.
The filters help you narrow things down first. You can select which star ratings to include, filter by keyword, or set a minimum character count to drop the ratings that came in with no text attached.
Decide What Reaches Your Page, on Every Feed
The All Access Bundle puts filters and visual moderation in every feed you build, from Instagram and Facebook to YouTube and Google reviews.
Get Moderation on Every FeedWhich Reviews Should You Actually Hide?
Review feeds attract the same junk as any other feed. Promo spam, bot accounts, reviews clearly meant for a different business. None of that tells a visitor anything about you, so hiding it is an easy call.
A real complaint from a real customer is a different matter. It’s tempting to filter those out as well, but the data says it costs you:
- Purchase likelihood peaks somewhere between four and five stars and drops off as you approach a perfect five, because a flawless record reads as curated rather than earned
- Three quarters of buyers say they worry about running into fake reviews
- Purchase intent doubles when they see a brand respond to criticism
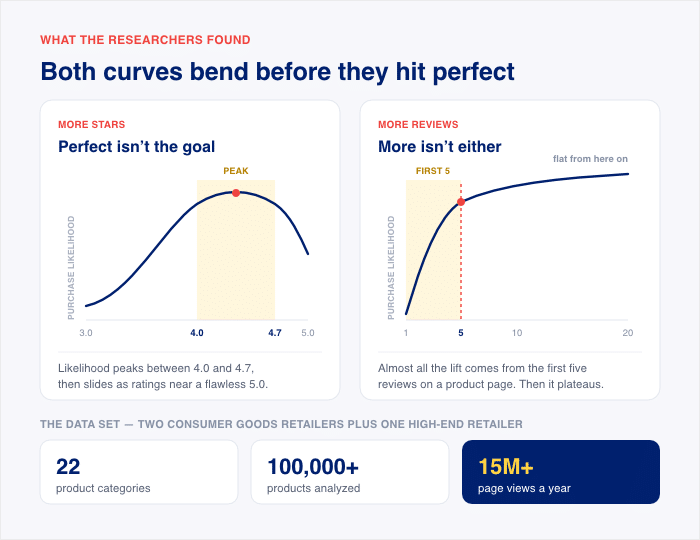
The strongest review feed isn’t the one with the highest average. It’s the one that reads like it came from actual customers, with a few honest complaints in it.
Pro Tip: Want some help dealing with reviews? Check out this guide where we explain how to handle and respond to negative reviews.
Someone Asked You to Remove Their Post. Now What?
It doesn’t happen often, but it’s worth being ready for. Someone used your campaign hashtag, saw their photo on your landing page, and would rather it wasn’t there. Handle it in three steps.
- Remove it from your feed. Open the feed in the live editor, find the post in your moderation settings, and remove it from your feed.
- Clear the cached feed data. Backup caching can keep serving a removed post for a bit after it’s filtered. Clearing the cache makes sure your page stops showing it right away.
- Reply and tell them it’s done. Load the page yourself first and confirm the post is actually gone. Then send a short message: their photo is off the site, and thanks for flagging it.
Worth remembering: reposting a public hashtag post on your site is not the same as owning it. Honoring the request takes minimal effort and leaves you with a happier follower.
Frequently Asked Questions
If I Block a Keyword, Will It Hide Good Posts That Mention It?
Yes, blocking a keyword will hide good posts that mention it, because the filter only reads text and can’t tell context. A customer writing “this saved me a DM to support” gets caught by a “DM” block just like a spammer does. Block full phrases like “link in bio” rather than single common words. You can also open moderation and remove specific posts one by one.
Someone Deleted Their Post on Instagram. Does It Disappear From My Site?
Yes, but not immediately. Backup caching keeps serving feed data from your site so your feed survives an outage, which means a deleted post can keep displaying until the cache refreshes. Clear the cached feed data to force it to regenerate.
What Should I Actually Be Blocking?
Start with what you’re already seeing on the tag rather than a generic list. Promo language, link-in-bio phrasing, and competitor names cover most of it. Add to it as things come up, since every tag attracts slightly different junk.
Can I Filter Reviews the Same Way?
Yes. Smash Balloon Reviews Feed Pro has the same moderation modes, plus filtering by star rating, provider, and date. You can also use moderation to remove spam, empty ratings with no text, and reviews about a different business.
Start Moderating Your Feed Before It Goes Public
A social feed on your site is one of the fastest ways to fill a page with real content, and it keeps working long after you’ve built it. What it needs from you is a sense of what belongs there.
That’s what these two controls are for. Filters handle the volume, cutting out the promo language and the off-topic posts automatically. Moderation gives you the final word, so you decide post by post what your visitors actually see.
Set both up before you embed the feed, and you never have the bad morning. The page goes live with the posts you chose, and everything new waits for you.
Smash Balloon puts these controls in every feed you build, whether that’s Instagram, Facebook, YouTube, or your Google and Yelp reviews.
Ready to build a feed you’re happy to put on your homepage? Get the Smash Balloon All Access Bundle today!