Do you want to learn how to add Instagram feeds to Beaver Builder with ease?
By showing Instagram content on your site, you can easily keep visitors engaged, get more followers, and more. But if you’re using Beaver Builder, directly adding Instagram content to your site can be tricky — especially if you’re not used to coding.
So, we’ve put together his beginner’s guide to show you how to add your Instagram feed to Beaver Builder in just minutes.
But first, let’s see how adding Instagram feeds can help out your brand’s website.
Why Embed Instagram Feeds on Your WordPress Website?
On top of being a popular social media platform, Instagram can be a great place to promote your business online and reach more potential customers.
But with so many huge brands already on Instagram, standing out from the crowd can be tough.
In fact, over 80% of accounts on Instagram follow a business, while 200 million Instagrammers actively visit the profile of a business every day.
Instagram Data
The good news is that you can simply embed your Instagram feeds on your site and get tons of likes, comments, and followers with ease.
On top of helping you grow your online following, you can show relevant Instagram posts to grab people’s attention and keep them engaged.

You can even show positive reviews and brand mentions from Instagram to use as social proof and grow your sales.
How to Add Instagram Feeds to Beaver Builder (Easily)
Ready to add the Instagram feed to your Beaver Builder site? All you have to do is follow the step-by-step guide below.
Step 1: Install and Activate Instagram Feed Pro
If you want the best way to embed Instagram feeds, you can try using Instagram Feed Pro.
As the #1 Instagram feed plugin, this tool lets you create, customize, and embed beautiful Instagram feeds in just minutes — no need for HTML, CSS, or any kind of coding.

To get started, get your copy of the Instagram Feed Pro plugin here and then download it to your computer.
Next, install and activate the plugin on your WordPress website.
If you want to learn how to do that, you can follow this tutorial on installing WordPress plugins.
Step 2: Create a New Instagram Feed
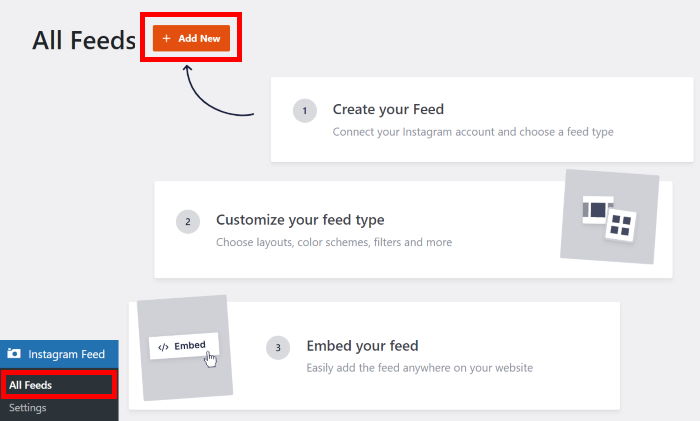
Once the plugin is ready, open the Instagram » All Feeds menu from your WordPress dashboard area and then click on Add New.
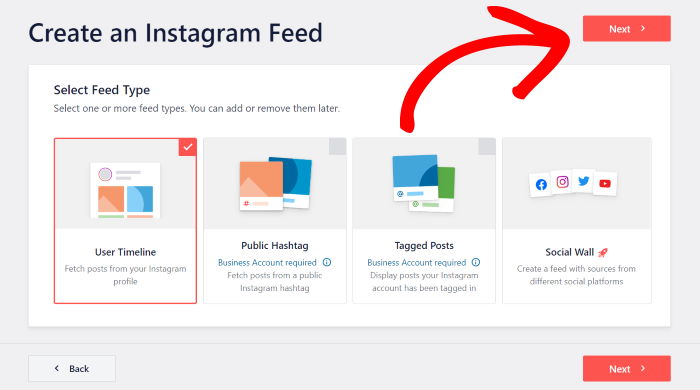
Now, the plugin asked me to pick the type of Instagram feed I wanted to create. If you’re not sure about the feed types, let me break it down for you:
- User timeline: Embed the photos and videos from your own Instagram profile
- Public Hashtag: Display Instagram posts with your chosen hashtags
- Tagged Posts: Show the posts that have tagged your brand’s Instagram account
Plus, you can combine multiple feed types into a single feed as well. Just select more than one option here to do that.
After picking your feed type, click on Next to continue.
Step 3: Connect Your Instagram Account
After creating a new Instagram feed, it’s time to connect this feed to your Instagram account.
You can start by clicking on the Add Source button here.

Here, you can choose between connecting a personal account or a business Instagram account.
With a business account, you can embed more types of Instagram content, like shoppable feeds, hashtag feeds, and more.
Once you select your account type, click on the Login With Instagram button.
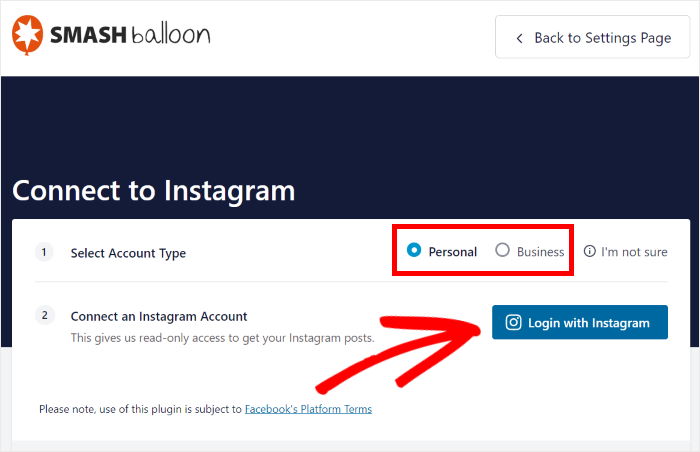
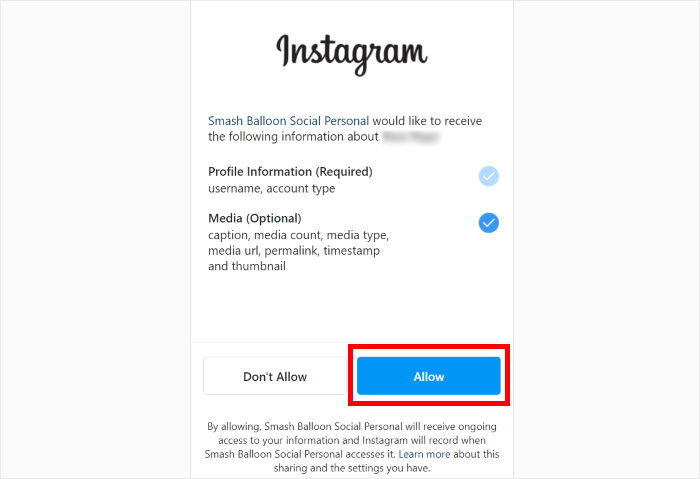
Doing that will redirect you to Instagram, where you can give the plugin read-only access to your Instagram account.
This means Instagram Feed Pro can only view your content and won’t be able to make any changes to your account.
All you have to do is click on Allow to continue.
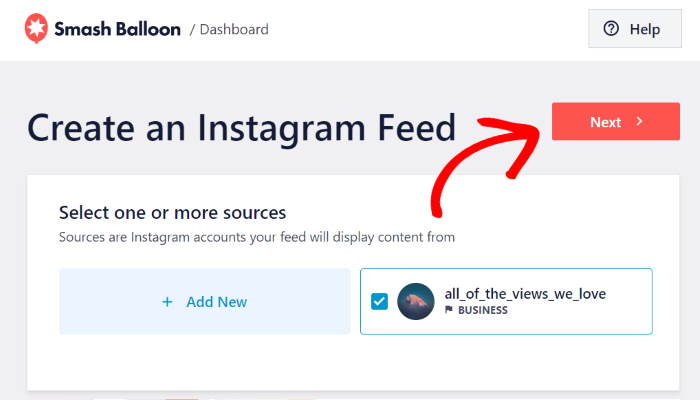
Now, Instagram Feed Pro will open your website once again. Here, you can select your account as the source for your new Instagram.
After selecting your source, click on the Next button.
Step 4: Customize Your Instagram Feed
Now, it’s time to customize how the Instagram feed will look on your Beaver Builder website.
The good news is that Instagram Feed Pro will automatically copy your website’s design and match your brand’s look right away. On top of that, you have lots of ways to customize your Instagram feed.
To get started, you can select a feet template and then click on Next.
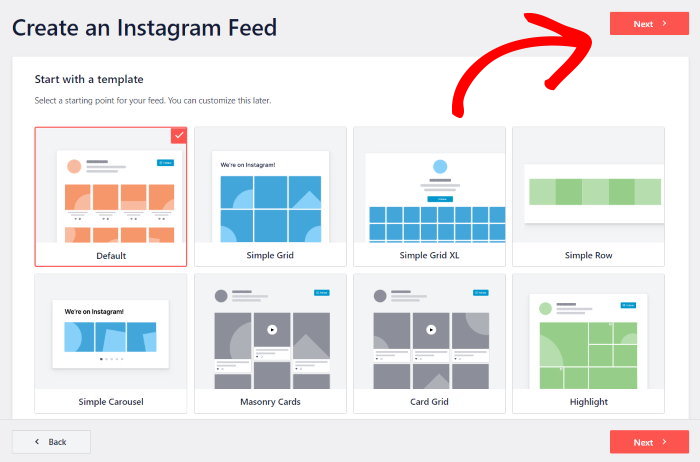
Then, the plugin will automatically import the template’s design for your Instagram feed.
After that, Instagram Feed Pro will send you to the visual customizer, where you can change your layout, color scheme, header, and more using the options on the left.

Whenever you make any changes here, you can use the real-time preview on the right to see how your Instagram feed will look on your site.
Now, click on Feed Layout here to change your feed’s layout.
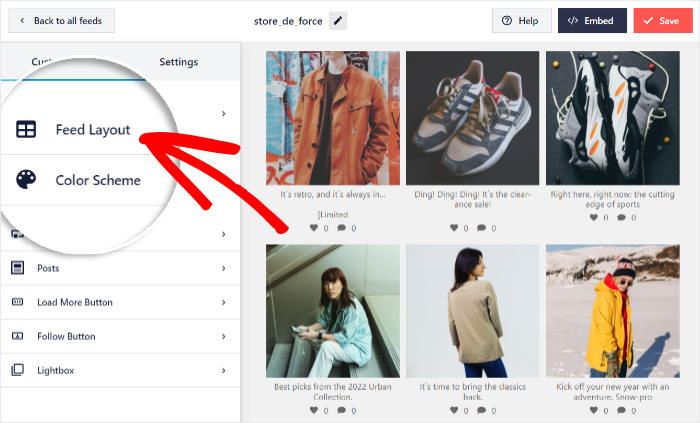
Instagram Feed Pro has 4 different layouts with unique designs that you can choose from:
- Grid: Embed square thumbnails in different rows and columns so you can display lots of engaging content at once
- Carousel: Make your website more interactive by turning your Instagram feed into an engaging slideshow carousel
- Masonry: Show your post content in multiple columns while keeping the original proportions
- Highlight: Remove extra details from your feed and put the focus on specific Instagram posts
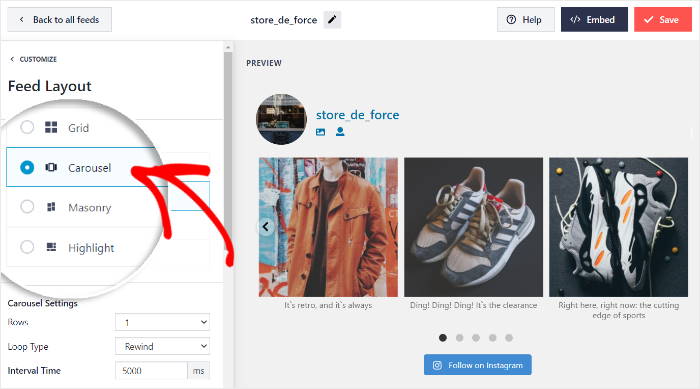
Once you finish picking your layout, click on Save to keep your changes.
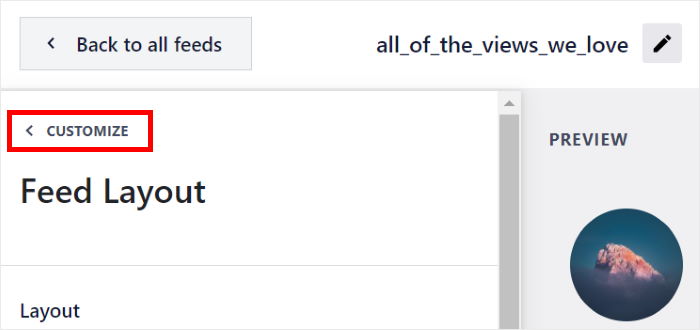
To keep customizing your Instagram feed, click on the Customize button in the top-left corner. This will bring you back to the main customization options.
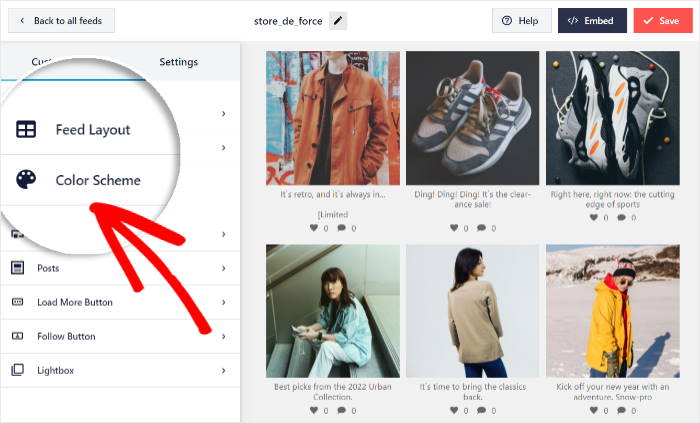
Next, let’s change the colors of your Instagram feed. You can do that from the Color Scheme option on the left.
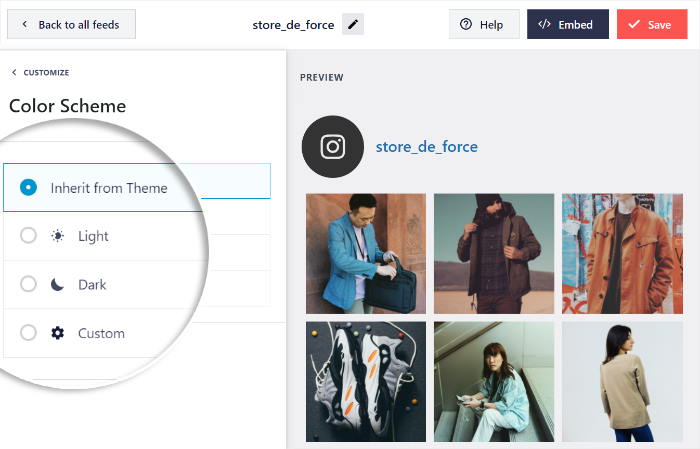
You have 4 different color schemes that you can pick from:
- Inherit from Theme: Use the same colors as your Beaver Builder website.
- Light: Display a feed with a light background and a dark font.
- Dark: Show a dark ground along with a light font color.
- Custom: Pick each color for your Instagram feed manually.
Finally, click on Save to keep your new color scheme. Using the remaining options, you can change your header, post elements, filters, and more.
Remember to click on Save to keep your changes once you’re done with the customization.
Step 5: Add Instagram Feed to Beaver Builder
Finally, you can add this Instagram feed to your Beaver Builder page.
Click on the Pages » Add New menu from your WordPress admin area to create a new page.
Then, you can just hit the Launch Beaver Builder button to proceed.
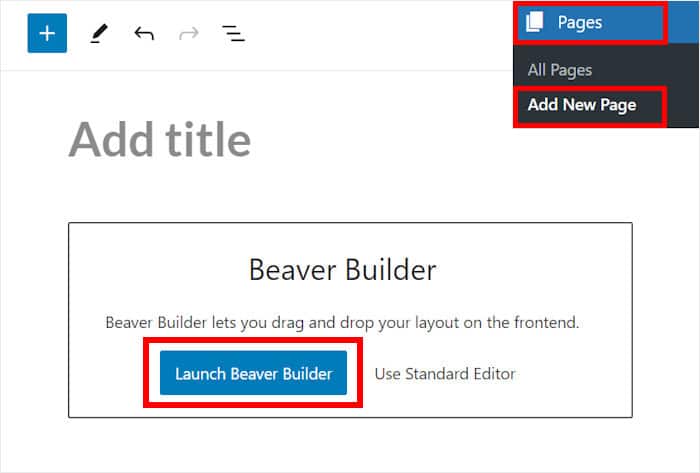
This will open the page in the Beaver Builder editor. Here, you can find the live preview of your WordPress page on the left.
On the right, you can see the different modules, rows, and templates that you can insert into the page. It’s all pretty simple.
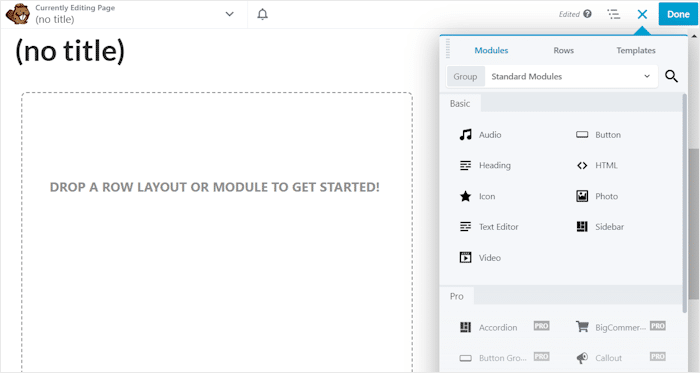
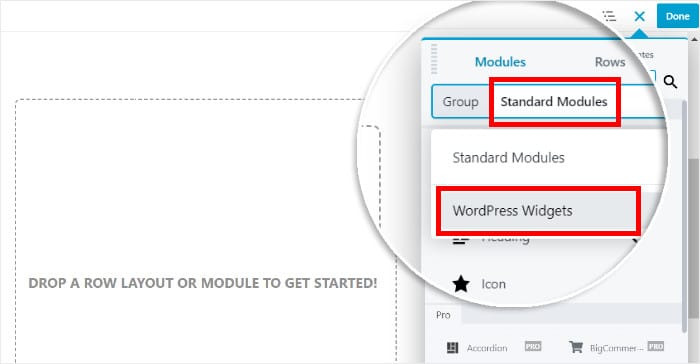
To continue, click on the Standard Modules option at the top to open a drop-down menu.
Then, select the WordPress Widgets option instead.
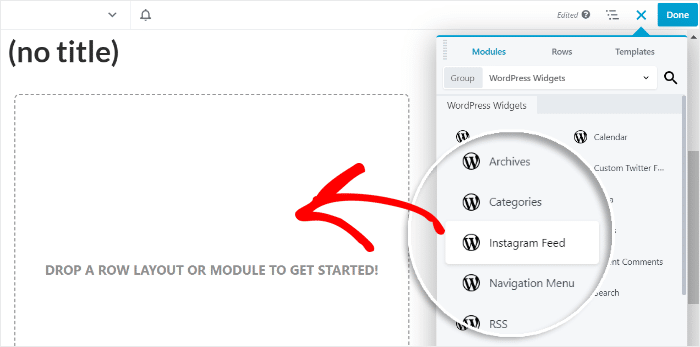
You’ll then see different WordPress widgets that you can add to your page.
From all the options, click on the Instagram Feed widget and then drop it on your page on the right.
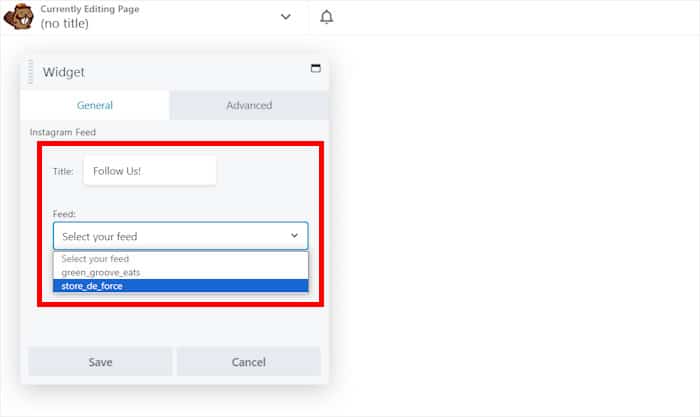
Next, Beaver Builder will show you additional options for the Instagram Feed widget.
To continue, enter the heading for your Instagram feed on the Title option.
Then, use the drop-down menu under the Feed option to select the Instagram feed you want to embed.
To make this feed live on your website, click on the Done button in the top right corner before selecting the Publish option.
Just like that, the Beaver Builder plugin will do the rest and embed the Instagram feed on your WordPress site.

And there you go!
Now you know how to embed Instagram feeds on your Beaver Builder website in just a few simple clicks. You can now engage visitors, grow your Instagram following, get more sales, and much more.
As you can see, Instagram Feed Pro is easily the best option out there if you want to integrate your website with Instagram — all with absolutely zero coding.
Ready to embed Instagram feeds? Get your copy of Instagram Feed Pro today.
Want more awesome tools to help build your brand’s website? Check out our list of the best page builder plugins for WordPress.
For more social media marketing tips and tricks, just follow us on Twitter and Facebook.


