Social Wall
  Feed Analytics


Every brand owner I’ve talked to knows user-generated content is gold. Customer photos build trust faster than any polished marketing shot.
But the question I keep getting is always the same: how do you actually use all those tagged posts and hashtag photos without spending your weekends screenshotting Instagram?
So I dug into what works. After testing a lot of tools across different sites, I landed on a setup that pulls UGC content automatically, keeps everything updated, and stays compliant with platform rules.
You can build a self-updating UGC gallery on your WordPress site in about 5 minutes.
I’ll walk through how to pull in posts by hashtag or tag, moderate what goes live, pick the right layout, and place the gallery where it’ll do the most for conversions.
- Can I Create a UGC Gallery on My WordPress Website?
- What Is a UGC Gallery and Why It Beats a Static Photo Wall
- What You Need Before You Start
- How to Set Up Your UGC Gallery in WordPress (Step by Step)
- Layout Options and When to Use Each
- How to Moderate and Curate Your UGC Gallery
- Where to Place Your UGC Gallery for Maximum Impact
- How to Get More UGC Into Your Gallery
- Start Building Your UGC Gallery Today
Can I Create a UGC Gallery on My WordPress Website?
Yes, and you don’t need a developer to do it. Instagram Feed Pro lets you build a self-updating UGC gallery in about 10 minutes by pulling customer photos through a hashtag feed or a tagged-posts feed.
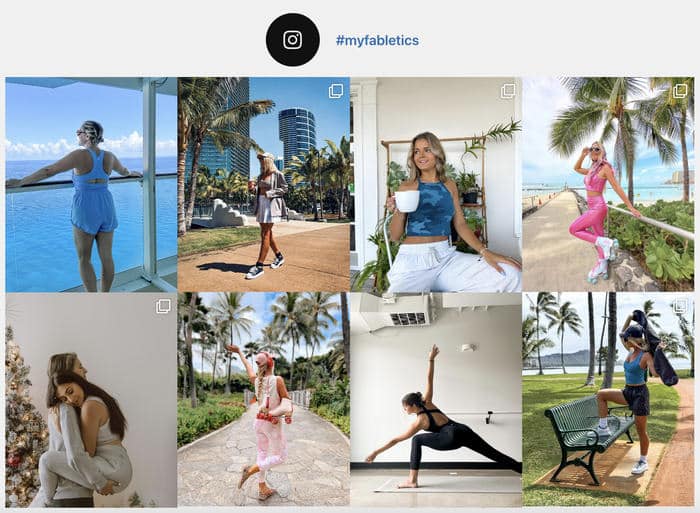
Both options use the official Instagram API, so creator names and post links stay attached automatically.
Here’s what you get out of the box:
- Hashtag feeds that pull in every public post tagged with your branded hashtag
- Tagged-posts feeds that surface photos where customers tagged your account
- Automatic attribution with creator usernames and links back to the original post
- Moderation controls so you can hide specific posts or approve content before it goes live
- Shortcode, block, and widget display options for any page, post, or sidebar
- Customizable layouts including grid, masonry, carousel, and highlight styles
- Mobile-responsive design that adapts to any screen size without extra setup
The gallery refreshes on its own as new tagged content rolls in, so you’re not chasing customers for permission or copy-pasting image URLs every time someone posts about your brand.
What Is a UGC Gallery and Why It Beats a Static Photo Wall
A UGC gallery is a section of your site that displays customer-created content, like photos, videos, and reviews, pulled in automatically from social platforms.

Instead of hand-picking images, the gallery refreshes itself every time a customer tags your brand or uses your hashtag.
Having a well-curated UGC gallery can pay off really well for a business.
According to the Bazaarvoice Shopper Experience Index (2022), engaging with UGC, including reviews, can boost revenue per visitor by 162% and lift average order value by around 13%.

Compare that to a static photo wall. You upload a handful of images once, then the wall sits frozen while your customers keep posting about you on Instagram.
Every update means another round of screenshots, edits, and uploads.
A UGC gallery works as a self-updating form of social proof. Once it’s connected to a hashtag or tagged-posts feed, new customer content is added to the gallery automatically, saving you time and effort.
What You Need Before You Start
Before you build the gallery, get these five things in place. Each one removes a step you’d otherwise have to backtrack on later.
- Branded Hashtag: This is what the gallery filters on, so pick something short, specific to your brand, and easy to spell. You can use one your customers already use or launch a new one.
- Business or Creator Account: Personal accounts can’t access hashtag and tagged-posts data, so you’ll need to switch your account type if you haven’t already.
- Instagram Feed Pro Plugin: This is the plugin that connects your Instagram account, pulls in hashtag and tagged-posts feeds, and handles the display on your pages.
- Display Location: A homepage block, a product page, or a dedicated “Community” page all work. You’ll paste a shortcode or block here once the feed is built.
- UGC Policy: A short note on your site explaining how you feature customer content sets expectations and makes future outreach easier (optional but recommended).
Note: Pulling content through the official Instagram API, which Instagram Feed Pro uses, is compliant with Instagram’s terms and keeps creator attribution attached to every post.
Manually screenshotting posts and re-uploading them is not compliant, and it strips out creator credit.
As a best practice, I’d still comment on the original post asking permission before featuring a creator prominently, even though the API connection itself covers you.
How to Set Up Your UGC Gallery in WordPress (Step by Step)
Here’s the six-step process I follow when setting up a UGC gallery from scratch. The whole thing comes together in about 5 minutes once your Instagram account is ready.
Step 1: Install and Activate Instagram Feed Pro
First, grab a copy of Instagram Feed Pro here.
This is the plugin that handles the API connection, layout, and moderation in one place, so you’re not stitching together separate tools.
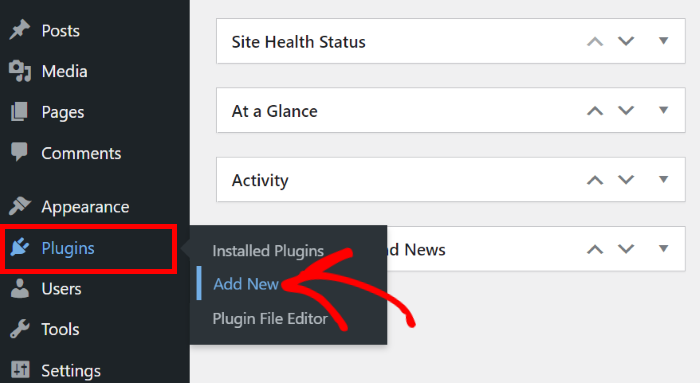
Head to Plugins » Add New and install the plugin on your website.
Step 2: Create a New Feed and Choose Your Source
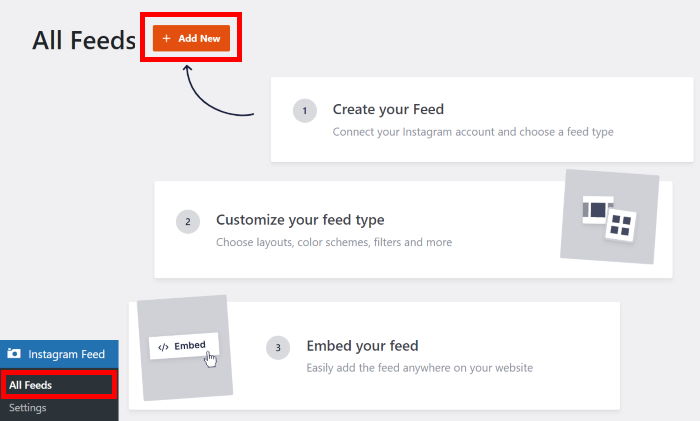
To create a feed, head to Instagram Feed » All Feeds from your dashboard and click on Add New.
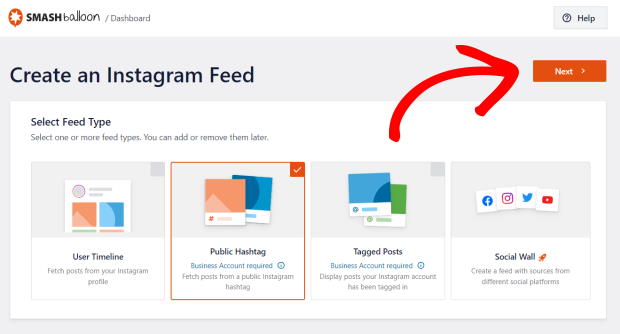
Out of the available feed types, 2 options matter for UGC:
- “Hashtag Feed” pulls any public post using your branded tag
- “Tagged Posts” pulls posts where customers tagged your account.
I’d start with a hashtag feed for broader reach and use tagged posts when you want tighter control over what shows up.
Select your feed type and click on Next.
Step 3: Connect Your Instagram Business or Creator Account
The official connection is what unlocks hashtag and tagged-posts feeds and keeps the gallery compliant with Instagram’s terms.
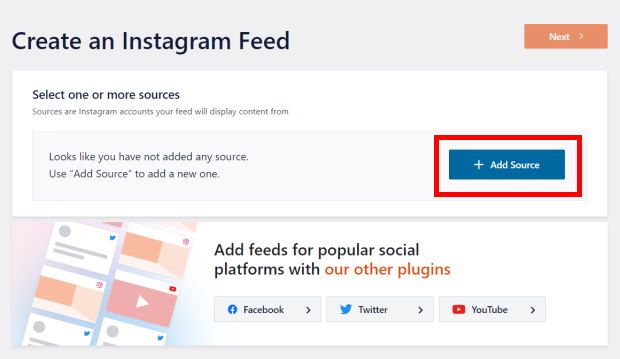
First, click on the Add Source button.
From the options, select the Business Advanced feed type and click on Connect.
An advanced connection lets you pull hashtags and mentions, which is perfect for a UGC gallery.
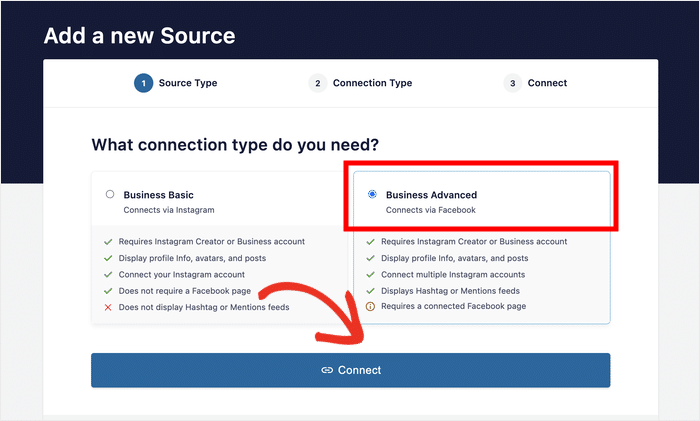
If you just want to embed your Instagram profile, a basic connection is enough. For now, we’ll use an advanced connection type.
On the next page, select the Connect with Facebook option to continue.
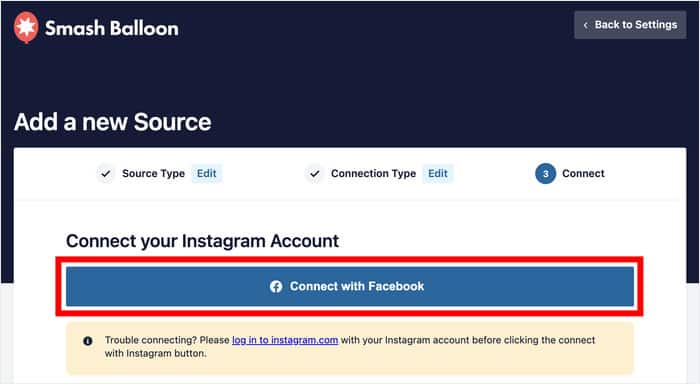
On Facebook, confirm that you want to give Instagram Feed Pro read-only access to your account.
This only lets the plugin view content on Instagram, so it’s totally safe.
Once you choose to Continue, you’ll be redirected to your website.
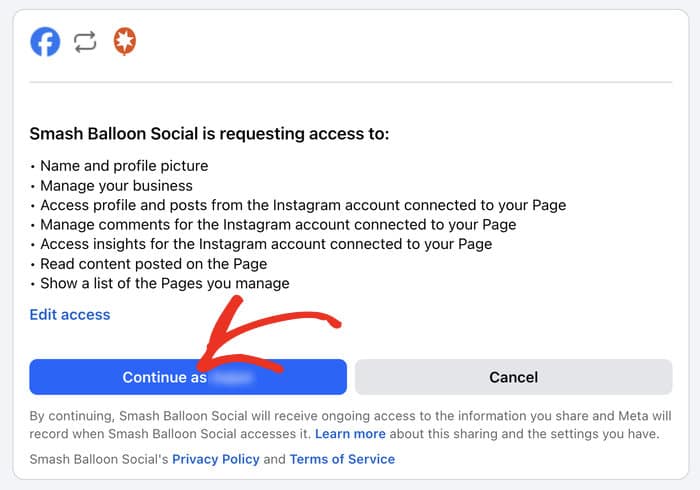
Pick the accounts you want to connect on the popup and click on the Add button.
You can connect other accounts right now to save you time later.
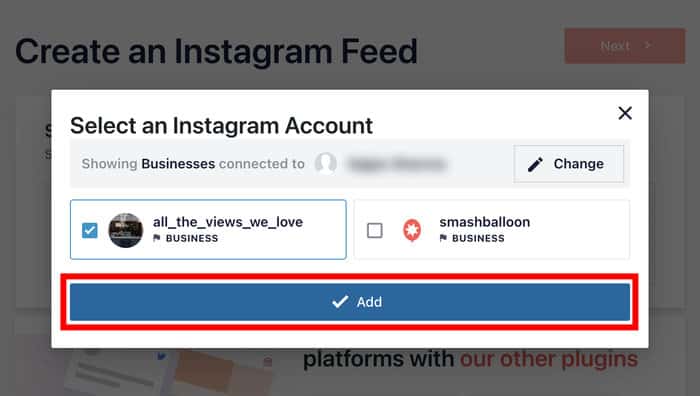
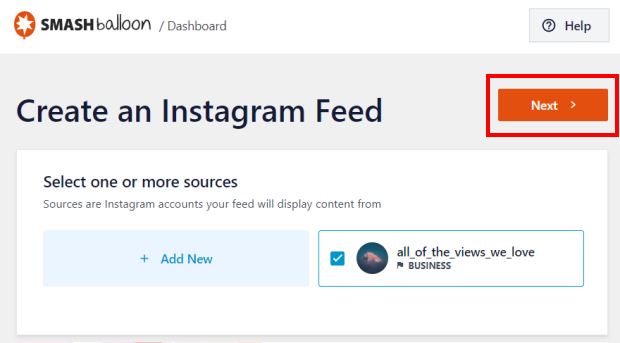
Finally, select your account as the source and click on the Next button.
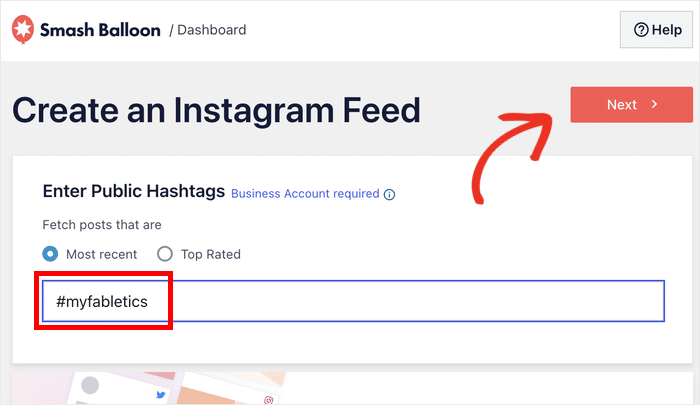
Step 4: Enter Your Branded Hashtag
This is the filter that decides what shows up in the gallery, so it sets the tone for everything.
Start with one specific hashtag tied to your brand rather than a generic one, or you’ll end up with off-brand content in the mix.
Enter your branded hashtag into the field and click on Next.
You can also choose from showing the Most recent posts or the Top Rated posts that have this hashtag.
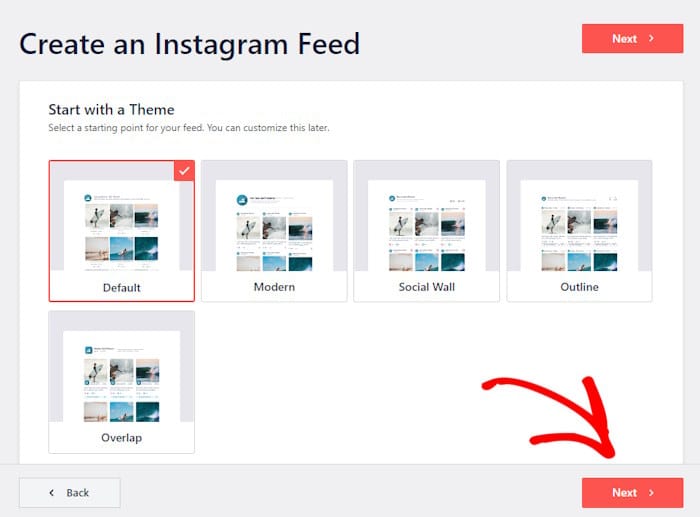
After selecting a hashtag, you can select a theme and template for your new UGC gallery.
Just pick a design you like (don’t worry, you can change this later) and click on Next.
Step 5: Choose Your UGC Gallery Layout
Now, you’ll see the live editor where the customization takes place.
It’s pretty simple: select the options from the left panel, and you get a live preview on the right.
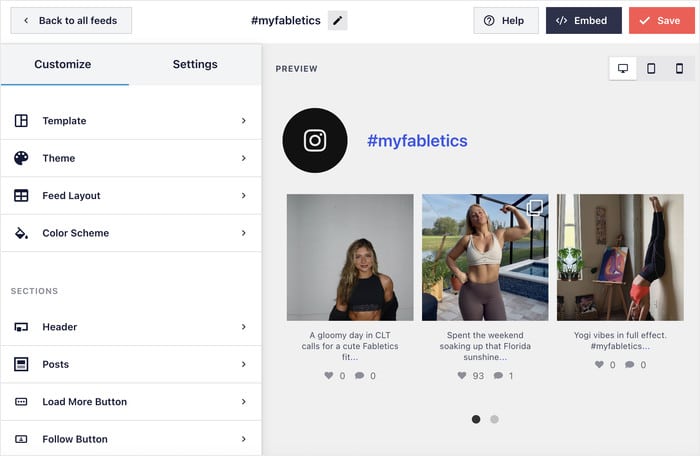
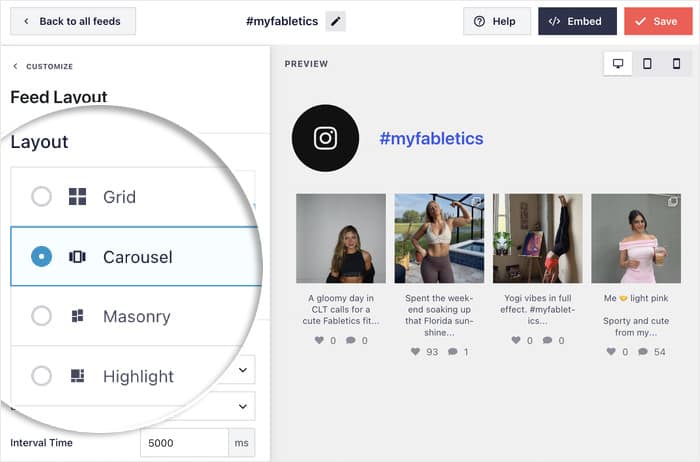
First, select Layout from the customization panel on the left.
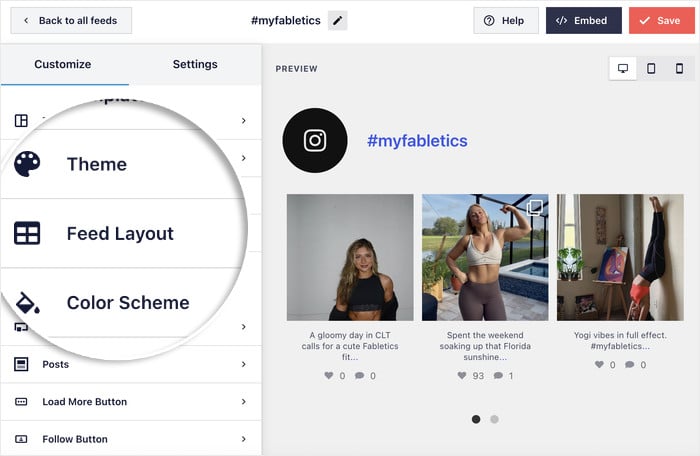
Pick from grid, carousel, masonry, or highlight based on the look you want and where the gallery will live on your site.
I’ll break down which layout fits which use case in the next section.
Next, scroll down on the left and go to the Number of Posts section.
From here, select the number of posts visible for desktop users and mobile users.
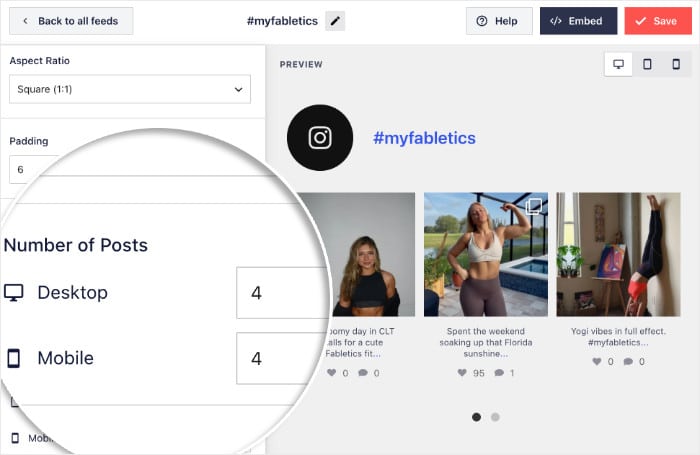
The ideal number depends on the type of feed you have. If you want to highlight a few important posts, then go for 3-6 here. To show a ton of UGC content at once 8-12 can work.
After that, Save your changes, then click the Customize button to return to the main editor.
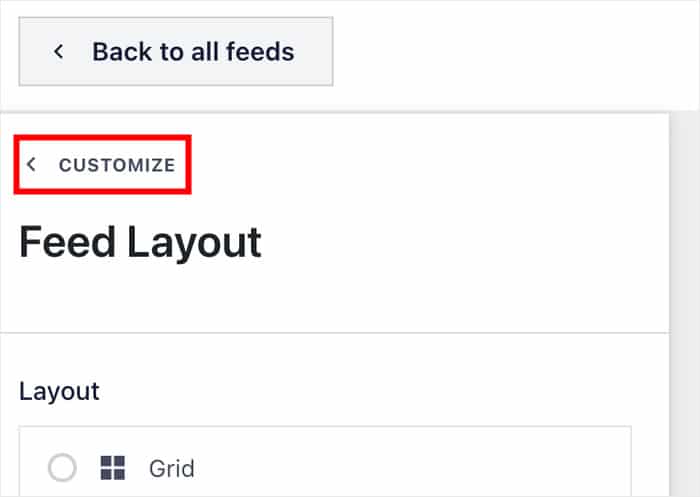
Next, you can adjust colors, spacing, hover effects, and the header so the gallery matches the design you have in mind.
This is what makes the feed feel like part of your brand instead of a generic Instagram embed.
Step 6: Add the UGC Feed to Your Website
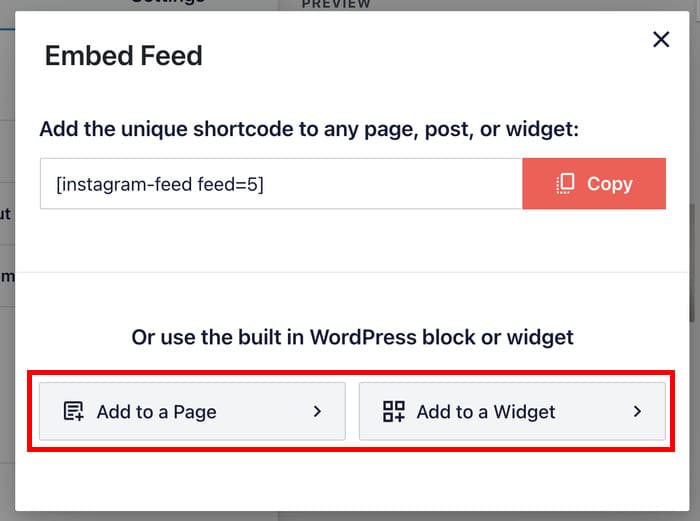
There’s a handy Embed button on the editor that lets you start adding the UGC feed to your website.
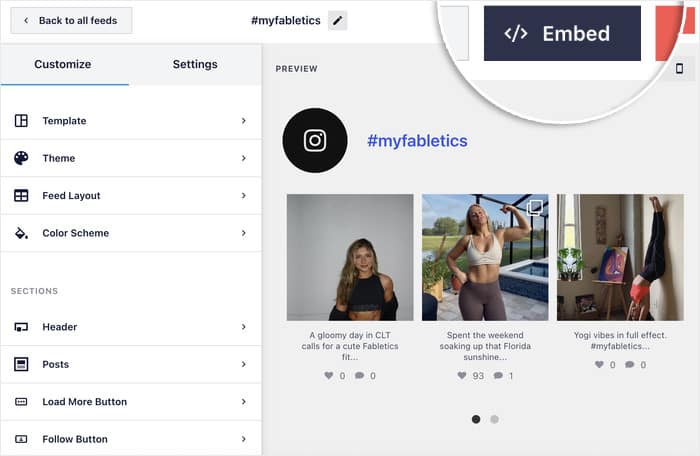
You have two options: drop the feed on a page or show it as a widget on your sidebar or footer.
No matter which option you pick, you can use a simple Gutenberg block to embed the feed.
To show the UGC content on a page, select the Add to a Page option on the popup.
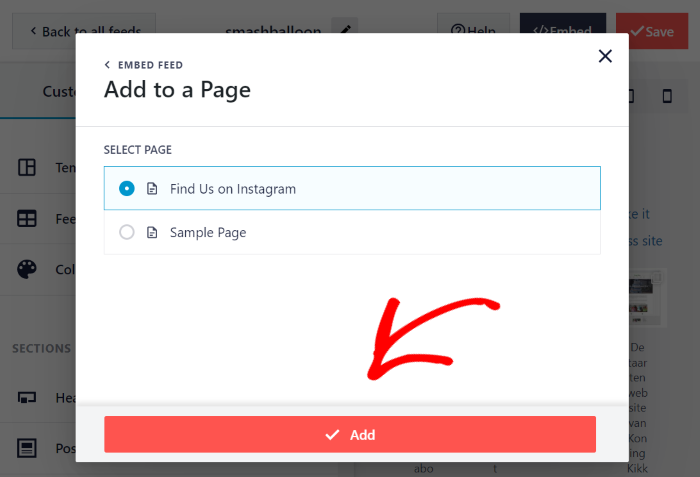
Next, pick a page from the available options and click on Add.
Note that only published pages are visible here, so your drafts won’t be listed until you publish them.
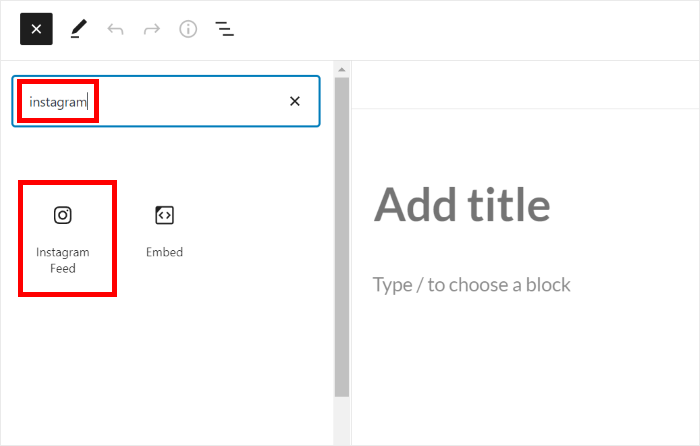
Once you’re on the page (or in the Widgets page of your site if you went with the other option), add a content block.
Finally, select the Instagram Feed block, and you’re good to go.
The plugin handles the rest, and you’ll have an automatically updating UGC gallery that pulls content directly from Instagram.

Layout Options and When to Use Each
The layout you pick shapes how your UGC gallery feels on the page and how well it fits the space around it.
Here’s a quick breakdown of the four layout options in Instagram Feed Pro and where each one shines.
| Layout | Best For | Why It Works |
|---|---|---|
| Grid | Product-heavy ecommerce sites | Clean, consistent visual rhythm that doesn’t compete with product imagery |
| Carousel | Sidebars, product pages, and homepage strips | Space-efficient; shows social proof without dominating the layout |
| Masonry | Lifestyle, hospitality, and creator brands | Keeps original image proportions for an editorial, Pinterest-style feel that handles mixed photo dimensions naturally |
| Highlight | Hero sections and image-first storytelling | Removes likes and comment summaries and scales specific images larger, putting the full focus on the visuals themselves |
Each layout in Instagram Feed Pro is fully responsive, so the gallery adjusts itself on phones and tablets without any extra setup.
That means you can pick the layout that fits your brand best without worrying about a separate mobile build or custom CSS, and your gallery will look polished on every screen your customers use.
How to Moderate and Curate Your UGC Gallery
Pulling in customer content automatically is great, but you still want a say in what actually shows up on your site.
Instagram Feed Pro gives you three controls that keep your gallery on-brand without forcing you back into manual work.
1. Moderation Queue
Instead of letting every tagged post go live the moment it’s posted, you can switch on pre-approval and review each post before it appears in the gallery.
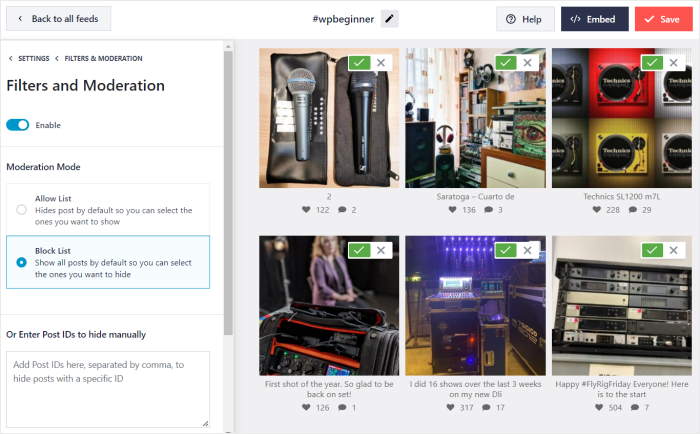
This solves the off-brand photo worry without going all-or-nothing. You still get the auto-pull benefits, but nothing publishes to your site until you’ve given it the green light.
2. Automatic Durability
Because the gallery refreshes through the Instagram API, deleted posts drop out of your gallery on their own.
If a customer removes their photo or changes their username, the feed updates to match. As a result, you won’t end up with:
- Broken images sitting on your homepage
- 404 placeholders where photos used to be
- Stale content from deactivated accounts
That’s one of the biggest reasons manual screenshot galleries go stale.
3. Filtering
You can block specific posts from ever showing up, so off-brand content stays out of the feed. Here’s what you can filter on:
- Only show keywords to choose reviews that mention a specific word.
- Hide keywords to hide posts that mention certain words or phrases you don’t want on your feed.
- Post type to control if you want to show Instagram photos, reels, or both.
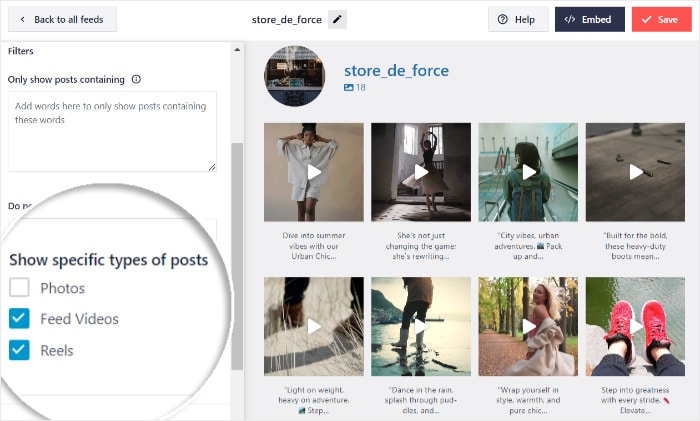
Set these filters once during setup, and the gallery applies them to every new post the feed pulls in, so curation stays hands-off after the initial configuration.
Where to Place Your UGC Gallery for Maximum Impact
A UGC gallery works hardest when it shows up where buying decisions actually happen. Here are four placements that consistently pull their weight, and the reason each one converts.
Homepage, Above the Fold
First-time visitors decide whether to trust your brand in seconds, and real customer photos do that faster than any copy can.

A grid of tagged posts above the fold signals an active, beloved brand the moment the page loads. I’d pair it with a short headline like “From our community” so visitors know what they’re looking at right away.
Product Pages, Near the Add to Cart
Product pages are where doubt peaks, and that’s exactly where UGC closes the gap.
Seeing the product in a real customer’s hands or home helps shoppers picture it in their own lives, which is the missing piece that polished studio shots can’t fill.
A compact carousel near the buy button works well here because it adds proof without pushing the cart action below the fold.
A Dedicated “Community” or “As Seen By Customers” Page
A standalone page gives the gallery room to breathe and turns it into a destination customers actively want to be featured on.
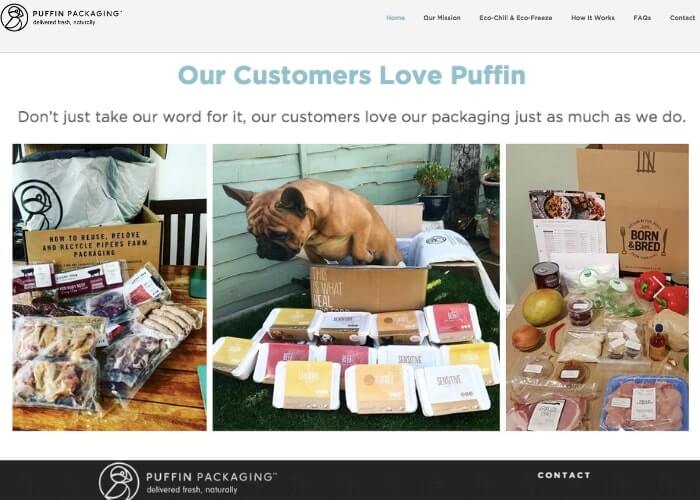
It also earns its own indexable URL, so you pick up SEO value from a page that’s mostly populated with fresh, on-topic content.
This is a strong fit for brands with an engaged following and plenty of tagged photos to show off.
About Page
Your About page is where the brand story lives, and a UGC gallery turns that story from a monologue into a chorus.
Real customer photos back up what you say about yourself with proof from the people you serve.
This placement works especially well for service businesses, creators, and hospitality brands where the “vibe” is part of the sell.
Pro tip to save you time: With Instagram Feed Pro, you can drop the same feed into multiple locations without rebuilding it each time.
How to Get More UGC Into Your Gallery
The best UGC gallery in the world only works if customers are tagging you in the first place.
The good news is that getting more tagged posts isn’t about luck or going viral, it’s about making your hashtag impossible to miss and giving customers a clear reason to use it.
Here are the tactics that consistently turn quiet customers into active contributors.
- Print It on Packaging: Add the hashtag to unboxing inserts, thank-you cards, and product tags so customers see it the moment they open the box, when excitement about the purchase is at its peak and the urge to share is strongest.
- Add It to Transactional Emails: Include the hashtag in order confirmation, shipping, and delivery emails where open rates are high and customers are already pulling out their phones to track the package.
- Put It in Staff Email Signatures: Drop the hashtag and a one-line invite into the email signature of every customer-facing team member so that every support reply, sales follow-up, and account email doubles as a soft prompt to tag you.
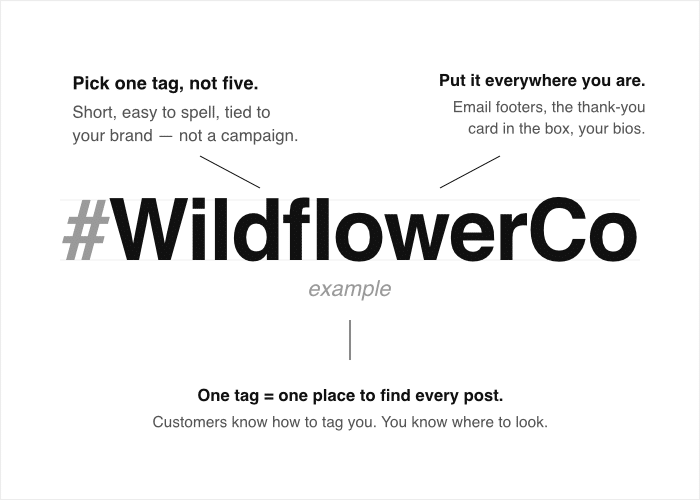
- Pin It on Your Instagram Profile: Add the hashtag to your Instagram bio, save a dedicated Story highlight that explains how to get featured, and pin a post that shows past features so anyone visiting your profile knows exactly what to do.
- Feature Top Contributors Publicly: Spotlight standout creators in newsletters, on the homepage gallery, and in your own Stories so customers see real people getting real attention for tagging, which is the social signal that turns lurkers into contributors.
- Run a Light-Touch Campaign: Tie the hashtag to a seasonal theme, a product launch, or a monthly “featured customer” pick so there’s a fresh reason to post instead of a vague evergreen ask that easily gets ignored.
- Reply to Every Tag: Comment, react, or repost when a customer tags you, even if you don’t end up featuring the photo on your site, because that small bit of acknowledgment makes the next tag feel worth the effort.
Publicly featuring creators is the single biggest driver of more UGC, because it turns a one-time tag into a community behavior people want to repeat.
Once one customer sees their photo on your homepage, others start tagging too without you ever asking, and the gallery essentially fuels its own pipeline.
Note: A lot of brands want UGC from beyond Instagram, like TikTok videos and Google reviews. The Social Wall Pro plugin can pull UGC from the biggest platforms (Instagram, Facebook, Twitter/X, YouTube, TikTok, and all major review sites) into the same wall.
Frequently Asked Questions
Do I need permission from customers before featuring their Instagram post?
The best practice is to comment on the original post asking for permission before featuring it, and to publish a short UGC policy that treats your branded hashtag as implicit consent so contributors know the deal upfront.
Will my gallery break if someone deletes their post or changes their username?
No, your gallery will not break if a creator deletes their post or changes their handle. Instagram Feed Pro pulls live from the Instagram API, so deleted posts drop out of the feed on the next refresh and username changes update on their own.
Can I filter out off-brand or inappropriate photos before they go live?
Yes, you can filter out off-brand or inappropriate photos before they ever appear on your site. If you enable Instagram Feed Pro’s moderation feature, you can approve each post manually before it publishes to the gallery, and you can also block specific usernames or caption keywords so spam and off-brand content never make it through.
Can I pull in posts from people who don’t tag me?
Yes, as long as a post uses your branded hashtag on a public account, Instagram Feed Pro can include it in the gallery even if the creator never mentioned your handle.
Will an auto-updating UGC gallery slow down my WordPress site?
An auto-updating UGC gallery will not slow down your WordPress site when it is built the right way, like Instagram Feed Pro. This tool caches feed data locally and lazy-loads images, so the gallery does not fire a live API call on every visit, so the rest of your page loads as fast as ever.
Start Building Your UGC Gallery Today
A UGC gallery is the highest-trust real estate on your website, and the only sustainable way to build one is automated, API-based, and properly moderated.
Manual screenshots and one-off embeds will never keep up with a brand that customers are actively tagging, and they expose you to rights and durability issues that a live feed avoids entirely.
The good news is you don’t have to wait. Here’s what you can do today to get your UGC gallery off the ground:
- Create your gallery with Instagram Feed Pro: Connect your Instagram account, set up a hashtag or tagged feed, and drop it on your homepage, product pages, or About page with a shortcode.
- Pick the right placement: Decide whether your gallery lives on the homepage for instant social proof, on product pages to lift conversions, on a dedicated community page for SEO value, or on your About page to back up the brand story.
- Promote your branded hashtag: Print it on packaging, add it to transactional emails, drop it in staff email signatures, and pin it to your Instagram bio so customers actually see it.
- Feature your top contributors: Spotlight standout creators in newsletters, on your homepage gallery, and in your own Stories so tagging feels worth the effort.
- Reply to every tag: Comment, react, or repost when a customer tags you, even if the photo doesn’t make the final cut on your site.
- Expand beyond Instagram (optional): If you also want TikTok videos and Google reviews in the same wall, grab the Smash Balloon All Access bundle and pull all the sources into one gallery.
With Instagram Feed Pro, the hashtag and tagged feeds can be live on your site before lunch, pulling in real customer photos that update themselves from here on out.
Get Instagram Feed Pro and build your UGC gallery today.