Want to know how to create a YouTube widget for your website?
Since YouTube is the top social network for video content, YouTube widgets can be a smart way to engage visitors or grow your channel.
But directly adding YouTube widgets can be tricky — especially if you’re not used to dealing with code.
To help you out, we’ve put together a complete guide on adding YouTube widgets to your website.
We’ll cover multiple methods in this article, so you can click on the one you want to skip to:
- Why Use a YouTube Widget for Your Website
- Easiest Way to Create a YouTube Widget for WordPress
- Methods for Creating a YouTube Widget for Your Website
- Best Practices for High-Converting Widgets
- Other Social Media Guides & Tutorials
Why Use a YouTube Widget for Your Website
Video content is dominating the internet. By 2026, video traffic is now making up the majority of consumer internet traffic. By embedding a YouTube widget, you can:
- Build Trust: You can show social proof like reviews and testimonials on YouTube and convince people to buy your products.
- Grow Online: To get more views, likes, and subscribers, you can show your own video content using a YouTube widget.
- Better SEO: You can grab people’s attention and keep them on your site for longer, which is great for your site’s SEO.
- Engage People: Your YouTube widget can also share your live stream with your website visitors so you can get interested people to join in.

Easiest Way to Create a YouTube Widget for WordPress
If you want to add a YouTube widget to your website, there are 2 options that you can choose from:
- Manually add the YouTube widget to your website
- Use a WordPress plugin to create and embed the YouTube widget
With the manual method, the downside is that you’ll have to work with CSS, JavaScript, and other coding languages.
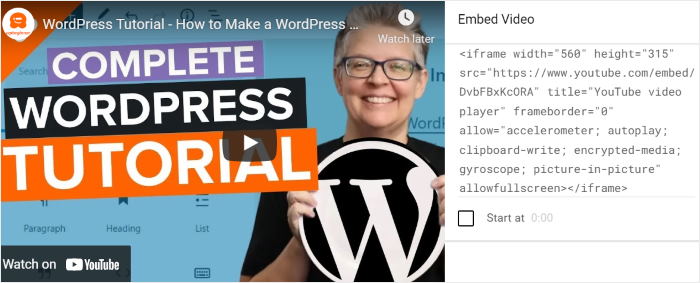
Pro Tip: Embedding multiple YouTube videos using iframes can significantly hurt your site speed. Using a plugin that utilizes lazy loading makes sure your site remains fast while displaying a gallery of videos.
As an easy alternative, you can use a WordPress plugin instead. That way, the plugin can fetch the videos and automatically show them on your website.
And when it comes to YouTube feed plugins, the best option in the market is YouTube Feed Pro by Smash Balloon.

This fantastic tool lets you create YouTube widgets and display them on your website in just a few clicks – no coding needed.
To make things even easier, you also get several great features to work with:
- You can use your widget to display videos from your channel, YouTube playlists, live streams, and more.
- Since the plugin is so lightweight, you can display tons of YouTube videos, and your feed will still load lightning-fast.
- To help you grow your channel, the plugin lets you display a banner with a subscribe button while your video is playing.
- In a single click, you can import a pre-built template, and even use the live editor to design your widget in detail.
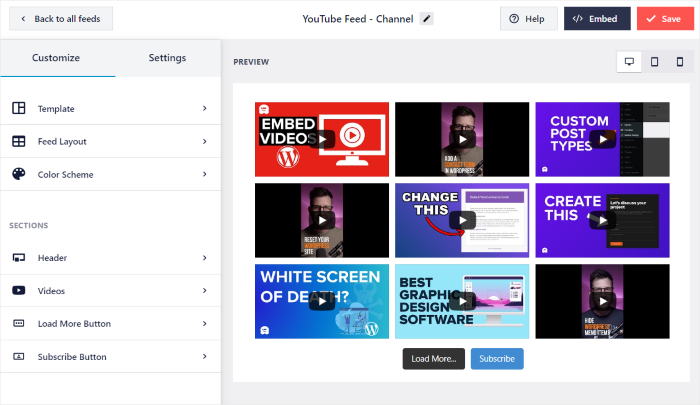
As you can see, YouTube Feed Pro gives you the easiest way to embed YouTube widgets for websites.
Ready to get started with YouTube marketing? Get your copy of YouTube Feed Pro today.
Methods for Creating a YouTube Widget for Your Website
Now, let’s look at steps you can take to create a YouTube widget for your website. We’ll start with the easiest method first, then work down to the most difficult instructions.
Method 1: Create a YouTube Widget With a WordPress Plugin
As mentioned earlier, the simplest method is to use a WordPress plugin and let it fetch and display YouTube videos for you.
Let’s get started:
Step 1: Download and Install the YouTube Feed Pro Plugin
First, click here to get your copy of YouTube Feed Pro. Next, install and activate this plugin on your website.
If you’re not sure how to do that, you can simply follow these steps to install a WordPress plugin.
Step 2: Create a New YouTube Widget
You can now follow the 3-step guided flow to create a new YouTube widget.
First, open the YouTube Feed » All Feeds menu from your WordPress dashboard area.
From there, you can click on the Add New button.
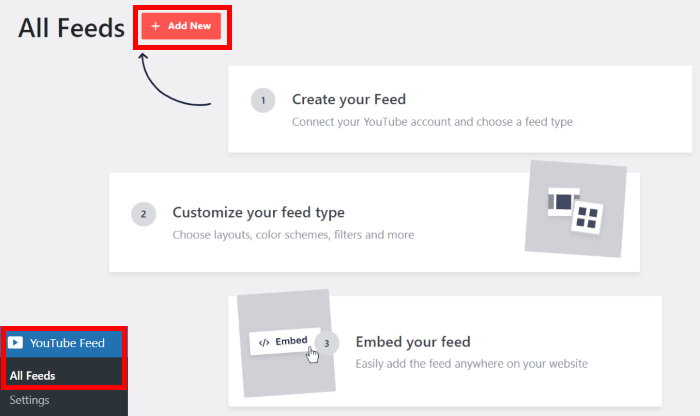
When you do that, YouTube Feed Pro will allow you to choose the type of YouTube content to display in your widget. The options included are:
- Channel: A feed displaying content from a YouTube channel using a channel ID or username
- Playlist: Show specific playlists in a feed by entering the YouTube playlist ID
- Search: Use the search feed type to show content based on specific search terms or phrases
- Live Streams: Display a single upcoming or live-streaming video in your feed
- Single Videos: Show individual videos sorted in order
To continue, select your feed type and then click on Next.
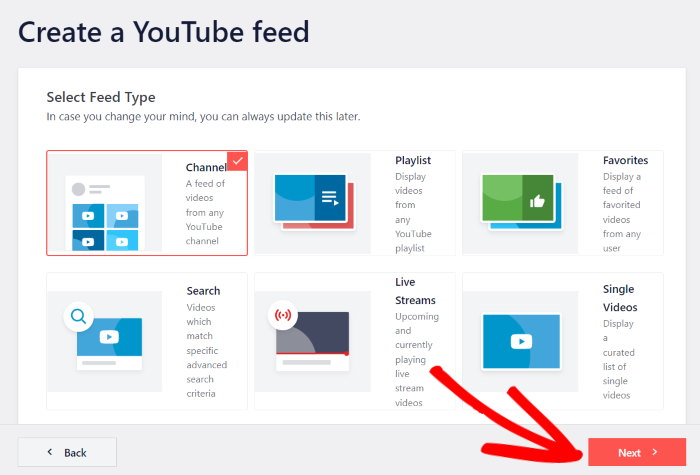
For our example, we’ll use the Channel option to embed a YouTube channel in the widget.
Step 3: Add Your YouTube Widget Source
Now that you’ve created a new widget, it’s time to connect it to your YouTube account. The simplest way to do that is by using an API key.
Pro Tip: In case you don’t have a key yet, you can just follow this simple guide on creating a new API key.
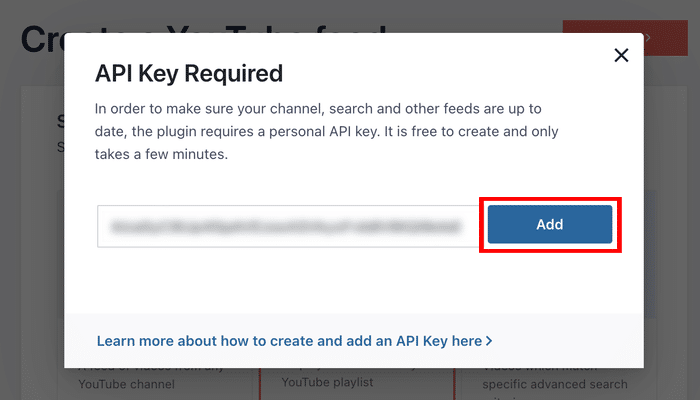
Once you have your API key, paste it into the popup before clicking on Add.
Now, it’s time to select which YouTube content you want to show. For this example, we’ll use a YouTube channel.
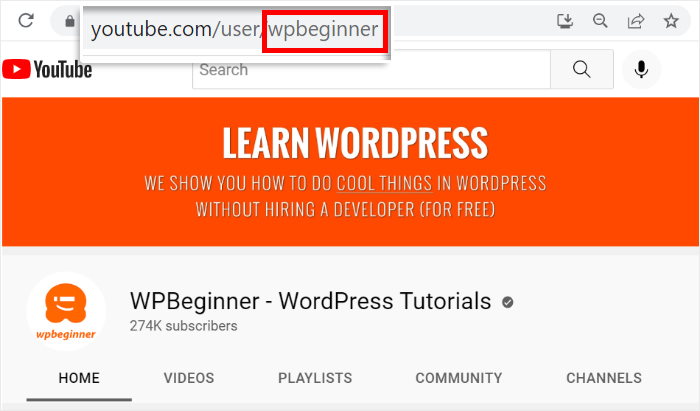
First, open the YouTube channel that you would like to embed. You can find the channel URL at the top of the address bar.
There, copy everything after /user/ or /channel/ and then return to your site.
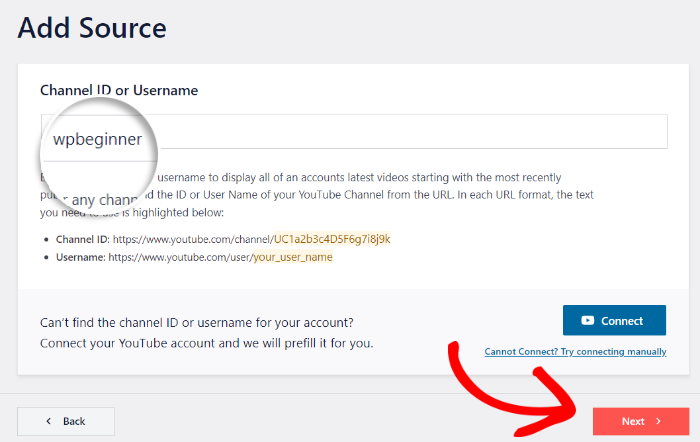
On your website, paste the code you just copied on the Channel ID or Username field before clicking on Next.
Similarly, you can copy the code from the URL of your playlists, live streams, individual videos, and more for other feed types.
Step 4: Customize Your YouTube Widget
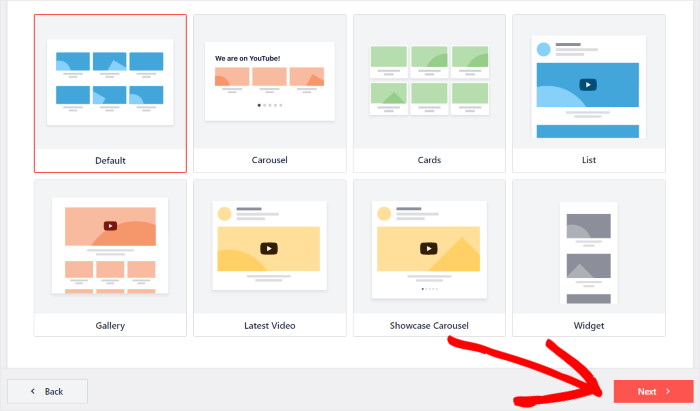
If you really want your YouTube widget to stand out from the rest of your content, you can choose from a collection of feed templates:
- Default
- Carousel
- Cards
- List
- Gallery
- Latest Video
- Showcase Carousel
- Widget
All you have to do is pick a template that you prefer and then click on the Next button.
Just like that, you can import a pre-built design for your YouTube widget.
To help you customize your widget in detail, the plugin will now show you the live feed editor. This is where you can change your feeds’ layout, color scheme, header, feed size, and much more.

Whenever you make any changes, you can see how your YouTube widget looks by using the live preview on the right.
First, click on the Feed Layout option on the left to get started.
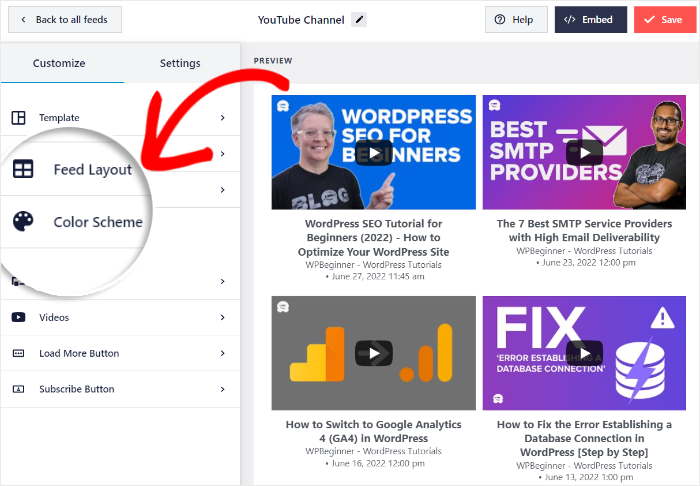
From here, you can choose from 4 different layouts for your YouTube widget:
- Grid: A clean and uniform grid of video thumbnails. Best for showcasing a large volume of content.
- Gallery: One large feature video with smaller thumbnails below. Great for highlighting a specific video.
- List: A single column of videos. Ideal for sidebars.
- Carousel: A sliding row of videos. Perfect for saving vertical space on your homepage.
Clicking each layout option reveals further settings, such as how many columns to use, etc.
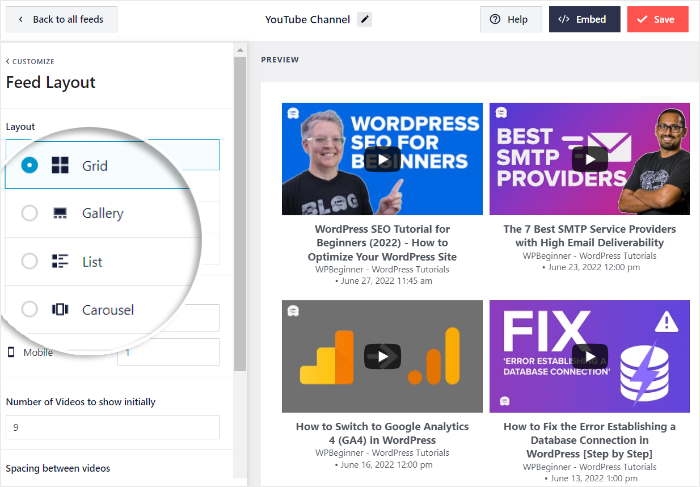
Once you pick a layout that you like, click on Save to keep your changes.
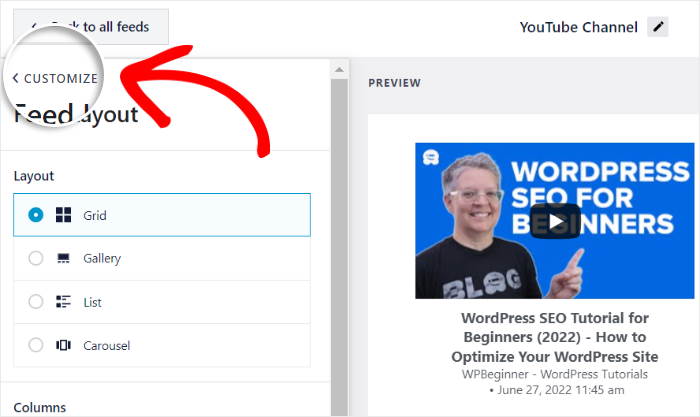
To continue customizing your widget, click on the Customize button in the top left.
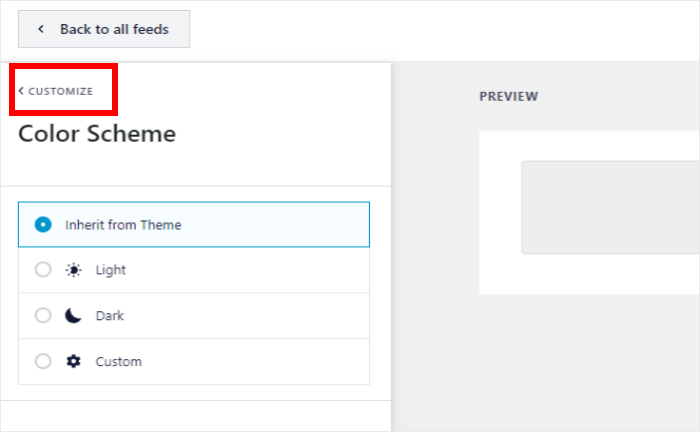
Now, you can edit the colors of your widget by clicking on the Color Scheme option on the left.
With YouTube Feed Pro, you can easily change all the colors at once by selecting a color scheme.
Here, you have 4 color schemes to pick from:
- Inherit from Theme: Make sure your widget copies the colors of your website
- Light: Use light colors and dark font for your YouTube widget
- Dark: Display a widget with a dark background color and a light font color
- Custom: Manually select all the YouTube widget colors by yourself
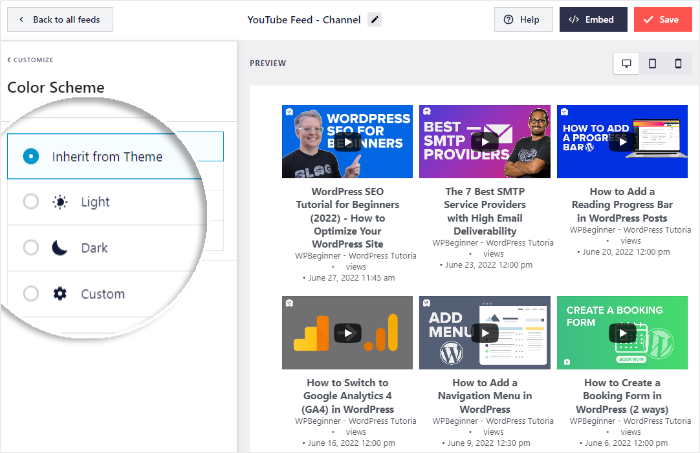
Remember to click on Save to confirm your changes once you pick a color scheme.
Like before, you can click on Customize in the top left to keep on changing the design of your YouTube widget.
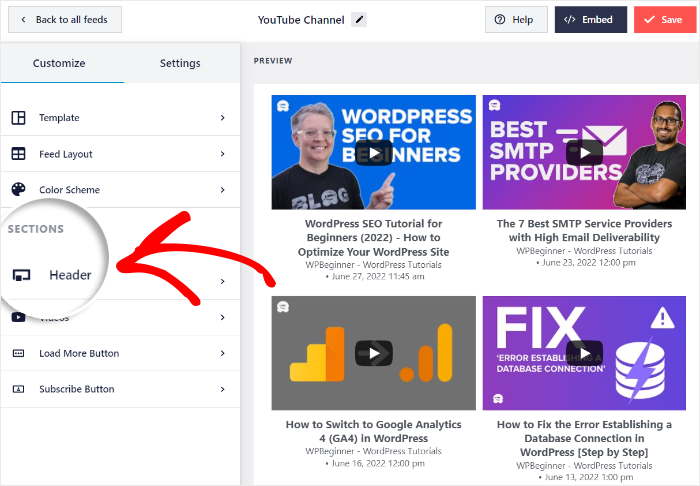
Now, click on the Header option from the left-hand panel to change how the header of your widget looks.
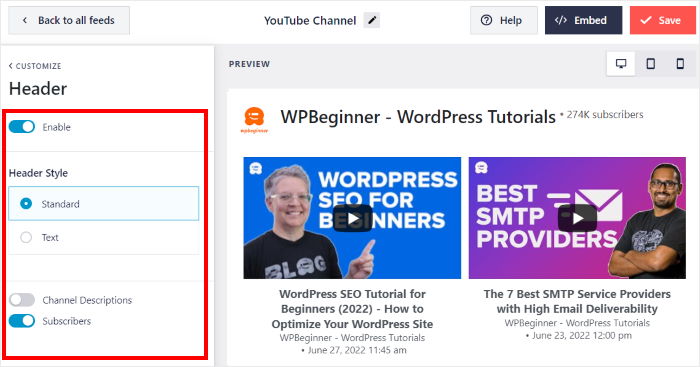
You can choose to show or hide your header by toggling the Enable option.
Below that, you can choose to show a Standard header with your channel name, logo, subscriber count, and descriptions.
Or, you can pick a Text header and write a custom piece of text for your YouTube widget header.
After that, click on Save to confirm your changes, just like before.
Now, you can use the remaining options to set your feed size, button design, visible elements, and much more. You can even curate your social media feed by adding filters from here.
Once you’re happy with the design of your YouTube widget, click on the Save button once again.
Step 5: Display Your YouTube Widget
Now that you’ve created your YouTube widget, it’s time to display it on your website. To embed your YouTube widget in a page, you can simply use the live feed editor.
All you have to do is click on the Embed button in the top right corner.

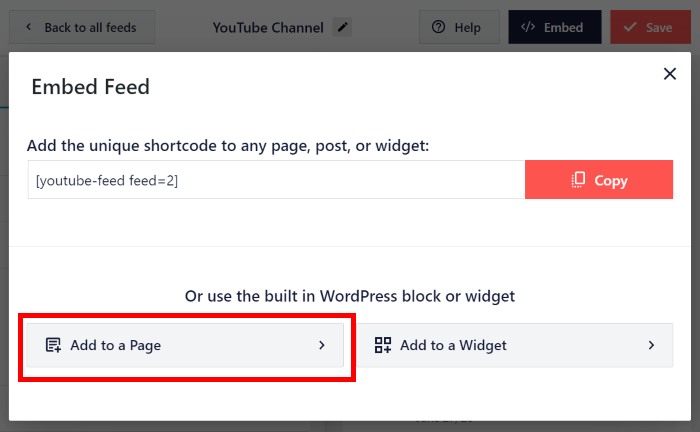
Now, you’ll see a popup where you can set the location for your YouTube feed widget. You can choose to display social media content on your webpage or widget-ready areas of your site.
For now, click on the Add to a Page button on the popup.
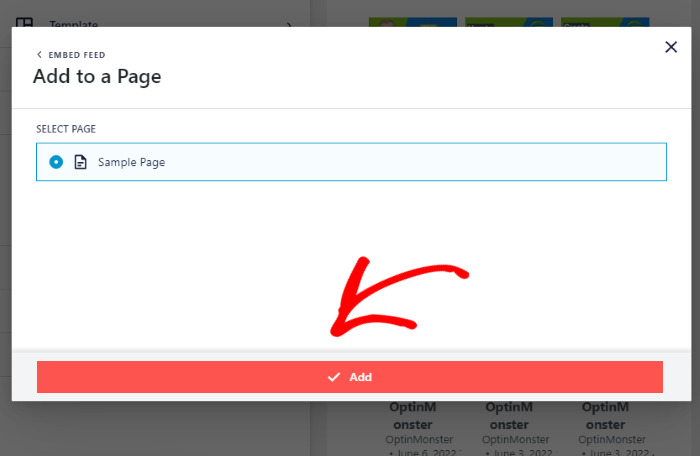
YouTube Feed Pro will then show you a list of the pages on your WordPress website.
To continue, select a page from the list and then click on Add.
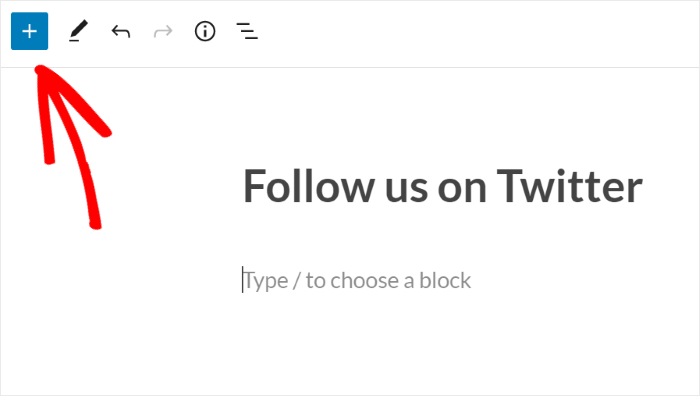
This will open that page in the WordPress block editor. Now within the block editor, click the Plus (+) icon to choose a new content block.
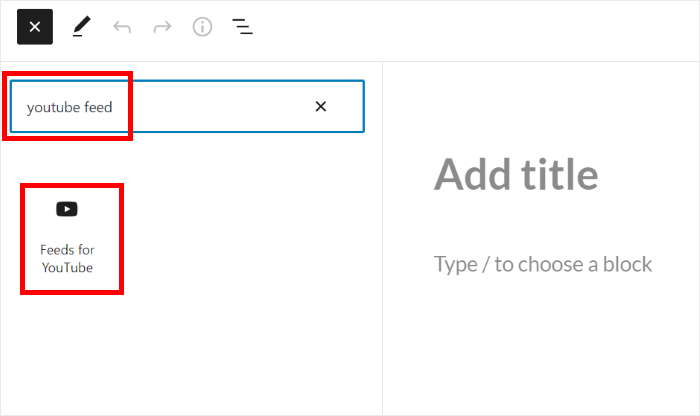
Now, use the search bar at the top to look for “youtube feed” before clicking on the Feeds for YouTube widget below.
Doing that will embed the YouTube feed widget on your page. Now click on the Update or Publish button at the top, and your YouTube widget will be online.
Just open your website, and you can see how it looks.

Now, let’s check out the next way to embed your YouTube feed widget.
Method 2: Create a YouTube Widget for Your WordPress Sidebar or Footer
The YouTube Feed Pro plugin also comes with a ready-made WordPress widget you can add to your website’s sidebar areas, such as your footer or sidebar.
To display a YouTube sidebar widget on WordPress, follow the steps above to create your feed widget.
Then, head to YouTube Feed » All Feeds from your WordPress dashboard and then click on your YouTube widget.
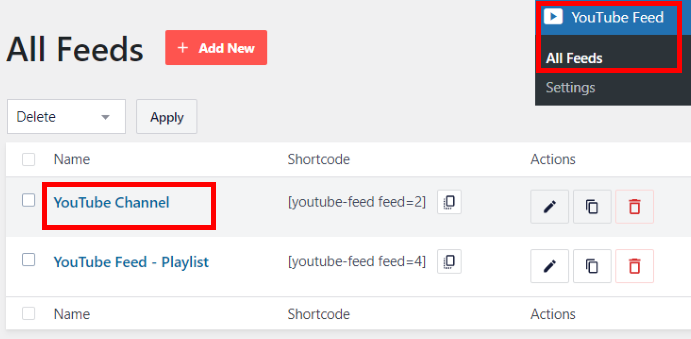
You’ll see your YouTube feed widget open in the live feed editor once again.
Like with the previous method, click on the Embed button at the top.

Using the popup, you can choose to embed this YouTube feed widget on your sidebar or footer areas.
Just click on the Add to a Widget button here.
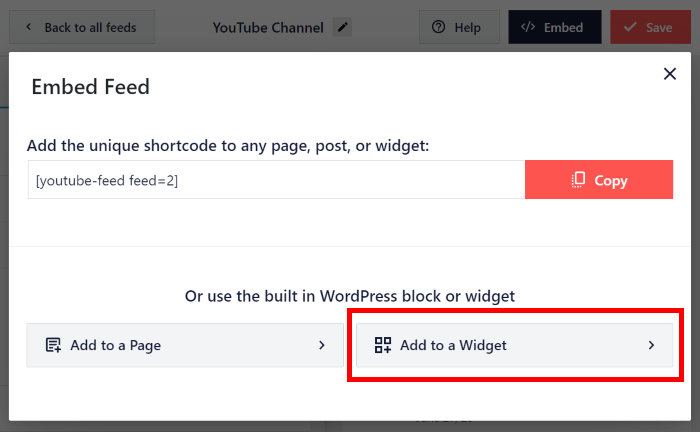
Clicking on it will send you to the Widgets page of your website, where you can manage the widgets on your sidebar or footer.
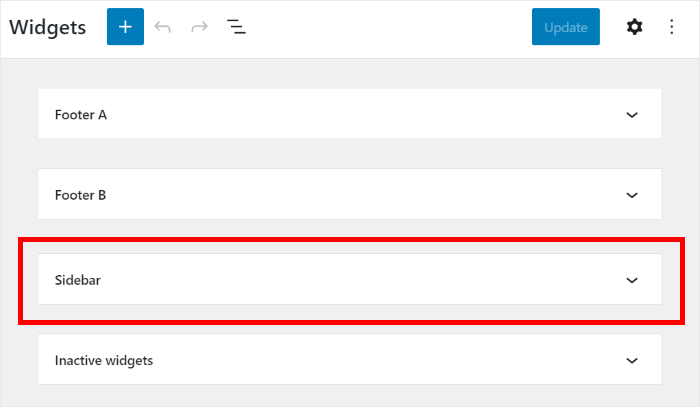
Want to show the YouTube feed widget on the sidebar? Click on the Sidebar panel.
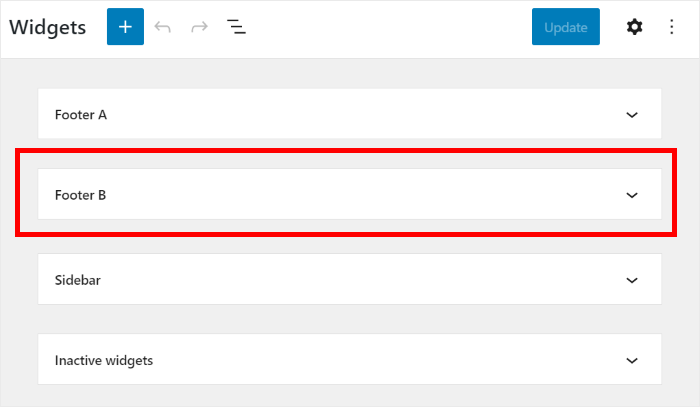
If you want to show YouTube content on the footer, then you can click on Footer here.
For now, we’ll go with the sidebar for our example.
You can click on the plus icon (+) to add a new widget.
After that, simply click on the Feeds for YouTube widget from the options.
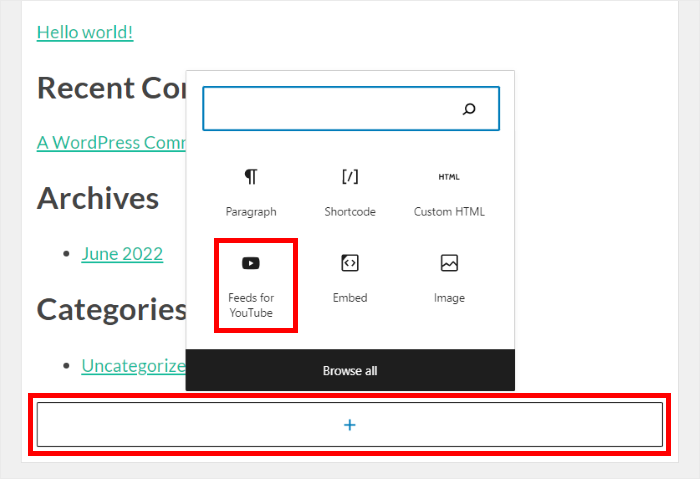
Click on the Update, and your new YouTube feed widget will now be online.
When you navigate to the front of your website, you can see how your YouTube channel widget works.
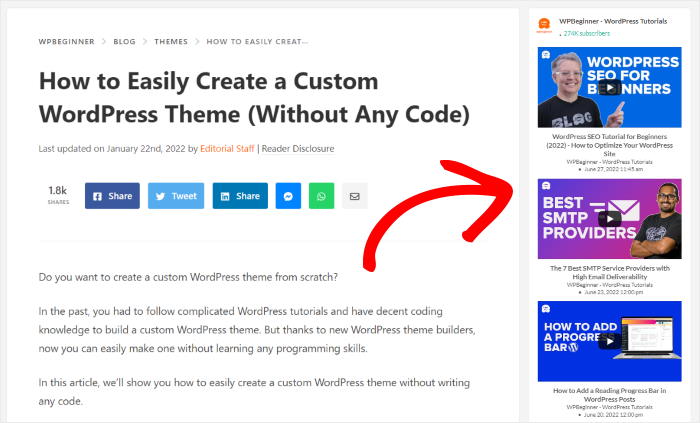
Method 3: Create a YouTube Widget for Your Site Manually
If you want to create a YouTube widget for your website manually, you’ll need to copy and paste the embed code from YouTube onto your site.
Since you need to go back and forth to paste the embed code for each video, using this method takes much longer. What’s more, it doesn’t offer the same level of customization you can achieve with a WordPress plugin.
In fact, to get your widget looking exactly how you want, you might have to hire a developer.
That said, there are 2 ways to manually create a YouTube widget on WordPress, which include:
- By pasting a YouTube video URL directly into your WordPress editor
- Copying the iFrame embed code from the video’s share option
Neither of these methods lets you display a complete feed of videos, limiting your widget to showing only 1 video.
YouTube URL Method
To try the first option, first open the YouTube video that you want to embed.
After opening the video, copy the URL from the top.
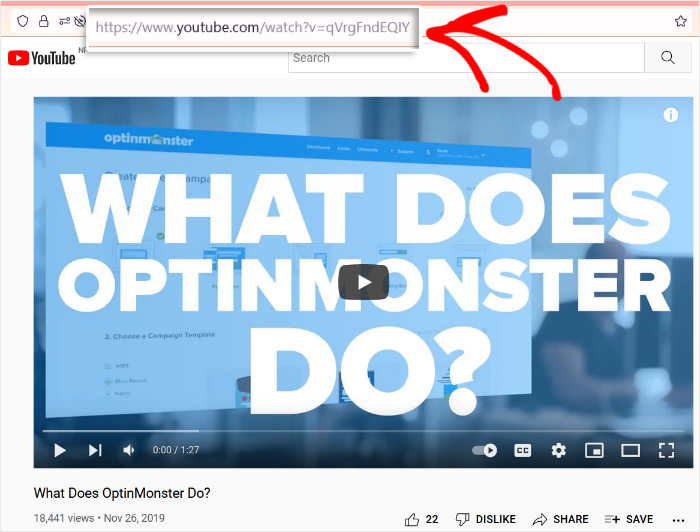
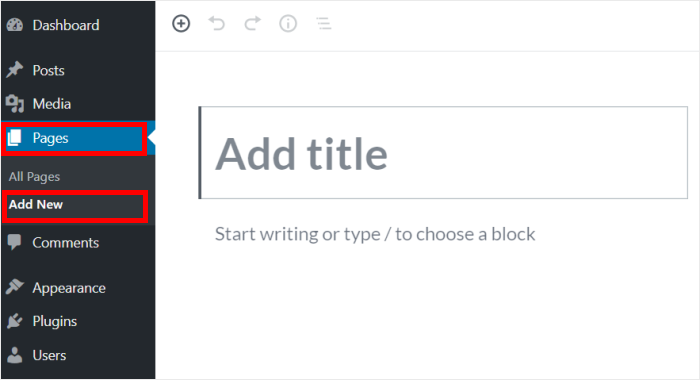
Once you do that, create a new page on your WordPress site by navigating to the Pages » Add New menu from your dashboard.
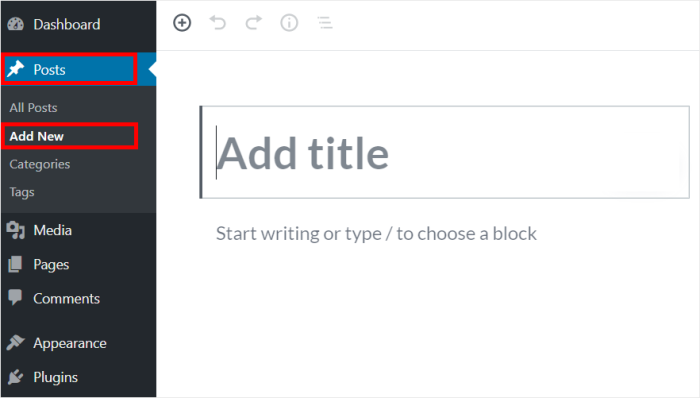
If you want to use a WordPress post instead, go to Posts » Add New from your dashboard.
For our example, we’ll use a WordPress page.
Then, paste the URL directly in either the classic or block editor of the new post or page.
When you do that, WordPress will convert that URL into a YouTube video and then display it on your page or post.
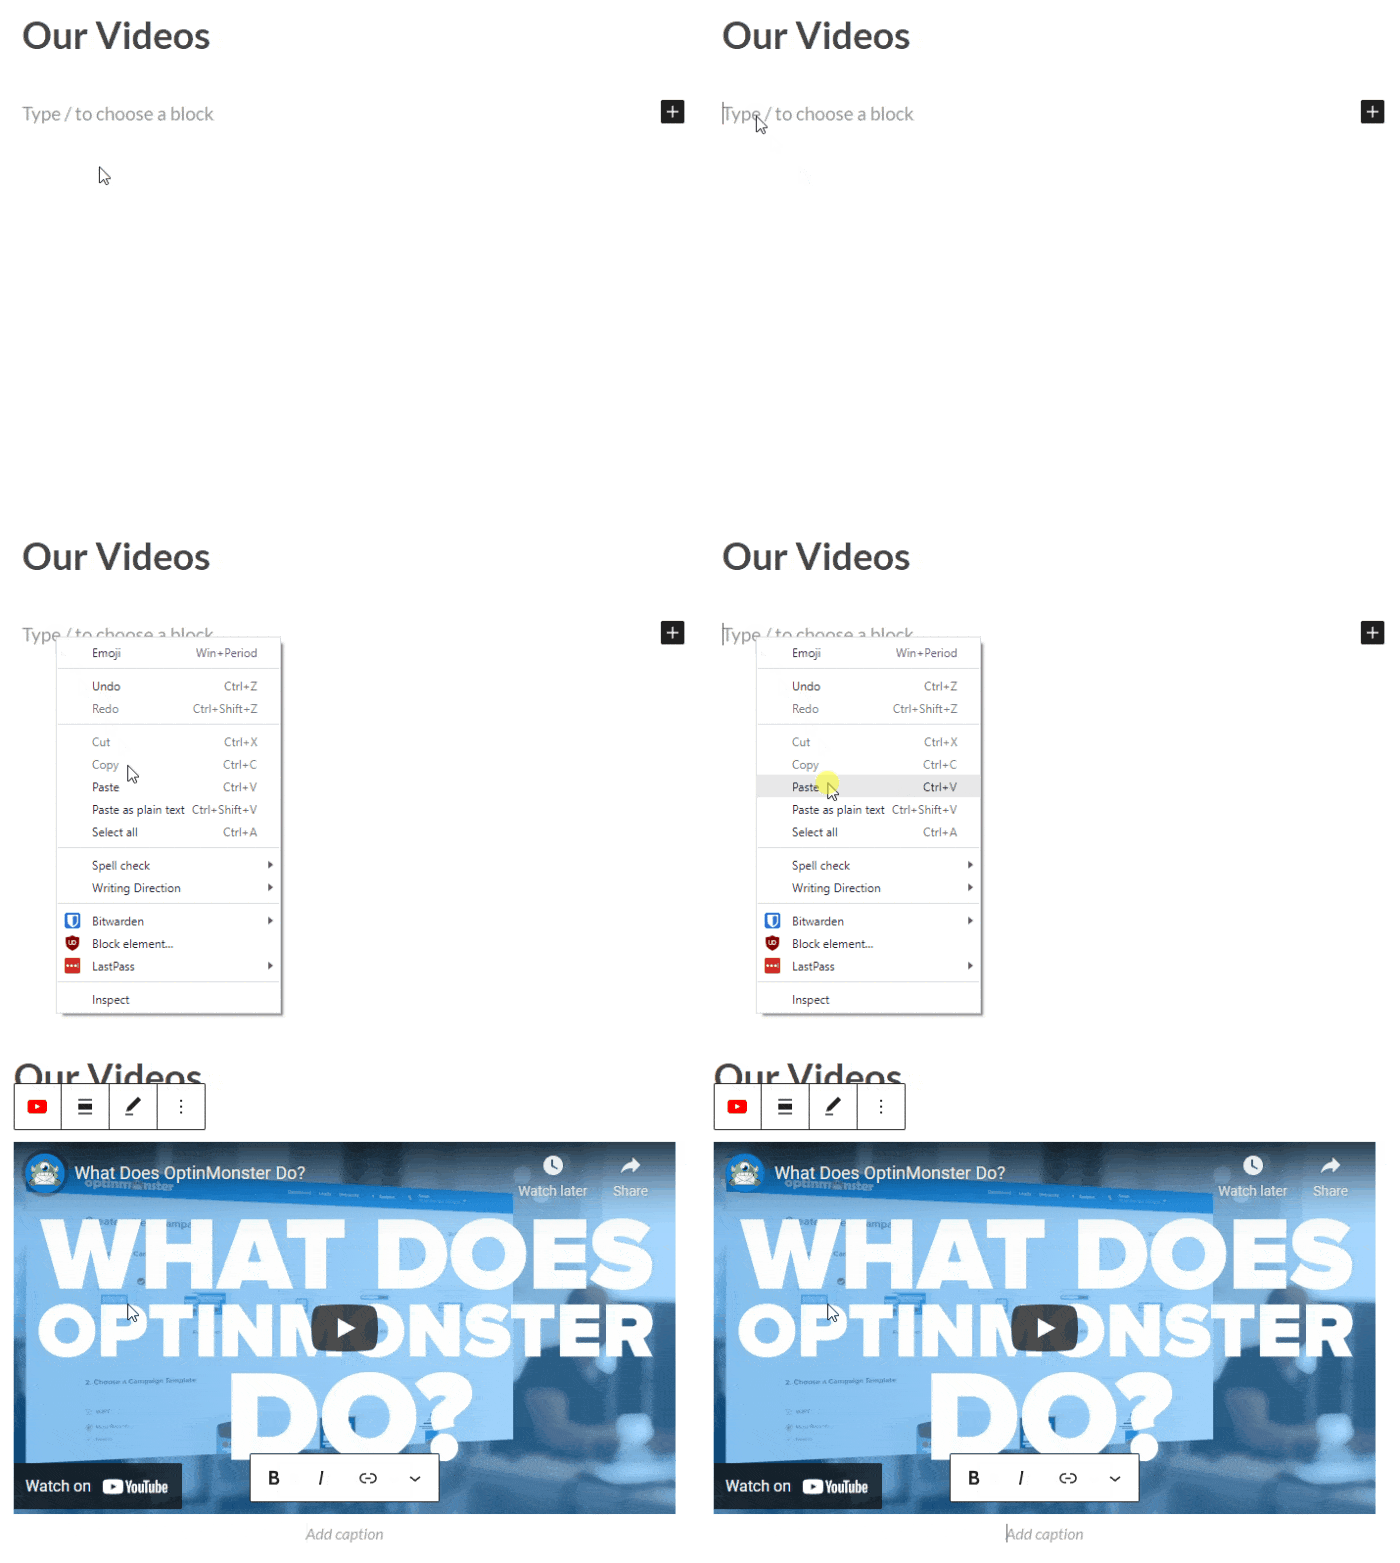
You can use this method to display your widget in a sidebar, too.
Simply navigate to Appearance » Widgets so you can start managing your WordPress widgets.
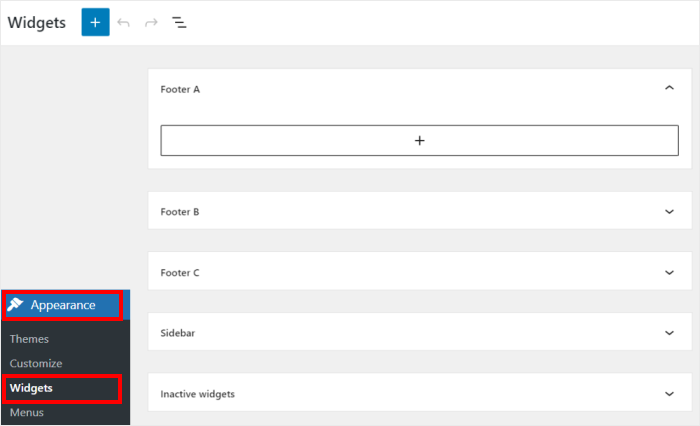
There, click on the Sidebar option to embed the video on your sidebar.

Want to show a video on your footer? Click on the Footer panel instead.
For this tutorial, we’ll go with the sidebar.

Here, click on the plus (+) icon to add a new widget and then select Paragraph from the
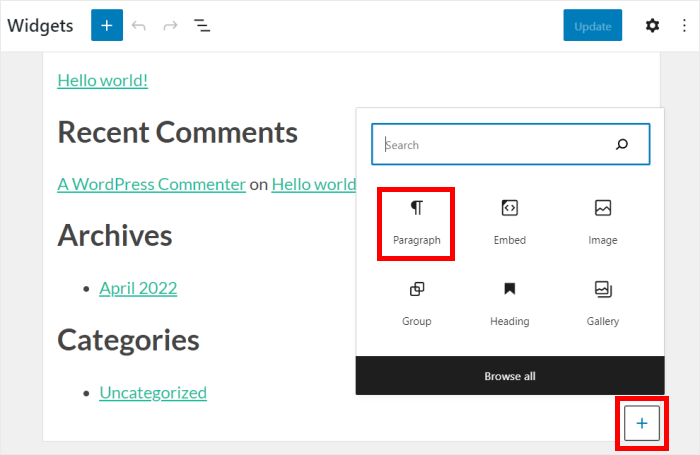
Now, simply paste the URL of your YouTube video into the paragraph widget to embed your video.
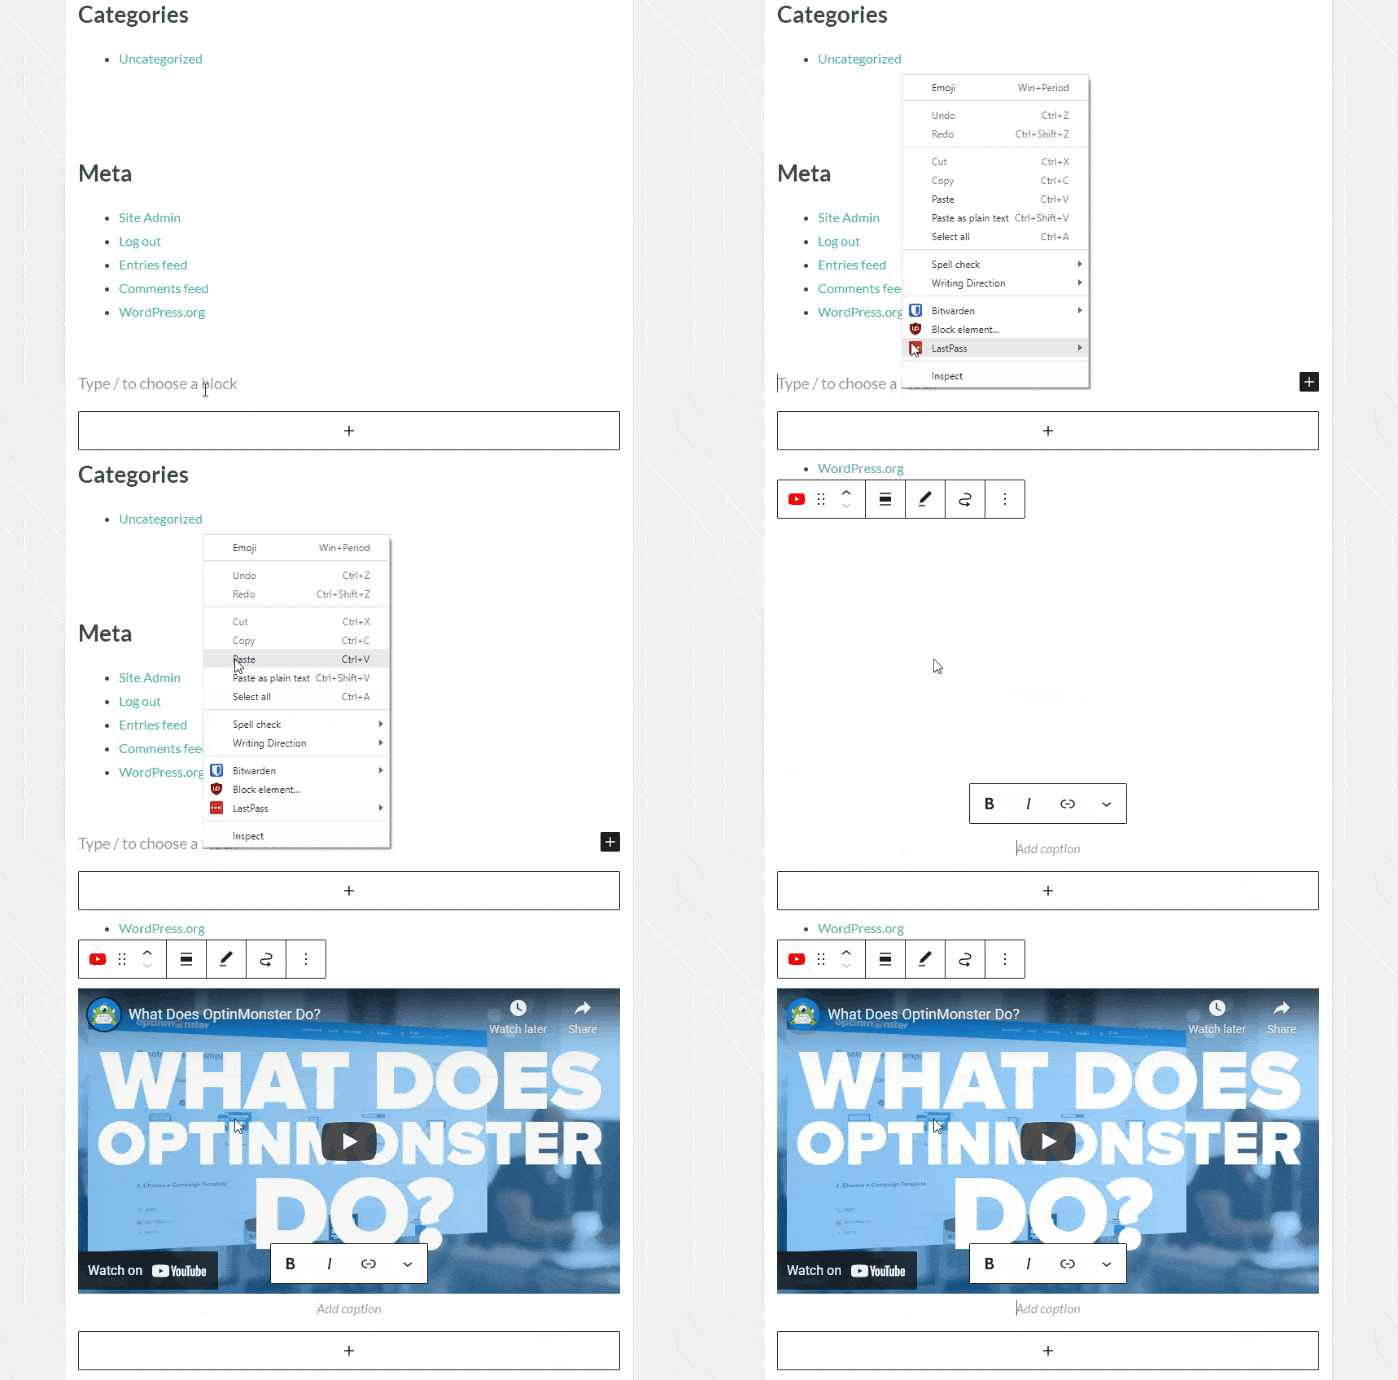
Finally, there’s one more way to embed YouTube content on your website.
YouTube iFrame Method
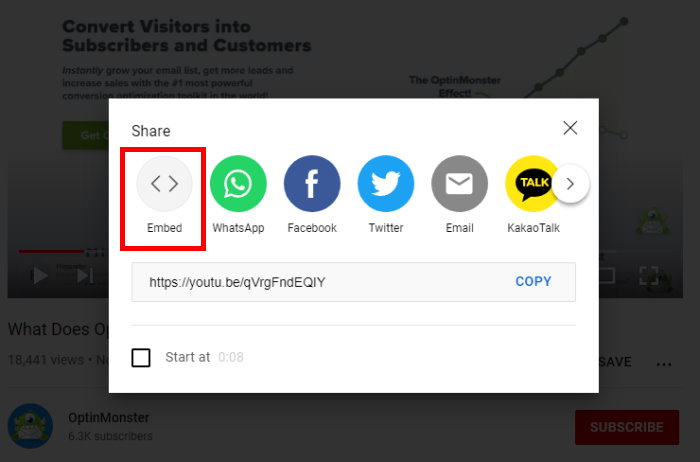
To use the more complicated iFrame method, start by finding the YouTube video you’d like to embed and click the Share icon.
On the next screen, choose the Embed option.
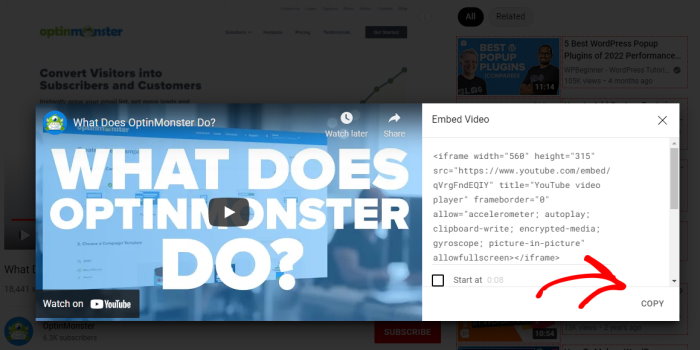
Now copy all the code that’s provided in the box.
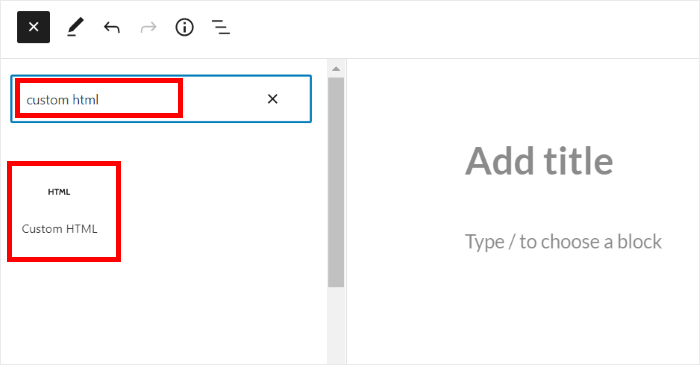
In the WordPress block editor, click the Plus (+) icon and search for the “custom html” widget. From the search results, just click the Custom HTML block from the options.
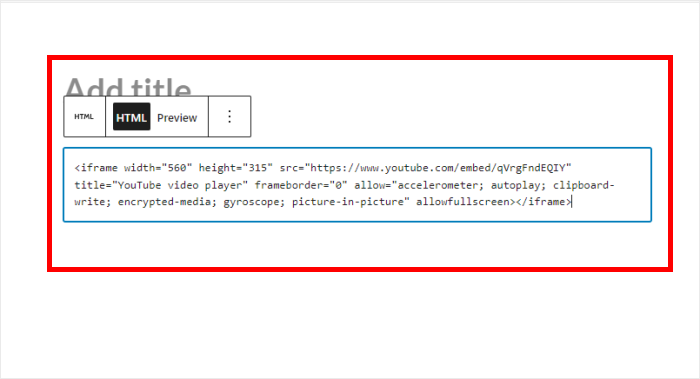
Next, paste your embed code inside the Custom HTML block and click Publish.
When you preview your page, it’ll look similar to the example below.
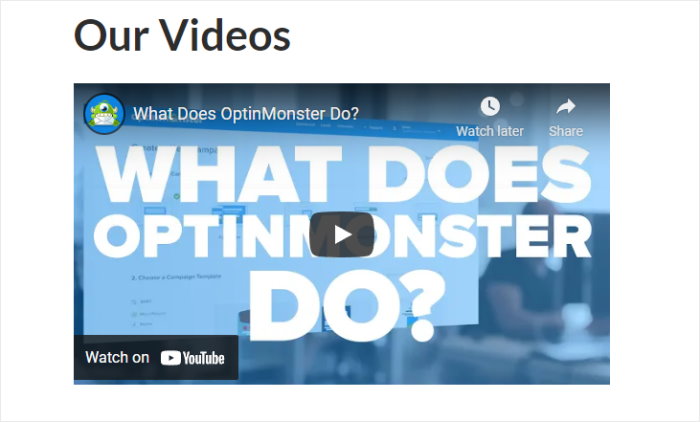
To create a YouTube widget for your site’s sidebar using this method, simply open your widgets page by going to Appearance » Widgets once again.

Like earlier, you can choose between a sidebar or footer panel.
Then, click on the plus (+) icon and then add the Custom HTML widget on your sidebar or footer.
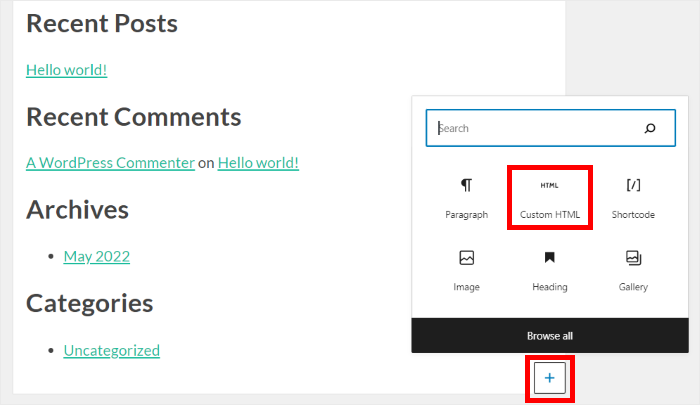
Finally, paste the embed code into the widget to embed the YouTube video.
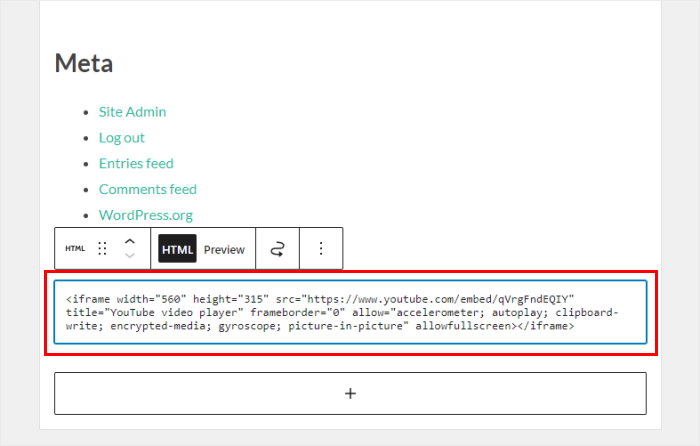
Now drag the widget over to your chosen sidebar, paste the embed code, and click Save.
Best Practices for High-Converting Widgets
To get the most out of your new YouTube widget, consider these best practices:
- Curate Your Content: Don’t just show everything. Create specific feeds for specific pages. For example, use a “Product Reviews” playlist feed on your checkout page to boost confidence.
- Experiment With Design: Try out different designs and see what looks the best for your sidebar, footer, or page areas.
- Call to Action (CTA): Along with a video widget, asking people to subscribe for more video content is a great way to grow your channel even faster.
And there you have it!
Just like that, you can create YouTube widgets for your site to get more views, boost your following, or even engage your website visitors.
As you can see, YouTube Feed Pro makes it super easy to embed YouTube widgets – even if you’re new to WordPress.
Ready to embed YouTube widgets the easy way? Click here to get started with YouTube Feed Pro.
Want to supercharge your Instagram videos as well? Then check out this complete guide on how to make popular Instagram videos.
Other Social Media Guides & Tutorials
- Types of YouTube Videos to Skyrocket Your Subscribers Easily
- How to Make Money on YouTube Without Showing Your Face
- TikTok is Your Secret Weapon: Best TikTok Ideas for Small Businesses
- How to Embed Multiple TikTok Videos at Once (Zero Coding Method)
