Are you tired of Trustpilot widgets not working on your website?
Trustpilot can be a great source of reviews and testimonials to promote your business and get more sales.
But if your Trustpilot widgets aren’t working, you’re missing out on all those potential sales.
The good news? We’ve put together this easy guide to help you fix your Trustpilot widgets in a few easy steps.
Let’s get started!
Why Add Trustpilot Widgets to Your Website?
- Since Trustpilot is a trustworthy source of reviews, you can show positive reviews to convince people to buy your products.
- By showing visitors that you pay attention to what customers are saying, you can encourage them to leave more reviews.
- You can display detailed Trustpilot reviews to showcase product features and highlights on your sales page to get more sales.
How to Fix Your Trustpilot Widgets Not Working (Easy Guide)
Ready to fix your Trustpilot widgets? Just go through the steps below
Step 1: Check if Trustpilot is Down
In some cases, Trustpilot itself could be dealing with issues which can make your widget stop working.
So, the first step is to check if Trustpilot is down. For that, you can check the Trustpilot community or a website like Downdetector.
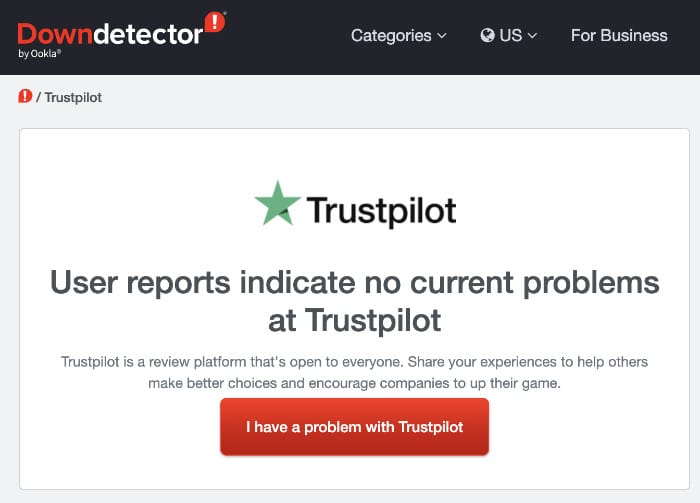
If Trustpilot is working, you can scroll down to the next step.
But if Trustpilot is down, you can add widgets that stay online even when Trustpilot is down using Reviews Feed Pro.
Step 2: Update Your WordPress Website
If Trustpilot is working fine, the issue could be your WordPress website.
After all, WordPress regularly gets new updates that change how the site works. So, an outdated website might have features that don’t work properly.
To update your WordPress site, open your dashboard and click on the Please update now button.
In case you don’t see this button, feel free to scroll down to the next step below.
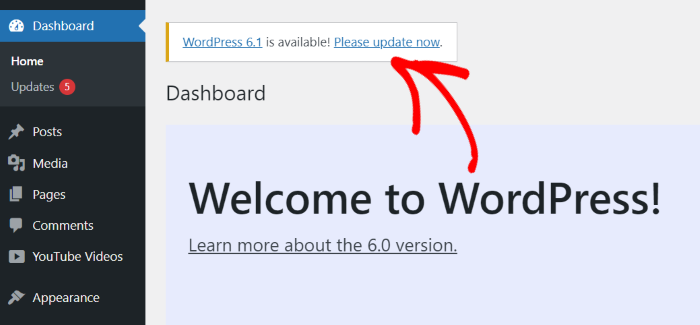
After you click the button, your site will show you some additional information about this update, along with your version number.
Just click on the Update button below to continue.
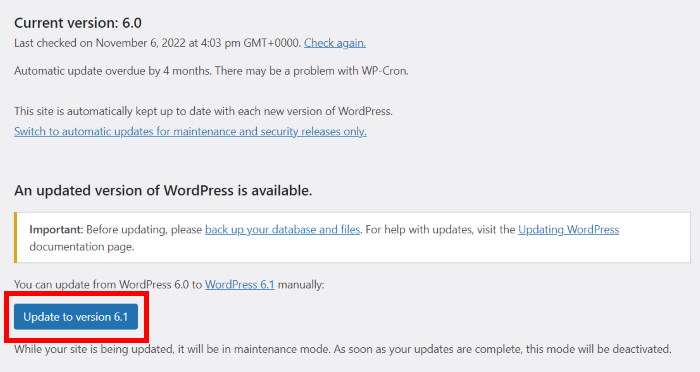
After you do that, just wait a little bit for WordPress to finish installing the update. You can then open your website and check if your Trustpilot widgets are working.
Step 3: Fix Plugin Conflicts
In some cases, it could be a WordPress plugin that’s causing issues with your site widgets.
The good news is that it’s pretty easy to check. You can temporarily deactivate all your plugins and see if that fixes your issue.
To get started, return to your WordPress dashboard and open the Plugins » Installed Plugins menu.
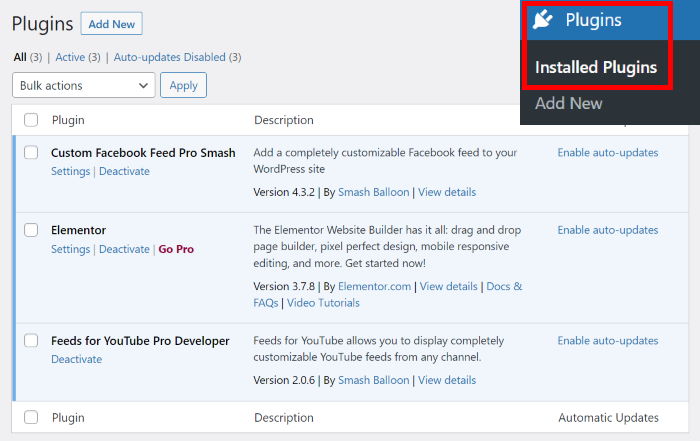
Doing that will show you a list of all the WordPress plugins that you’ve installed on your website.
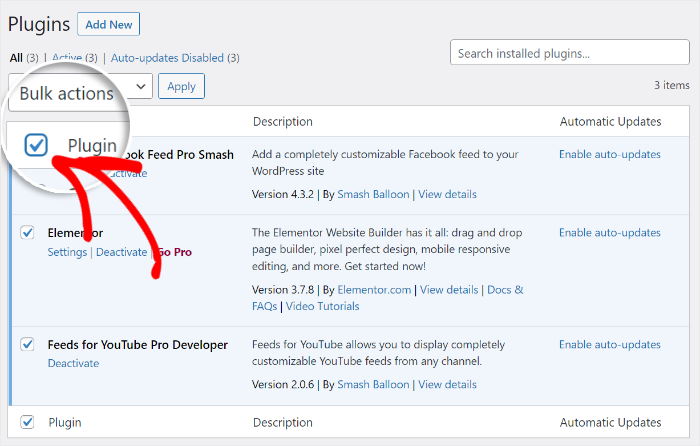
First, click on the checkbox icon on the top left to select all the plugins at once.
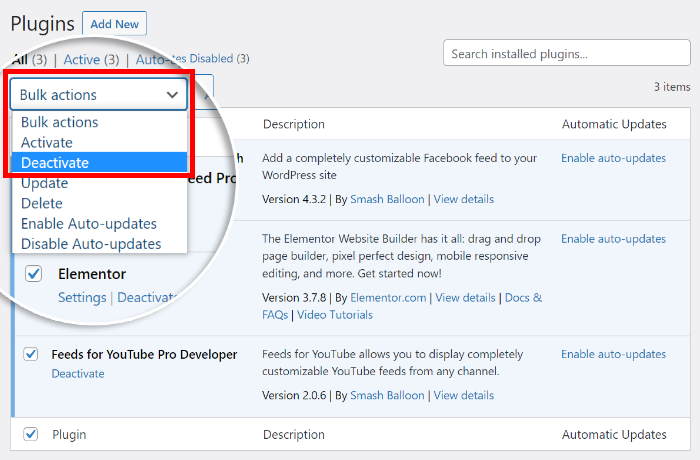
Now, open the dropdown menu that’s right above the checkmark icon.
You can select the Deactivate option here to proceed.
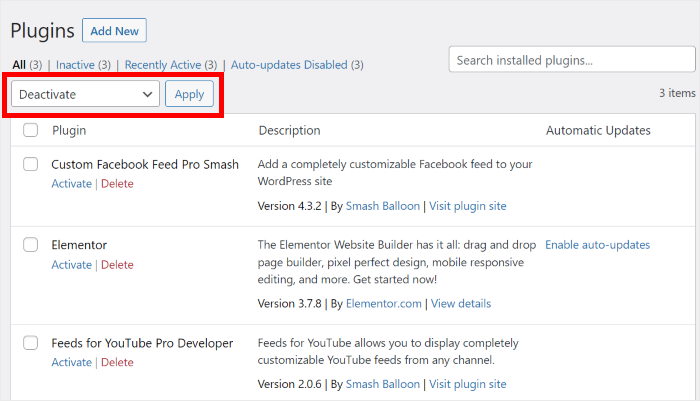
Finally, click on the Apply button to the right of the dropdown menu.
Just like that, all the plugins on your website will be deactivated.
Now open your website once more and check if Trustpilot is working or not. If they’re working now, we can be sure that one of the plugins is causing the problem.
But if they still don’t work, you can scroll to the next step.
To identify which plugin is causing the issue, just click on the Activate button for one of the plugins.
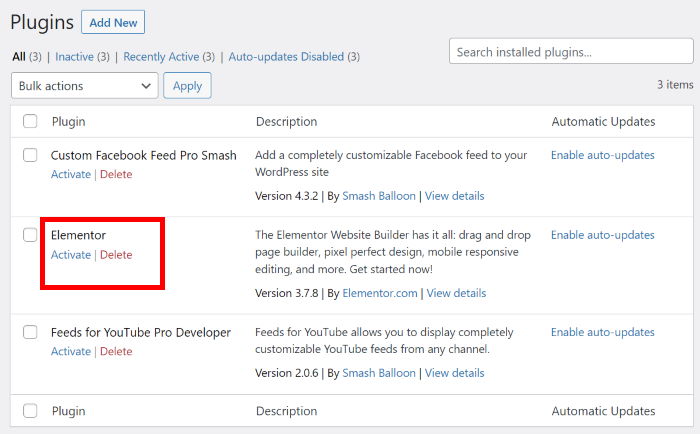
Then open your website and check if your Trustpilot widgets are working. You can repeat this until you find the plugin that’s causing the issue.
Once you find the plugin, you can either remove it or look for an alternative with the same features.
Step 4: Contact Your Web Hosting Service
If you still can’t access Trustpilot widgets on your website, then the issue could be your hosting services. So, you can reach out to their support team and ask them for assistance.
In case your website is constantly dealing with similar issues, you can even try switching to a higher quality WordPress hosting service.
And if none of these steps work, you can go ahead and try our tried-and-tested solution below.
Step 5: Install Reviews Feed Pro
Instead of manually adding Trustpilot widgets that can stop working, you can embed your widgets using a review aggregator plugin.
When it comes to review aggregators, the best option out there is the Reviews Feed Pro plugin.

As the best reviews aggregator plugin on the market, you can use it to create, customize, and embed Trustpilot widgets in just minutes!
The best part? You can do all that with absolutely zero coding since it’s 100% beginner-friendly.
In fact, the plugin is packed with features to make it easier than ever to display review widgets on your website:
- To help you build trust, Reviews Feed Pro comes with support for the biggest review platforms: Facebook, Yelp, Trustpilot, Tripadvisor, WordPress.org, and Google Reviews.
- Just follow the 3-step guided flow, and you can have an engaging Trustpilot widget in a few simple clicks.
- You get feed templates and even a live customizer to control how each part of your Trustpilot widget looks.
- Reviews Feed Pro keeps a cached copy of your widgets, so they stay online even when Trustpilot is facing issues.
- This plugin also comes with a team of experts that are always ready to lend you a hand and help you deal with any issues.
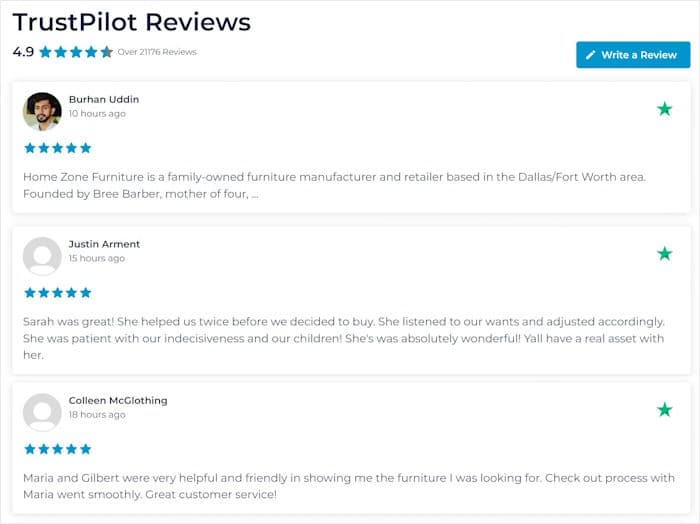
As you can see, Reviews Feed Pro has a lot to offer if you’re looking for a way to grow your business with review widgets.
Get your copy of Reviews Feed Pro and start embedding your Trustpilot widget with ease.
How to Add Trustpilot Widgets on Your Website (Easy Way)
Below, we’ll show a step-by-step guide on adding Trustpilot widgets to your website with the help of the Reviews Feed Pro plugin.
Let’s get started!
Step 1: Install the Reviews Feed Pro Plugin
First, you can get your copy of Reviews Feed Pro here. After you install and activate the plugin, you can move on to step 2.
If you need help, there’s this handy guide on how to install and activate WordPress plugins that you can check out.
Step 2: Create a Trustpilot Widget
Now, you can use the plugin’s guided flow to create a new Trustpilot widget.
First, open the Reviews Feed » All Feeds menu from your WordPress dashboard and click the Add New button.
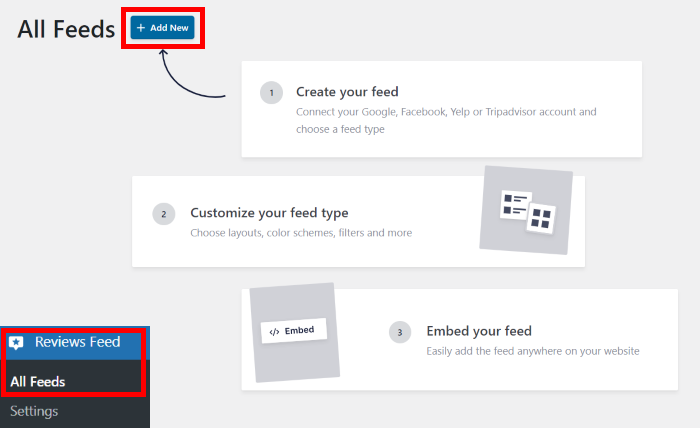
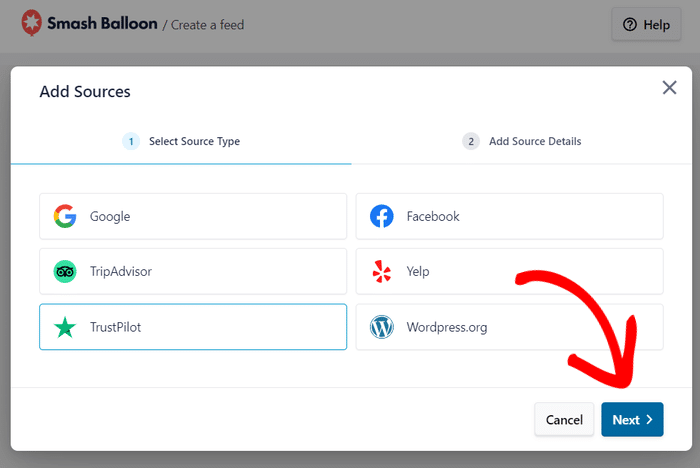
If it’s your first time creating a widget, the plugin will ask you to add a source. This means you can choose the review platform that you want to connect to.
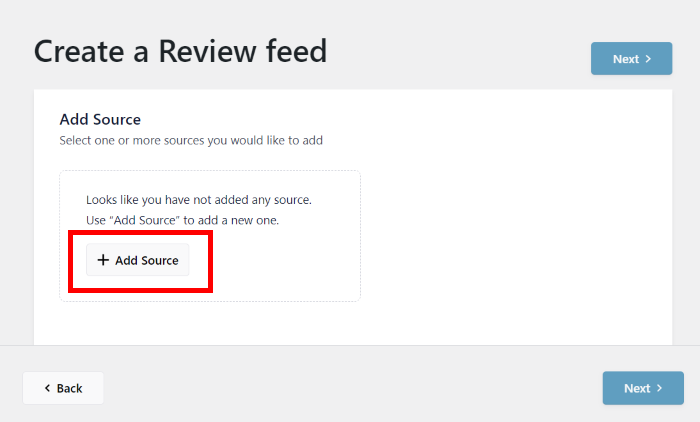
First, click on the Add Source button.
Next, you can choose from 6 different options, including Trustpilot:
- Trustpilot
- Tripadvisor
- WordPress.org
- Yelp
Just select the Trustpilot option here and click on Next.
Step 3: Connect Your Widget to Trustpilot
This step is actually a lot simpler than I initially thought. All you have to do is copy the link to your brand’s Trustpilot page.
Next, return to your website and paste that link into the popup and click on Finish.
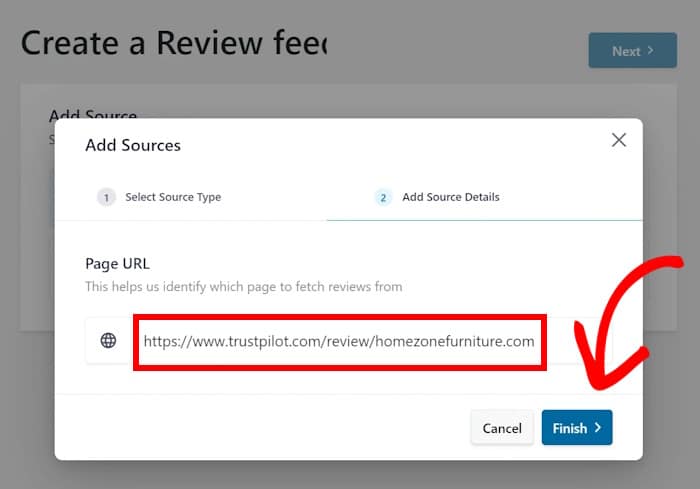
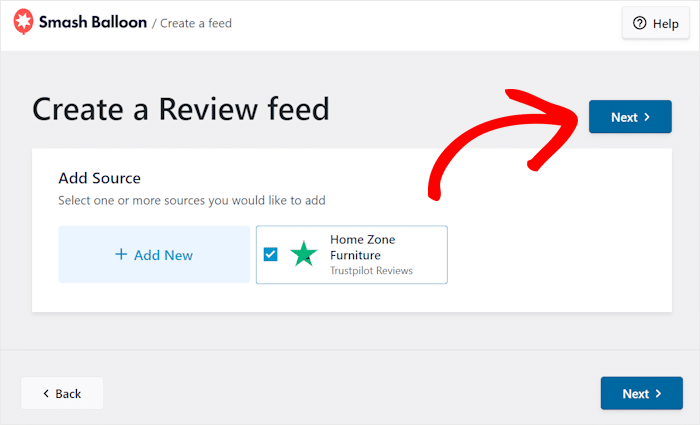
Just like that, you’ve connected your new widget to Trustpilot. In fact, you can now reuse this source for as many widgets as you like.
From here, you can click on the Next button to continue.
Step 4: Customize Your Trustpilot Widget
Reviews Feed Pro will handle the rest and automatically create a Trustpilot widget that matches the design of your website.
On top of that, you get different templates with unique designs that you can import for your widget:
- Default
- Simple cards
- Masonry
- Single review
- Showcase carousel
- Carousel
- Grid carousel
After you select a template, click on Next.
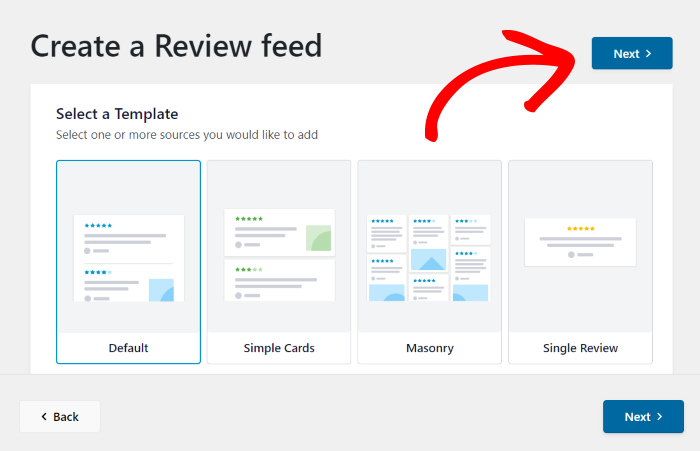
I went with the Default template since I prefer the minimalist look with a header and buttons at the top.
After selecting a template, Reviews Feed Pro will open the widget in the live customizer. Here, you can find the different customization options on the left.
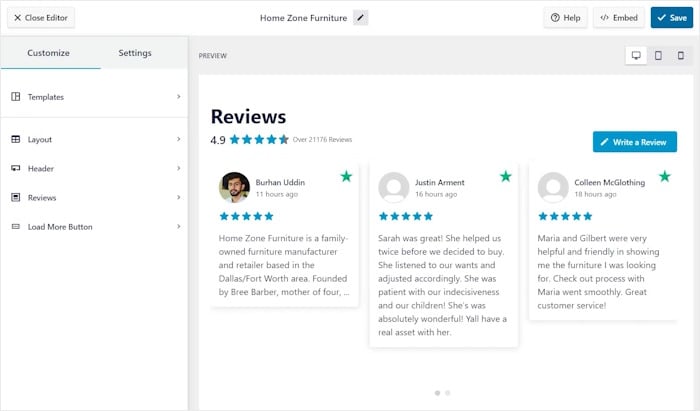
Using these, you can change your layout, header, button design, and much more. Plus, the live preview on the right will help you track your changes, so customization is easy and accurate.
Since there are so many options here, I’ll walk you through the major design options here.
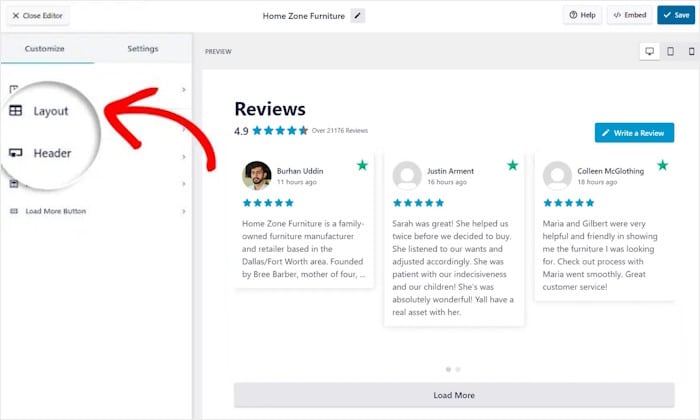
First, click on the Layout option on the left so you can change how the reviews are shown on your widget.
With Reviews Feed Pro, there are 3 different layouts that you can choose for your widget:
- List: Display your reviews in a single column, so each entry gets a lot of focus
- Masonry: Promote your products by showing lots of reviews in multiple columns
- Carousel: Make your site more interactive with a sliding carousel of Trustpilot reviews
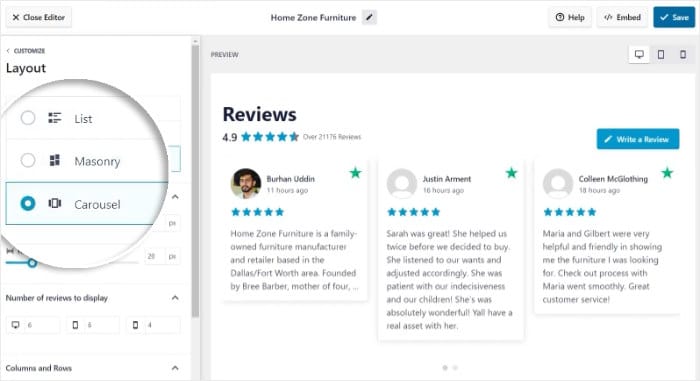
After picking your layout, remember to click on Save.
You can also customize your layout even further by changing the number of rows, columns, visible reviews, and more.
Once you’re done setting up the layout, click on the Customize button to go back.
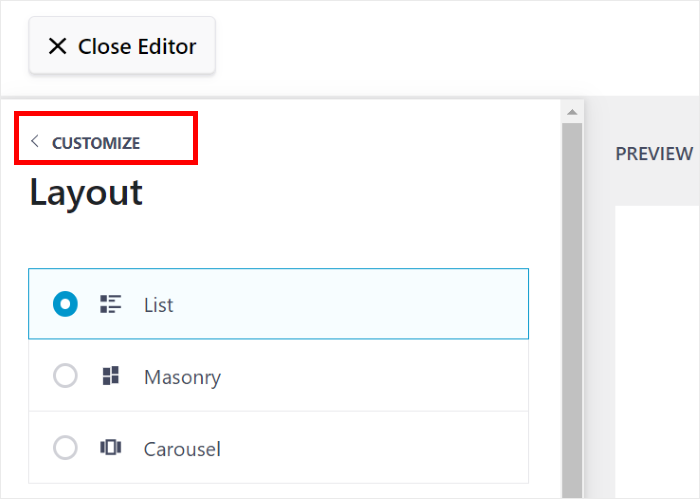
Like with the layout, you can use the remaining options to change your header, buttons, review elements, and more. And remember to Save any changes you make.
Now, I’ll show you a quick way of setting up filters for this reviews widget.
First, open the Settings tab at the top and choose the Filters option.
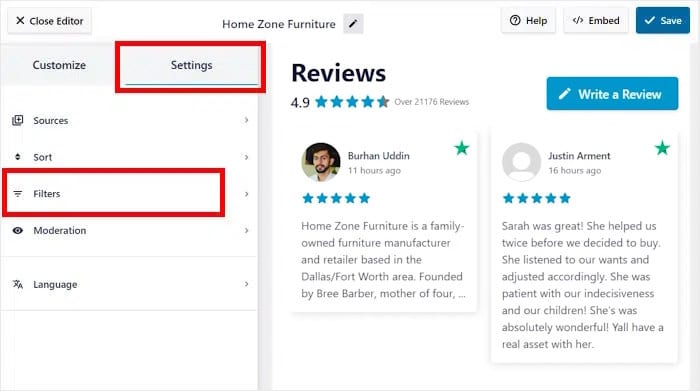
From here, you select the star ratings that you want to show on your widget.
Just check the boxes on the left for the star ratings that you want to display and click on Save.
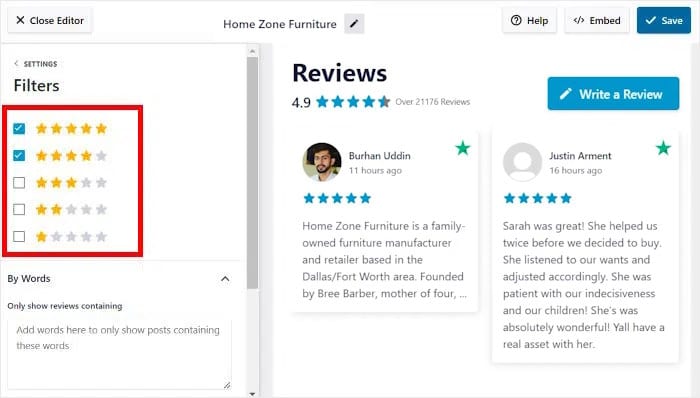
After you do that, your Trustpilot widget will only show the reviews with those star ratings.
You can also filter your reviews by word using the options on the left. This means you can set up banned words or only show reviews with specific words.
Like with your customization options, remember to click on Save once you’re done.
Step 5: Add the Trustpilot Widget to Your Website
Now, you can choose from 2 ways of adding this Trustpilot widget to your WordPress site:
- Add the Trustpilot widget to a page
- Add the Trustpilot widget to your sidebar or footer
We’ll go through both of these options below:
Add the Trustpilot Widget to a Page
For a streamlined experience, you can start embedding the widget directly from the visual customizer.
First, click on the Embed button at the top.
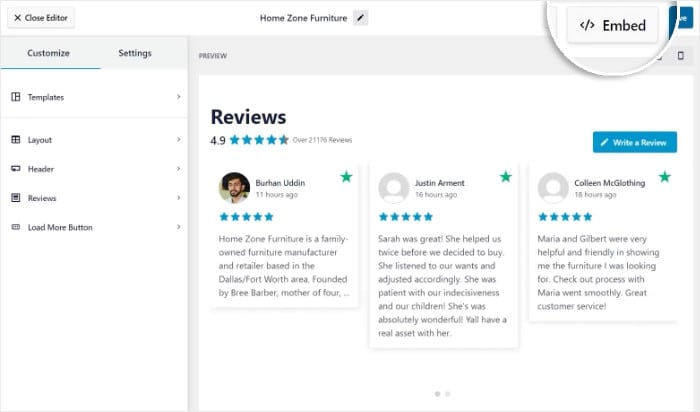
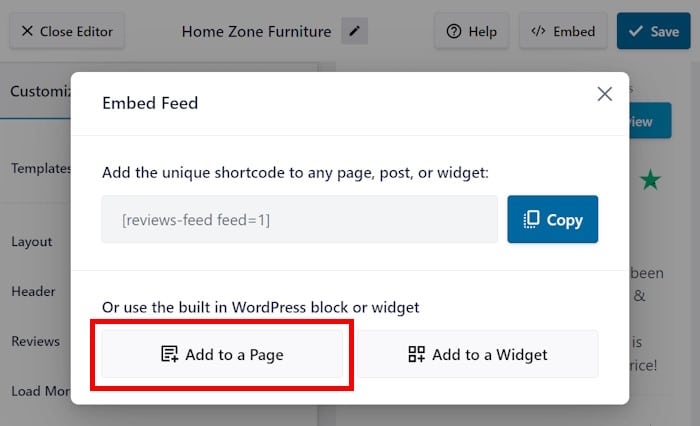
Now, you can see a popup with all the ways to embed your Trustpilot reviews.
For now, you can click on the Add to a Page button to proceed.
Next, the popup will show you a list of the available WordPress pages on your site.
Simply pick a page from the options and hit the Add button below.
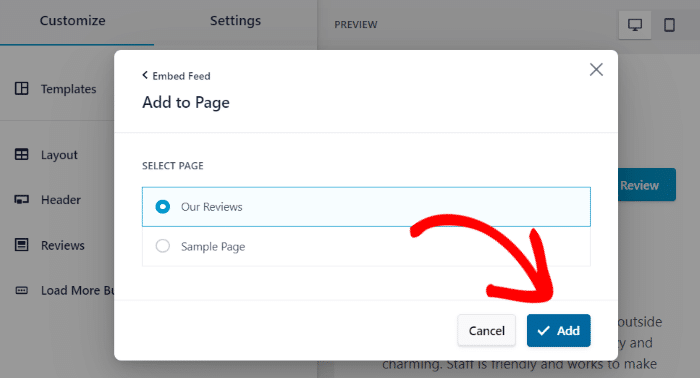
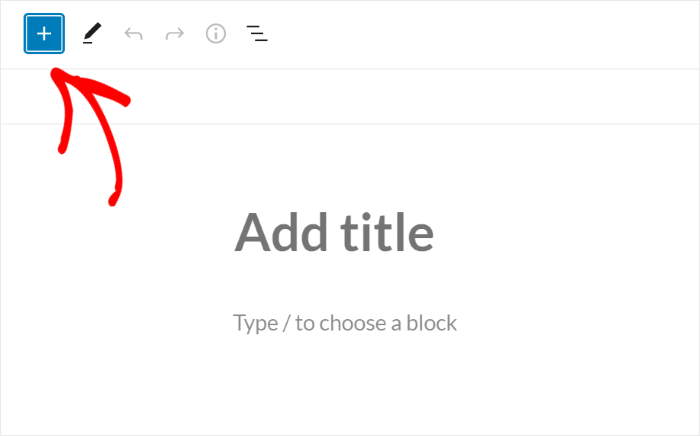
After you do that, Reviews Feed Pro will open the page in the WordPress editor so you can insert your widget.
First, click on the plus (+) icon to add a new block.
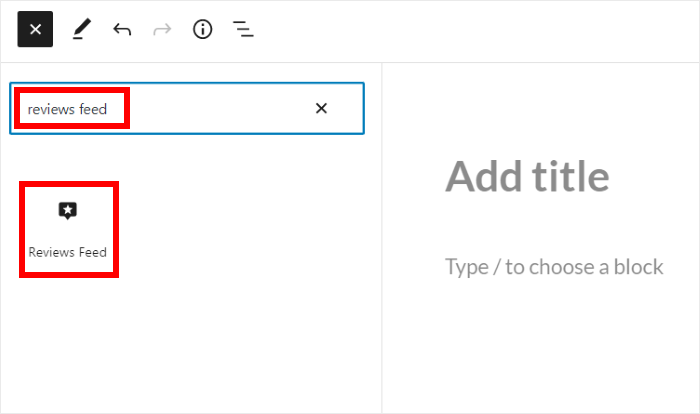
Using the search bar at the top, look for the “reviews feed” block.
After that, click on the Reviews Feed block in the search results below.
All you have to do is click on Update and your widget will be added to your website.
Just like that, you can start converting website visitors into paying customers and growing your business with ease.

Add the Trustpilot Widget to Your Sidebar or Footer.
Just like the earlier method, you can get started from the visual customizer.
In case you don’t have your customizer open, go to your dashboard and open the Reviews Feed » All Feeds menu.
Next, click on the widget that you want to display on your site.
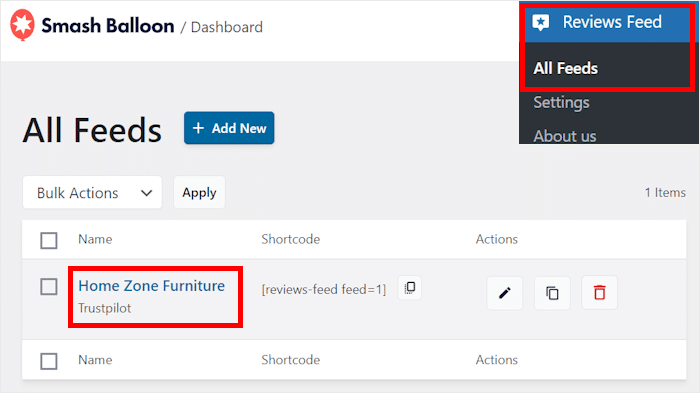
You’ll see the widget open in the visual customizer once more.
If you’re done changing the design of your Trustpilot widget, you can click on Embed.

Similar to the previous option, you’ll see a popup with all the ways to embed the Trustpilot reviews on your site.
This time, we can click on the Add to a Widget button.
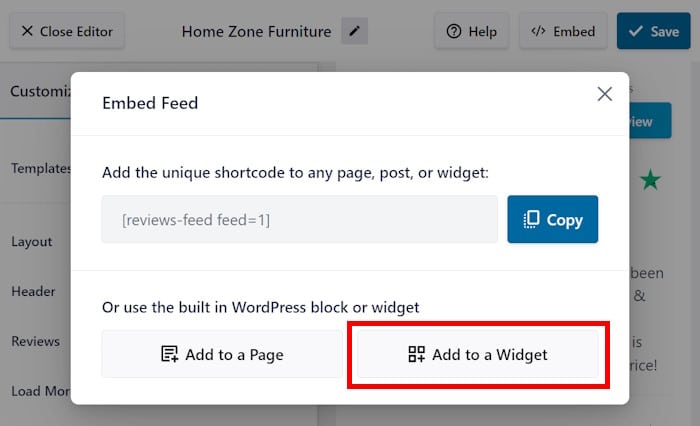
Now, Reviews Feed Pro will open the Widgets page of your website.
From here, you can choose between 2 locations for your Trustpilot reviews: Sidebar or Footer.
I’ll select the Sidebar for now, but feel free to pick any option you like.
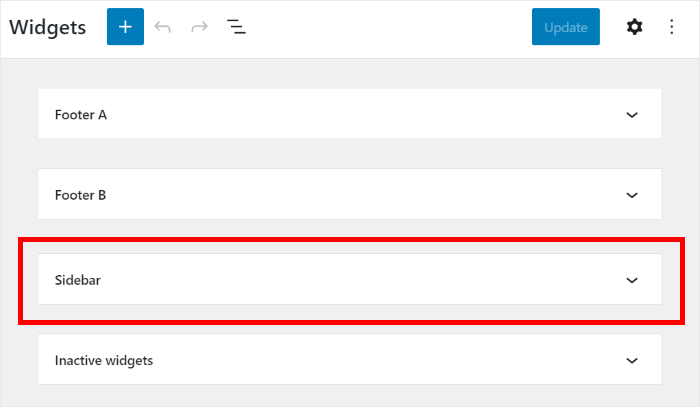
Once you pick your location, click on the plus (+) icon at the bottom to add a widget.
From the available options, click on the Reviews Feed widget.
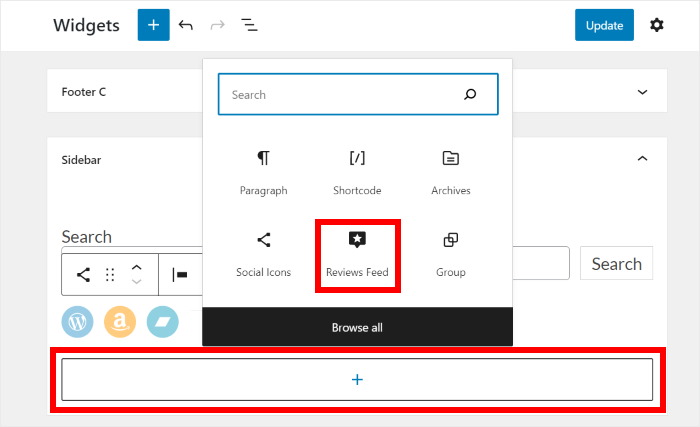
Once you click on Update, this widget will be added to your website.
You can even open your website right now to see how your Trustpilot reviews will look to your website visitors.
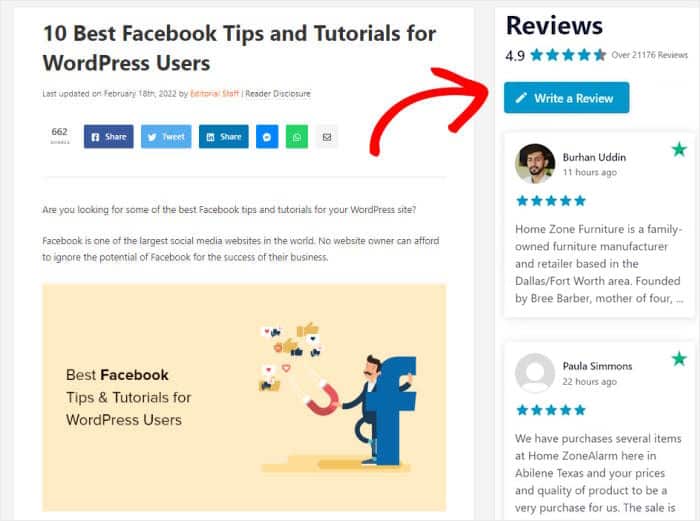
And there you go!
If your Trustpilot isn’t working, you can try these steps to fix your problem. As you can see, using Reviews Feed Pro is a surefire way of embedding a Trustpilot widget on your website.
Just like that, you can showcase social proof on your website to get more sales and grow your business with ease.
Ready to embed your Trustpilot widget? Get your copy of Reviews Feed Pro today!
More Social Media Marketing Tips and Guides (Expert Picks)
- How to Add Instagram Chat to Your Website (Step-by-Step Guide)
- Best Link in Bio Tools for Instagram to Grow Your Followers
- How to Use Instagram for Your Business (Expert Tips That Work)
- Best TikTok Plugins for WordPress Websites (Must-Haves!)
- How to Add Yelp Reviews to Your Beaver Builder Website
