If you want to learn how to share WordPress posts on Facebook automatically, you’re in the right place.
Automatically sharing posts to Facebook can be a great way to drive traffic to your blog posts, share engaging content, and grow your business.
In this guide, we’ll show you how to schedule Facebook posts on WordPress in just a few simple clicks – all from your dashboard!
Why Share Your WordPress Posts on Facebook?
- By sharing your WordPress posts on Facebook, you can reach even more people with your content and drive traffic to your site.
- Getting more Facebook followers checking out your engaging posts can help boost your SEO and search engine rankings.
- You can reuse popular WordPress posts to promote seasonal sales, events, and anniversaries to get more sales.
- By regularly posting engaging content on Facebook, you can grow a community of dedicated fans of your brand.
- To promote new products and drive more sales, you can create announcement posts and immediately share them on social media.
Easiest Way to Share WordPress Posts on Facebook Automatically
For the simplest way of posting content on Facebook from WordPress, you can use ClickSocial.
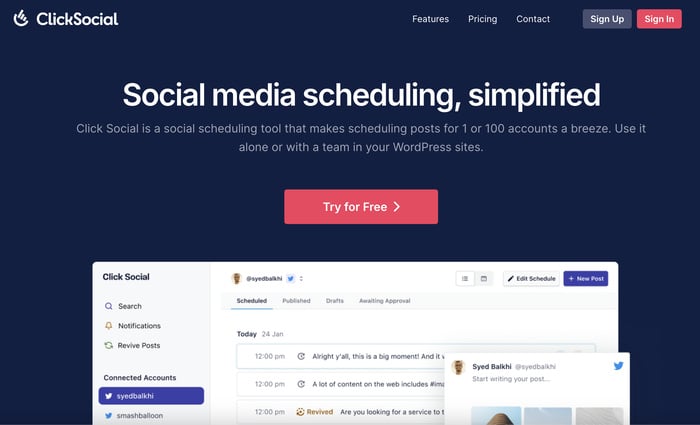
As the #1 social media scheduler plugin, ClickSocial lets you share WordPress posts to Facebook and make new Facebook content from your dashboard – in just minutes!
To help you supercharge your social media marketing, ClickSocial comes with tons of great features:
- Supported Platforms: You can use ClickSocial to post on the biggest social platforms out there, including Facebook, Instagram, and Twitter/X.
- Simple Post Composer: From the post composer, you can quickly draft engaging posts, add media, and link WordPress posts with ease.
- One-Click Scheduling: Once your Facebook post is ready, you can easily schedule it in just a single click.
- Post Calendar: To keep track of your scheduled posts, drafts, and published content, you get a convenient post calendar.
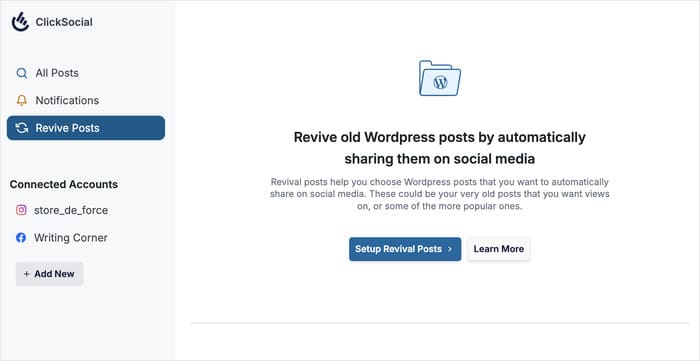
- Revival Campaigns: You can use revival campaigns to refresh old WordPress posts and share them on Facebook automatically.
On top of that, this social auto poster comes with a support team of experts who are always ready to lend you a hand and answer your questions.
Ready to start sharing your posts on Facebook? Get started with ClickSocial today!
How to Share WordPress Posts on Facebook Automatically
You can follow the step-by-step guide below to learn how you can auto post from WordPress to Facebook the easy way.
Let’s get started!
Step 1: Create a ClickSocial Account
Ready to start auto-posting on Facebook? First, open the ClickSocial website and Sign Up for an account.
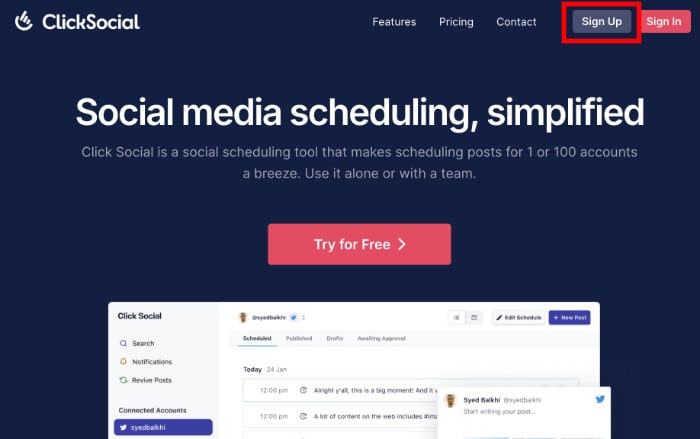
After you have your ClickSocial account, you can return to your website and install this social media scheduling plugin.
Step 2: Install the ClickSocial Plugin
From your WordPress dashboard area, go ahead and open the Plugins » Add New Plugins menu.
After that, look for the “ClickSocial” plugin using the search bar at the top.
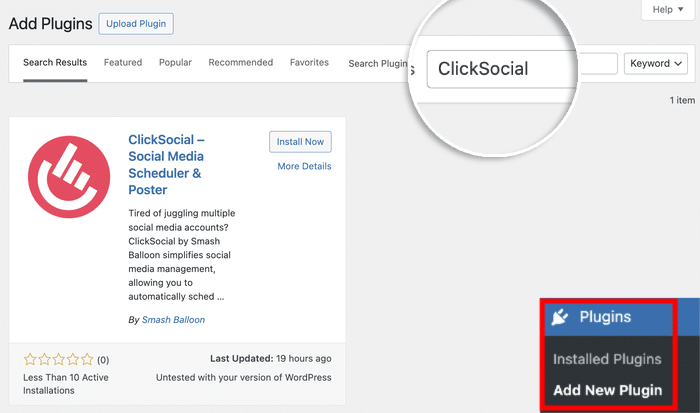
You should then see the plugin in the search results below.
There, click on the Install Now button to start adding ClickSocial to your site.
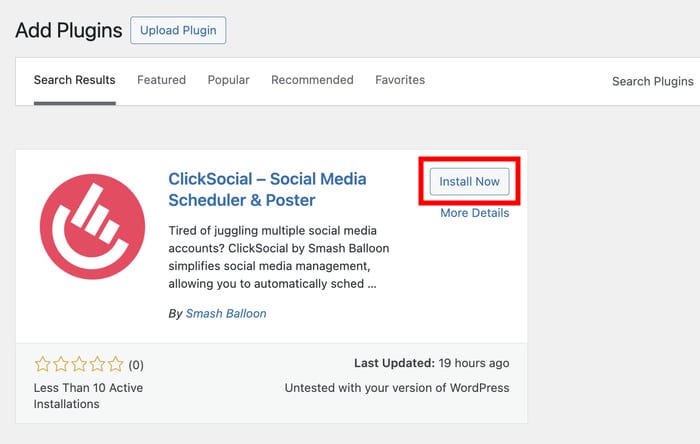
Finally, you can go ahead and Activate the plugin.
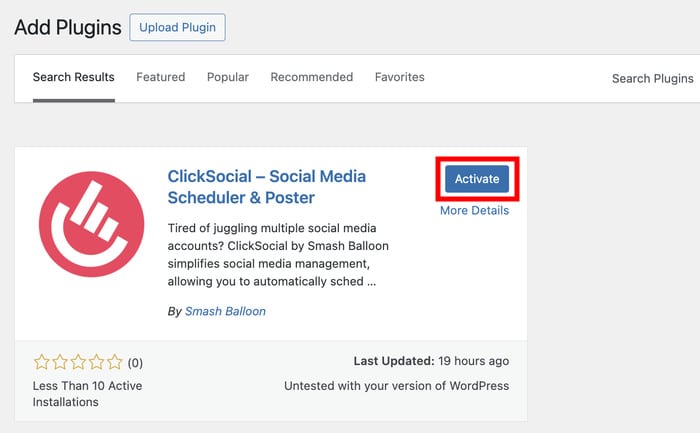
Step 3: Connect Your Website to ClickSocial
You can generate an API key to connect this WordPress site to ClickSocial.
This API key lets ClickSocial connect to your website and schedule your Facebook posts for you.
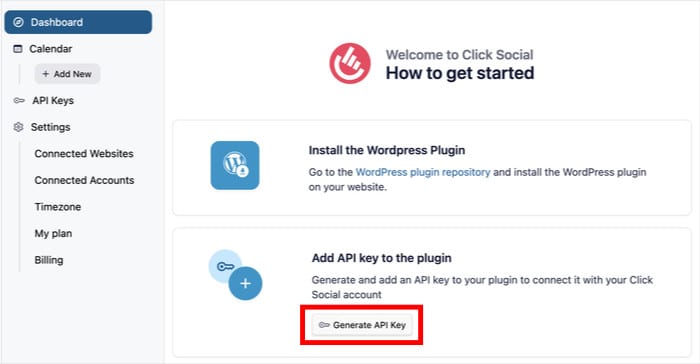
To generate an API key, return to your account on the ClickSocial website, then click on the Generate API Key button on your dashboard.
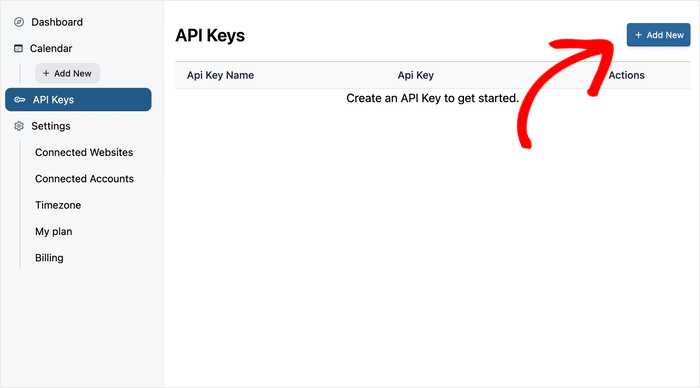
You’ll then see a list of your active API keys. If you’re just getting started, your list should be empty.
To change that, click on Add New.
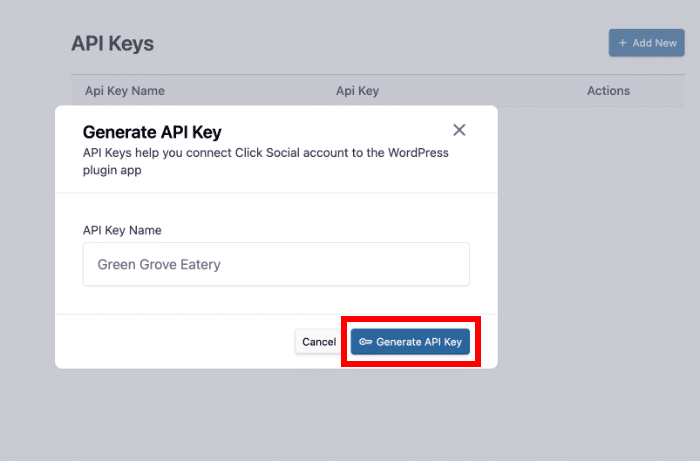
Once you do that, ClickSocial will open a popup where you can enter the name of your website.
Next, click on the Generate API Key button.
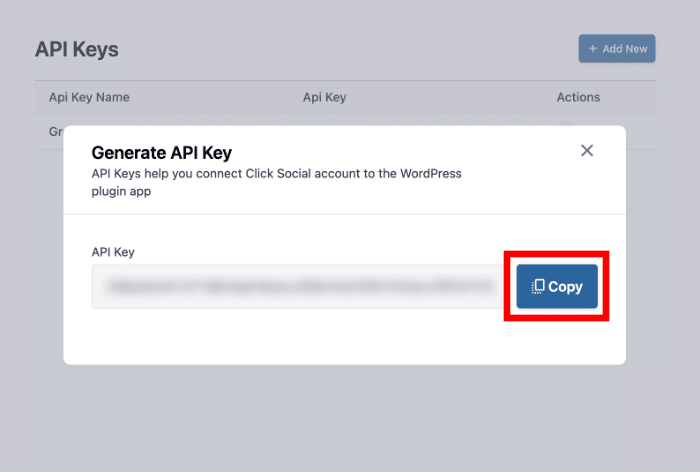
You’ve successfully created a new ClickSocial API Key. Keep this secure, as it’s essential for connecting your website.
Click on the Copy button here before returning to your WordPress website.
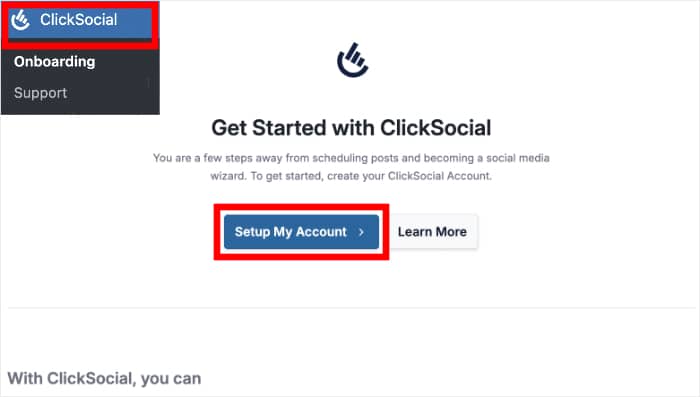
From your WordPress dashboard, open the ClickSocial menu before clicking on Setup My Account.
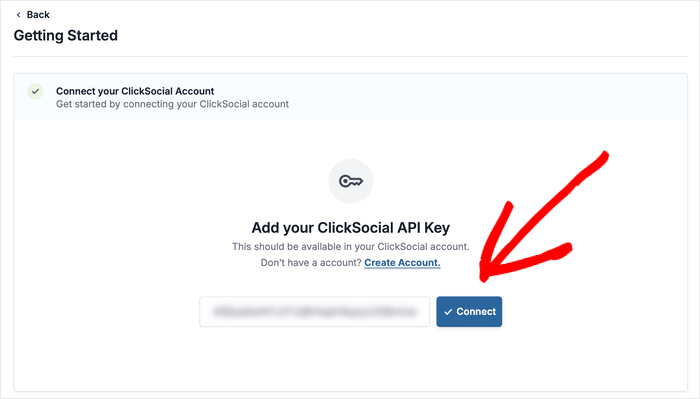
You can now use the API Key you copied earlier to connect your website to ClickSocial.
To do that, simply paste the key into the field and click on Connect.
Step 4: Connect Your Facebook Account
Once you enter your API key, it’s time to connect your Facebook account.
That way, you can use ClickSocial to post content directly on Facebook from your site. This includes sharing WordPress posts as well as creating new Facebook posts.
You can get started by clicking on Add Account.
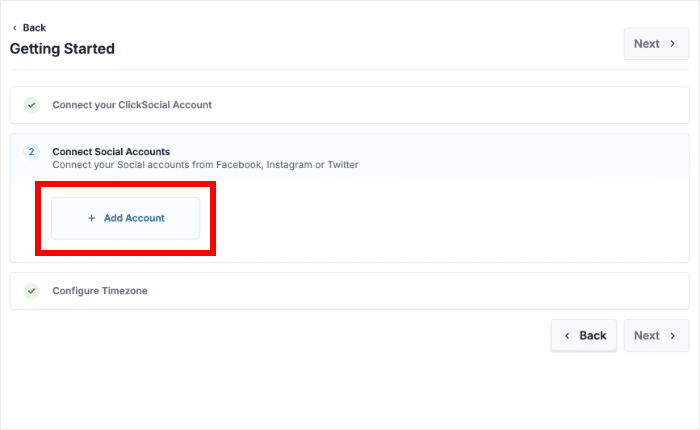
Using ClickSocial, you can connect your site to 3 of the biggest social media platforms:
- Twitter/X
This time, I’ll go with the Facebook option.
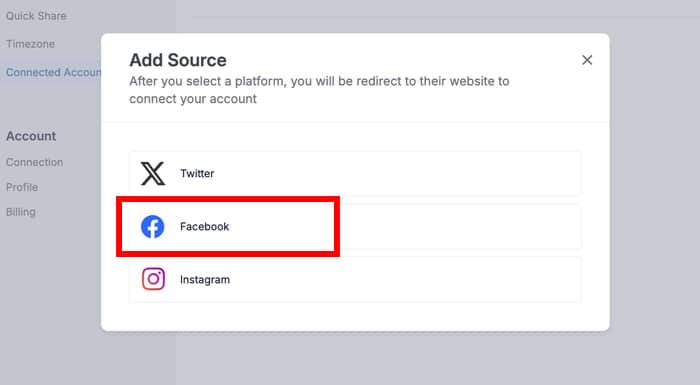
After you do that, the plugin will redirect you to Facebook.
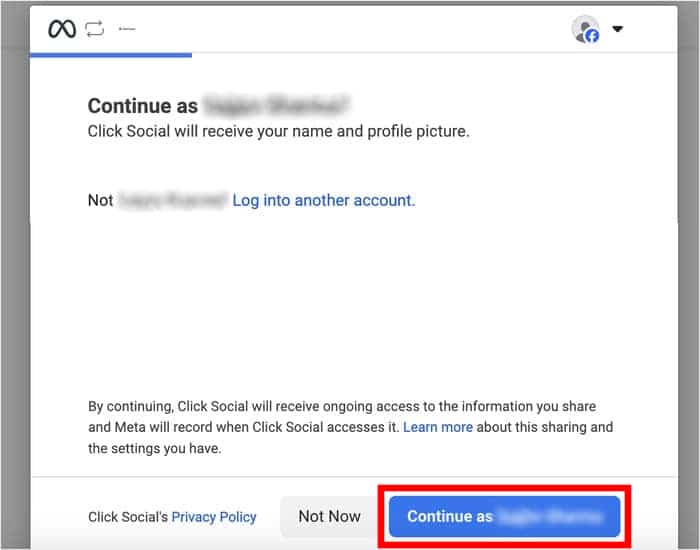
Here, you can go ahead and select your profile before clicking on Continue.
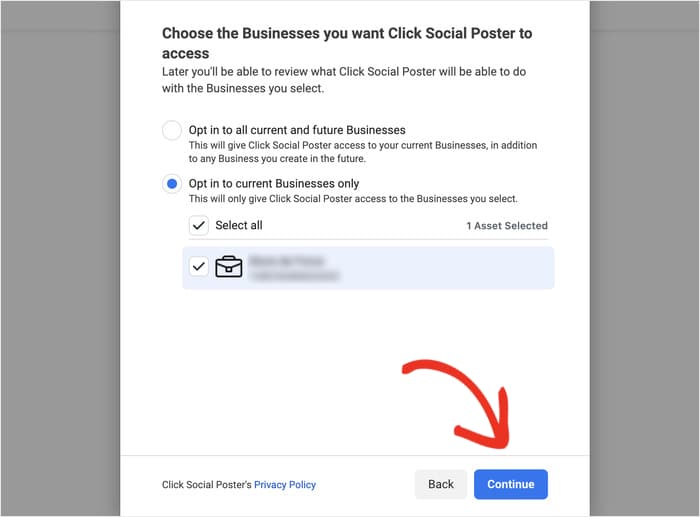
On the popup, you’ll see a list of businesses that you’ve connected to Facebook. To continue, just select your business on the popup and click on Continue.
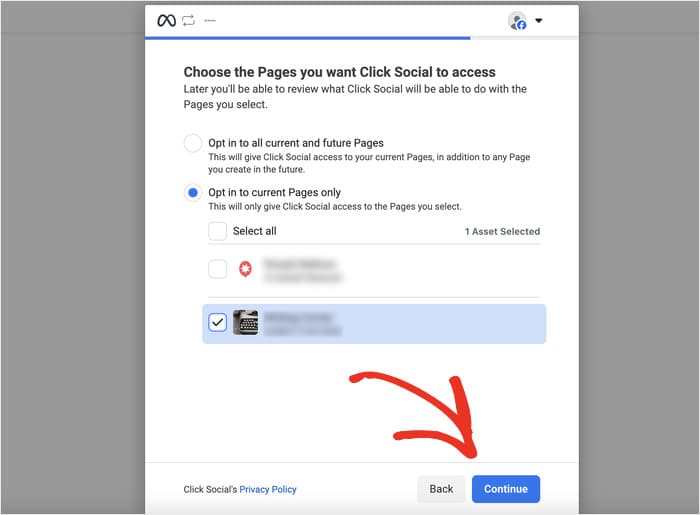
After that, the popup will show a list of Facebook pages that you’ve created.
Like before, select a page on the popup and click on the Continue button.
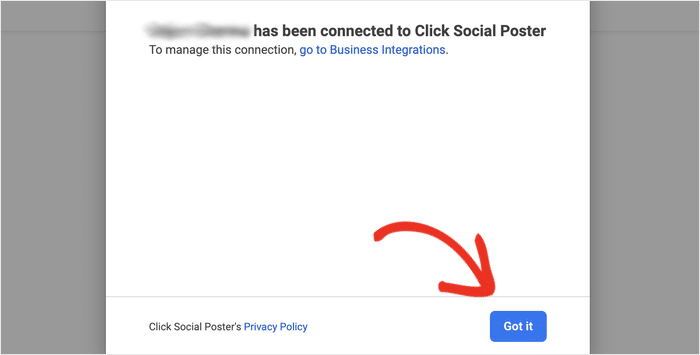
Finally, you can check out the permissions that ClickSocial will ask for. By enabling these permissions, you can auto-post to Facebook from WordPress in just a few clicks.
Simply click on Got it, and you’ll be redirected to your website.
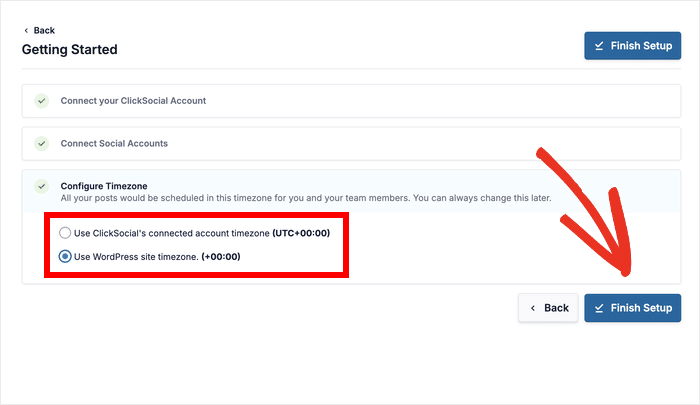
Before scheduling Facebook posts, you can set up your timezone for ClickSocial. There are 2 different timezone options you can pick from:
- Use ClickSocial’s connected account timezone
- Use WordPress site timezone
For this example, I’ll use the same timezone as the WordPress website.
After you pick your option, it’s time to click on Finish Setup.
Step 5: Setup Your Facebook Post Calendar
Since you’ve connected your Facebook account, you can set up your post calendar now.
From this calendar, you can easily schedule Facebook posts on WordPress. Plus, you can use the tabs at the top to check published posts, drafts, posts that need approval, or posts that failed to publish.
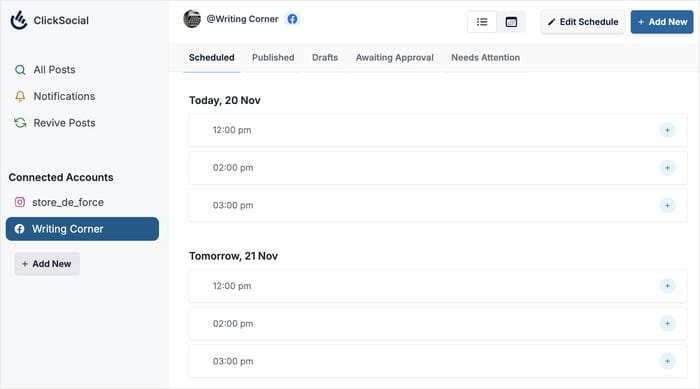
Before we start sharing WordPress posts to Facebook, let’s set up the time slots. That way, you can control when your posts will be automatically published by ClickSocial.
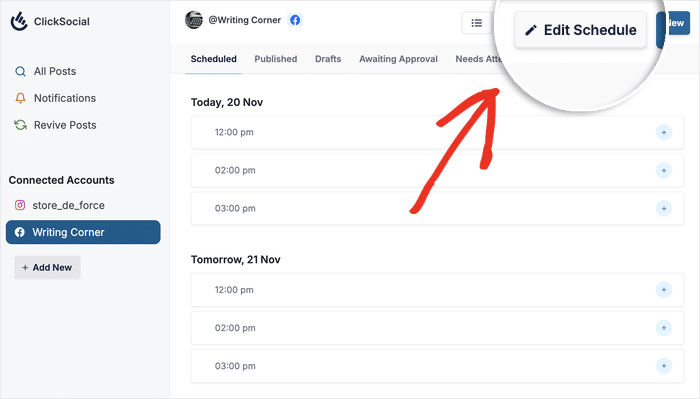
First, click on the Edit Schedule button in the top right corner.
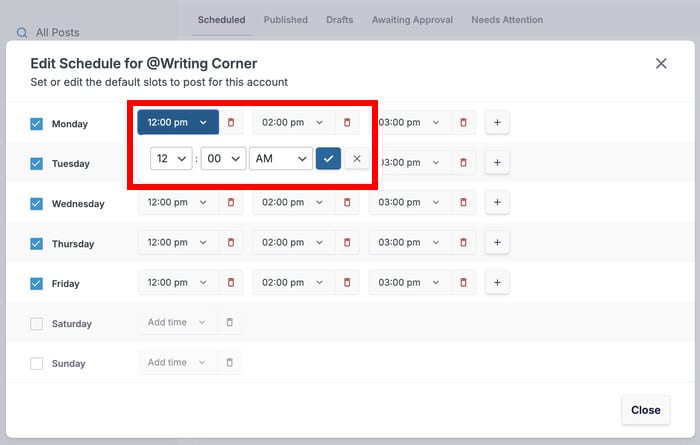
Doing that opens a popup where you can select the days and times when you’ll publish your Facebook posts.
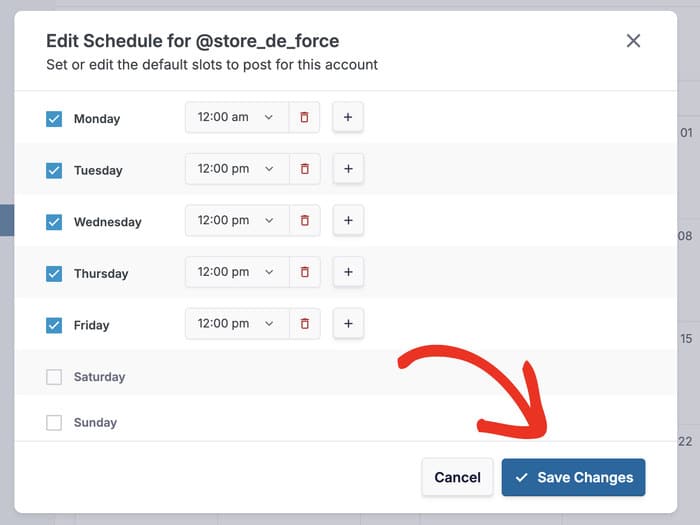
First, you can use the checkboxes to pick the days when you want to post content. In this example, I chose Monday to Friday as the default days when I’ll be publishing social media posts.
Once you pick the days, you can select the time slots that you can use for your posts.
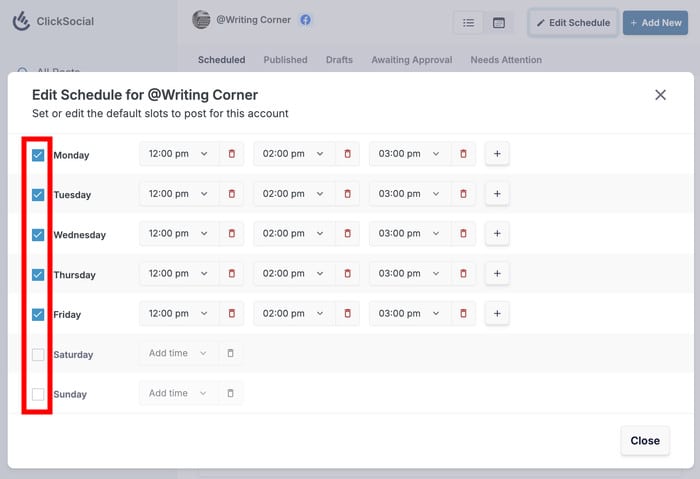
On the popup, use the dropdown menu to choose your time slots.
You can add more time slots by clicking the plus (+) icon. To remove a slot, simply click the red trash icon.
Once you’re done, click on Save Changes to proceed.
Step 6: Schedule Facebook Post on WordPress
Now that we’ve set up the time slots, it’s time to start posting Facebook content directly from your site.
You can do this by selecting a timeslot from the calendar and clicking on the plus (+) icon to its right.
Alternatively, you can also click on the Add New button at the top.
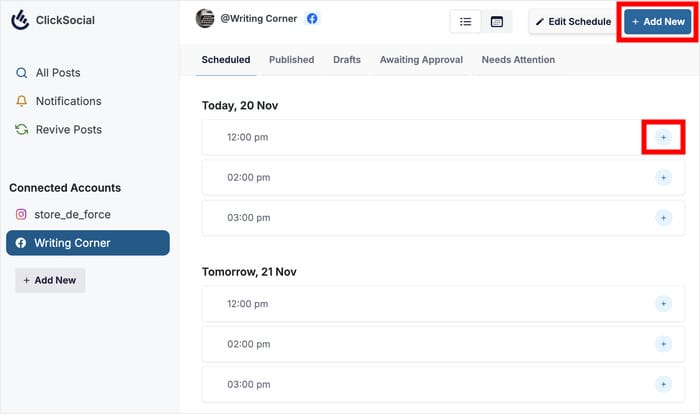
Clicking on either of the buttons will open the convenient post composer, where you can create your Facebook post.
In the composer’s text box, you can go ahead and type in your post content.
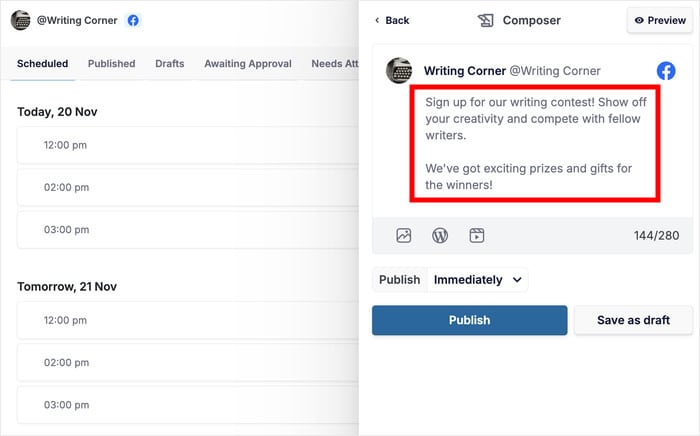
Using the buttons below the text, you can add more content to your Facebook post:
- Photo: Add a photo from your WordPress media gallery
- WordPress Post: Share one of your WordPress posts on Facebook
- Video: Select a video from your media gallery for your post
First, I’ll go ahead and click on the photo icon to add an image to this Facebook post.
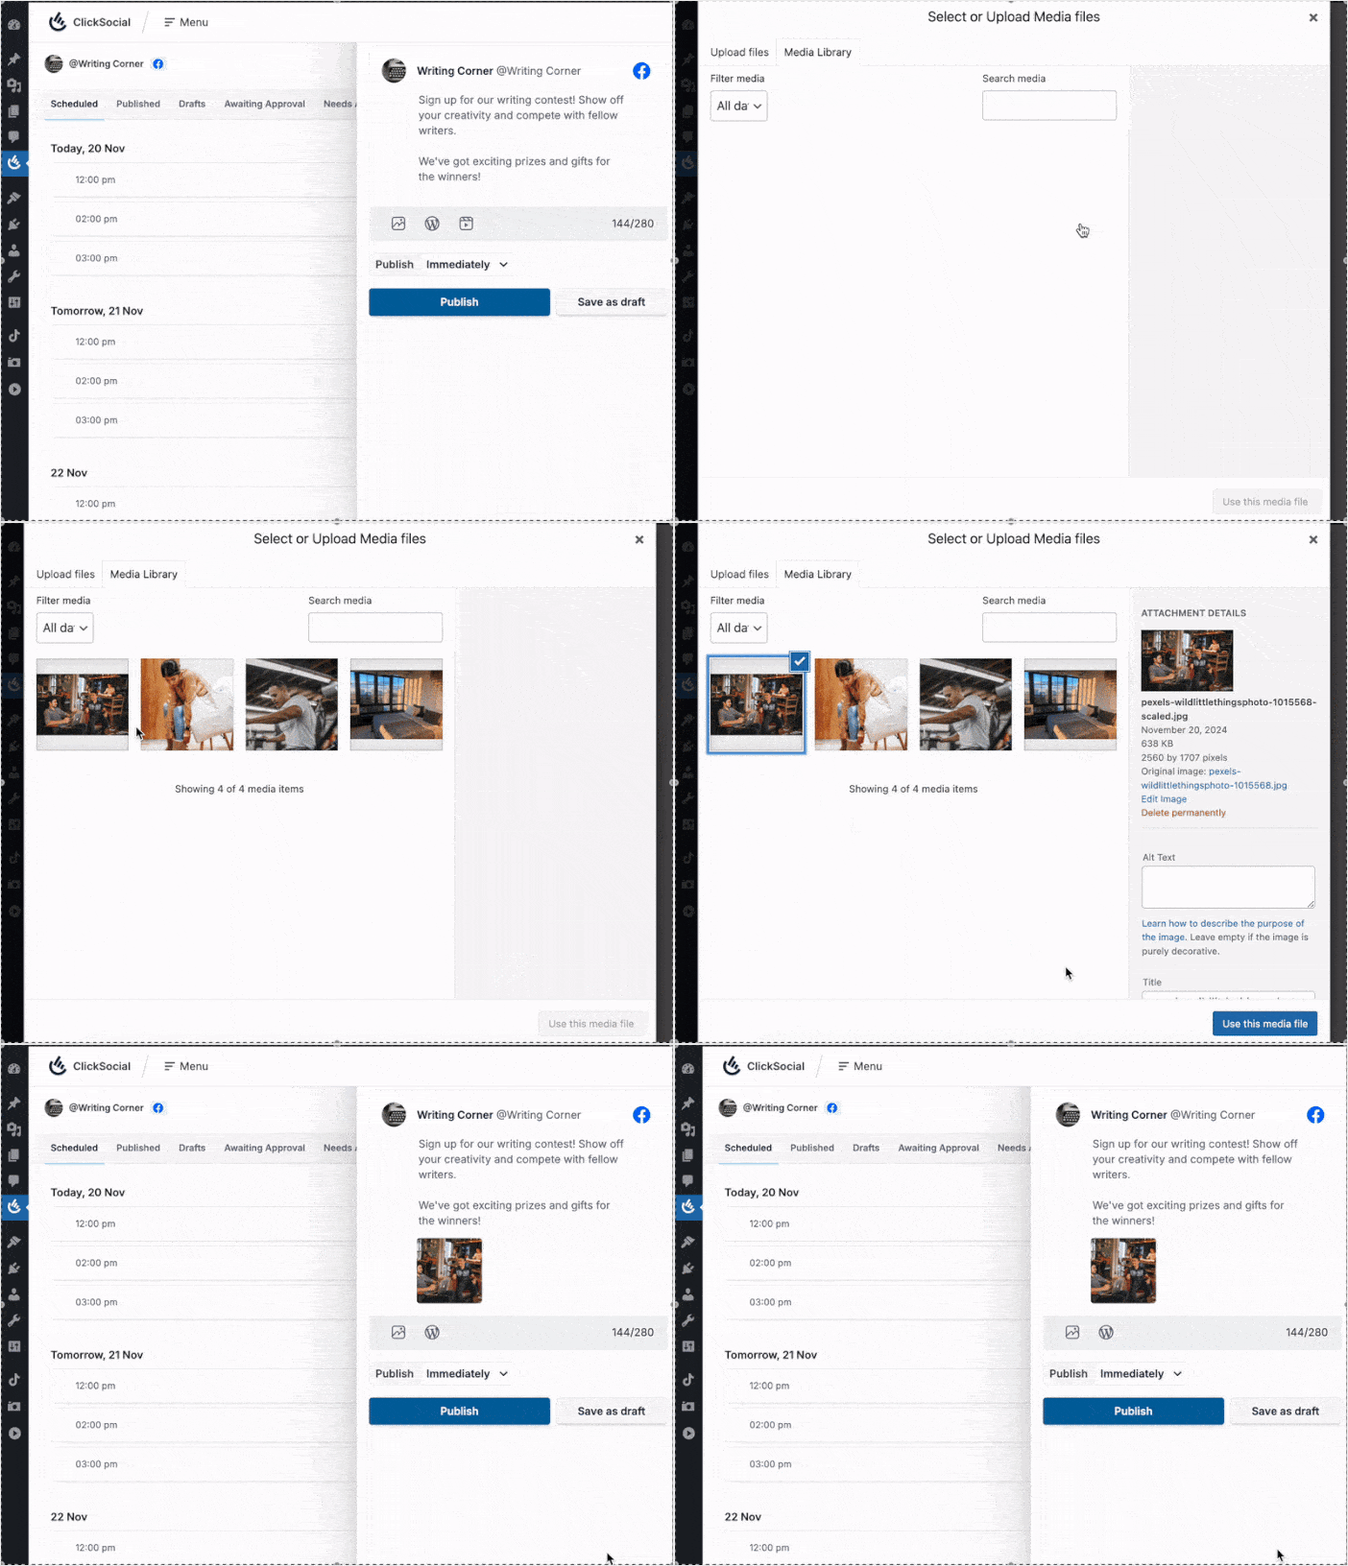
Now that we’ve added an image, let’s add a WordPress post to this Facebook post.
To do that, click on the WordPress icon below the text.
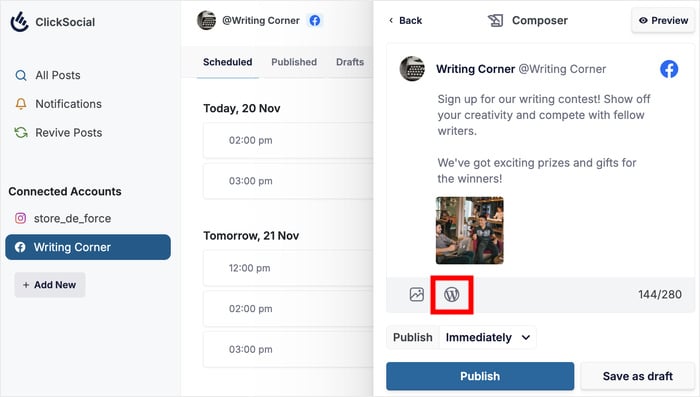
On this popup, you’ll see a list of available WordPress posts on your website.
To proceed, select a post from the list and click on the Add to Schedule button.
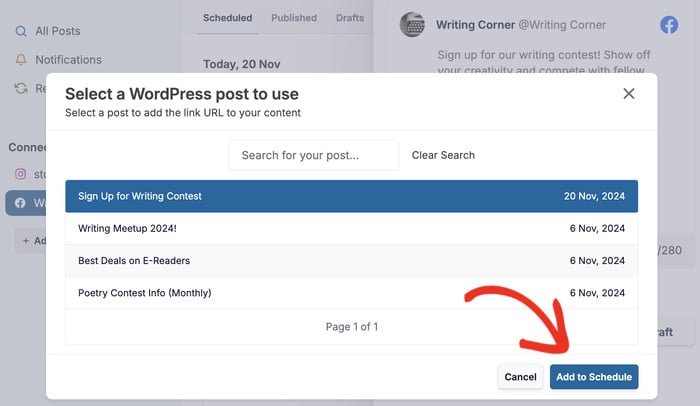
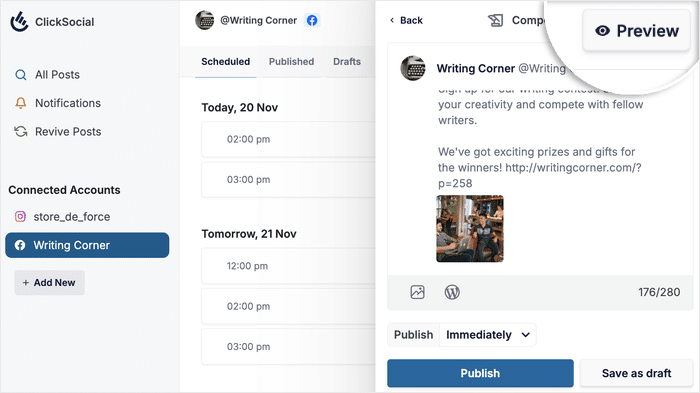
Once you’ve linked your WordPress post and added other content, you can check how it’ll look on Facebook.
To do that, you can click on the Preview button.
After you’re done drafting your Facebook post, you can quickly schedule it right here.
Look for the Publish option below the post and click on the dropdown menu.
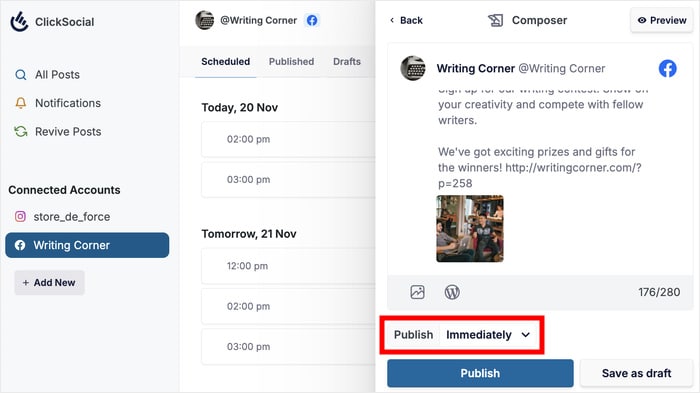
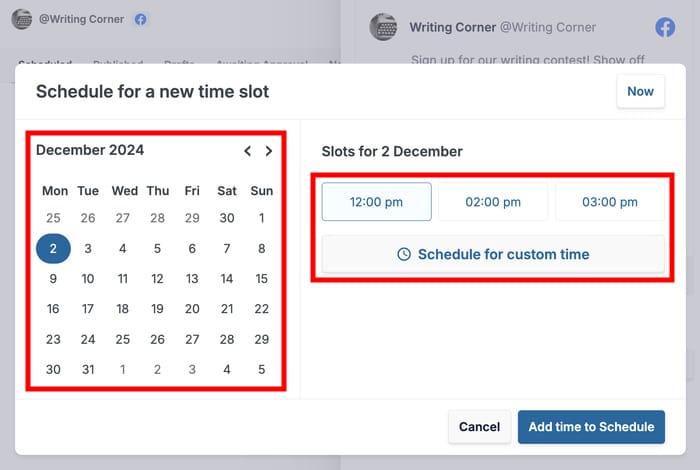
On the new popup, you can use the calendar on the left to select the month and day for your post.
Once you pick a day, you can see the available time slots on the right. You can go ahead and select the slot that you want to use.
You can also click on Schedule for custom time to manually select the scheduling time.
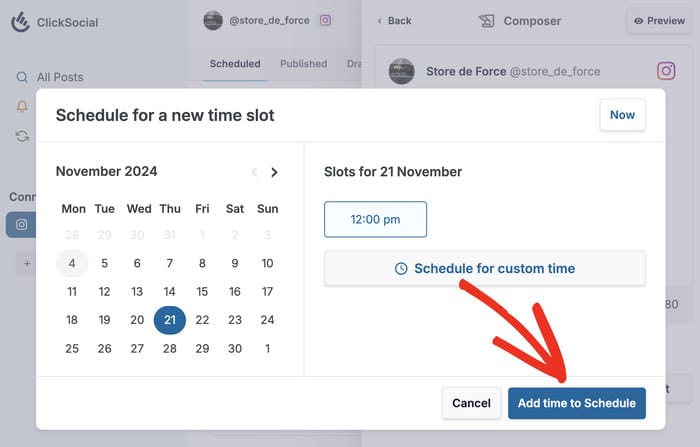
Once you’re happy with the date and time, click on the Add time to Schedule button below.
Finally, you can schedule this Facebook post – right from your WordPress dashboard!
Just click on the Schedule Post button to do that.
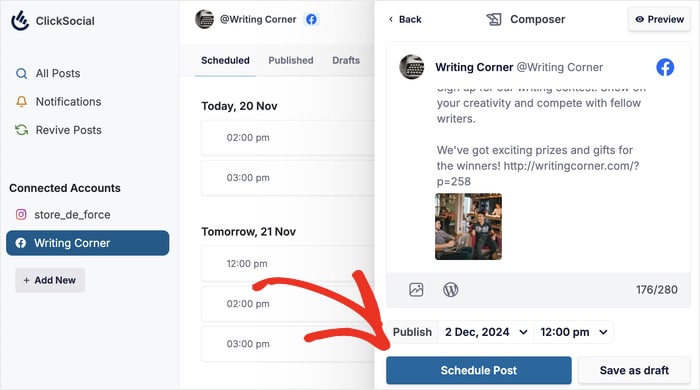
Now, ClickSocial will add your Facebook post to the calendar and set it to be published at your selected time. You can still freely make edits and changes before it’s published.
Once the Facebook post is online, you can just open your page and check it out for yourself.
And there you go!
Now you know how to schedule Facebook posts on WordPress in just a few simple clicks. As you can see, ClickSocial makes this process quick and easy.
And with ClickSocial, you can start making engaging social media posts directly from your WordPress dashboard and boost your social media growth.
Get ClickSocial for your site today and auto post on Facebook with ease.
Frequently Asked Questions
Can I schedule Facebook posts?
Yes, you can schedule Facebook posts with ease for a better way of sharing content to your followers. The easiest way to do this is by using a social media scheduling tool like ClickSocial.
How to auto post to Facebook from WordPress?
With the help of ClickSocial, you can quickly connect your site to Facebook. Then, you can freely draft, preview, and schedule Facebook posts directly from your dashboard. Plus, you can set up revival campaigns that automatically share older WordPress posts to Facebook. It’s a great way to share evergreen content to your followers
How do I embed Facebook Timeline in WordPress?
For the easiest way of embedding a Facebook page timeline on WordPress, you can use the Facebook Feed Pro plugin. In just minutes, you can create, customize, and embed Facebook feeds on your site – all with zero coding! This includes sharing Facebook posts, photos, videos, live streams, event calendars, and albums.
How do I automatically post from WordPress to social media?
ClickSocial lets you automatically schedule social media posts directly from your WordPress dashboard. The process is streamlined and user-friendly, so you can start making engaging social media posts with ease, even if you’re new to WordPress. In fact, this social sharing tool supports 3 of the biggest social media platforms out there: Facebook, Instagram, and Twitter/X.
More Social Media Marketing Tutorials and Guides
- How to Schedule Instagram Posts on WordPress (Easy Guide)
- How to Fix Customer Reviews Not Showing Up on Google
- How to Use Social Media in Affiliate Marketing
- Twitter Widget Examples You Can Embed on Your Website
- How to Grow Your YouTube Channel From 0 to 1000 Subscribers
