Social Wall
 Feed Analytics


Where to download every Smash Balloon plugin, free versions from WordPress.org and Pro versions from your account, and how they differ.
Would you like to download a Smash Balloon plugin, or replace the one on your site with a new download?
In this guide, we’ll walk you through finding the right plugin and downloading it from WordPress.org or your account. We’ll also cover swapping an installed plugin without losing your settings. All you need is a WordPress site and, for a paid plugin, a Smash Balloon account with a valid license.
- Finding the Right Plugin
- Downloading the Free Plugins
- Downloading the Paid Plugins
- How Downloads Differ by License Level
- Swapping Out an Installed Plugin
- Comparing Free and Paid Plugins
- Frequently Asked Questions
Finding the Right Plugin
Most Smash Balloon products come as a free plugin and a paid plugin. The table below gives the name of each one. That way, you can tell which file you’re looking at in WordPress.org, in your account, and on your Plugins page. Most paid plugin names also end with your license level. For example, an Elite license downloads Instagram Feed Pro Elite.
| Product | Free plugin on WordPress.org | Paid plugin |
|---|---|---|
| Smash Balloon Social Post Feed | Custom Facebook Feed Pro | |
| Smash Balloon Social Photo Feed | Instagram Feed Pro | |
| X (Twitter) | Custom Twitter Feeds | Custom Twitter Feeds Pro |
| YouTube | Feeds for YouTube | Feeds for YouTube Pro |
| TikTok | Feeds for TikTok | TikTok Feeds Pro |
| Reviews | Reviews Feed | Reviews Feed Pro |
| Feed Analytics | None listed | Feed Analytics Pro |
| All Access Bundle | None listed | All of the paid plugins above, plus Social Wall and WPChat Pro Elite |
Downloading the Free Plugins
You can download each free plugin in the table above from WordPress.org. A free plugin is a good way to try the plugin and its settings before you buy a license. To find them all in one place, see our WordPress.org profile.
To install a free plugin without leaving WordPress, go to Plugins » Add Plugin. Next, search for the plugin name from the table above and install it from the results.
Downloading the Paid Plugins
You download a paid plugin from your Smash Balloon account. The Downloads page lists your plugins, each with its license.
- Log in to your Smash Balloon account.
- In your account, click Downloads.
- Next, scroll down to the plugin you want to install.
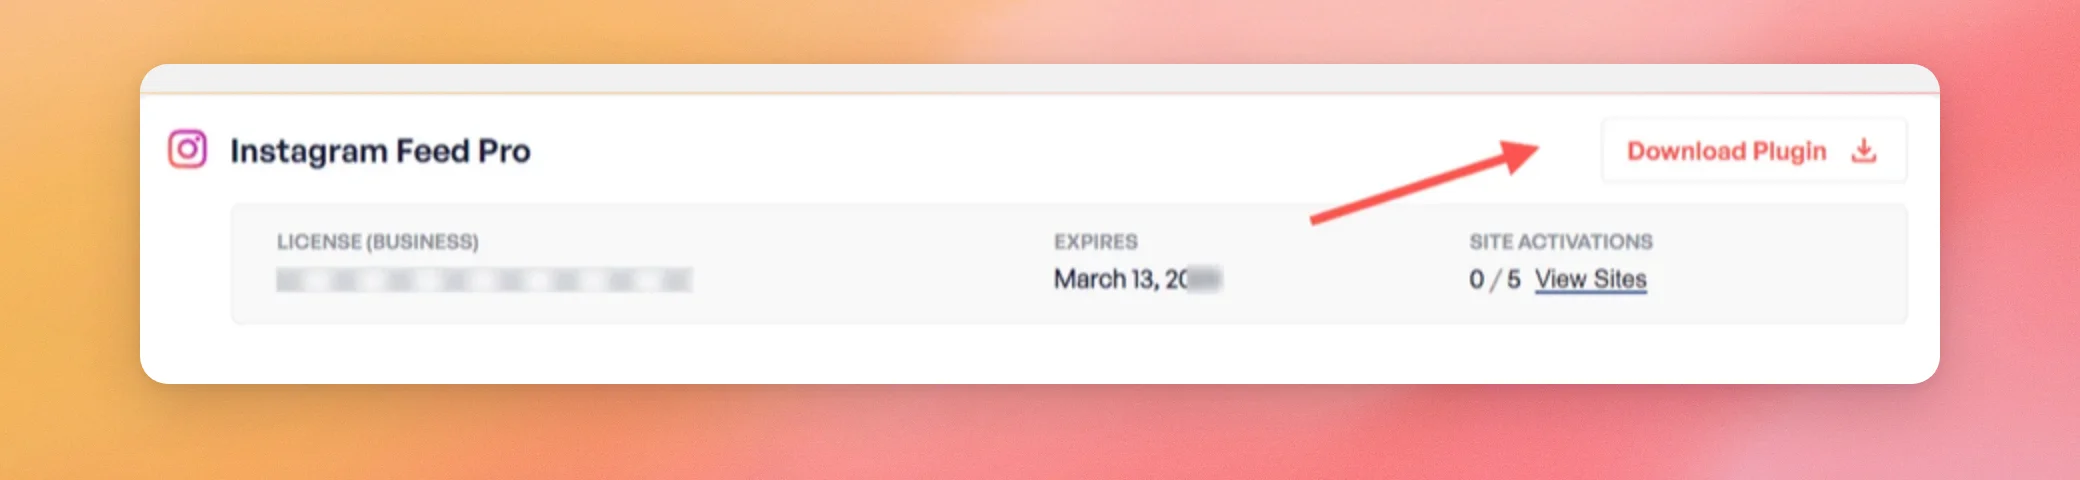
- Then, click the Download Plugin button, as the arrow shows below.
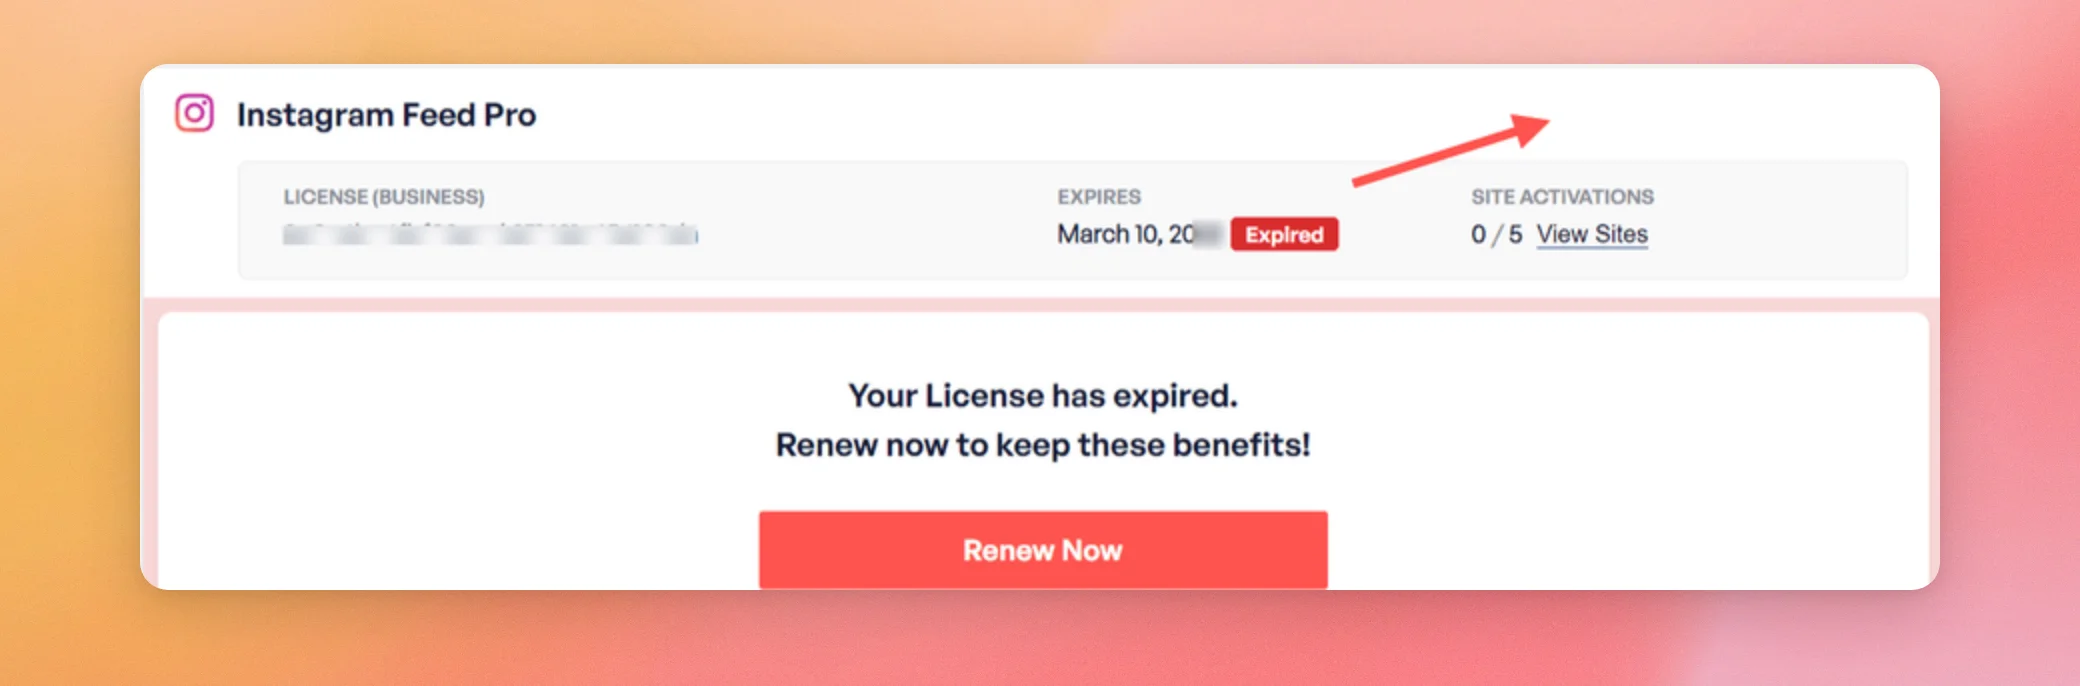
If the license is expired, the button doesn’t appear. Instead, the license is marked as expired, as shown below. To make the download available again, click the Renew Now button for the license.
After the renewal, the download button comes back in your account. Our License Renewals guide has the full steps.
If you can’t get into your account, the purchase receipt email we sent after your order also has download links for your plugin. Then you can download without logging in.
With the All Access Bundle, WPChat Pro Elite is also on the All Access Bundle card, under Download Individually. It works with your All Access license key, so there’s no separate key to enter, and it covers up to 25 sites. It isn’t in the purchase receipt email, so download it from your account.
How Downloads Differ by License Level
The plugin file you download depends on your license level. Each level gets its own download. Our Licenses Explained guide covers what each level includes.
When you upgrade to a higher license level, such as the All Access Bundle, activating the new license key isn’t enough. The plugin files on your site are still the old level’s files. This keeps the features of your new level locked. To finish an upgrade, download the plugin again from your account. Then replace the installed files with the new download. The steps in the next section do that without losing your settings. Our License Upgrades guide explains how to upgrade a license.
Swapping Out an Installed Plugin
These 3 steps replace the files of an installed plugin with a new download. They fit an upgrade, or a move from the free plugin to the paid one. Because deleting a plugin can erase its settings, you turn on a safety setting first. Then you remove the old plugin and install the new one.
Note: For a move from the free Instagram Feed plugin to Instagram Feed Pro, you can skip these steps. Once it’s up to date, the free plugin stays active on standby, as the Instagram Feed install guide shows.
Step 1: Saving Your Current Plugin Settings
In each plugin you use, turn on Preserve settings if plugin is removed. With it off, deleting the plugin also deletes its feeds and settings. With it on, your feeds and settings stay saved even when the plugin is uninstalled. The setting is on the General tab of the plugin’s Settings page.
- Facebook: go to Facebook Feed » Settings » General.
- Instagram: go to Instagram Feed » Settings » General.
- X (Twitter): go to Twitter Feed » Settings » General.
- YouTube: go to YouTube Feed » Settings » General.
- TikTok: go to TikTok Feeds » Settings » General.
- Reviews: go to Reviews Feed » Settings » General.
- Social Wall: go to Social Wall » Settings » General.
Next, scroll down to Preserve settings if plugin is removed and turn it on. When you’re done, save your changes on that page. Repeat this for every plugin you plan to remove.
Feed Analytics Pro has no preserve setting. You can skip this step for it. It doesn’t delete its stored analytics data when you remove the plugin.
Step 2: Removing the Installed Plugin
Next, go to Plugins in your WordPress dashboard. Then find the plugin and click Deactivate. After it deactivates, click Delete.
Step 3: Installing the New Plugin
Now install the plugin you downloaded. Follow the install guide for your plugin:
- Custom Facebook Feed install guide
- Instagram Feed install guide
- Custom Twitter Feeds install guide
- Feeds for YouTube install guide
- TikTok Feeds install guide
- Reviews Feed install guide
- Social Wall install guide
- Feed Analytics install guide
A Shorter Route: Replacing the Files by Upload
If the plugin is already installed, WordPress can replace its files in 1 step. You don’t have to delete it first. This works only when the zip holds the same plugin folder as the one on your site.
- In your WordPress dashboard, go to Plugins » Add Plugin.
- Next, click Upload Plugin. Then choose the zip file you downloaded. Finally, click Install Now.
- WordPress shows “This plugin is already installed.” Then click Replace current with uploaded.
This route doesn’t run the plugin’s uninstall routine. Your saved settings stay. If WordPress doesn’t offer the Replace current with uploaded button, use the 3 steps above instead.
Comparing Free and Paid Plugins
To see what a paid plugin adds, open the comparison for your plugin.
- Facebook: settings differences and feature differences
- Instagram: settings differences and feature differences
- X (Twitter): feature differences
- YouTube: settings differences
- TikTok: feature differences
- Reviews: feature differences
That’s it! You now know which plugin to download, where to get it, and how to swap it in without losing your settings.
Next, if you plan to move to a higher license level, see our License Upgrades guide.
Frequently Asked Questions
Below, we’ve answered some of the most common questions about downloading plugins.
Why can’t I see a Download Plugin button for my license?
If the license is expired, the button doesn’t appear. Then click the Renew Now button for the license. After the renewal, the button comes back. See Downloading the Paid Plugins.
I upgraded my license. Why are the paid features still locked?
Downloads differ by license level. The files on your site still belong to your old level. To fix this, download the plugin again from your account and replace the installed files with it. See How Downloads Differ by License Level.
Will I lose my settings when I replace a plugin?
Not if you turn on Preserve settings if plugin is removed before you delete the plugin. If you replace the files by upload instead, WordPress doesn’t run the plugin’s uninstall routine. Your settings stay. See Swapping Out an Installed Plugin.
Is Feed Analytics Pro included in the All Access Bundle?
Yes. Feed Analytics Pro is one of the 2 bonus plugins in the All Access Bundle, along with Social Wall. See Finding the Right Plugin.