Social Wall
 Feed Analytics


Why a feed updates slowly or not at all, from an expired access token to the Caching setting, and how to check each one.
Would you like to find out why your Instagram feed shows old posts, or takes longer to update than you expect?
This guide walks through the most common causes, from your Instagram connection to your caching settings and your server.
Before you get started, make sure Instagram Feed is installed and activated on your WordPress site.
- Checking Your Connection
- My Feed Won’t Update
- My Feed Only Updates After I Clear the Cache
- Frequently Asked Questions
Checking Your Connection
If a feed is not updating at all, the plugin may be showing a saved copy of your posts because it cannot get new ones from Instagram. After seven days, Instagram Feed shows a notice in your WordPress dashboard that says “Your Instagram feed has not updated in” followed by the number of days. If it still has not updated after 21 days, the notice changes to a more urgent one that starts with “Action needed.”
The most common reason is a source that needs to be reconnected. A connection can become invalid for various reasons, such as changing your account password, changing the security settings on the account, or Instagram or Facebook detecting suspicious activity on the account and invalidating the connection as a security measure.
- In the WordPress dashboard, go to Instagram Feed » Settings.
- On the General tab, look at the sources in the Manage Sources box.
- If a source is marked Source Invalid, click Reconnect, and follow the steps in our guide on reconnecting your Instagram source.
If Instagram limits how many requests your site can make, the plugin does not mark a working connection as invalid or ask you to reconnect. The plugin treats it as a temporary limit and retries later. This change arrived in version 6.13.0, so update to the latest version of Instagram Feed if you run an earlier one.
If you see an error message in your feed or in the plugin, look it up in our Instagram API error message reference.
Next, we’ll look at caching, which is the other common reason a feed looks out of date.
My Feed Won’t Update
Instagram Feed saves your posts in a cache to improve performance and limit the requests it makes to Instagram. Your site, your host, or another plugin may also cache your pages. Any of these can make your feed appear not to update.
Lowering the Caching Setting
Use the Caching setting to choose how often the plugin checks for new posts. If it is set to a long interval, new posts take a while to show up.
- In the WordPress dashboard, go to Instagram Feed » Settings, and click the Feeds tab.
- In the Caching box, choose Every 30 minutes, Every hour, Every 12 hours, or Every 24 hours. The default is every 12 hours.
- When you choose 12 or 24 hours, you can also pick the time of day for the check.
- When you’re done, click Save Changes.
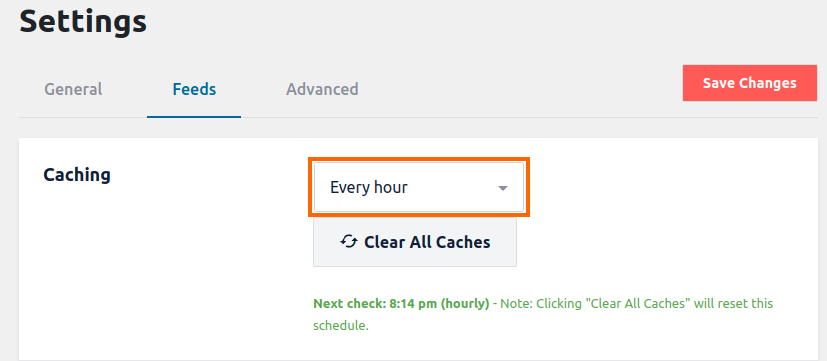
If you post often and want new posts to appear sooner, choose a shorter interval such as every 30 minutes or every hour. If you post less often, a longer interval is fine, and it means fewer requests to Instagram.
Below the dropdown, the plugin shows when the next check happens. To check for new posts right away, click Clear All Caches. This clears the plugin’s cache and asks supported caching plugins to clear theirs. It also resets the schedule for the next check.
Checking Your Caching Plugin and Host
Site caching can show visitors an outdated version of the page with your Instagram feed, which makes the feed look like it is not updating. To test this, clear your site cache and check whether the feed shows the most recent posts.
If that fixes it, open the settings for your caching plugin and set a lower Cache Timeout or TTL (Time To Live) value, so the page refreshes more often. Most caching solutions also let you exclude certain pages from caching.
Many hosts, especially managed WordPress hosts such as WP Engine, also have their own caching on their servers. You may need to contact your host to clear it or to exclude the page that has your feed.
Loading Initial Posts With AJAX
Instagram Feed has a setting that can often work around page caching. When it is off, the initial posts are added to the page directly, so a cached copy of the page keeps showing the posts it had when it was cached. When it is on, those posts load with AJAX instead, so a feed on a cached page can update according to your Caching setting.
- In the WordPress dashboard, go to Instagram Feed » Settings, and click the Advanced tab.
- Turn on Load Initial Posts with AJAX.
- When you’re done, click Save Changes.

Version 6.14.0 also fixed feeds that showed up empty on pages served from a long-lived page cache, and Load More not working on those pages. If you use a page cache and run an earlier version, update to the latest version of Instagram Feed. If your feed shows no posts at all, see our guide on what to do when your Instagram feed is empty.
My Feed Only Updates After I Clear the Cache
This usually happens when there is an issue with the CRON setup on your web server. CRON runs the scheduled background tasks that let the plugin update and show new posts. Instagram Feed uses the default WordPress CRON for compatibility, which is enabled on most hosts. Try these steps in order.
- Ask your web hosting company to check that the CRON configuration on your server is running correctly. WordPress CRON must not be turned off in your
wp-config.phpfile. This WPBeginner article gives more information. In some cases, you or your host need to make sure thewp-cron.phpfile is being run. - In your caching plugin, look at the TTL of your page cache. If it is too high, it can block new posts from showing. Set it to a lower value.
- Lower the Caching setting in the plugin so it checks for new posts sooner. See Lowering the Caching Setting above.
- Add the
cachetimeoption to your shortcode. With it, the feed checks for new posts when the page loads instead of in the background, so new posts no longer wait on CRON. If your current shortcode is[instagram-feed feed="1"], change it to[instagram-feed feed="1" cachetime=30].
If you still have issues, remove the cachetime option and test the CRON workaround in our guide on forcing CRON jobs to run on your server.
That’s it! You now know how to check your connection, your Caching setting, your page cache, and WordPress CRON when your Instagram feed updates slowly or not at all. To hear about a stuck feed sooner, see our guide on getting alerts when your Instagram feed stops updating.
Frequently Asked Questions
Below, we’ve answered some of the most common questions about feed updates.
How often does Instagram Feed check for new posts by default?
By default, the plugin checks every 12 hours. To change it, see Lowering the Caching Setting.
Why does my dashboard say my feed has not updated in several days?
The feed is showing a saved copy of your posts because the plugin could not get new ones from Instagram. Start with Checking Your Connection. The notice clears on its own after the feed fetches fresh posts.