Social Wall
 Feed Analytics


How to download, install and set up the Reviews Feed Pro WordPress plugin, and where to find your licence key.
Would you like to get the Reviews Feed plugin you purchased up and running on your WordPress site?
In this guide, we’ll walk you through switching from the free version, installing the plugin, activating your license key, and updating the plugin by hand. All you need is your Reviews Feed purchase and access to your WordPress dashboard.
Note: Using the free version of Reviews Feed? See our guide on installing the free Reviews Feed plugin.
- Downloading the Plugin
- Switching From the Free Version
- Installing the Plugin
- Activating Your License Key
- Deleting the Free Version
- Updating the Plugin Manually
- Frequently Asked Questions
Downloading the Plugin
To get started, we’ll download the Reviews Feed Pro plugin file.
After your purchase, log in to your Smash Balloon account and open the Downloads tab. Then, click the download link for Reviews Feed Pro to save the plugin’s .zip file to your computer.
We also email your download link and license key to the address you used at checkout.
There’s no need to unzip the file. You’ll upload the .zip file to WordPress as it is.
Note: Safari can unzip files on its own after it downloads them. In Safari’s settings, open the General tab and uncheck the option to open safe files after downloading. Then, download the plugin again.
With the .zip file saved to your computer, the next step depends on whether your site already runs the free version.
Switching From the Free Version
If you already use the free version of Reviews Feed, a few quick steps get it ready for the switch. Both versions use the same feeds and settings. The paid version picks up your feeds as they are.
New to Reviews Feed? Skip ahead to Installing the Plugin.
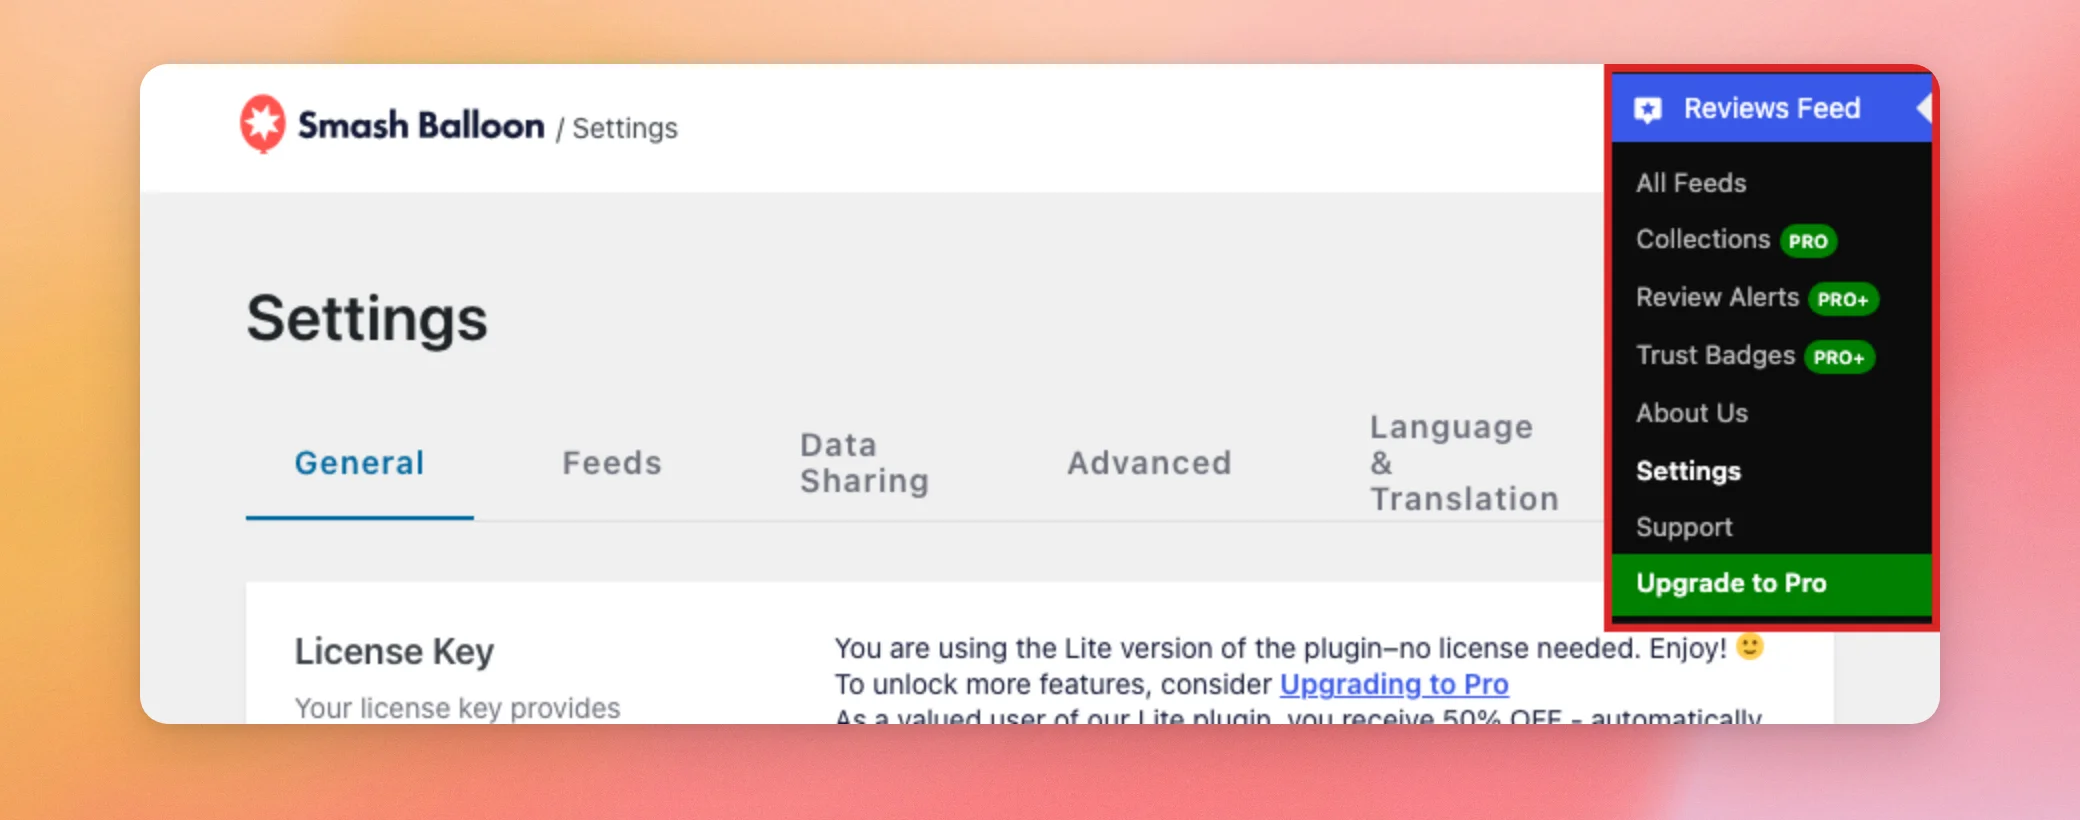
First, go to Reviews Feed » Settings in your WordPress dashboard.
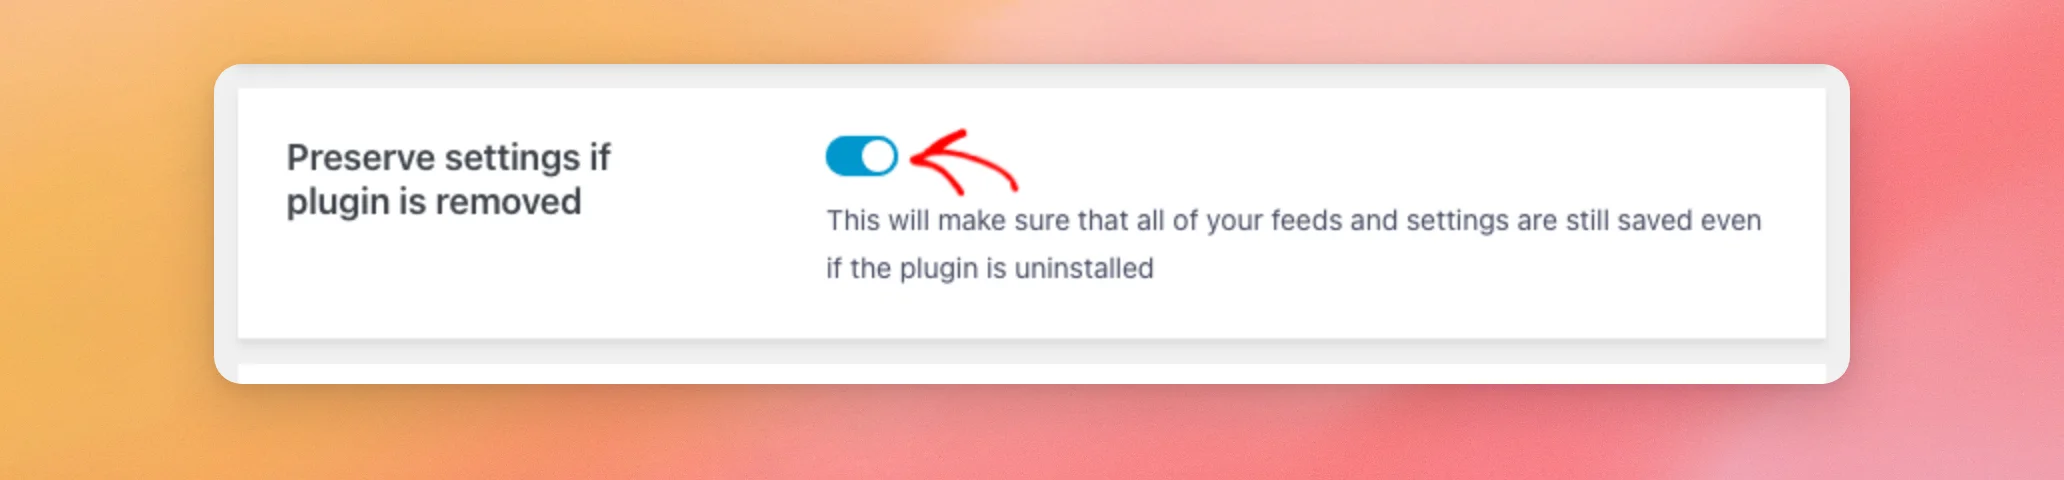
On the General tab, scroll down to Preserve settings if plugin is removed. It’s off by default. While it’s off, deleting Reviews Feed cleans up its feeds and settings too.
Since you’ll delete the free version later, click the toggle to turn it on. This keeps your feeds and settings saved for the paid version.
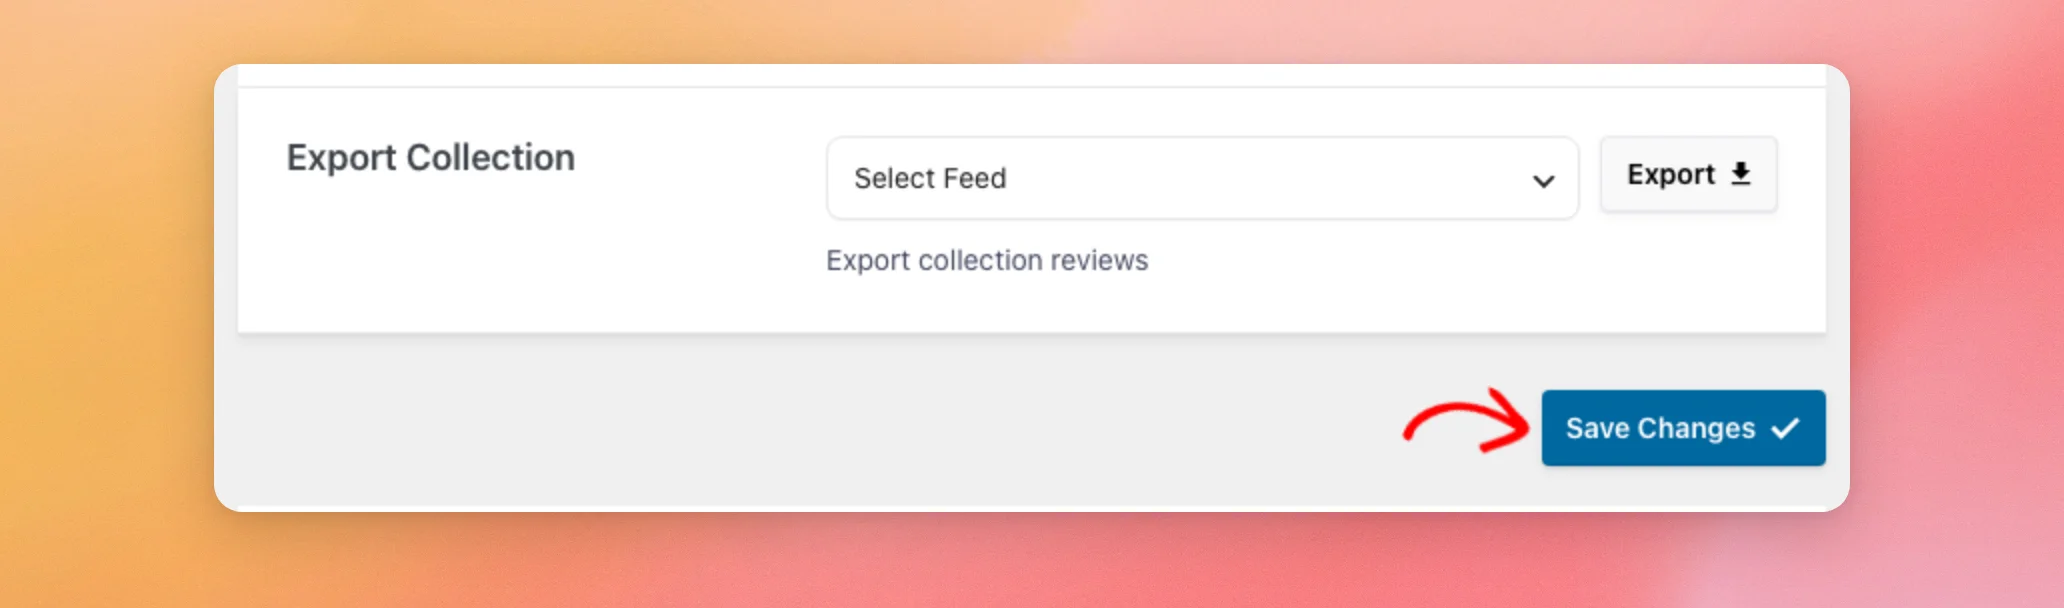
At the bottom of the page, click Save Changes.
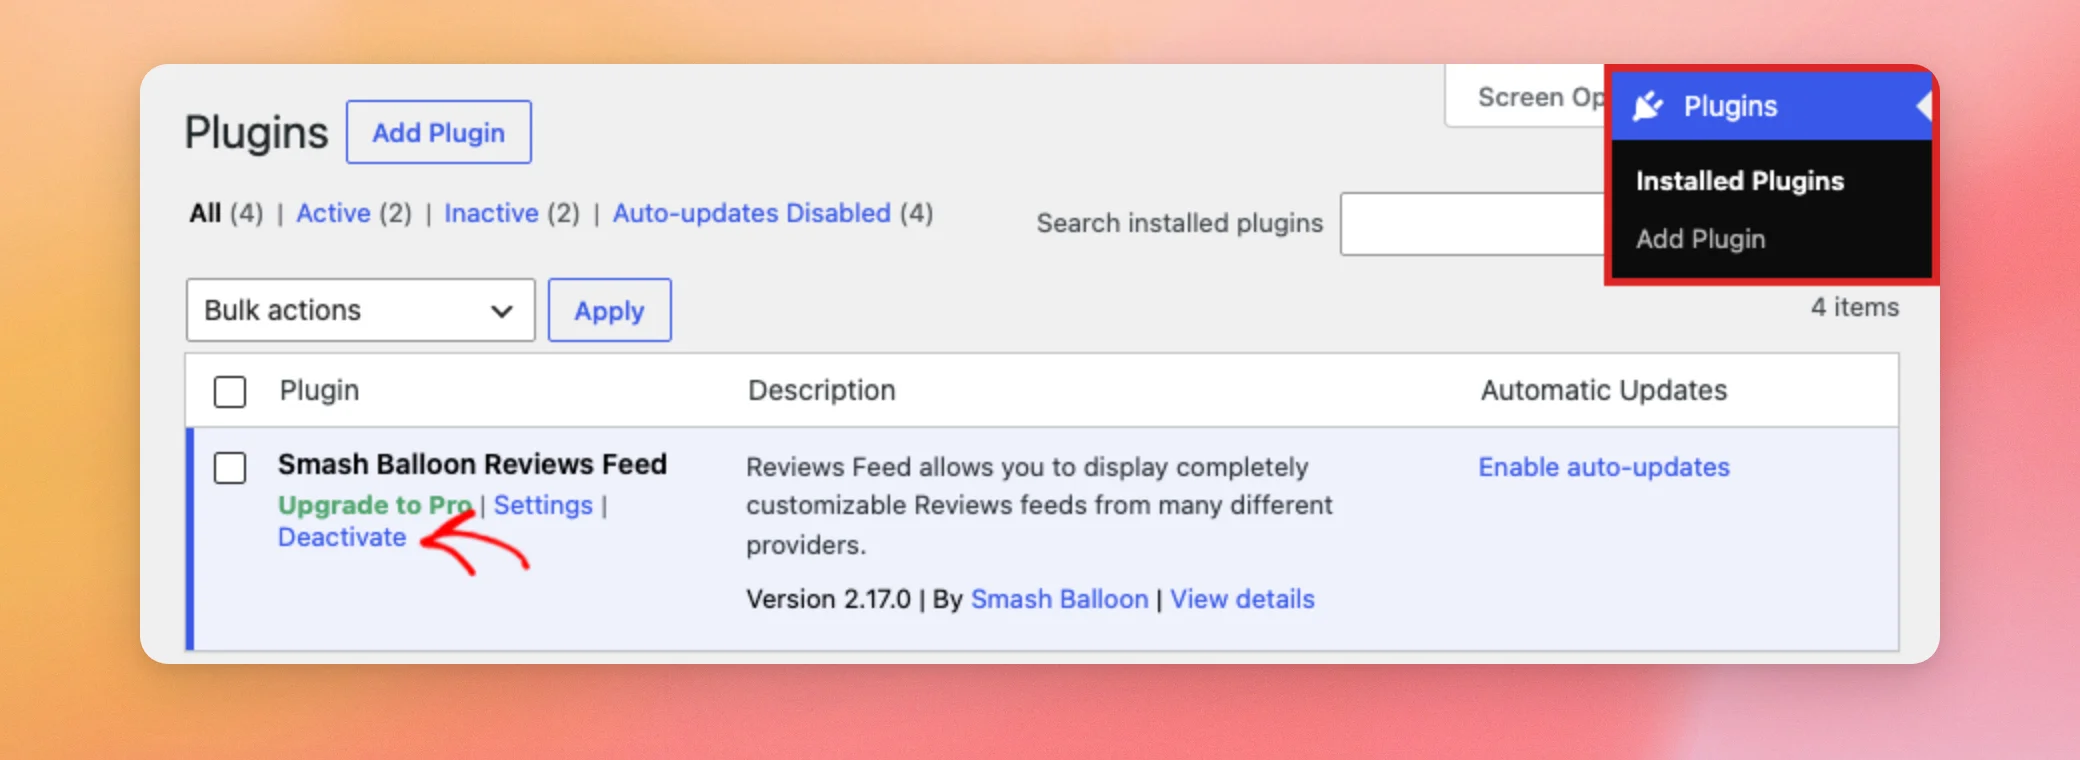
Next, go to Plugins » Installed Plugins. The paid version won’t activate while the free version is active. Under Smash Balloon Reviews Feed, click Deactivate.
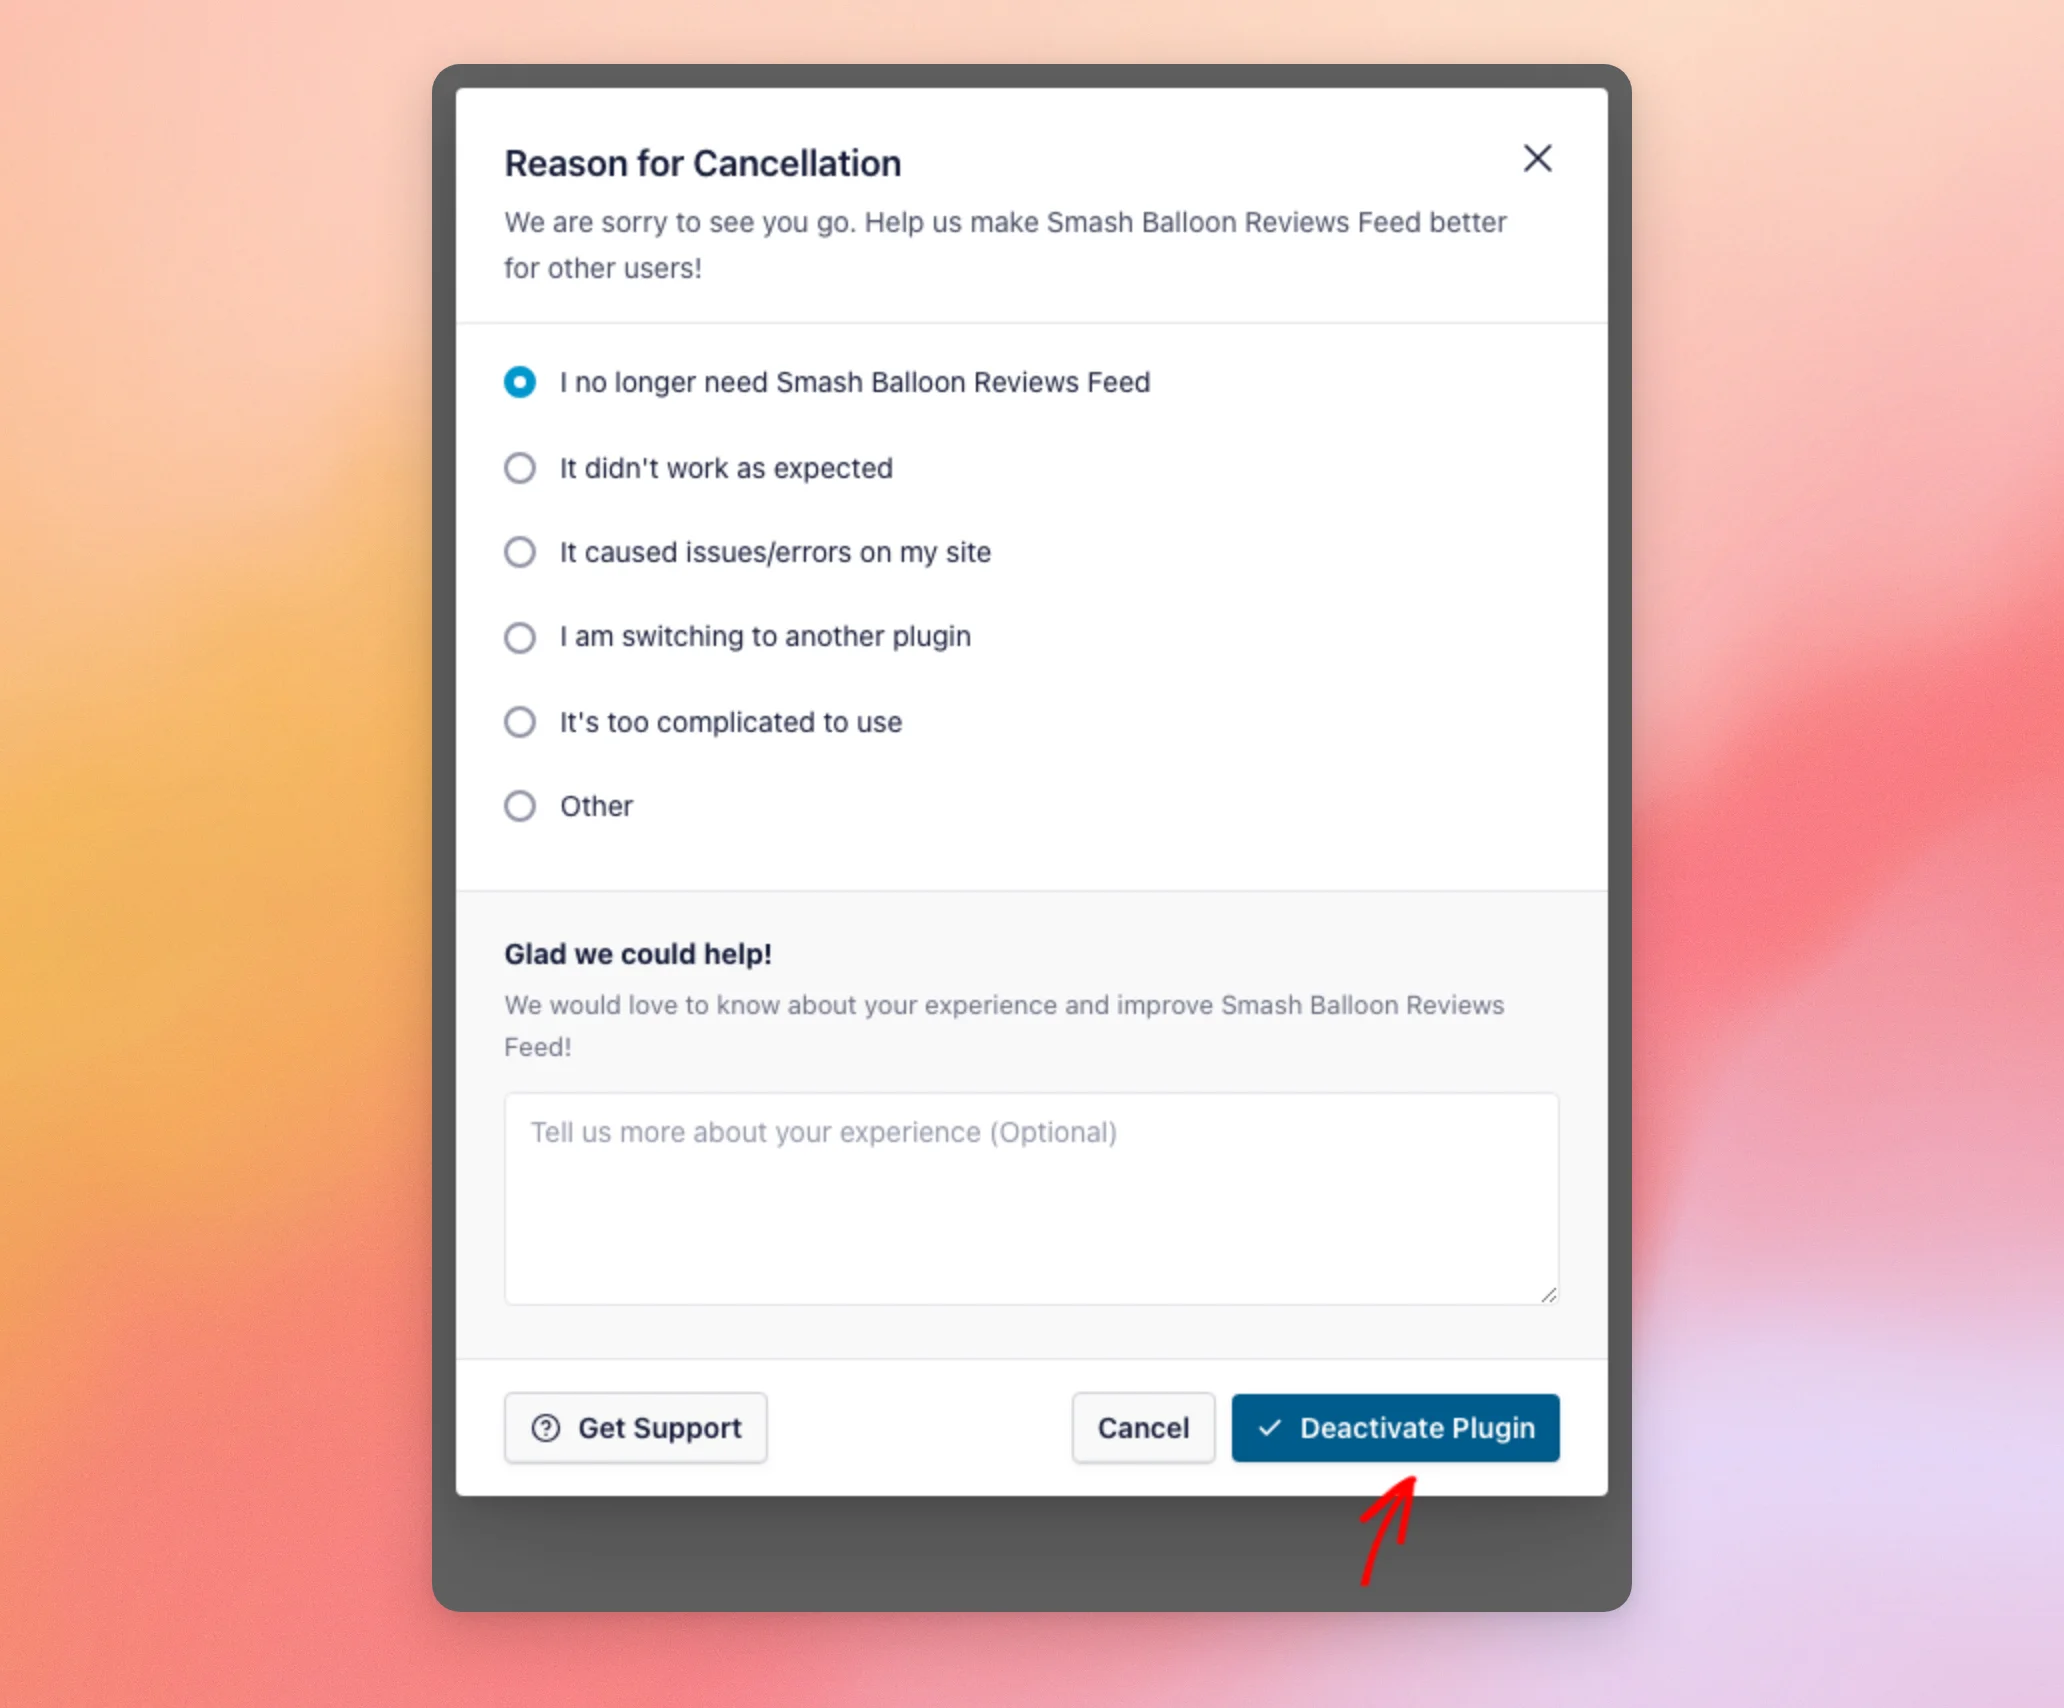
A window opens and asks why you’re deactivating the plugin. It’s a feedback survey for Smash Balloon. The plugin deactivates the same way whichever reason you pick.
In that window, pick the reason that fits best. Then, click Deactivate Plugin.
Now that the free version is deactivated, you’re ready to install the paid version.
Installing the Plugin
You’ll install the paid version by uploading the .zip file you downloaded.
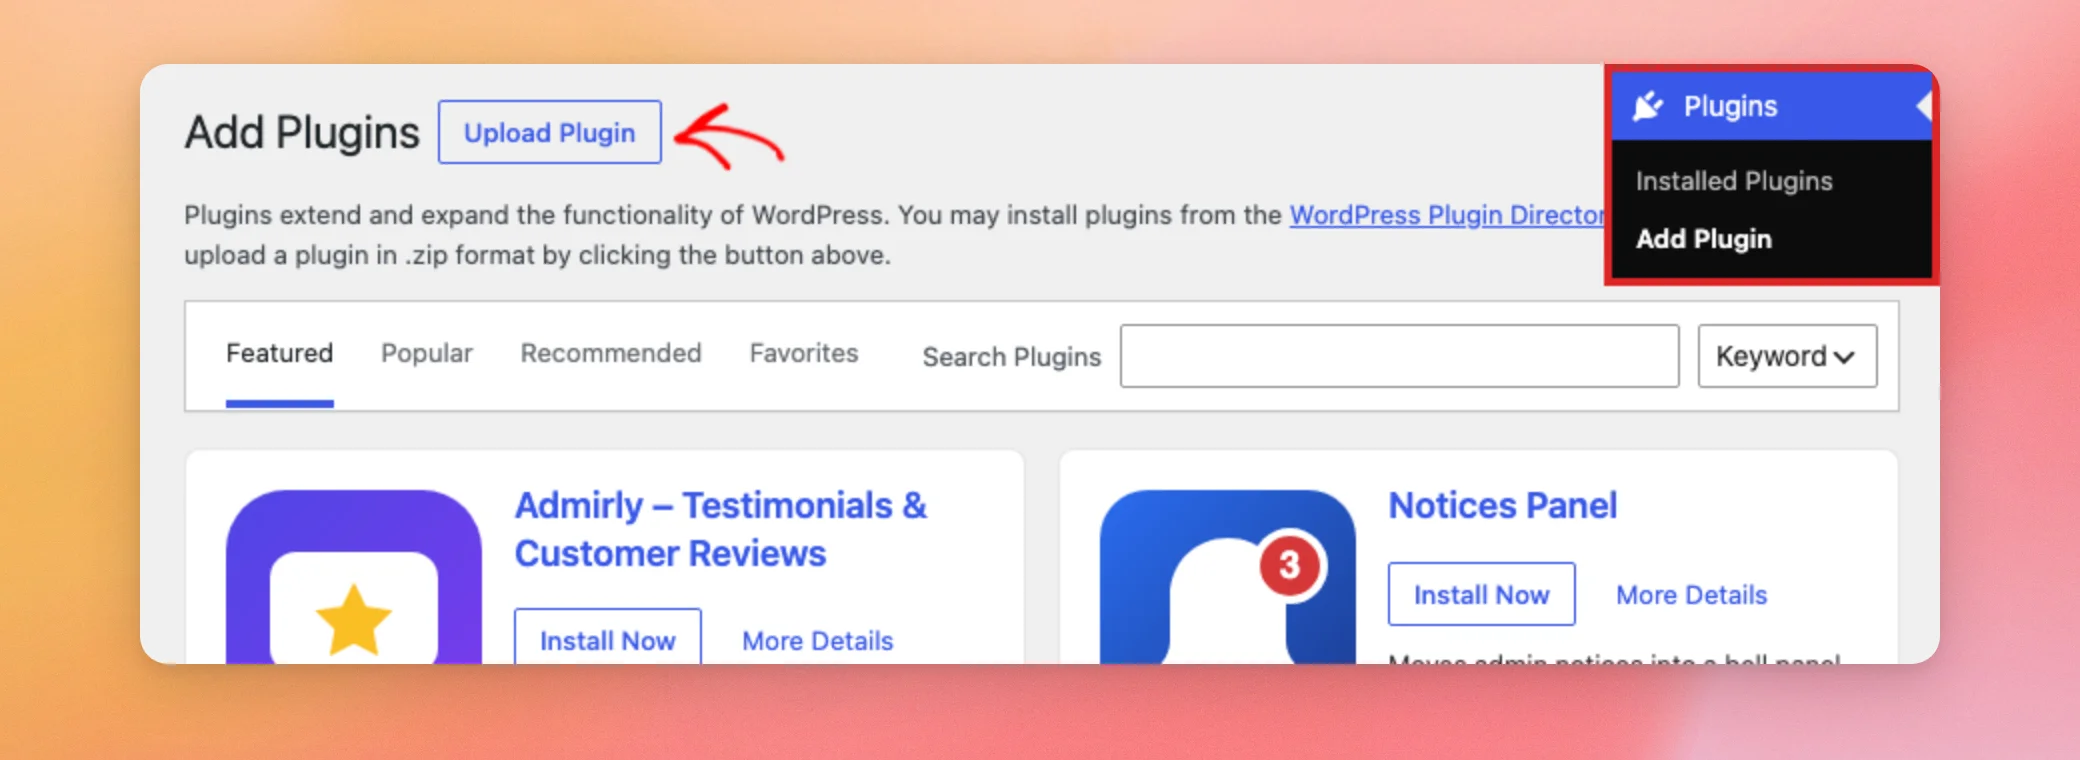
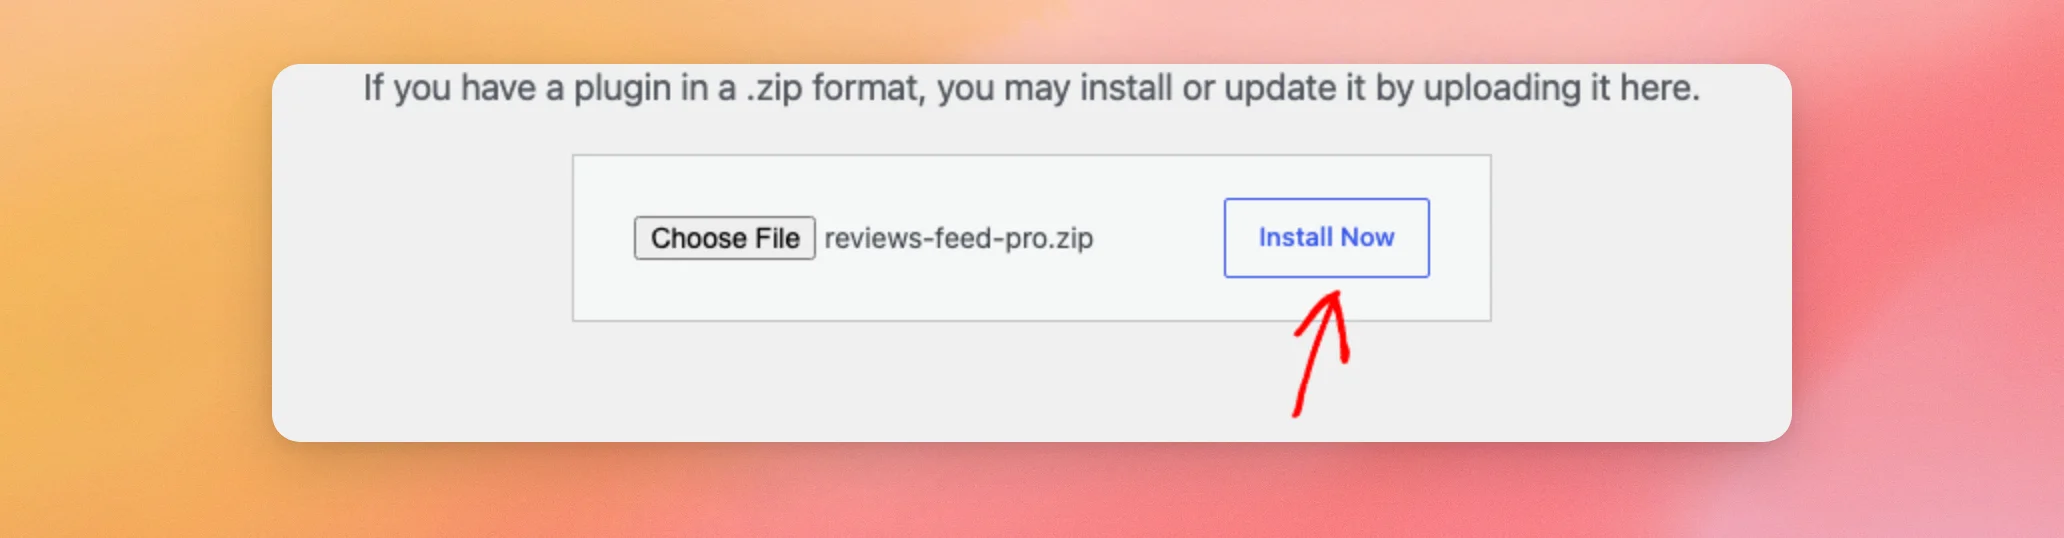
In your WordPress dashboard, go to Plugins » Add Plugin. At the top of the page, click Upload Plugin.
In the upload box, click Choose File and select the .zip file you downloaded.
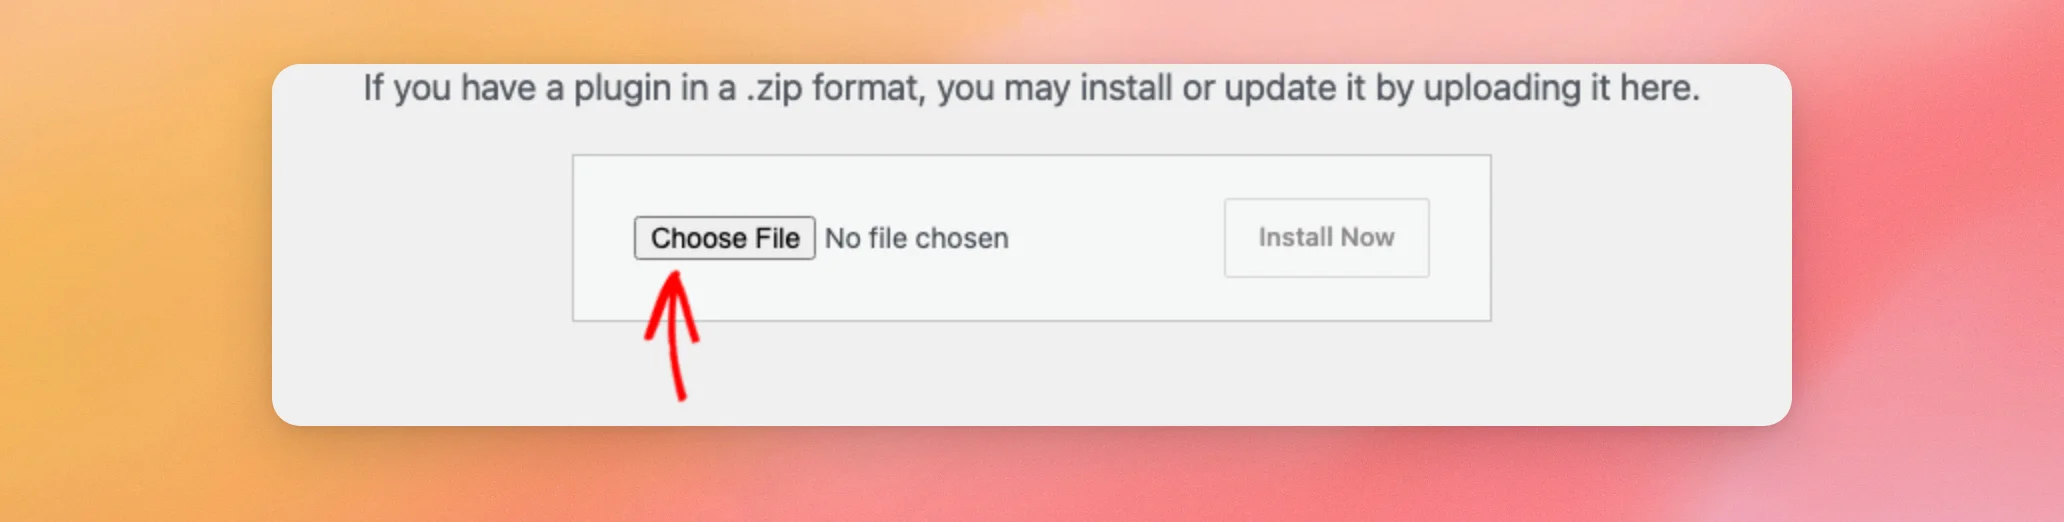
Once your file shows next to the button, click Install Now.
WordPress uploads and installs the plugin. When it’s done, click Activate Plugin.
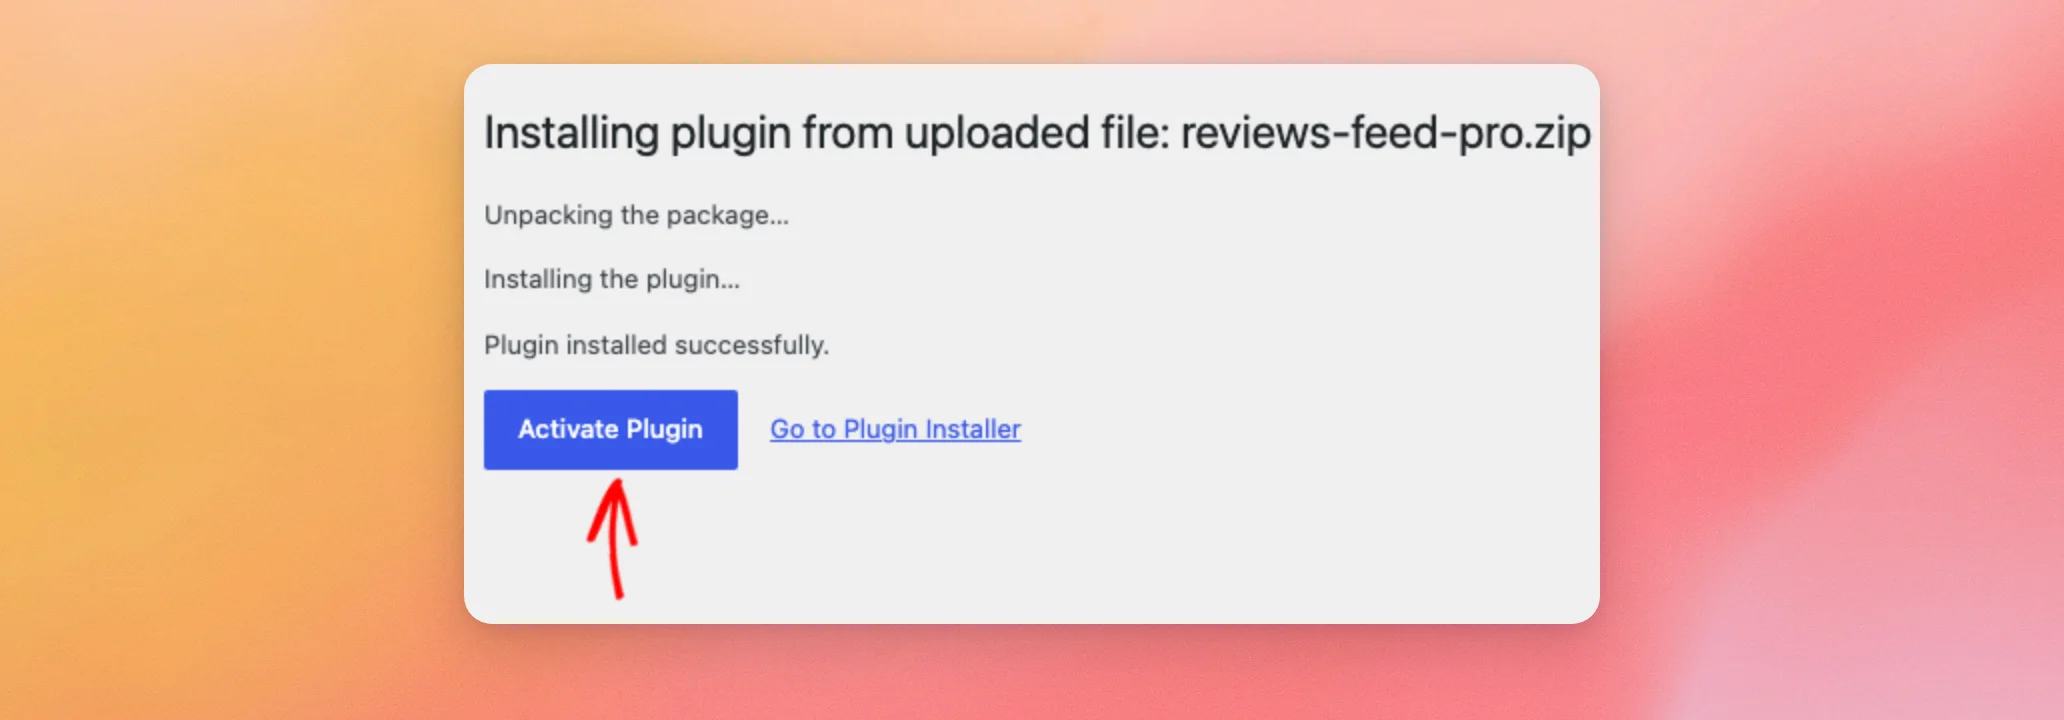
With the plugin installed and active, you’re ready to add your license key.
Activating Your License Key
Activating your license key lets new versions show up on your Plugins page and unlocks the full Reviews Feed menu.
From your WordPress dashboard, go to Reviews Feed » All Feeds. Until your license is active, this page shows a field for your license key. Next, paste the license key from your purchase email into the field and click Activate.
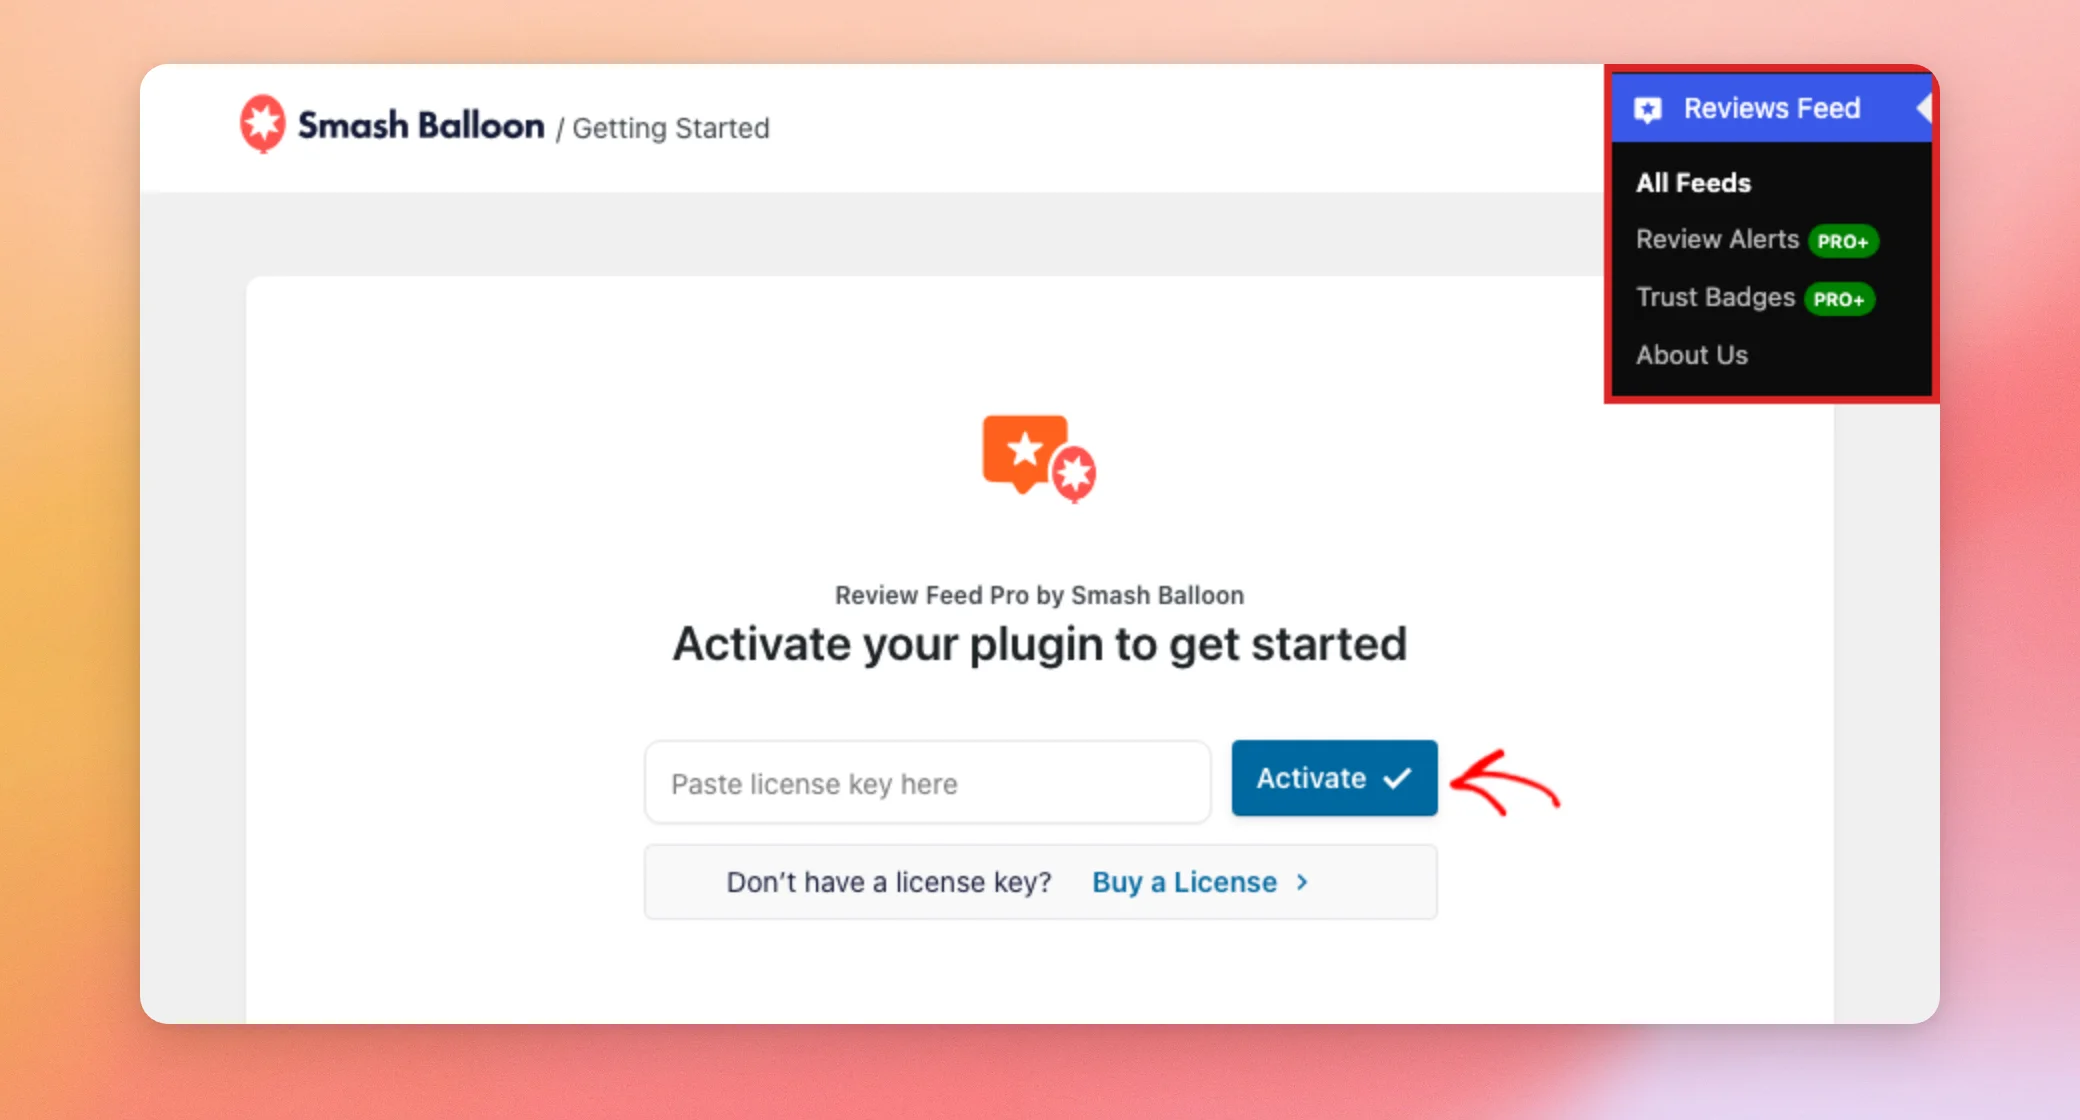
Once your license is active, the Reviews Feed menu shows all of its pages, including Settings and Support. You can check your license at any time in Reviews Feed » Settings, under License Key. To learn what the Settings and Support pages offer, see our settings reference and our guide on using the Support page.
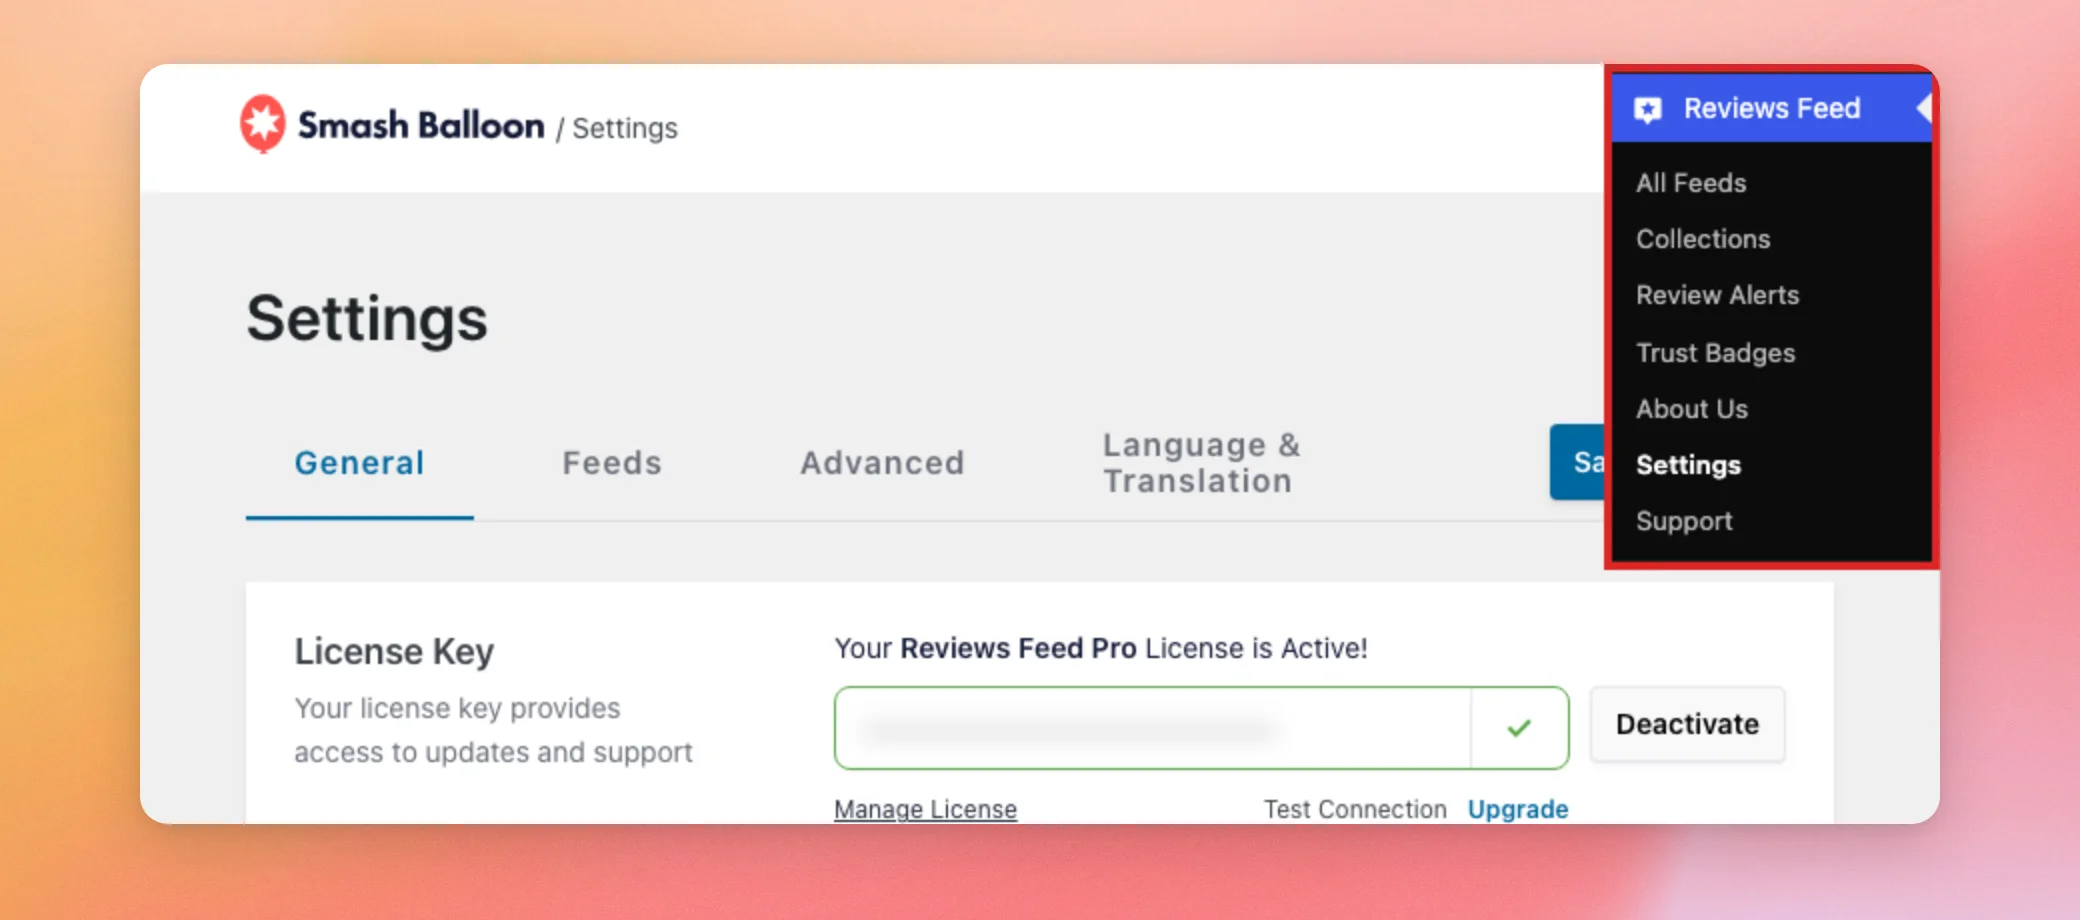
Your license is now active. If you switched from the free version, you can delete it next.
Deleting the Free Version
With the paid version active, you no longer need the free version. Since you turned on Preserve settings earlier, your feeds and settings stay in place when you delete it.
Note: Skipped the Preserve settings step? The paid version has the same setting on the General tab of Reviews Feed » Settings. In that case, turn it on and click Save Changes before you delete the free version.
On the Plugins page, find Smash Balloon Reviews Feed and click Delete. When your browser asks you to confirm, click OK.
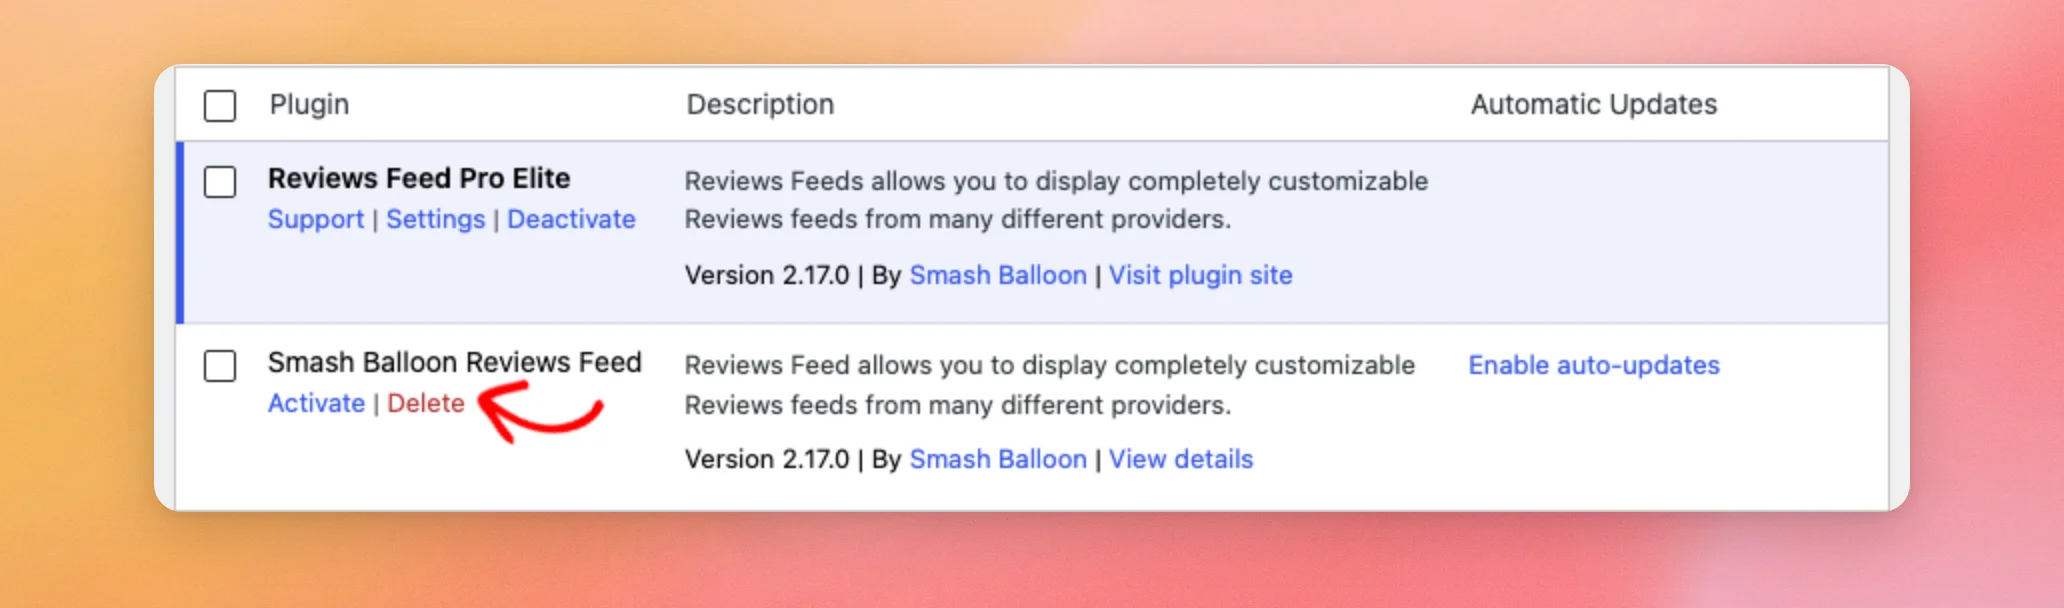
The free version is now deleted. Your feeds and settings stay in place.
Next, we’ll look at updating the plugin by hand when a new version comes out.
Updating the Plugin Manually
While your license is active, new versions of Reviews Feed show up on your Plugins page. You can update from there. If an update from the Plugins page doesn’t go through, you can upload the new version yourself.
First, download the latest version from your account, as shown in Downloading the Plugin. Then, upload the new .zip file with the steps in Installing the Plugin.
Since the plugin is already installed, WordPress shows your current version next to the one you uploaded.
On this screen, click Replace current with uploaded.
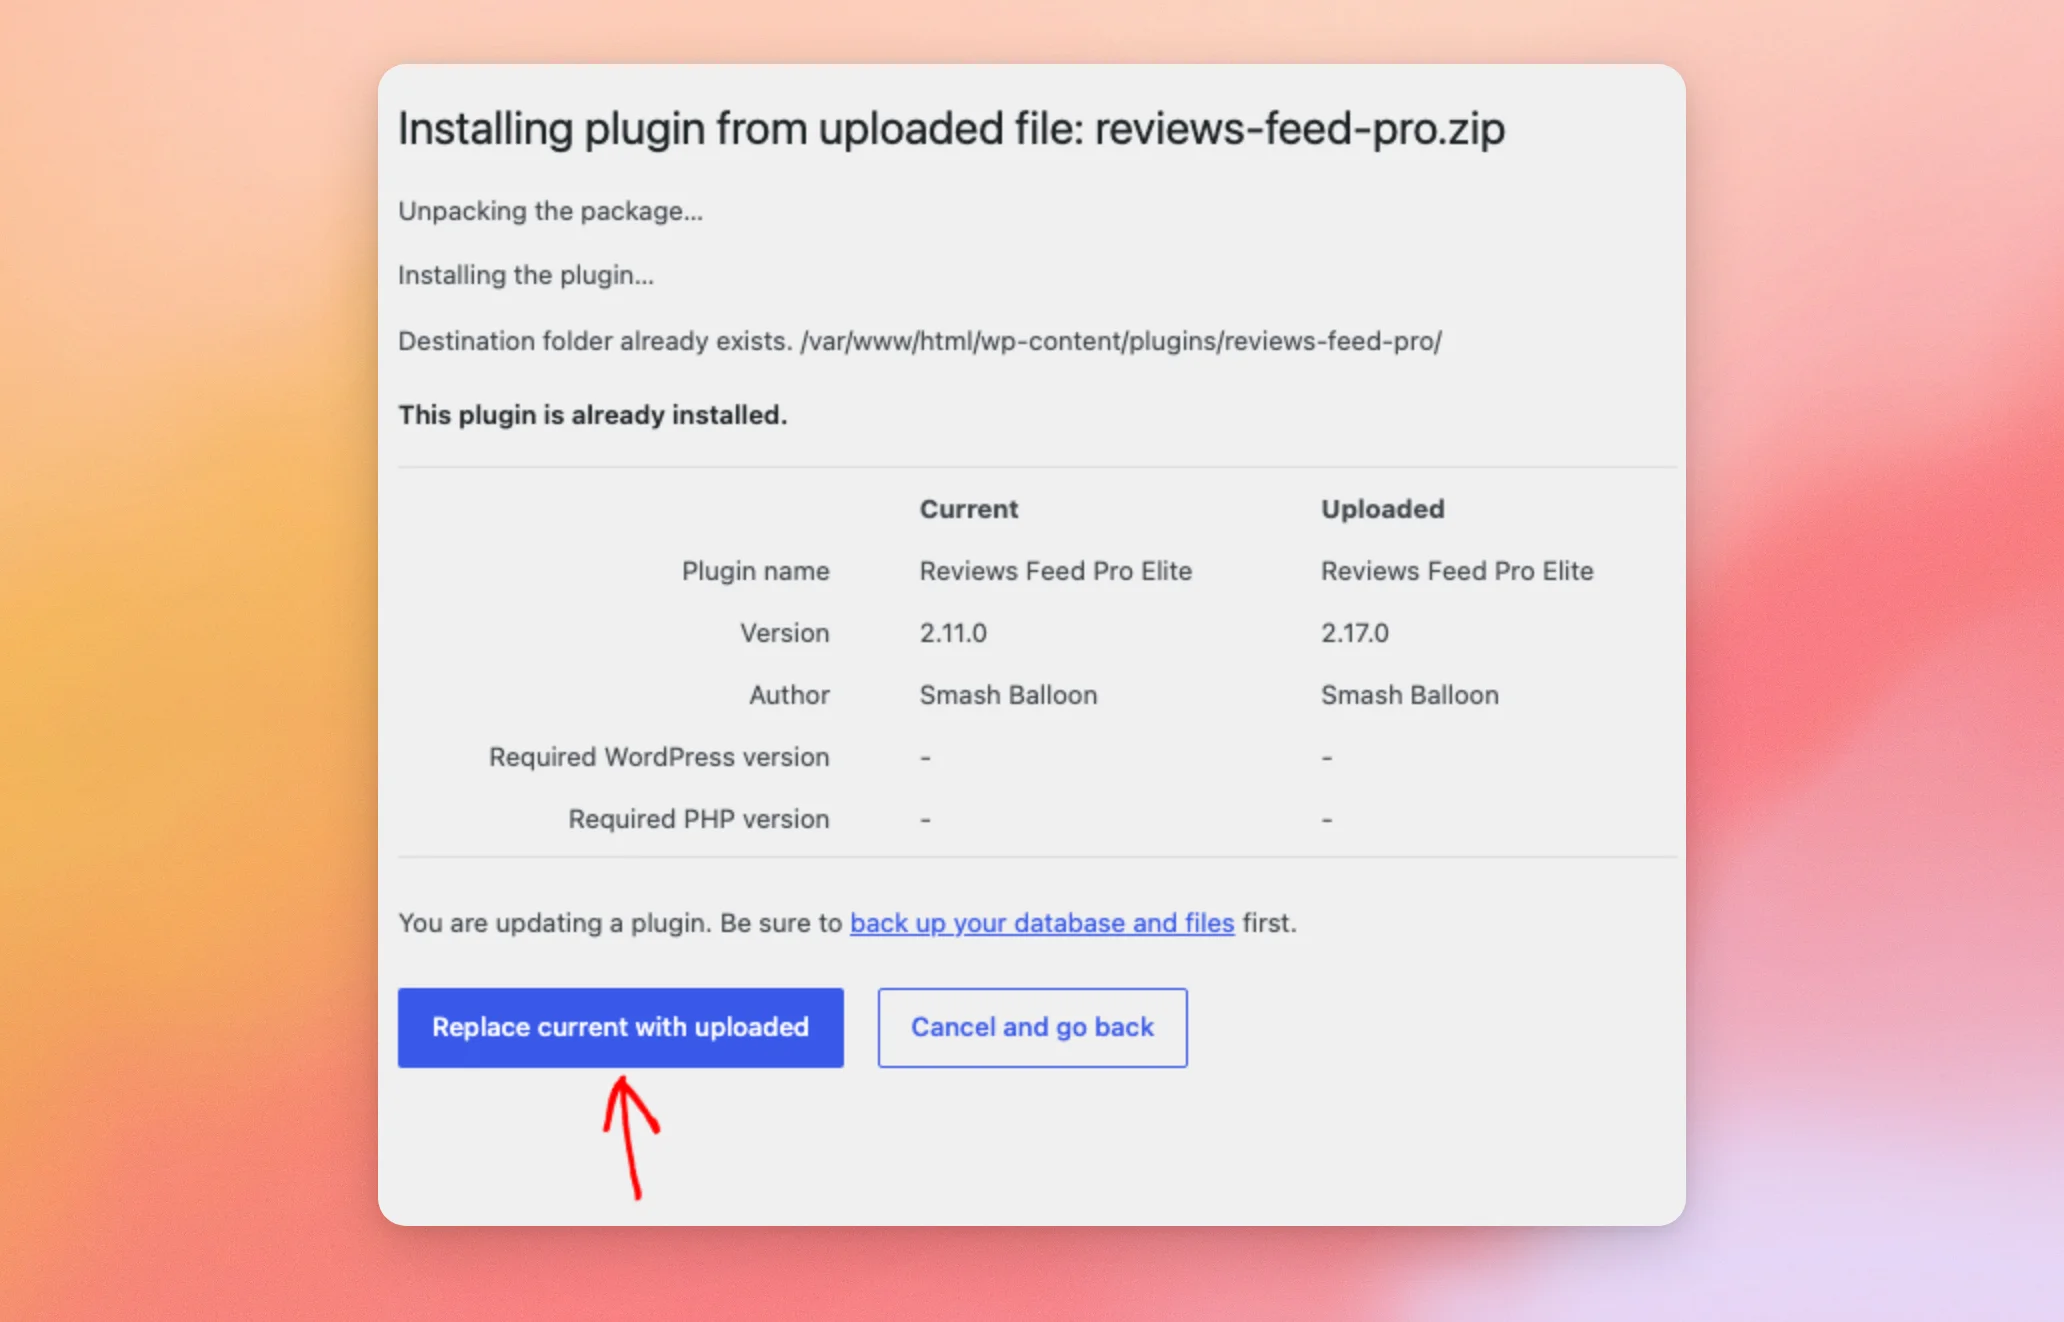
WordPress replaces the plugin files and confirms the update. Your feeds and settings stay as they are.
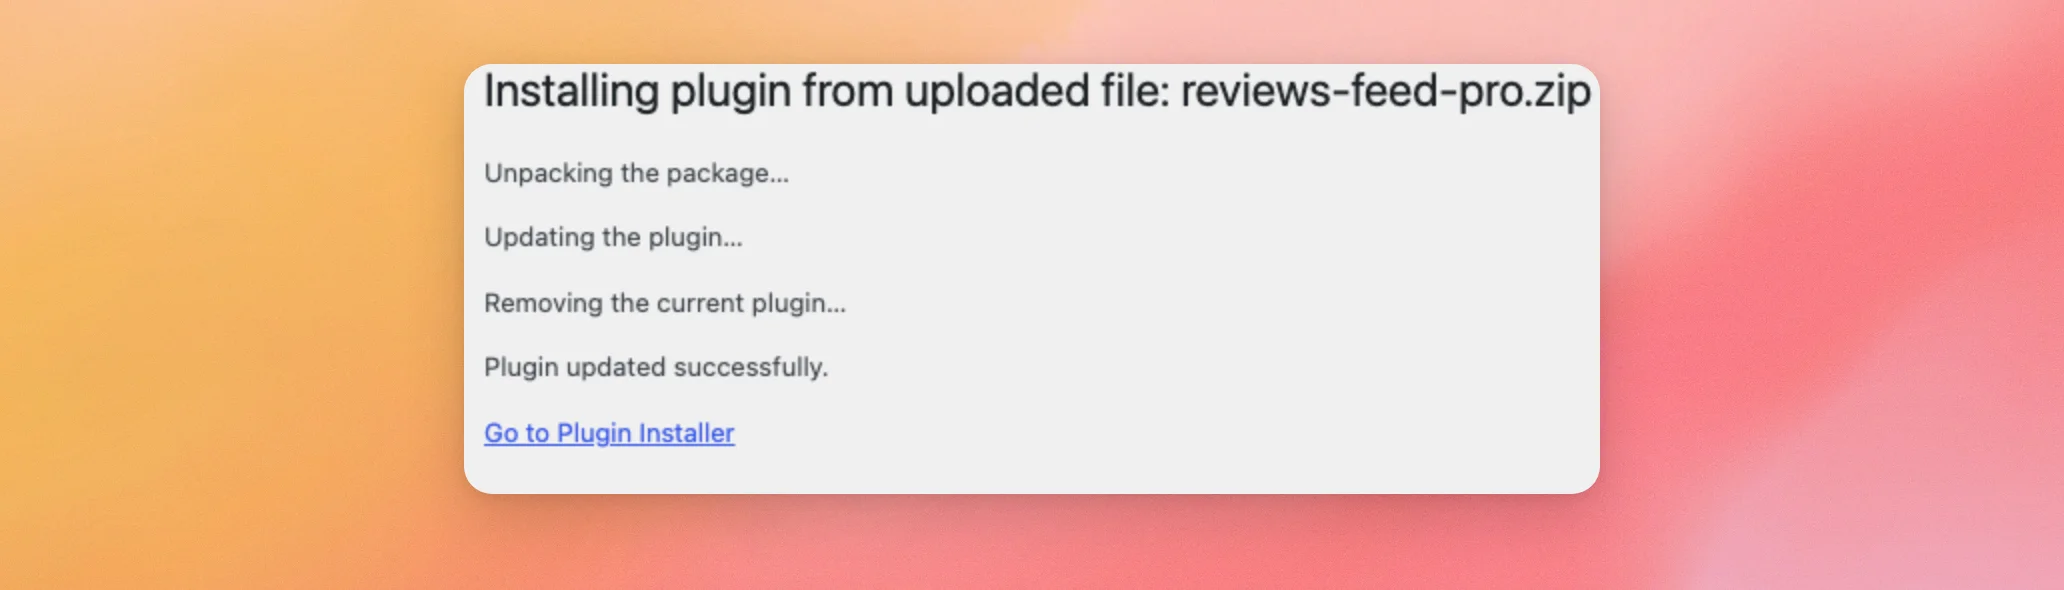
That’s it! You’ve installed the paid version of Reviews Feed and activated your license key.
Next, build your first feed with our guide on creating a reviews feed.
Frequently Asked Questions
Below, we’ve answered some of the most common questions about installing and updating Reviews Feed.
Why does WordPress ask me to deactivate the free version first?
The paid version runs in place of the free version. Only one of them can be active. If you activate the paid version first, WordPress shows the message “Please deactivate the free version of the Reviews Feed plugin before activating this version.” To continue, deactivate Smash Balloon Reviews Feed on your Plugins page. Then, activate Reviews Feed Pro.
Will my feeds carry over from the free version?
Yes. Both versions use the same feeds and settings. Your feeds are there when you activate the paid version. Before you delete the free version, turn on Preserve settings if plugin is removed, as shown in Switching From the Free Version.
Where can I find my license key?
Your license key is in the email we sent you after your purchase, along with your download link.
Why don’t I see Settings in the Reviews Feed menu?
The Settings and Support pages show up once your license is active. Until then, Reviews Feed » All Feeds shows the license key field. Next, activate your license there, as shown in Activating Your License Key.
Can I update the plugin over FTP?
Yes. First, unzip the new version on your computer. Then, connect to your site with your FTP client. Next, upload the new reviews-feed-pro folder to wp-content/plugins, replacing the folder that’s already there. If you haven’t used an FTP client before, see How to Use FTP to Upload Files to WordPress for Beginners for a step-by-step guide.
What if my site runs WordPress 5.4 or older?
WordPress added the option to replace a plugin with an uploaded version in WordPress 5.5. On older versions, go to Reviews Feed » Settings. There, turn on Preserve settings if plugin is removed. Then, click Save Changes. After that, deactivate and delete Reviews Feed Pro on your Plugins page. Next, upload the new version, as shown in Installing the Plugin.