Social Wall
 Feed Analytics


How to create your first feed in version 4 of the free Custom Facebook Feed plugin, starting with the Timeline feed type.
Would you like to set up the free Custom Facebook Feed plugin and show your Facebook Page posts on your WordPress site?
In this guide, we’ll walk you through installing the plugin, running the setup wizard, connecting your Facebook Page, creating your first feed, and adding it to a page.
Before you get started, you need a Facebook profile that has a role on the Page you want to display.
If you already own a paid version of Custom Facebook Feed, use Installing and Configuring the Custom Facebook Feed WordPress Plugin instead.
Here is what we will cover.
- Installing the Plugin
- Running the Setup Wizard
- Connecting Your Facebook Account
- Connecting on Behalf of Someone Else
- Creating Your Feed
- Embedding Your Feed
- Frequently Asked Questions
Installing the Plugin
To get started, we’ll install the free plugin from the WordPress plugin directory, so you don’t need to download or upload a file.
- In your WordPress dashboard, go to Plugins » Add Plugin.
- In the search box, type Smash Balloon Social Post Feed and press Enter. That’s the name the free Custom Facebook Feed plugin uses in the directory.
- In the results, find Smash Balloon Social Post Feed by Smash Balloon and click Install Now.
- When the button changes, click Activate.
You can also find the plugin on WordPress.org. If you’d like more help with this step, see How to Install a WordPress Plugin.
Once the plugin is active, a Facebook Feed item appears in your WordPress menu. Next, you’ll run the setup wizard.
Running the Setup Wizard
The first time you activate the plugin, WordPress takes you to a setup wizard. It’s optional, and you can leave it at any step with Exit Setup. It’s also the quickest way to connect your first Page.
- On the Let’s set up your plugin! screen, click Launch the Setup Wizard.
- Step 1, Connect your Facebook Account, is where you add your Page. On that screen, click Add New and follow Connecting Your Facebook Account. When your Page appears, click Next. If you’d rather connect later, click Skip this step.
- Step 2, Configure features, shows the Facebook User Feed and Downtime Prevention switches already turned on. It can also show switches, such as Social Feed Collection, that install other Smash Balloon plugins. These start on too, so turn off any you don’t want. It also lists a few paid features, which you can’t use in the free plugin. The Localization dropdown sets the language of any predefined text that Facebook provides. If your site isn’t in English, choose your language there. When you’re done reviewing, click Next.
- The You might also be interested in… screen suggests up to three other plugins that Facebook Feed users also install. Their switches start on. If there are any you don’t want, turn them off. Then click Install Selected Plugins.
- On the Awesome. You are all set up! screen, you can check Help Improve Smash Balloon plugins to share basic usage data with Smash Balloon. It’s optional. When you’re ready to finish, click Complete Setup Without Upgrading.
The last screen also has an “Already have a license key?” box. That box is only for upgrading to a paid version. You don’t need it for the free plugin.
If you skipped the wizard, you can still create feeds from Facebook Feed » All Feeds. Next, we’ll look at connecting your Facebook Page, which the wizard and the feed builder both use.
Connecting Your Facebook Account
A feed needs a source, which is the Facebook Page it shows posts from. The wizard and the feed builder use the same steps.
- When you click Add New, the plugin shows a message that it’s redirecting you to connect.smashballoon.com and then takes you to Facebook. If you’re not logged in, log in first. Then click the Continue button.
- Facebook asks which Pages to use. We suggest you select all of your Pages here. You choose the ones to connect when you’re back in WordPress.
- On the permissions screen, review what the app asks for and click Done. Then click OK to return to your WordPress dashboard.
- Back in WordPress, the Select a Facebook Page list shows your Pages. Select the ones you want to use and click Add.
Important: Your feed may not work properly if you turn off any of these permissions.
These permissions don’t let the plugin manage your Page settings, edit it, or post to it. They only let the plugin get a read-only Access Token for your Page, which it uses to retrieve the posts you want to display.
Facebook stopped Group feeds from updating in April 2024, so this guide uses a Page.
For details, see Facebook API Changes Affecting Groups April 2024.
If you’re connecting a Page that belongs to someone else, the next section covers how.
Connecting on Behalf of Someone Else
Facebook (Meta) no longer lets you generate a Page ID and Access Token to enter by hand. The connection has to be made by someone who has a role on the Page.
If you’re connecting an account on behalf of someone else, the simplest way is to ask the Page owner to give you a role on it. Then connect the Page with your own Facebook profile.
If the owner can log in to your WordPress site, they can also connect the Page themselves from Facebook Feed » Settings » Manage Sources.
For the other options, see our guide to connecting a Facebook Page for a client.
Once your Page is connected, you’re ready to create your feed.
Creating Your Feed
A feed pairs a source, which is the Facebook Page it shows, with the layout you choose. You set up both in the feed builder.
- From your WordPress admin sidebar, go to Facebook Feed » All Feeds and click Add New.
- Under Select Feed Type, click Timeline and then click Next. The other feed types have a rocket icon. This marks the ones the free plugin doesn’t include.
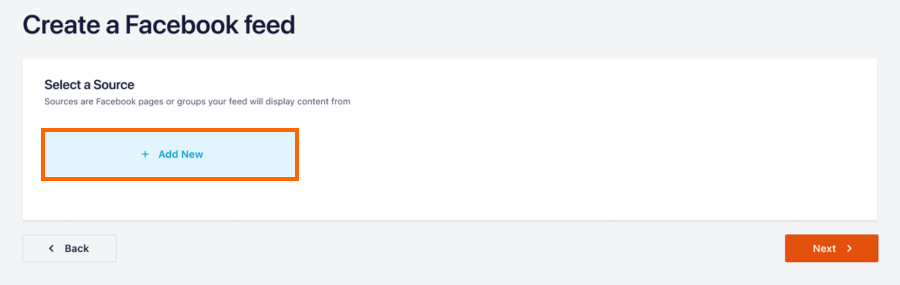
- On the Select a Source screen, click Add New and connect your Page by following Connecting Your Facebook Account. If you’ve already connected a Page, skip this step.
- In the source list, select your source and click Next.
- In the feed editor, adjust the options on the left to change how the feed looks. Then click Save.
To change a feed later, go to Facebook Feed » All Feeds. Next to each feed, use the Edit, Duplicate, or Delete button. When your feed is ready, you can place it on your site.
Embedding Your Feed
Once your feed is saved, you can place it on any page, post, or widget area. The steps below use the shortcode, which works everywhere.
- In the feed editor, click Embed.
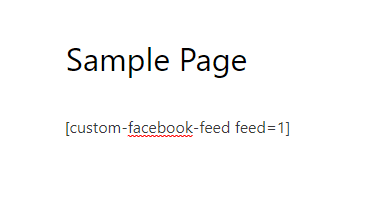
- In the Embed Feed window, click Copy to copy the shortcode, for example
[custom-facebook-feed feed=1]. - Next, paste the shortcode into any page, post, or widget, and then save or update it.

If you’re new to shortcodes, see How to Add a Shortcode in WordPress for a step-by-step guide.
To use the WordPress block or widget instead of the shortcode, click Add to a Page or Add to a Widget in the same window.
If you use the block editor, add the Facebook Feed block from the Smash Balloon category. Then pick your feed in its settings. For more options, including adding the feed to a theme template, see Display a Facebook Feed on a WordPress Page, Post or Widget.
You can also manage your feeds by asking an AI assistant. See our guide on managing Facebook Feed with AI assistants using WPVibe.
That’s it! You now know how to install the free Custom Facebook Feed plugin, connect your Page, and display your first feed. To get an alert if your feed ever stops updating, see Getting Alerts When Your Facebook Feed Stops Updating. If you have any issues, check our Facebook Feed docs for solutions to common problems, or contact support.
Frequently Asked Questions
Below, we’ve answered some of the most common questions about the free Custom Facebook Feed plugin.
Why are some of my Facebook Page posts missing from the feed?
Facebook only returns the posts your Page published itself. Posts that other people made on your Page, and posts shared from elsewhere, don’t appear. For more help, see our guide for a feed that doesn’t show posts you can see in the Like Box.
Can I use other feed types, such as Photos or Videos, in the free plugin?
No. The free plugin only offers the Timeline feed type. The other feed types have a rocket icon in the feed builder and need a paid version.
How do I move to a paid version later?
Follow the steps in Installing and Configuring the Custom Facebook Feed WordPress Plugin. It shows how to keep your settings when you swap the free plugin for the paid one.