WordPress plugin
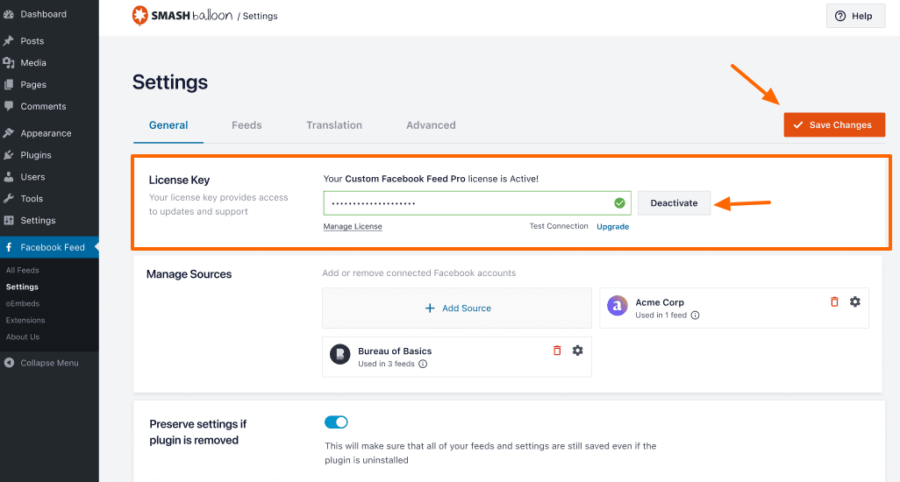
Enter your license in the ‘License’ section, which is found under the Facebook Feed > Settings page, as shown in the screenshot below: The free version and Pro version are actually two separate versions of the plugin. When you purchased the plugin you should have received a link to download a zip file of the Pro version, along with your license key. This should also have been emailed to you at the address that you entered when purchasing the plugin. The Pro version contains the ‘License’ section which will allow you to enter and activate your license. There are step-by-step instructions on how to install and activate the Pro version here. If you want to transfer your settings from the free version to the Pro version then you can do the following: Step #1 – Save your current Free version plugin settings: Go to your WordPress Dashboard – Facebook Feed – General – make sure to enable the following set “Preserve settings when plugin is removed”. Then click on “Save Changes”. Step #2 – Remove the currently installed Free version plugin: Next, go to your WordPress Dashboard – Plugins and deactivate the current plugin. Then remove the free version of the plugin. Step #3 – Now install the Pro version and activate the license. All set!Facebook Plugin Version 4.0 and above

You enter your license under the ‘License’ tab, which is on the Settings page, as shown in the screenshot below: Please note, if you don’t see a ‘License’ tab then it’s likely that you still have the free version of the plugin installed. The free version and Pro version are actually two separate versions of the plugin. When you purchased the plugin you should have received a link to download a zip file of the Pro version, along with your license key. This should also have been emailed to you at the address that you entered when purchasing the plugin. The Pro version contains the ‘License’ tab which will allow you to enter and activate your license. There are step-by-step instructions on how to install and activate the Pro version here. If you want to transfer your settings from the free version to the Pro version then you can do the following: Step #1 – Save your current Free version plugin settings: For Custom Facebook Feed: Go to your WordPress Dashboard – Facebook Feed – Customize (tabbed page) – Misc (sub-tabbed page) – scroll to bottom of the page and make sure the box next to the setting of “Preserve settings when plugin is removed” has a checkmark in it. Then click on “Save Changes” at the bottom of the page. For Instagram Feed: Go to your WordPress Dashboard – Instagram Feed – Settings – 1. Configure (tabbed page) – scroll to the setting of “Preserve settings when plugin is removed” and make sure the “Yes” box next to it has a checkmark in it. Then click on “Save Changes” at the bottom of the page. For Custom Twitter Feeds: Go to your WordPress Dashboard – Twitter Feeds – 1. Configure (tabbed page) – scroll to the setting of “Preserve settings when plugin is removed” and make sure the box next to it has a checkmark in it. Then click on “Save Changes” at the bottom of the page. For Feeds for YouTube: Go to your WordPress Dashboard – Feeds for YouTube – 2. Customize (tabbed page) – scroll to the bottom section on the page “Advanced” and then for the setting of “Preserve settings when plugin is removed” make sure the box next to it has a checkmark in it. Then click on “Save Changes” at the bottom of the page. Step #2 – Remove the currently installed Free version plugin: Next, go to your WordPress Dashboard – Plugins and deactivate the current plugin. Step #3 – Now install the Pro version and activate the licenseBelow Plugin Version 4.0
Then delete the current plugin.


