Version 2.0 and above
1) Once you’ve purchased the Social Wall plugin, click on the “Downloads” tab to download the plugin. Your download link, license key, and purchase information are also emailed to you at the address you provided during checkout.

2) Once you’ve downloaded the .zip file, there’s no need to open it. You’ll be uploading and installing this .zip file directly to WordPress.
Please note, if you’re using Safari:
The .zip file will be automatically extracted after downloading it. You can disable this feature by navigating to Safari > Preferences > General > Deselect the box with the text “Open safe files after downloading“. After that, the plugin will now download as a .zip file and can be uploaded directly to WordPress.
3) To upload the Pro version of the plugin, click Add New at the top of your WordPress Plugins page.

4) Click Upload Plugin at the top.

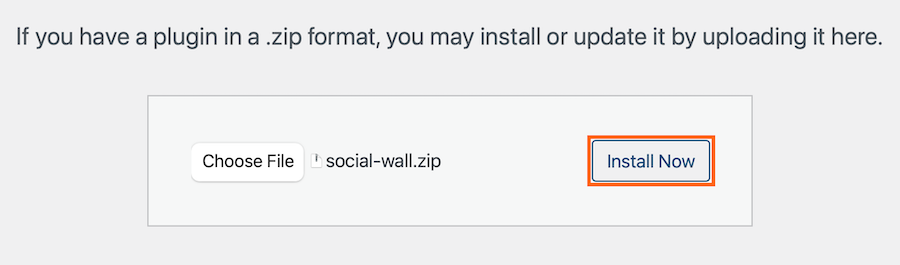
5) Browse the .ZIP file which you downloaded when you purchased the plugin and click Install Now
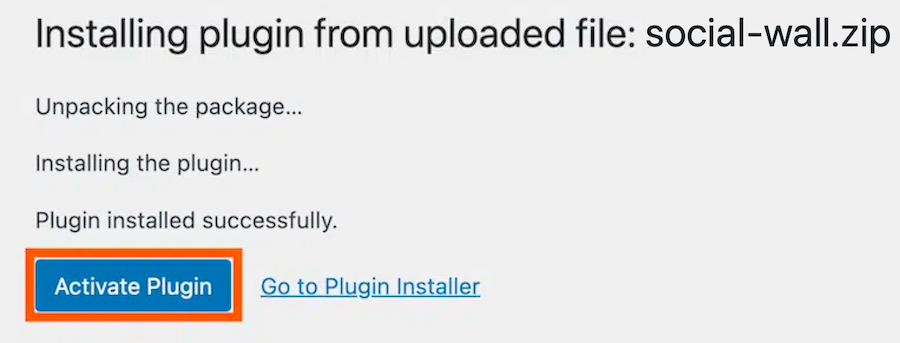
6) Activate the plugin.
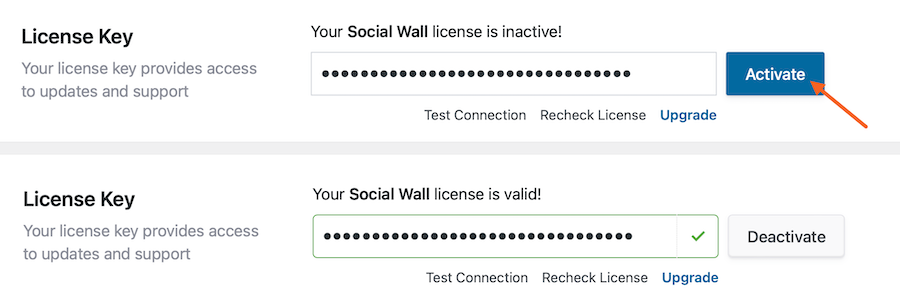
7) You’ll now see the Social Wall plugin appear in your WordPress menu. Click on it and enter your license key.
8) Paste your license key into the field and click the Activate button (It may take a few clicks before it shows Active). Then click the Save Changes button.
To set up a new Social Wall Feed, please follow this other guide here.
Version 1.0
1) Once you’ve purchased the Social Wall plugin click on the “Downloads” tab to download the plugin. Your download link, license key, and purchase information is also emailed to you at the address which you provided during checkout.

2) Once you’ve downloaded the zip file there’s no need to open it. You’ll be uploading and installing this zip file directly to WordPress.
Note: If you’re on a Mac then your OS may be set up to automatically unzip zip files when downloading. You can zip the files up again by just right clicking on the folder containing the files and clicking ‘Compress’. Alternatively, you can download the zip directly from your account.

3) To upload the Pro version of the plugin click Add New at the top of your WordPress Plugins page.

4) Click Upload Plugin at the top.

5) Browse to the zip file which you downloaded when you purchased the plugin and click Install Now.

6) Activate the plugin.

7) You’ll now see the Social Feeds menu appear in your WordPress menu. Navigate to the License page to enter your license key.

8) Paste your license key into the field and click Save Changes.

9) Click Activate License.


10) Once you’ve installed the plugin click on the Social Feeds item in your WordPress menu.

11) Install and activate one or more of the Smash Balloon social media plugins:
Instagram Feed Pro (setup directions)
Custom Facebook Feed Pro (setup directions)
Custom Twitter Feeds Pro (setup directions)
Feeds for YouTube Pro (setup directions)
12) Visit the “Create a Social Wall” page. Use the shortcode generator to add the social media feeds and the accounts/feed types for each social media type.

13) Navigate to the Customize page to customize your feed.
14) Once you’ve customized your feed, copy the shortcode into any page, post or widget where you want the social wall to appear.

Questions? Visit our support page for more help.